How can we help you?
Type a search word …
… or browse the cateogries to find help:
There are several ways to create a new gallery:
Click on "Create New Gallery" in your gallery overview, enter the preferred name of your new gallery and click on "Create gallery" or press ENTER. You will automatically be taken to the new gallery and you can start uploading your first files.
Important info about the Lightroom plugin.
Upload via Lightroom is automatically enabled for picdrop accounts registered before June 2022. If your account was created after June 2022, you won't find the plugin in your account settings. But don't worry: if you can't do without the Lightroom plugin for your work, please email us at hello@picdrop.com and we'll be happy to help.
only for accounts created before June 2022
In your FTP program, log into your picdrop FTP account and create a folder. Ready! The gallery is created with it and you can upload files to the gallery at any time via FTP, Lightroom or in your browser.
For all three ways, you should remember to check the gallery settings afterwards and if necessary set what your client is allowed to see and do in the gallery.
After you've signed up for your free picdrop account there are many ways to upload your files to picdrop:
Simply mark the files you want to upload in Apple Finder or Windows Explorer and drag them anywhere in your open gallery. (No need to drag them on the hint field for the "Drag & Drop" upload.) Then release your mouse button. Your upload starts immediately without you having to do anything else. You can check the status of your upload on the bottom right.
In the hint field for the "Drag & Drop" upload you will also find a classic upload button (yellow). By clicking on it, you can search in your Finder or Explorer and also select several files at the same time.
only for accounts created before June 2022
You can also manage and organize your galleries and files via FTP. You will find the login data in your registration mail and instructions on how to set up your FTP program in the FAQ section "How do I set up my FTP program correctly?"
Important info about the Lightroom plugin
Upload via Lightroom is automatically enabled for picdrop accounts registered before June 2022. If your account was created after June 2022, you won't find the plugin in your account settings. But don't worry: if you can't do without the Lightroom plugin for your work, please email us at hello@picdrop.com and we'll be happy to help.
Your clients do not need an account to enter a picdrop gallery.
You simply send your clients the direct URL to a gallery. They then do not need to create an account or anything to open the gallery.
If you have activated the password protection for the gallery, all they have to do is to enter their password and they'll find themselves right in the gallery, ready to view their pictures.
To send this information to your clients you can easily use email, any messenger or the like - or conveniently send it from within picdrop by using the “Share”-option within every gallery.
It's as easy as that!
In each of your galleries, you can activate or deactivate all functions individually. You can tailor your galleries perfectly to every client and every project. You are able to do this in each gallery in the upper right corner under “Gallery Settings”.
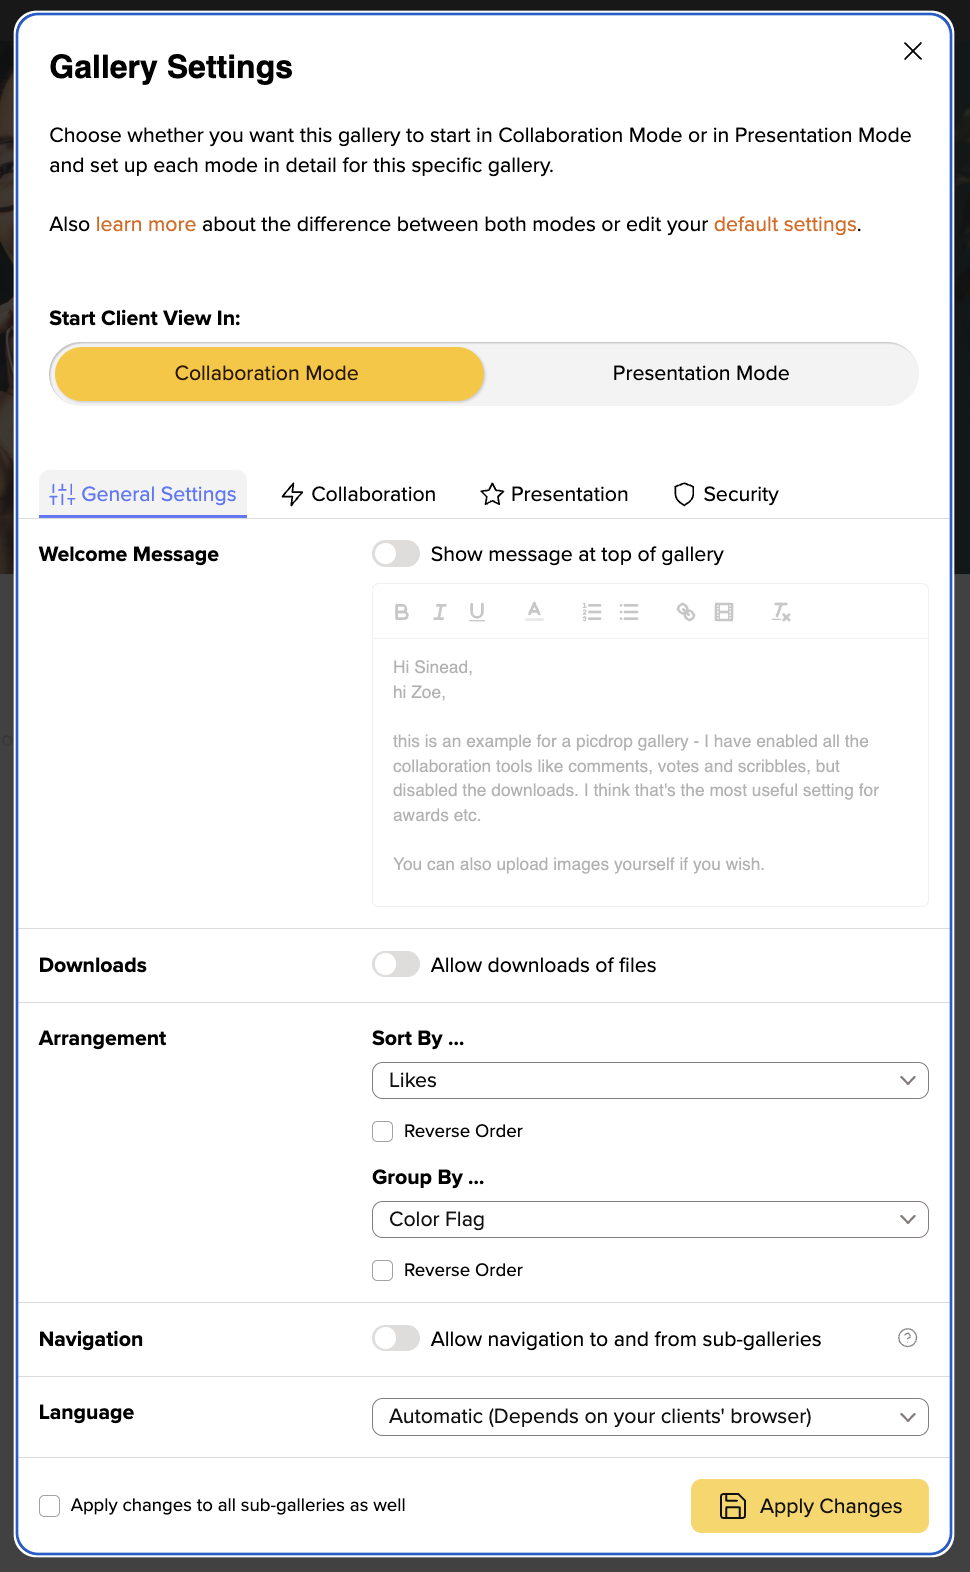
If you want to change the header image you can find detailed instructions right here.
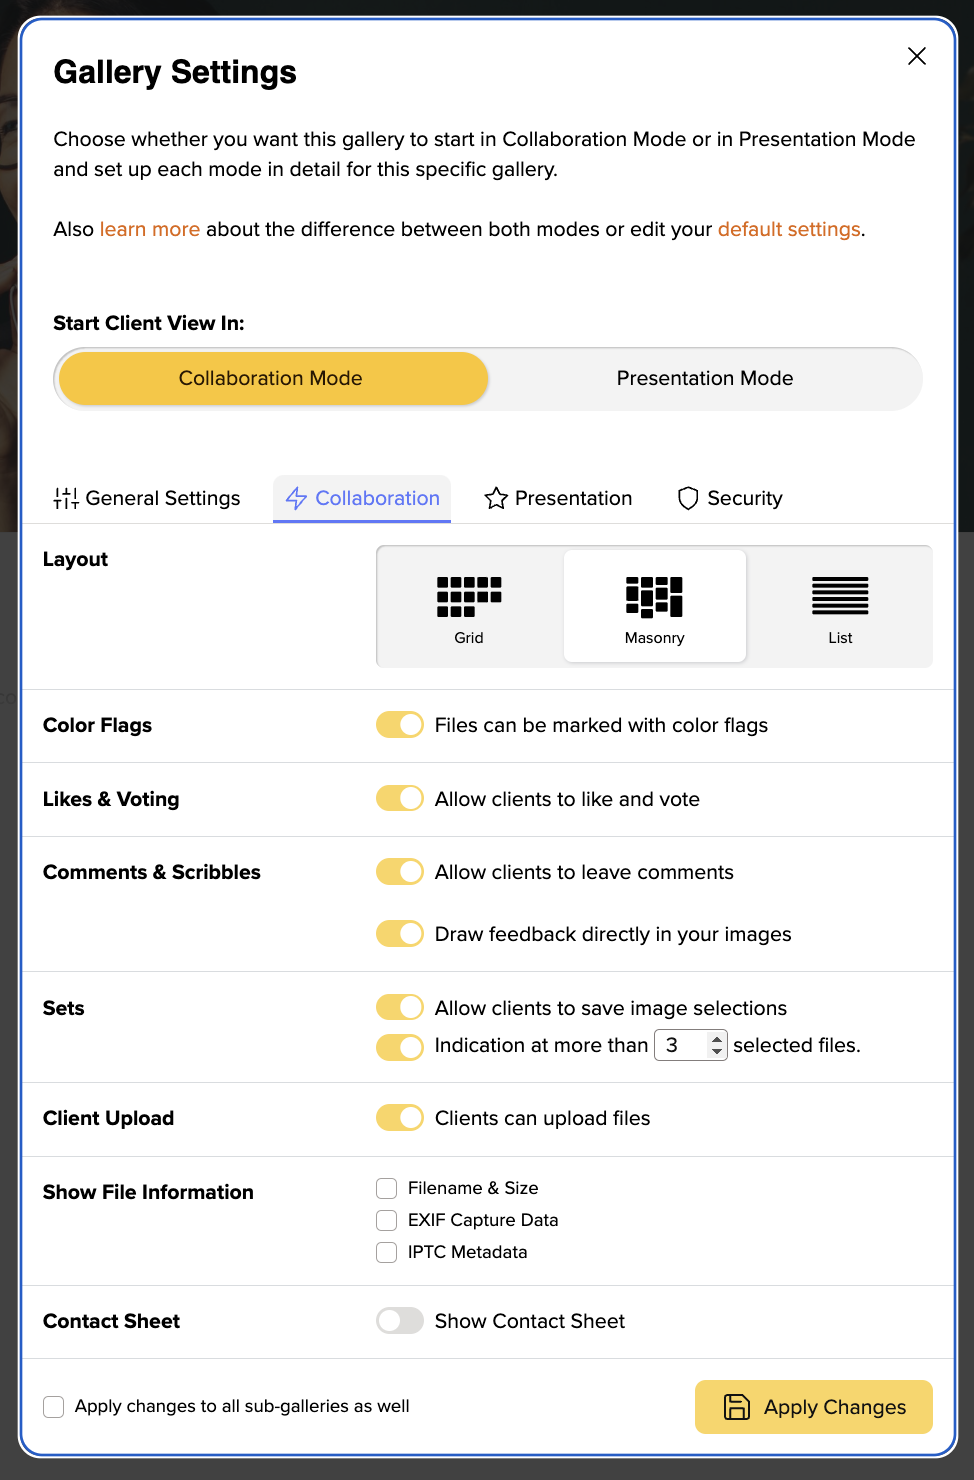
picdrop’s Edit Mode is for collaborating and communicating with your clients. Here you can decide what your clients can do.
(Pro-Tip: Sort the images in the “Appearance” area by color markers and downwards. This automatically sorts your images in the overview according to color and displays them separately, which makes it extremely easy to filter out favorites.)

The Presentation Mode is a specific way for you to deliver a gallery to your clients. It focuses on the beautiful presentation of your pictures and videos and puts the practical picdrop functions in the background. The Presentation Mode is available for you in some plans (starting with Pro). All features of the Presentation Mode are also available in detail in our FAQ.
You can find more detailed information in our separate FAQ articles about gallery design, background color, title settings, setting a gallery’s header imgage and thumbnail settings.
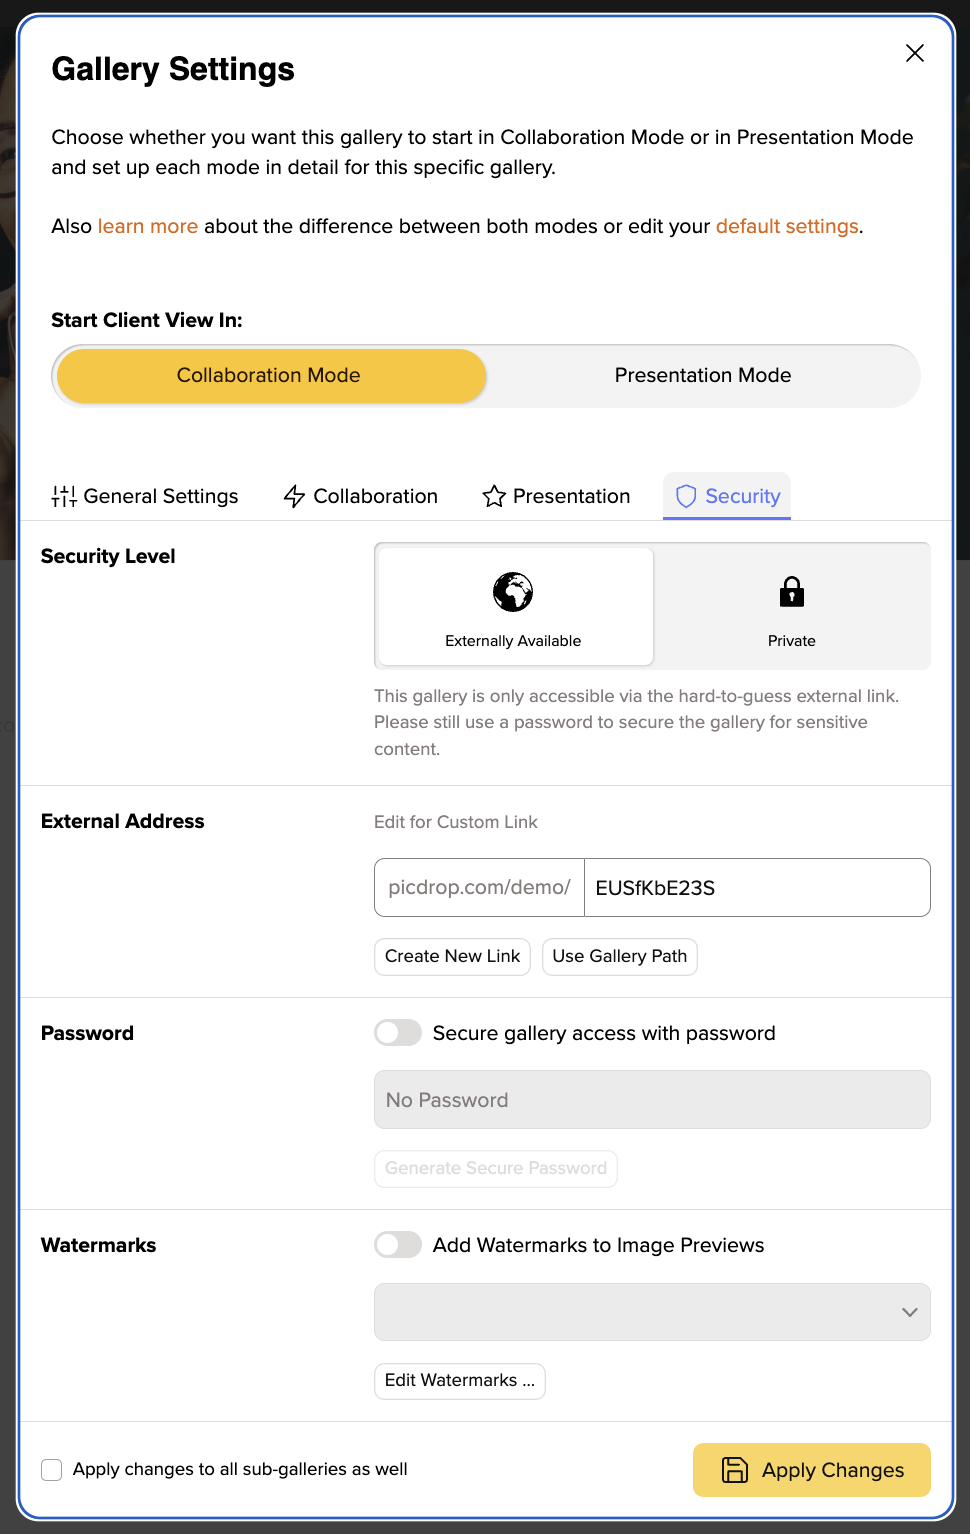
Here you are able to protect your pictures with a watermark and password. But above all, you can specify the address at which your gallery should be accessible.
If you have set everything, you can save your settings by clicking on “Apply Changes“. To make sure that your clients gets exactly the settings you expect, select “Client View” in the top right corner to see how your clients will see the gallery!
You can define the criteria by which your files are sorted and grouped in each gallery. You can do this in the gallery settings under "Genera Settingsl".
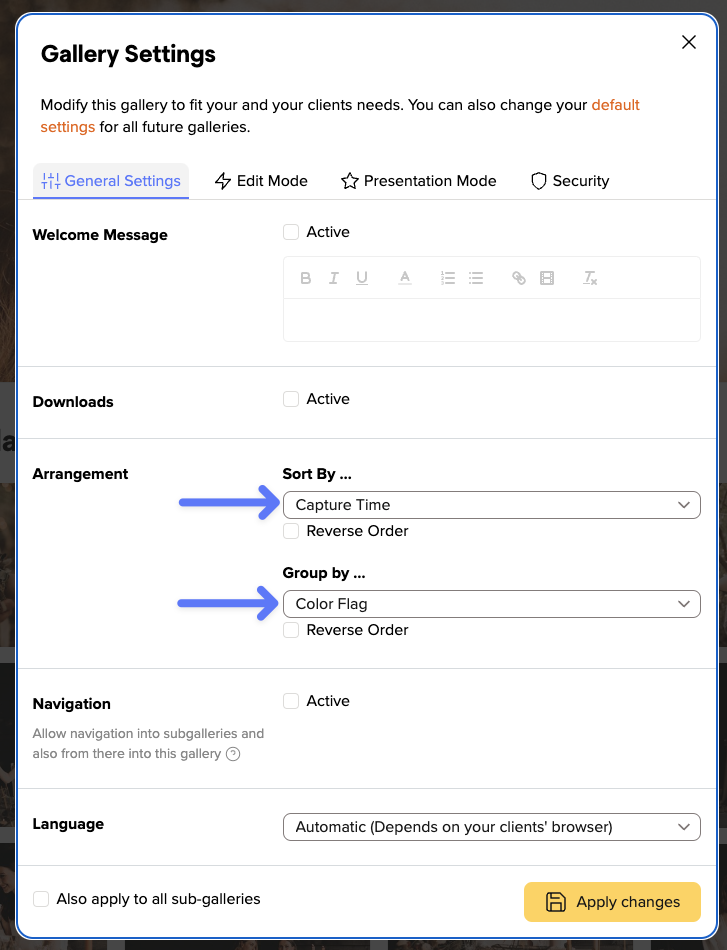
You can sort your files by the following criteria:
In order to be able to sort images according to the time they were taken, this information must be stored in the Exif data of your images.
You can also group files in your gallery. They will then be displayed in the gallery in individual sections.
You can group your files by these attributes:
For example, all files marked with the green color flag will be displayed in a separate section. Within this section they will be sorted according to your desired settings.
Each sorting and grouping can also be displayed in reverse order (e.g. files sorted by file name from Z to A instead of from A to Z) by activating "Reverse order".
In your picdrop account you will always find the Activities in the top right-hand corner so you can see what is happening in your galleries at any time.
The red number indicates that there is news in your account.
In the Activities you will find
in your galleries.
No matter where you are currently working in your account, when you call up the Activities, you will always see the events for all your galleries.
If you are in a gallery, you can restrict the display to the current gallery using the button at the top right ("Show current gallery only").
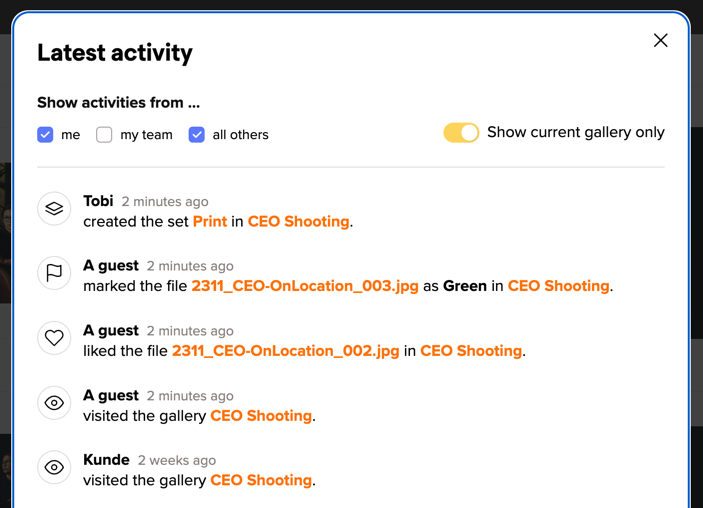
With the three options to the left, you can specify whose actions you want to see: all your own actions, actions from your Team Members or actions from all other visitors to your gallery. You can combine these filters as you wish to get the overview you need.
Two more practical tips:
The Activities will keep you updated about what’s happening in your galleries. You can also get notifications via email for some of those Activities.
You can use picdrop for free for as long as you want. Please note that there are two different forms of free. First, the trial period: in the first month after your registration, you can use picdrop with all features and without limits. This trial period is pretty much the same as our PRO plan. After the trial period ends, you can decide if you want to use one of our plans – for example, the PRO plan just mentioned, which is what most of our users choose. If you do not actively choose one of our paid plans, your account will automatically be assigned to our FREE plan. This plan is limited in its functionality and storage/gallery size, but as promised, it is free. You can use this plan within its limits for as long as you like, or switch to one of our paid plans at any time.
After the trial month you are free to choose one of our plans or continue to use the free plan.
If you don't decide for one of our affordable plans, but choose the limited free plan, all your galleries created so far and all uploaded files will of course be preserved. If the uploaded files exceed the total amount of data or the number of galleries in the free plan however, all exceeding files and galleries can no longer be downloaded and accessed by third parties, such as your clients.
Of course, you can always switch to a Lite, Pro or Business plan to continue working without any restrictions.
Termination means that your contract will not automatically be renewed for the same period at the end of the current billing period. In the event of termination, the current billing period can, of course, be used in full until the end. A proportional repayment of the current billing period is not possible.
You will always have until the last day to object to an automatic renewal, i.e. to cancel your plan. We want you to stay with us because of our great service - not because of a adhesion contract. If you no longer need picdrop, you can leave us painlessly at any time and download all your data without any problems.
Your account will be automatically reduced to the free plan at the end of the current, already paid billing period. All your galleries and files will of course remain. Existing galleries and files that exceed the maximum of 3 galleries or the 1 GB storage of the free plan are no longer available for third parties and cannot be downloaded anymore.
You can find all your invoices at any time directly in your picdrop account.
To find them, click on the Account Preferences at the top right when you are logged in to your picdrop account. Then go to the Payments & Legal section.
Here you can find all invoices and the current payment status. You can download all your invoices as PDF files.
Of course you can!
If you switch to a higher plan, you can start using the new plan immediately. We will deduct the remaining credit from your old plan from your first bill for the new plan. This way you don't pay a cent too much.
If you switch to a lower or our Free plan, you will keep the plan you have already paid for until the end of your current billing period. The new plan will then be activated at the end of the billing period.
There are multiple ways to pay for your invoices:
You can pay all plans at picdrop monthly, semi-annually or annually – conveniently by SEPA direct debit (also simply called direct debit) or with your credit card.
You can use SEPA direct debit if you have your bank account in a country that uses the Euro as its currency and your bank account is therefore also held in Euros.
With a credit card that supports transactions in euros, you can pay for picdrop from anywhere in the world.
No.
We don't want to annoy you with emails every month. In your account settings under "Your plan", you will always find all the information about your current plan and when your subscription will be automatically renewed.
Yes, of course!
If you reach the storage limit in your Pro plan or your Business plan, you can book additional storage space for your picdrop account:
In the Pro plan, you can expand your storage space at any time and as often as you like in 250 GB increments.
For each 250 GB you pay 7.99 € net per month in addition to the basic price of your Pro plan.
For your picdrop account in the Business plan, you can expand your storage space in 1 TB increments.
You pay 50,00 € net per month for each 1 TB storage expansion.
Please send us an email to hello@picdrop.com and let us know how much additional storage you need.
But of course! For every direct debit, you will receive a proper invoice with VAT and you can book picdrop as an expense at the tax office. You can call up and print out older invoices at any time in your account.
Unfortunately, this is not possible. picdrop is a very complex program that we constantly maintain and improve for you. This also includes perfectly adapted servers and the interaction of several functions. A use on other servers is therefore not possible.
Instead, you can use picdrop with our Web Forwarder.
For students of certain degree programs and photography schools, we offer discounted conditions in the Pro plan.
So if you have a lot to do with photos and videos during your studies, please send us an email to hello@picdrop.com. Please enclose a current certificate of enrollment with your email and we will check it for you! You are also welcome to register for a picdrop account if you don't have one yet.
In general, there are no individual prices at picdrop, but a transparent price structure for our affordable plans. You can view this in our plans overview: https://www.picdrop.com/web/pricing
If you need a quote for one of our plans or are interested in a Business XL plan, please send us an e-mail to hello@picdrop.com with the key data of your planned usage and we will gladly create the corresponding quote document for you.
We would be happy to provide you with a formal quote for your desired plan at picdrop. Simply send us an e-mail to hello@picdrop.com. Tell us your desired plan and the address details to which you'd like us to issue the quote and we'll create and send the corresponding document for you directly.
If you reach your monthly limit for video conversion in the Pro plan, you can book additional conversion minutes for your picdrop account with us at any time.
For just €5.00 + VAT per month, we can activate an additional 60 video minutes for your account. The amount will simply be added to your existing invoice amount each month.
Please send us an e-mail to hello@picdrop.com and let us know how many additional video minutes you need. We'll be happy to set it up for you!
Our video function with streaming, preview image & quick preview is included in the Pro and Business plans. Users of the (old) Studio plan and users in the Test month can also use the video functions to the same extent as Pro plan users. Lite and Free users can continue to upload and download video files to their account.
Each video must first be processed so that it can be played directly in picdrop. It is important to know that once a video has been processed, it can be played again and again in the account without any restrictions. There is a monthly processing volume for the Pro and Business plan:
In addition, the length of streamable videos is limited:
All longer videos get the preview image, the animated preview and can be up- and downloaded, but are not directly playable in picdrop.
This pricing model is the attempt to not raise prices for our plans but also cover the costs of the new video function in picdrop. We reserve the right to make further adjustments in the future.
If you have reached your monthly conversion limit on the Pro plan, you can find information on how to increase your monthly conversion volume here.
Thank you for your understanding!
We are happy to help you book a Business XL plan and set up your account according to your wishes with the appropriate number of team members and storage.
To book a Business XL plan, please send us an e-mail to hello@picdrop.com with the key details of your planned usage. We will then quickly provide you with the corresponding price or create the corresponding quote if required.
Your clients do not need an account to enter a picdrop gallery.
You simply send your clients the direct URL to a gallery. They then do not need to create an account or anything to open the gallery.
If you have activated the password protection for the gallery, all they have to do is to enter their password and they'll find themselves right in the gallery, ready to view their pictures.
To send this information to your clients you can easily use email, any messenger or the like - or conveniently send it from within picdrop by using the “Share”-option within every gallery.
It's as easy as that!
In your picdrop account you will always find the Activities in the top right-hand corner so you can see what is happening in your galleries at any time.
The red number indicates that there is news in your account.
In the Activities you will find
in your galleries.
No matter where you are currently working in your account, when you call up the Activities, you will always see the events for all your galleries.
If you are in a gallery, you can restrict the display to the current gallery using the button at the top right ("Show current gallery only").

With the three options to the left, you can specify whose actions you want to see: all your own actions, actions from your Team Members or actions from all other visitors to your gallery. You can combine these filters as you wish to get the overview you need.
Two more practical tips:
The Activities will keep you updated about what’s happening in your galleries. You can also get notifications via email for some of those Activities.
picdrop is an online service that lets you as a photographer create flexible galleries for your clients in a flash.
You don't need more than an internet browser and your own picdrop account. The installation of software on your computer or server is not necessary - but possible.
As a photographer, you upload your image and video files at picdrop, where they are stored absolutely securely and permanently. Your clients will then only need the link to the picdrop galleries you have created to view, select, download, etc.
Of course JPGs, TIFFs, PSDs and most RAW formats are displayed cleanly in picdrop. An exact list of displayable formats that picdrop can handle can be found here.
With RAW formats, unfortunately, each manufacturer makes his own type, so that the formats of some manufacturers can lead to color shifts and other effects. This is especially true for brand-new camera models, which we don't always support immediately. However, we can display most formats without any problems. To make sure that picdrop can also display your RAWs well, you can simply output them as DNGs in your RAW editing program like Lightroom. This has no influence on the quality of your RAWs.
Everything works perfectly fine in 99% of all cases. However, with very complex Photoshop files (.PSD), errors can occur when working with many layers and various layer modes, etc. For example, we recommend to deactivate the alpha channels so picdrop is able to show a clean picture preview. Flat, simple PSDs without thousands of layers are no problem at all.
Of course!
You can customize your logo (for the whole account), the header image of each gallery and the text above each gallery at any time. Starting from the Pro plan you can use three different layouts (grid, masonry and list) in picdrop’s edit mode.
You can also format the welcome text of each gallery and embed Youtube or Vimeo videos there.
Tip: Use the welcome text to explain to your customers how to use the color flags and selections or to link to an individual tutorial.
Starting with the Pro plan, the features of your gallery also include the Presentation Mode, where you can make a lot of design settings for each of your galleries. For example, you can adjust the background color or the font according to the style of the gallery.
Detailed information about Presentation Mode can be found here.
Also, starting with the Pro plan, you can customize the color flags in your galleries account-wide: you can assign individual names to your color flags and (de-)activate individual color flags.
The operation of picdrop is simple and intuitive, as is the naming of your galleries. However, in some special cases it may be helpful to know which characters picdrop supports when naming your galleries.
You can use the following characters in your picdrop gallery names without any problems:
The following characters are automatically converted or reduced by picdrop into your gallery name:
You enter: & or + picdrop changes to: und
You enter in: ß picdrop changes to: ss
You enter: á picdrop changes to: a (letters with diacritical characters are reduced to the basic letters if possible - with the exception of German umlauts)
All other special characters in the gallery name are not supported by picdrop and will be removed from your gallery name.
Team Members allows you to work together with several people in one picdrop account. Each Team Member uses his own login data and can access galleries and settings of the picdrop account with individually adjustable access rights.
Team members can be used in Pro+ and and in our Business Plans. All details about setting up and using the team member function can be found here: Team Members in picdrop’s FAQ
Just you. No one else.
To share galleries with third parties, you should always send the direct link to the desired gallery.
With picdrop’s web-forwarder you can run picdrop under your own domain so that you clients see your domain initially and will be forwarded to picdrop.
You can finde the neccessary files right here.
With picdrop we would like to offer you a reliable service on which you can depend 100%.
We ourselves have seen, used and loved many tools that unfortunately had to stop working after a while because they only concentrated on popularity or great features rather than on how they can finance themselves and pay the next server bill. We do not speculate on being bought by an internet giant for millions of euros on day. Instead, we want to offer you a great service that you like to pay for. This is the only way to ensure that picdrop will remain for many years to come. Therefore, that's why picdrop costs money.
Our Business plan is the best way to work together with all your image and video files as a team.
Our Business plan includes all the advanced features of picdrop. Additionally, this plan allows you to invite multiple team members into your picdrop account to be able to work together, smarter and more effectively.
Your advantages with the Business plan:
The picdrop Business plan S already includes 3 team members, Business M includes up to 10 team members and Business L up to 15 team members. Further team member accesses and more storage can be booked flexibly with the Business XL plan at any time. You can find an overview of our Business plans here.
You can use team members to invite other people to collaborate in your picdrop account.
You can invite one team member on the Pro+ plan. With our Business plan, it's possible to work with even more people in one picdrop account.
You can find more information about how team members work here.
No. With picdrop we want to offer a lean, perfect service for the selection and transfer of image and video files. Selling images / videos and ordering prints is a very large, complex area that other vendors are already doing well and is not on our agenda.
No, unfortunately we don't offer such a service.
picdrop will send you a notification for
Notifications are always sent to the email address that is used to sign-in to your picdrop account. You can customize your notification settings right here: Notifications
We also send notifications about uploads to your galleries.
Notifications for uploads cannot be deactivated. We don’t want to spam your inbox with e-mails about every quick upload, though. We will only send you an e-mail for your own uploads if the upload took more than 10 minutes.
When clients upload files to one of your galleries (the client upload must be activated for this to work), we always send an e-mail to you – no matter how long the upload took. We want you to know about it in any case!
Our picdrop video function with streaming, quick preview & preview image is included in the Pro and Business plans, as well as in the Test month and the (old) Studio plan. Lite and Free users can upload and download videos to their account.
Here you can find an overview of all supported video formats.
Furthermore, you can find more information about the different limits of the video function in our plans here.
Video streaming allows you and your clients to play video files directly in picdrop. Each video must be processed first to be playable. Once uploaded and processed, your videos can be played as many times as you and your clients want. Processing your video file into a playable video in picdrop takes about one minute per minute of video. So have a little patience please.
Your video files also display a preview thumbnail that we create directly from the file.
And that's not all: we also show a quick preview for your video files when you or your clients move the mouse over the file. From left to right, you can scroll through the quick preview by moving the mouse. The quick preview and the thumbnail give you and your clients a good impression of your files and make it easy for everyone to (re)find a desired video file quickly in the gallery.
If you have problems playing a video, we have compiled an article on possible causes here.
If you have any further questions, please do not hesitate to contact our support team. Simply send us an e-mail to hello@picdrop.com
This function is deliberately not available in picdrop. Therefore, if you want to revoke access to a gallery that has already been shared with clients, please manually set the gallery to ‘private’ in the security settings.
As much as we understand that the feature of an ‘expiration date’ seems tempting at first glance, we would like to ask you to reconsider your request: As a photographer, you should always focus on the satisfaction of your clients. Automatically putting pressure on clients by threatening to lose access to their data at a certain point in time is not a good way to make them happier. Of course, you can continue to communicate your desire for prompt feedback personally with your clients.
In principle, you don't really need to worry about it. picdrop always supports the last three versions of the most popular browsers. These versions include all modern and up-to-date browsers that are currently in circulation and are used by a very large proportion of users. The used browser should, therefore, be compatible with picdrop for you and your clients.
A detailed list of the browsers picdrop gets along with, you can still find here:
The desktop version works with:
The following browsers can be used in their mobile version with picdrop:
Yes, of course!
For yourself, as the admin of a picdrop account, you can switch the language of your account right here in your settings: Userdata & Password
When sending a gallery link to your clients the language of the gallery will automatically switch between English and German depending on the browser of your clients.
If they use a non-German browser, the gallery will be automatically displayed in English. You don't have to do anything. If you want to be on the safe side, you can also set the language in your gallery settings and your clients will always see the galleries in English, no matter what language their computer or browser is set to.
You have received an email and you are not sure if it was really sent by picdrop?
Here you will find everything you need to know and steps on how best to proceed:
Why should I even doubt emails that look like picdrop?
On November 2018, picdrop became aware of emails and a fake website trying to pick up user data on our behalf. These were so-called phishing emails.
What are phishing emails?
With phishing, users are lured to fake websites by receiving emails that are often confusingly similar to emails from well-known providers. On these pages, which usually have exactly the same look as the pages and emails they are supposed to imitate, login data is queried. This serves the purpose of "fishing" this data so that the perpetrator can then use it elsewhere. Hence the term "phishing".
Keywords: email, phishing, security, password
You can upload these file formats to your picdrop gallery. We create a preview image for (almost) all of these formats and your customers can download them if you have enabled downloads in the gallery:
| File Format | File Extension | Preview? | Up- and Download? |
| JPEG | JPG, JPEG | ✅ | ✅ |
| JPEG 2000 | JP2, J2K | ✅ | ✅ |
| TIFF | TIF, TIFF* | ✅ | ✅ |
| Photoshop | PSD*, PSB* | ✅ | ✅ |
| ✅ | ✅ | ||
| Bitmap | BMP | ✅ | ✅ |
| GIF | GIF | ✅ | ✅ |
| PNG | PNG | ✅ | ✅ |
| High Efficiency Image Container | HEIC | ✅ | ✅ |
| RAW Formats | File Extension | Preview? | Up- and Download? |
| Canon | CR2, CR3, CRW | ✅ | ✅ |
| Nikon | NEF | ✅ | ✅ |
| Kodak | DCR | ✅ | ✅ |
| Sony (Minolta) | MRW | ✅ | ✅ |
| Olympus | ORF | ✅ | ✅ |
| Fuji | RAF | ✅ | ✅ |
| Pentax | DNG, PEF | ✅ | ✅ |
| Leica | DNG | ✅ | ✅ |
| Phase One | IIQ | ✅ | ✅ |
| Leaf | MOS | ✅ | ✅ |
| Mamiya | MEF | ✅ | ✅ |
| Digital Negative | DNG | ✅ | ✅ |
| Hasselblad | 3FR, FFF | ✅ | ✅ |
| Sony | ARW | ✅ | ✅ |
| Panasonic | RAW, RW2 | ✅ | ✅ |
| Samsung | SRW | ✅ | ✅ |
| Other Formats | File Extension | Preview? | Up- and Download? |
| Text Files | TXT | no image format | ✅ |
| HDR | HDR | – | ✅ |
| OpenEXR | EXR | – | ✅ |
| Meta data | XMP, BIM | no image format | ✅ |
| Lightroom | LRTEMPLATE, LRCAT | no image format | ✅ |
| Capture One | COCATALOG, COMASK, COS, COF, COP, COT, EIP | no image format | ✅ |
| Videos (playable) | MOV, AVI, FLV, M4V, MP4, MPG, MPEG, WMV, MTS, MKV, OGG, WEBM, HEVC | ✅ | ✅ |
| Audio | WAV, MP3, MXF, XML | no image format | ✅ |
| Graphic files | EPS, AI SVG DWG, DXF |
✅ – no image format |
✅ |
With some RAW files of some cameras, there may be color tints or image errors in the previews. Your uploaded original files however are not affected by this!
The technical reason for this is that most camera manufacturers do not publish their "RAW recipes". However, we do our best to analyze the raw data and still display a reasonably correct preview image in your galleries as quickly as possible.
You are missing a file format completely in this table?
Feel free to write us at hello@picdrop.com!
___
* For Photoshop and TIFF files, we recommend disabling the alpha channels in the file so that the image preview can be displayed in picdrop.
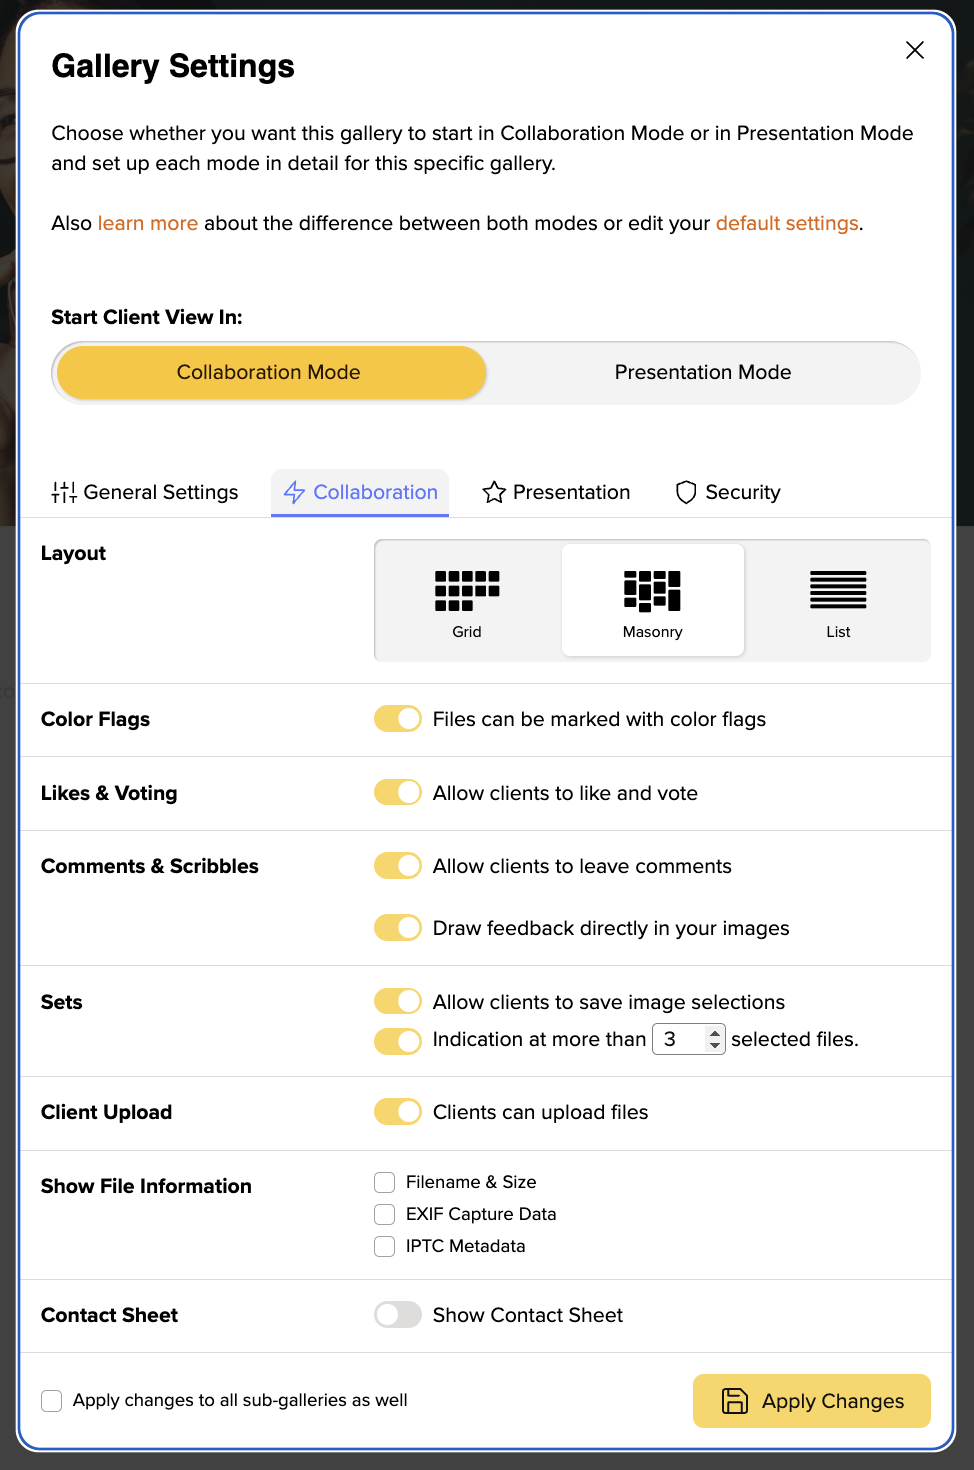
In your trial month as well as plans starting from the Pro plan you will have three different gallery layouts to choose from.
The grid layout is the layout that will automatically be used when a new gallery is created. Unless you have changed this in your own default settings. This layout gives your clients a quick, orderly overview of all images. Thus, making it the ideal layout for working with professionals such as picture editors or corporate clients who want to quickly make a selection and get an overview of all images.
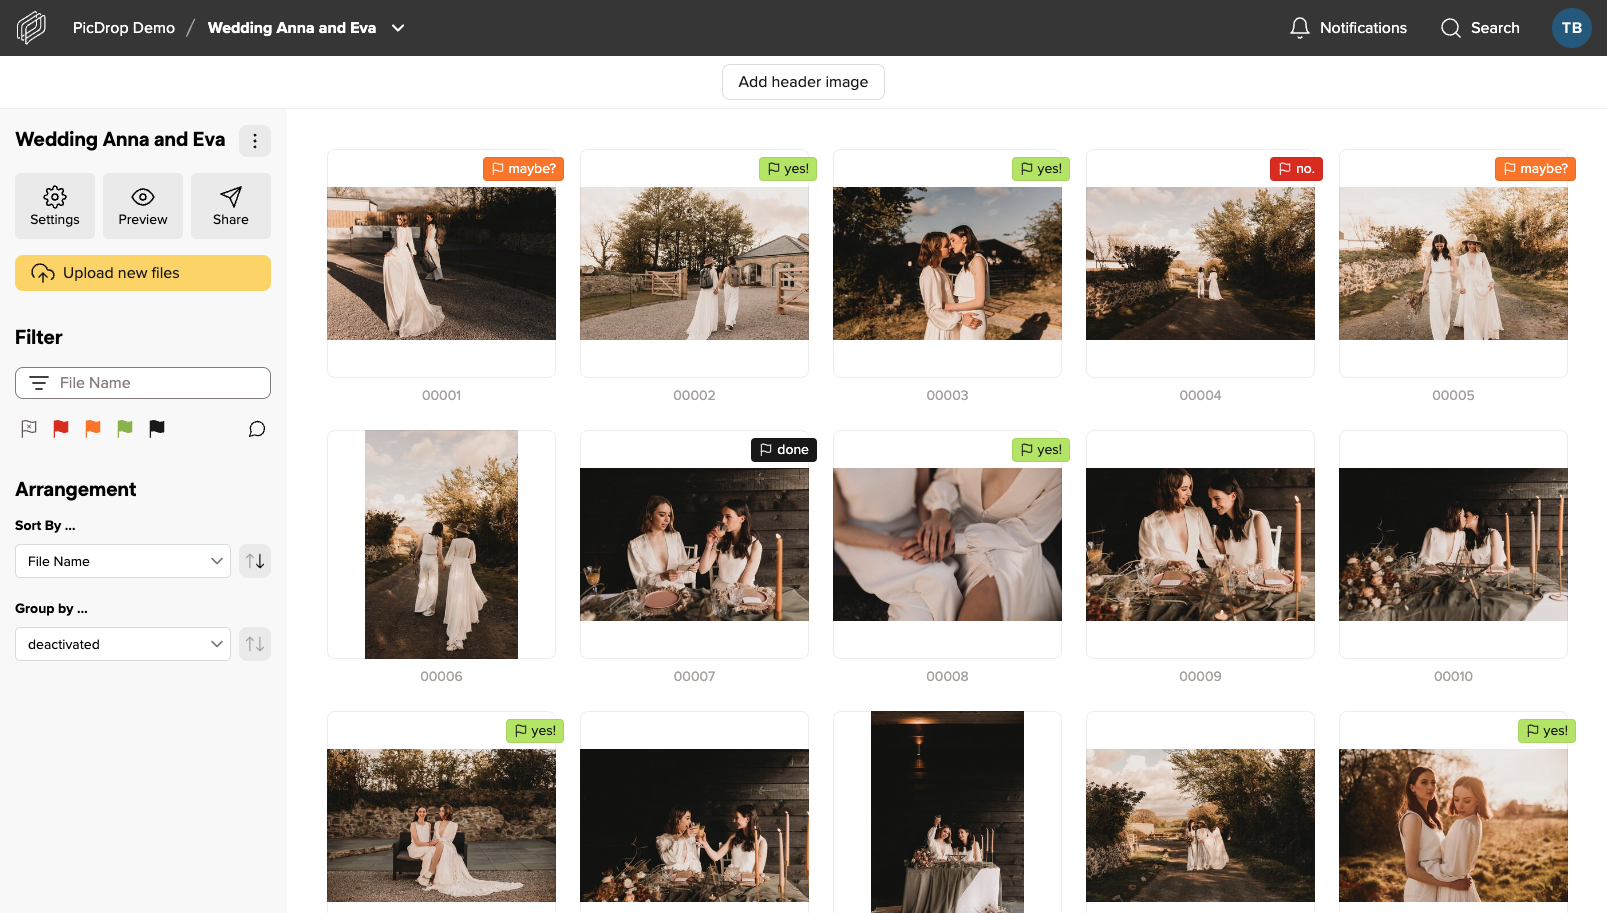
The main difference between the Masonry layout and the grid layout is that the images are displayed much larger and the arrangement is "fluid". One preview image after the other – this makes the gallery look prettier overall, but may also be a bit more confusing. The layout is therefore perfect for private clients, e.g. weddings, where presentation is more important than sets and quick comparison of similar images. Especially in combination with the large header image (also included in the Pro plan) your galleries will look much more impressive.
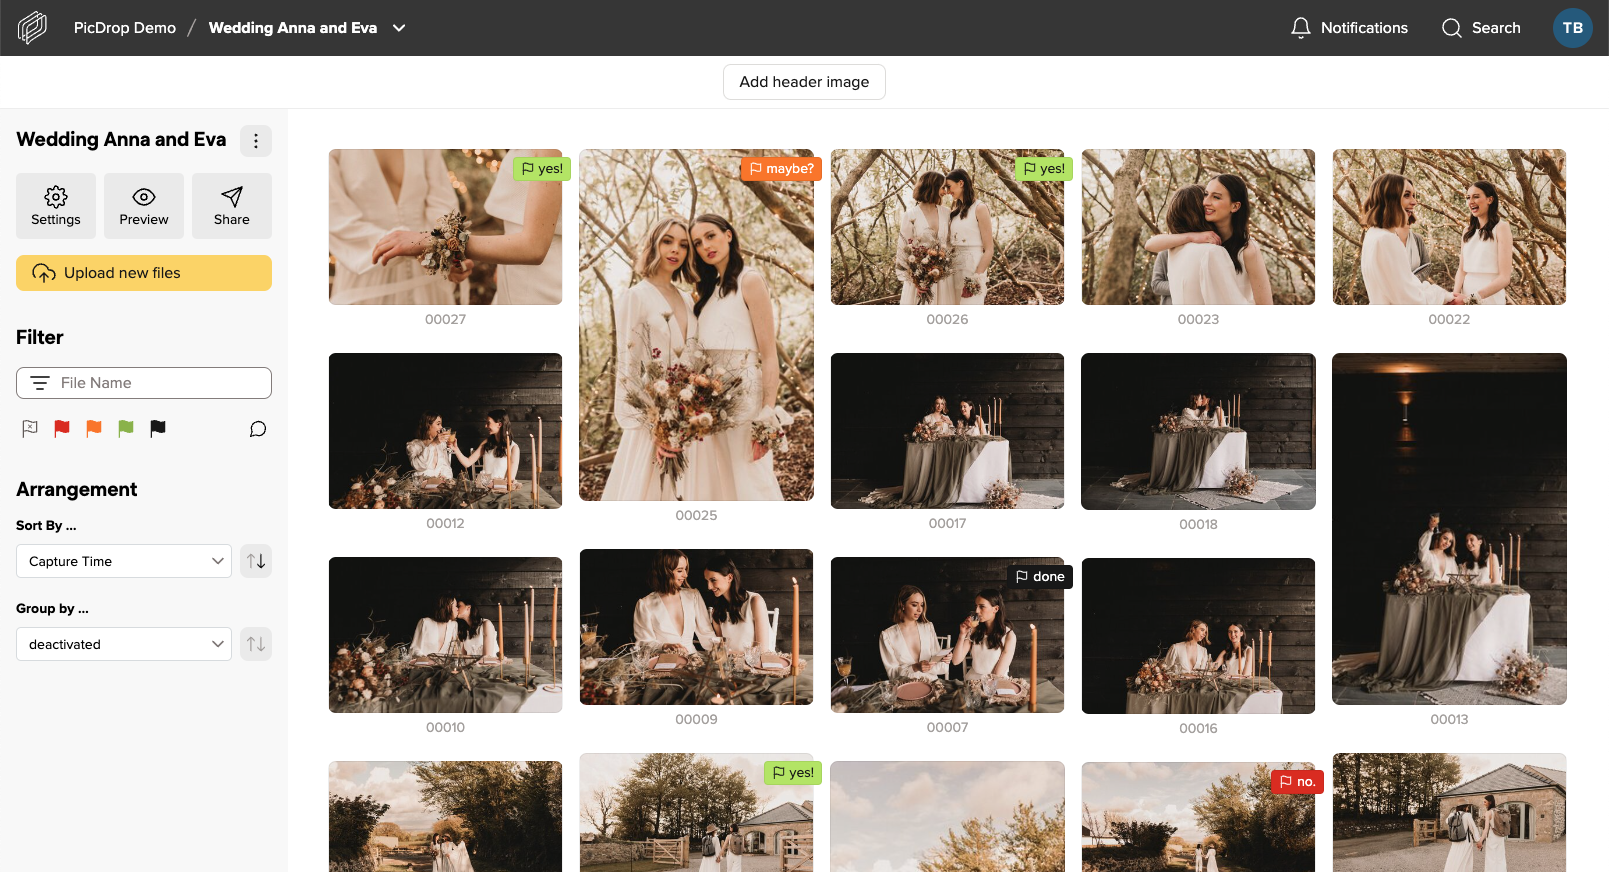
The list view is intended for fast file exchange between professionals working together on a project. If you're looking for a file with specific attributes such as dimensions or file type, this view is great for sharing with post-producers or staff who know exactly what they're looking for and need quick access to it. We recommend that you sort the view in the gallery settings so that the last upload is always on top.
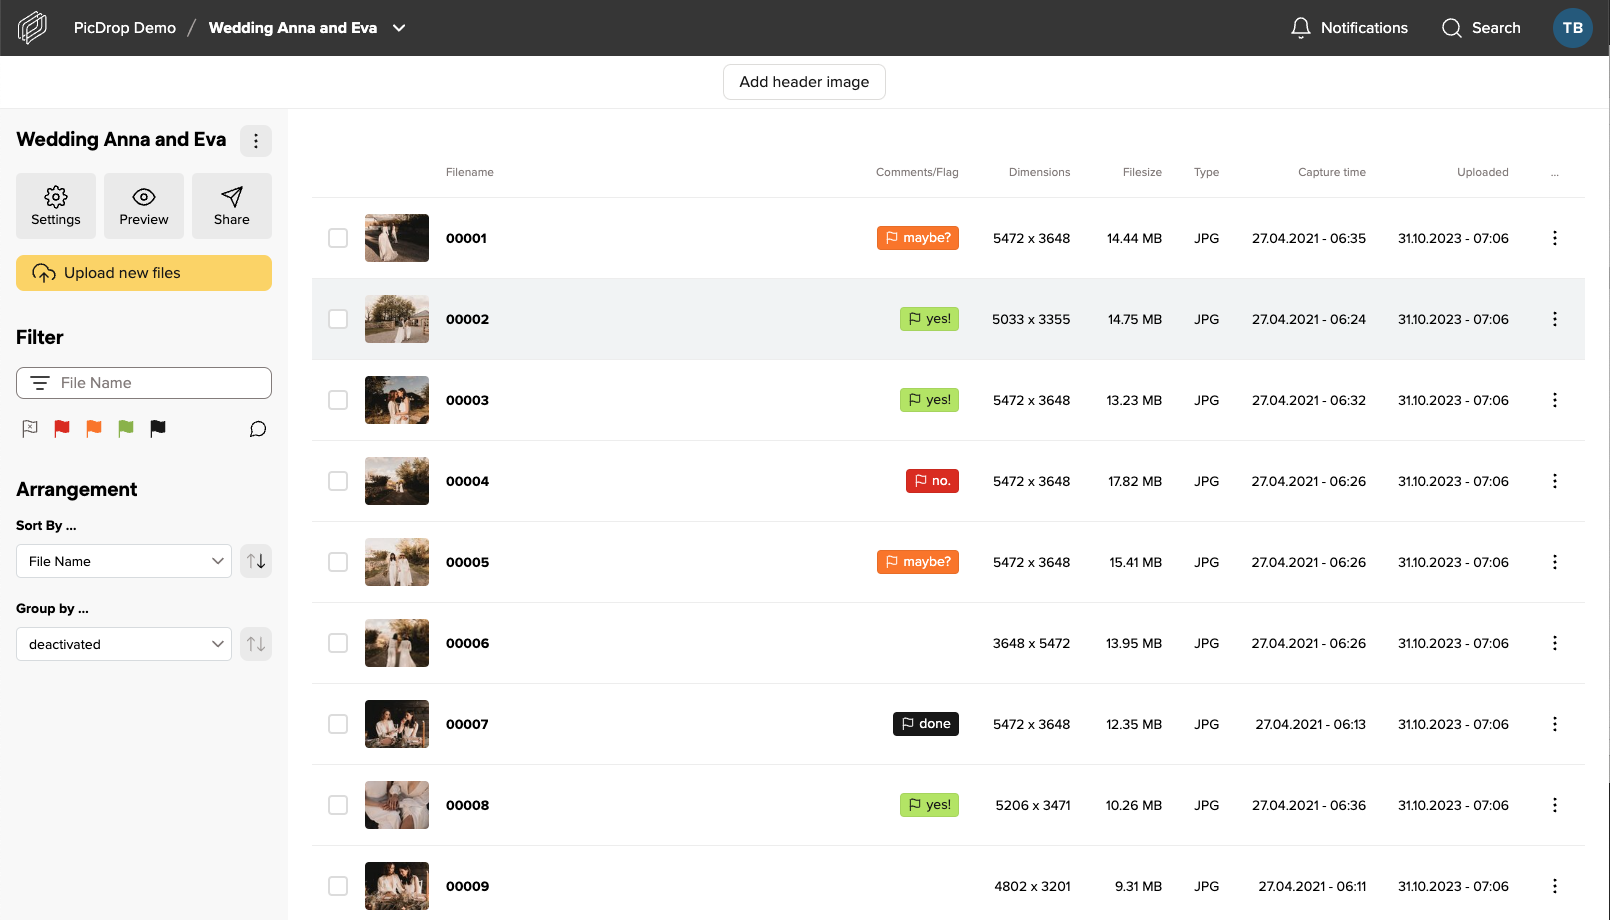
You can switch between the layouts in each gallery in the Pro and Business Plan.
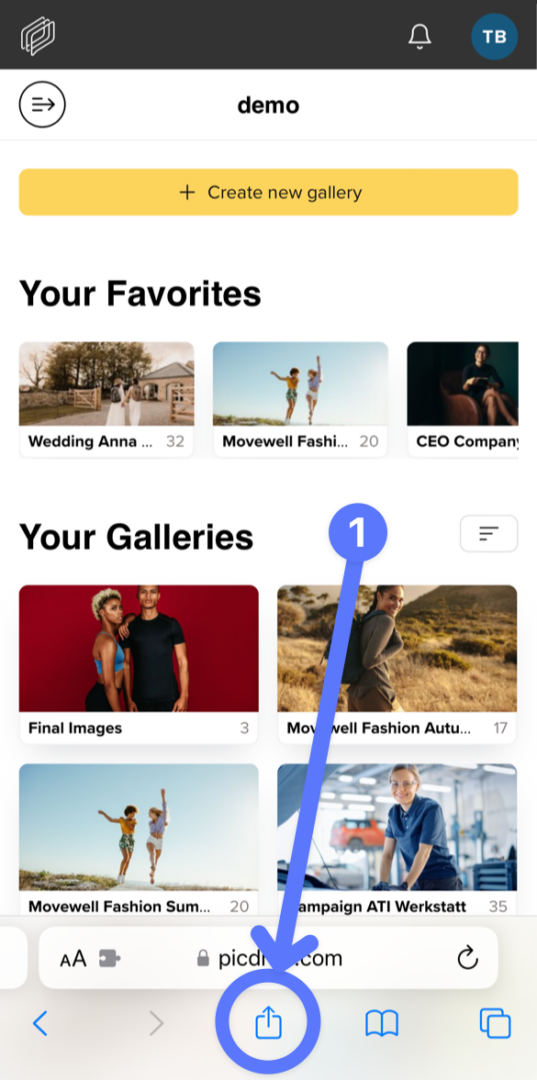
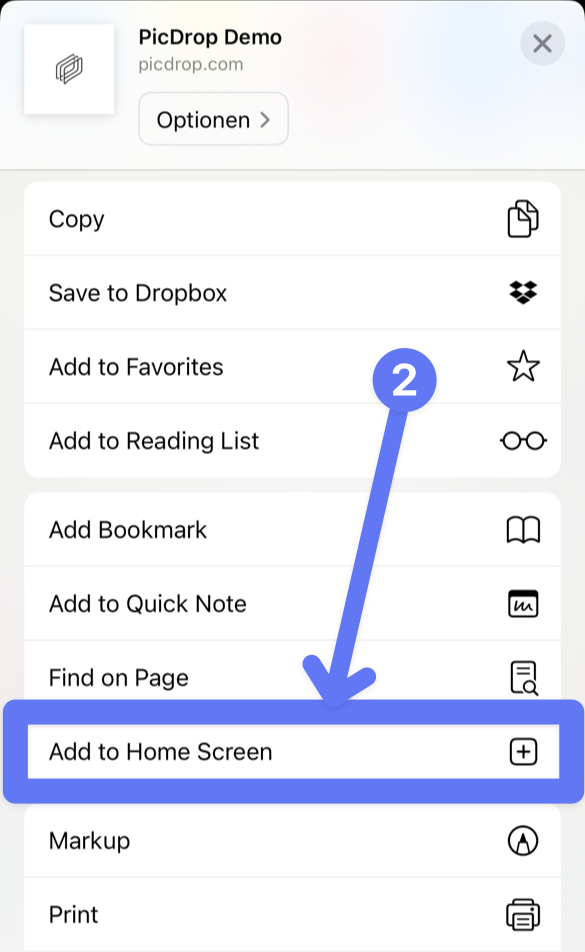
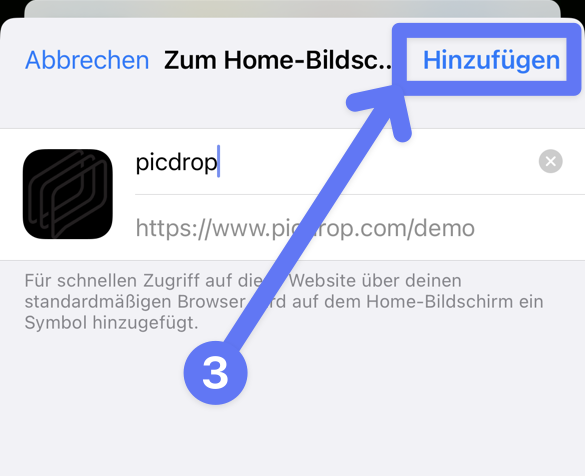
A picdrop app is not necessary. Instead, you can use our mobile version and place it on your smartphone as an app icon. (This way offers the same functions as an app would offer, but saves us the effort of developing several apps for different smartphone operating systems in parallel. Also you as a photographer don't have to install another app.
Just put the link to your gallery overview or to a single gallery directly with a shortcut on your smartphone. After that you can call picdrop with one "click" and it feels like an app.
Your clients can "drop" their galleries on their phone in the same way. All they need to do is open their gallery and follow the instructions below for their Android or iOS device.
Just follow these 4 steps:
Just follow these 3 steps on when you are on your dashboard:
With today's update (16.11.21), you can create individual "custom links" independently of the gallery name. Sharing new galleries via the previous "plain links" linked to the gallery names will no longer be possible. Existing galleries with active plain links can still be opened until December 15th. To increase the security of your galleries, we take a logical step here.
Read more about what you can and should do to ensure that your clients can still access their galleries in this article.
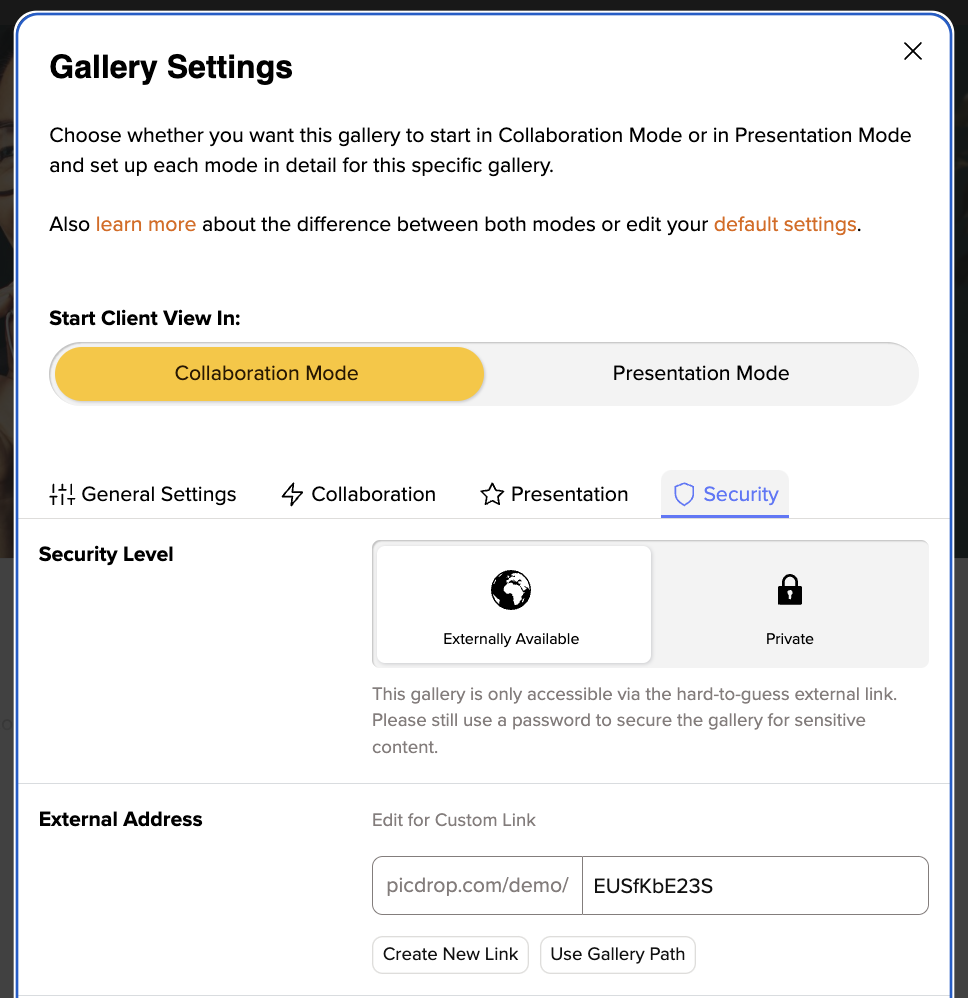
Plain Links are links that don't look like this: picdrop.com/username/3zj7uG6ZR, but for example like this: picdrop.com/username/grandmas-birthday.
In the security settings of your galleries you could choose between both variants. The Plain Link variant was used to get more readable URLs. However, for the last 4 years the second variant, the "secure link", is the default setting for all new picdrop users.
So if you are part of the majority of our users who always use the "secure link" to share galleries, you can stop reading here. Nothing will change for you!
If you use Plain Links regularly or have used them in the past, please note that these plain links will STOP working as of Wednesday, December 15th. This also applies to links that have already been sent. If you currently sent out links to clients, you have 2 options:
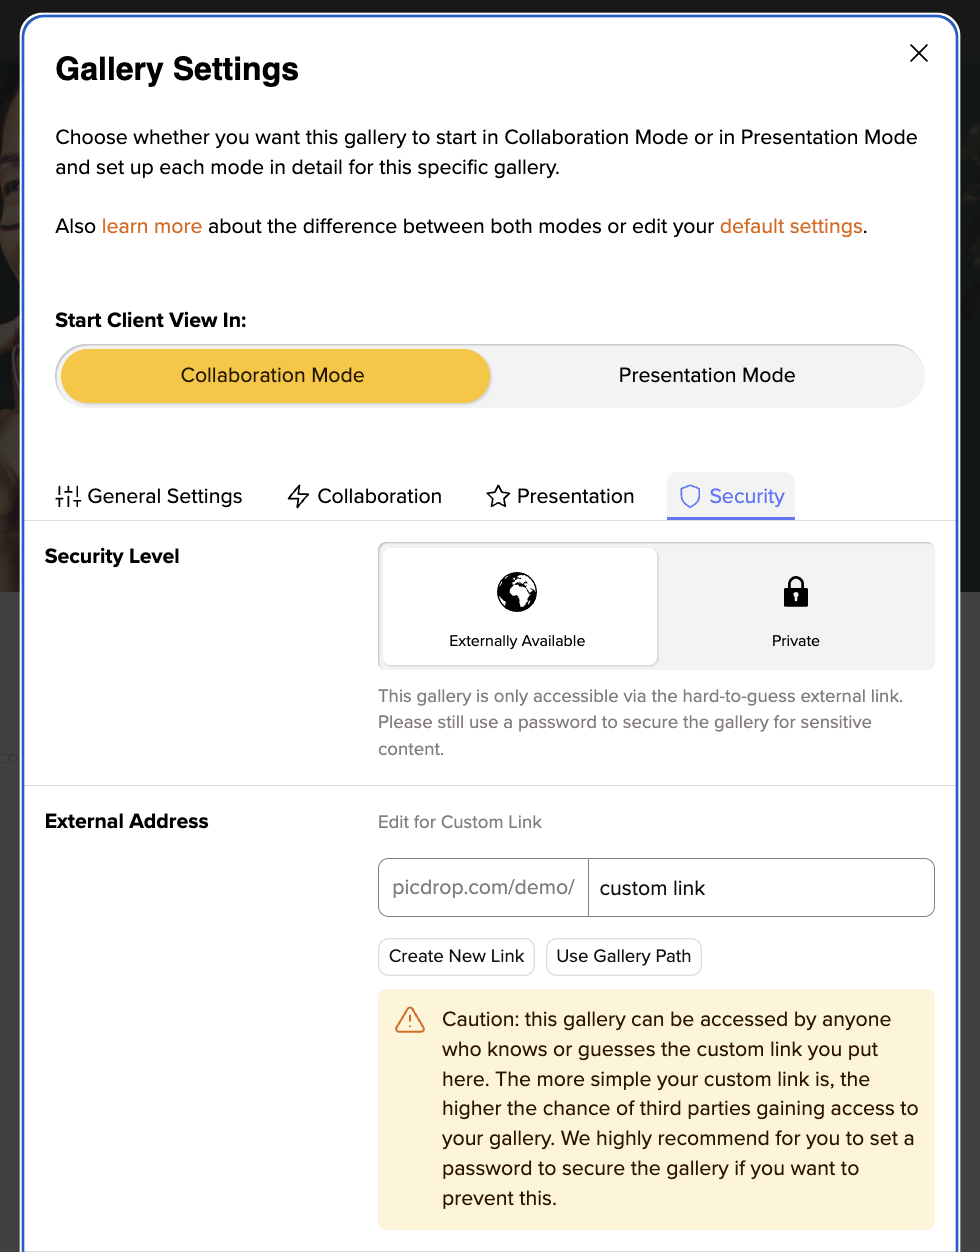
Go to the gallery settings and edit the Custom Link according to your wishes. You can e.g. use the gallery name as before or enter a completely individual name. Please note, however, that this link is then again less secure than the randomly generated link. To increase security, we strongly advise you to always set a password as well.
At picdrop we regularly take security precautions, check our application for improvement possibilities and implement them. In the security settings of each gallery we inform you that Plain Links are not as secure as the "secure links" and can be "guessed". Until now, we have relied more on your personal responsibility in deciding which link you choose and let all photographers decide for themselves what type of link you want to use for your galleries. In the future, we want to support you even more and hope that users will use this function much more consciously than before.
Yes, the time of automatically generated links Plain Links is over - unless you consciously decide to keep using them. In this case you can now edit the address of the link by clicking into the address field and name it individually. This is a new option with a similar result: a readable text link. So you can still create nice URLs for galleries that should be public, for example. But now you are no longer locked into automatically using the name of the gallery as the link! This way you can make sure that a link you sent to your clients in the last days remains available after the change on December 15th.
Of course, we know that in some cases there are a lot of plain links that need to continue working under their old address. In cases where the number of links is too large to check the settings yourself, or where you do not have an exact overview, we are happy to help. Please contact us at hello@picdrop.com so that we can work with you to convert your old plain link galleries to the new custom links. We are happy to help you!
No problem! Write us at hello@picdrop.com and we will be happy to answer all your questions.
There are many different reasons why a video cannot be played in your picdrop account.
Below you will find a list of possible reasons:
If you upload a new video and your plan limit allows the processing of a streamable video, picdrop will automatically process different versions of your video, which can then be streamed in your gallery with one click.
This process is very time-consuming and takes about 1 minute per minute of uploaded video material. After the processing is finished, your video is automatically updated and streamable with one click.
Your plan includes a maximum monthly volume of video minutes that can be automatically processed into a streamable video after an upload. The maximum amount of video minutes that can be processed within your plan can be checked in your account preferences. Here you will also find information about the minutes you have already used. If you have already used all your video processing minutes included in your plan, your volume will be topped up again on the 1st of the next calendar month – or you can simply book more monthly video minutes.
The video feature in picdrop was introduced in November 2022. Videos uploaded before that date cannot be streamed. If you want an existing video to be streamable and you are on a plan that includes video streaming you can easily download the video using the download button and then re-upload it. It will then be considered a new video and will be newly processed and made streamable. Please note that the processing of the streamable version will then be deducted from your monthly volume of video processing minutes (see 2.).
Depending on which picdrop plan you use, there is a time limit on how long a video can be to be playable in picdrop. This limit lies at 15 minutes for the Pro plan and 30 minutes for the Business plan. If your video file exceeds this time limit, streaming in picdrop is not possible. In order to watch the video your clients will then have to download it from picdrop first.
In our list of supported file formats you will find an overview of all video formats that picdrop currently supports. Please note that a file extension does not necessarily indicate which codec was used to encode a video.
Nobody is infallible - not even us. If none of the given solutions fit your problem, please write us at hello@picdrop.com and tell us the link to the gallery and the file name directly. We will then take a closer look. Thank you!
What is our Like feature in picdrop?
The likes are intended to help you and your clients - or you and your team - to vote on which image is rated best by a larger number of people. If several people are working in a gallery and an image or several images with the "highest common denominator" need to be found, the likes are the thing to work with!
For a quick coordination where only one person in a gallery determines their favorites, however, the color flags are better suited.
How do likes work in picdrop?
To activate the likes, simply proceed as follows:
go to the settings of your gallery and you can activate the likes, this can be done in the tab of the edit mode under the item Likes & Voting (1) - don't forget to save the gallery settings afterwards (2).
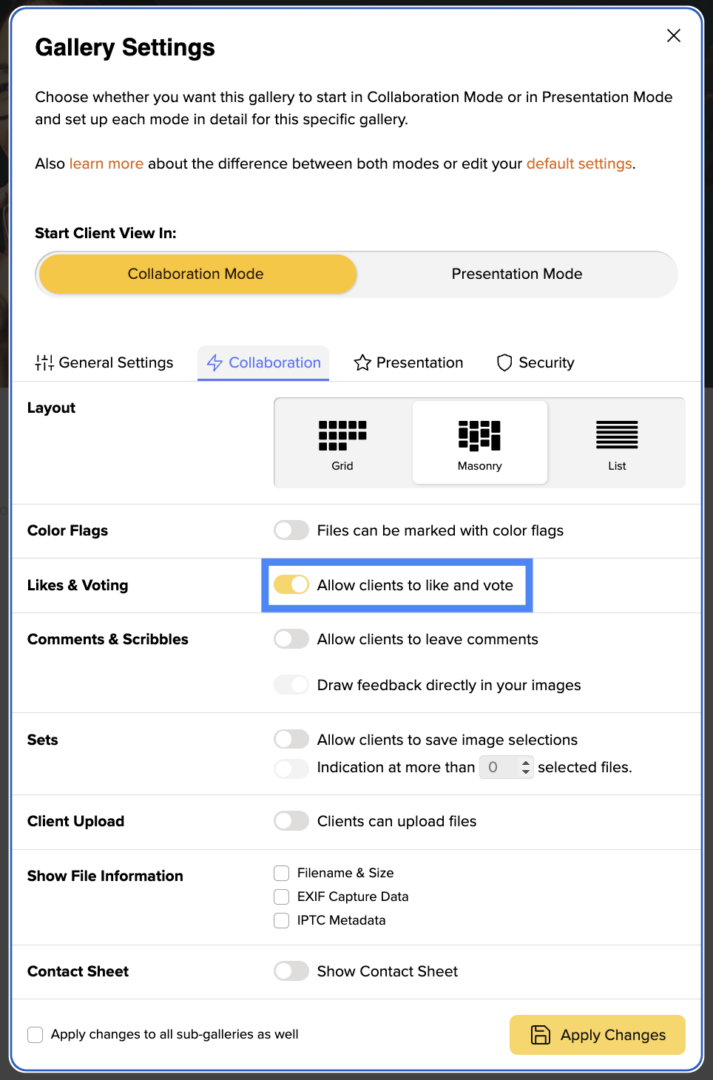
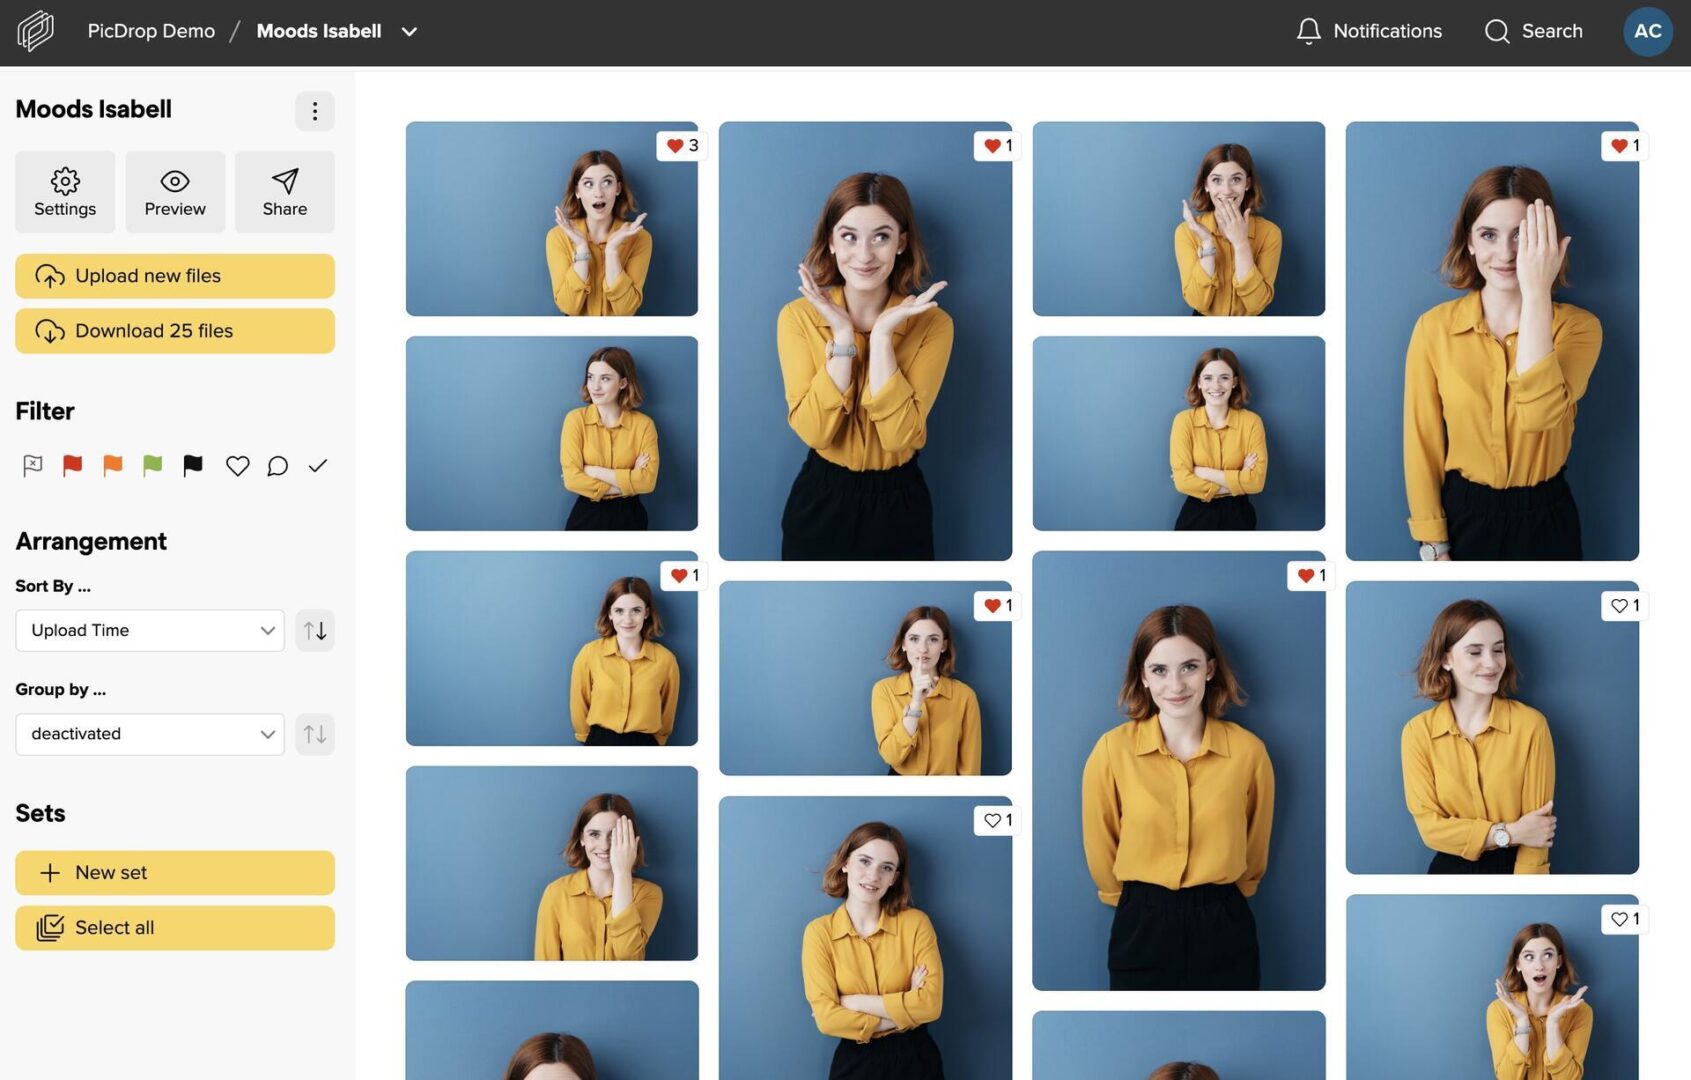
Once you have done this, your pictures can now be given likes. A small heart symbol will appear on each image when you or your clients hover over it with the cursor. With every picture that is liked, the number of likes for this picture increases and your clients' favorites quickly become visible.
Export selected images to Lightroom, Capture One, Finder, Explorer and more
As usual, selected images can be exported to Lightroom, Capture One, Finder or Windows Explorer with just a few clicks. This saves valuable time! You can find more information in our article on the export function.
Notifications about new likes
To find out if your clients like your pictures, simply click on the notifications in the top bar of your account. We've added the likes there to make it as easy as possible for you to stay up to date.
Sorting by number of likes
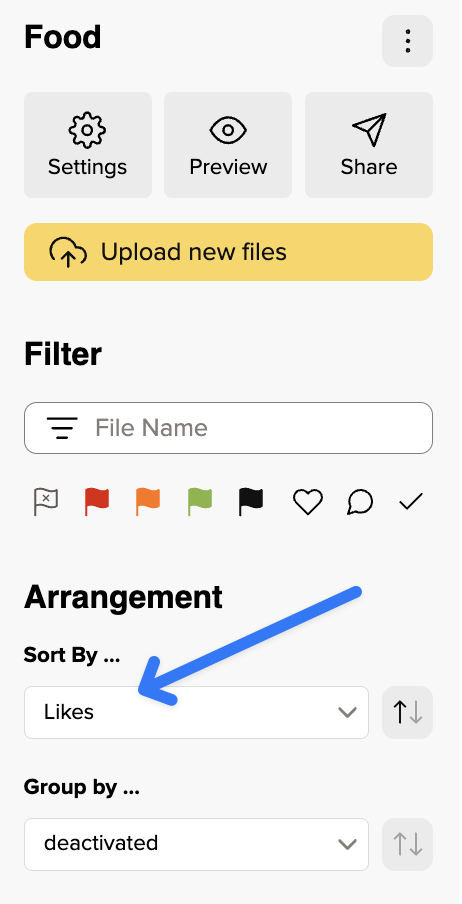
To make it even easier for your clients to find their way around, activate automatic sorting by likes in your settings in addition to the likes. Your images in the gallery are then sorted in real time with each like. The more likes a photo receives, the higher its position in the gallery. We recommend that you let your clients know if you have switched on real-time sorting to avoid misunderstandings due to the "moving" images. Of course, you can also sort or filter by likes as usual in the filter bar on the left-hand side without having preset this arrangement in the settings.
Only show pictures with likes
Ib the left-hand filter bar, you can now not only filter by pictures with likes and only display these, but also sort all pictures by their number of likes. To do so, simply click on the heart in the filter bar or select "Likes" in the sorting.
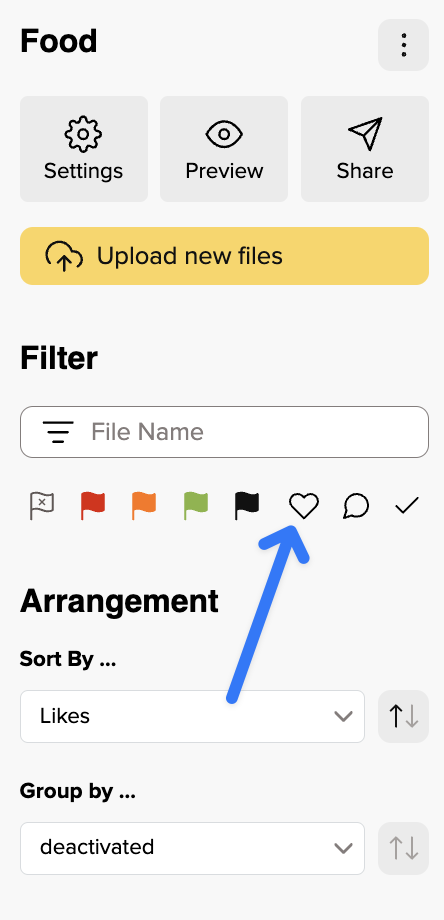
As you can see, working with Likes is easy as pie and if you still have any questions about this feature, just get in touch with our support team and we'll be happy to help you!
To learn many useful details of picdrop, we have put together a guide for advanced picdrop users. You can find it here.
Have fun exploring and trying it out!
You can define the criteria by which your files are sorted and grouped in each gallery. You can do this in the gallery settings under "Genera Settingsl".

You can sort your files by the following criteria:
In order to be able to sort images according to the time they were taken, this information must be stored in the Exif data of your images.
You can also group files in your gallery. They will then be displayed in the gallery in individual sections.
You can group your files by these attributes:
For example, all files marked with the green color flag will be displayed in a separate section. Within this section they will be sorted according to your desired settings.
Each sorting and grouping can also be displayed in reverse order (e.g. files sorted by file name from Z to A instead of from A to Z) by activating "Reverse order".
In your picdrop account you will always find the Activities in the top right-hand corner so you can see what is happening in your galleries at any time.
The red number indicates that there is news in your account.
In the Activities you will find
in your galleries.
No matter where you are currently working in your account, when you call up the Activities, you will always see the events for all your galleries.
If you are in a gallery, you can restrict the display to the current gallery using the button at the top right ("Show current gallery only").

With the three options to the left, you can specify whose actions you want to see: all your own actions, actions from your Team Members or actions from all other visitors to your gallery. You can combine these filters as you wish to get the overview you need.
Two more practical tips:
The Activities will keep you updated about what’s happening in your galleries. You can also get notifications via email for some of those Activities.
Our picdrop video function with streaming, quick preview & preview image is included in the Pro and Business plans, as well as in the Test month and the (old) Studio plan. Lite and Free users can upload and download videos to their account.
Here you can find an overview of all supported video formats.
Furthermore, you can find more information about the different limits of the video function in our plans here.
Video streaming allows you and your clients to play video files directly in picdrop. Each video must be processed first to be playable. Once uploaded and processed, your videos can be played as many times as you and your clients want. Processing your video file into a playable video in picdrop takes about one minute per minute of video. So have a little patience please.
Your video files also display a preview thumbnail that we create directly from the file.
And that's not all: we also show a quick preview for your video files when you or your clients move the mouse over the file. From left to right, you can scroll through the quick preview by moving the mouse. The quick preview and the thumbnail give you and your clients a good impression of your files and make it easy for everyone to (re)find a desired video file quickly in the gallery.
If you have problems playing a video, we have compiled an article on possible causes here.
If you have any further questions, please do not hesitate to contact our support team. Simply send us an e-mail to hello@picdrop.com
Go to the settings of your gallery. There you will find the option to activate scribbles in the following location:
Edit Mode ➔ Comments ➔ Image annotations
You must first activate the comments so that you can activate Scribbles, as each Scribble needs a comment to be saved.
After that, Scribbles in this gallery can be used in Edit Mode in the desktop version of picdrop. In the mobile version of picdrop on smartphones and tablets, you can see the comments and Scribbles, but you cannot currently change them or create new ones.
Activate Scribbles in the gallery settings under Edit Mode ➔ Comments ➔ Image annotations. Back in the gallery, click on an image to open the large single image view.
Below the image you will find the Scribble button to activate Scribble Mode.
You can also press X on your keyboard to start Scribble Mode.
The blue frame around the images indicates that Scribble Mode is activated.
Now click with your mouse on a spot in the image to create a small circular shape in the image.
Or hold down the left mouse button and freely draw any shape in the image.
You can undo the last steps of your Scribble by using the Undo button at the bottom left.
Or you can use the backspace key on your keyboard.
Click on the Comment and Save button at the bottom right to save your Scribble.
You still need to enter a name and a comment and confirm the whole thing with Save Scribble at the bottom right.
Tada: The Scribble is saved on the image and visible to all visitors to the gallery.
You will find the comment on the scribble in the comment bar on the left.
If you move the mouse over the scribble in the image, the corresponding comment will be highlighted. And of course it works the other way around too: if you move the mouse over a comment that belongs to a scribble, the scribble in the image will be highlighted.
If you are bothered by the scribbles in the image, for example because they are covering important areas, you can show or hide them by clicking the button at the top left of the comment column. Don't worry, the scribbles will not be deleted.
If you want to delete scribbles, you can do so using the trash can icon next to the scribble comment.
With Scribbles, you and your customers can draw comments and annotations directly into the images in a gallery. Scribbles are displayed on the image and saved together with a comment, making them visible to all visitors to the gallery.
Scribbles are the perfect tool for marking retouching requests in an exact location, leaving post-production instructions for certain areas of the image or simply for drawing ideas and thoughts into the image.
You can either place a circle in the image or draw your own shapes freely with the pen tool.
This is what Scribbles look like:
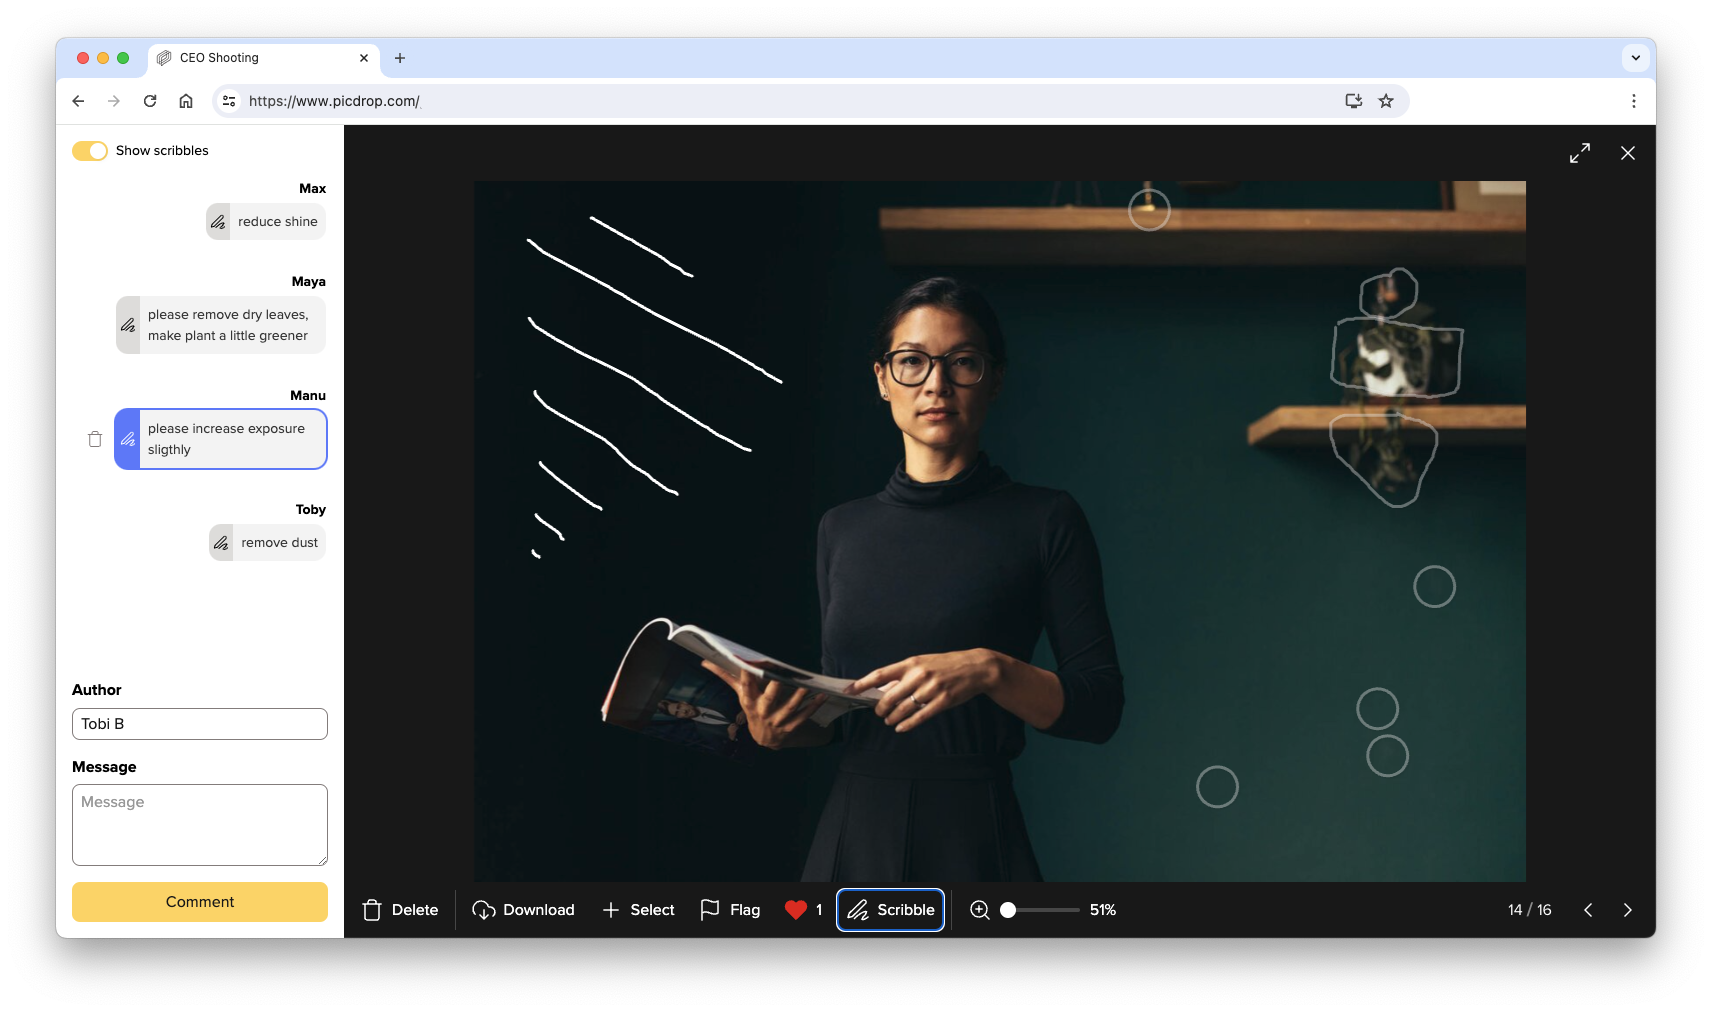
Scribbles can be created and changed in the desktop version of picdrop. In the mobile version of picdrop on tablets and smartphones, you can view scribbles and their comments.
To ensure that visitors of a gallery do not have access to existing sub-galleries, the item "View Sub-Galleries" in the parent gallery must be inactive. Thus no one in the parent gallery can see the lower galleries - and vice versa.
See also: How do I prevent visitors to a gallery from accessing the parent gallery?
To ensure that visitors to a sub-gallery in the left menu do not have access to the parent gallery, the option "Navigation to sub-galleries and vice versa" must be inactive in this parent gallery. Therefore, no one in the parent gallery can see the sub-galleries - and vice versa.
Are you using Custom Links for your gallries? In order to additionally prevent a "clever" visitor from shortening the address of a sub-gallery by one level and still being able to access the parent gallery, we recommend only using the automatically generated random link. This link consists of only one random code and does not allow any conclusions on your folder structure. You can find it in the "Send" section.
You can find the color flags above each preview in the edit mode of your galleries. You also find them below each preview in the large single file view.
Color flags can support the different stages of your editing or selection process. Just like you are used to in other photography apps and tools.
For example, you can use the color “green = yes” to mark files that you consider to be finished, and your clients can set them to “black = final” if they agree. Or they can mark files “orange = maybe” again if there are still changes to be made. Of course, this is just one example of the many ways you can use the color flags.
It is possible to give the color flags their own names. You can also hide individual color flags if you and your clients don't need them.
With these flexible settings you can set up your workflow exactly the way it suits you and your clients.
picdrop’s color flags are a very simple and quick way to mark those files that you want to use or select in the end.
They are primarily suitable …
Pro Tip #1: You can set the gallery up in a way that all the files get grouped by color. This way the color flags will also be visually separated for your clients.
They are not suitable …
picdrop's set function helps you capture and store multiple views of your clients in a gallery. Your clients use them best to set final favorites in a gallery. One of the most important things in creating a picture set is remembering to save and name them. Therefore nothing stands in the way of further work with the set.
It is best suited …
Pro Tip #2: Sets can be moved and copied to a different gallery with just a few clicks.
It is not suitable …
Pro Tip #3: With the Shift key held down, you can click the left mouse button anywhere in the voting mode and draw a blue selection frame. Any file inside the frame will automatically end up in your set bar at the bottom. More shortcuts can be found here.
In general, we recommend to enable only one of them (either color flags or selections) per gallery for your clients. This prevents misunderstandings and confusion when using picdrop.
In conclusion, the color flags should be used as temporary markers. Sets are saved file selections that you can recall at any time to continue working in the gallery.
The color flags are available in green, orange, red and black. In the default settings, they are named yes, no, maybe and final.
Starting with the Pro plan, you can customize the color flags to fit your own workflow and make it perfectly clear to your clients what a color flag means: to do this, you can change the name of the color in the Color flags section of your Default Gallery Settings.
A possible version could look like this:
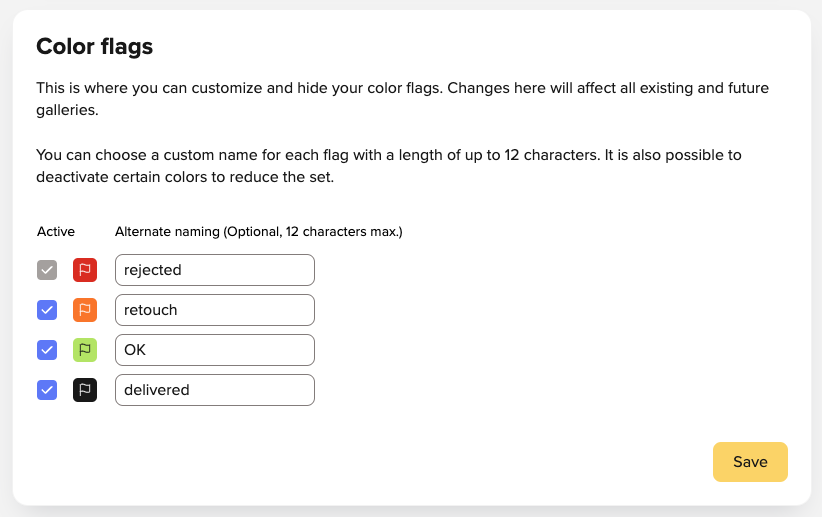
Please do not forget to save the new names for your color flags.
The name you assign to your color flags will then be displayed to you and your clients on every file that has that color flag.
Please note: Renaming your color flags will affect all color flags in your picdrop account. Even existing color flags in previous galleries will be labeled with the new name after saving.
You don't want to use all four color flags? You only want to activate some of them? This is also possible! You can find more information here.
The default settings for your picdrop account include four color flags: red, orange, green and black. They are named no, maybe, yes and final.
If you want to use color flags in your workflow, e.g. only for a simple YES or NO for individual files, you can always deactivate those colors you don't need in the gallery preferences:
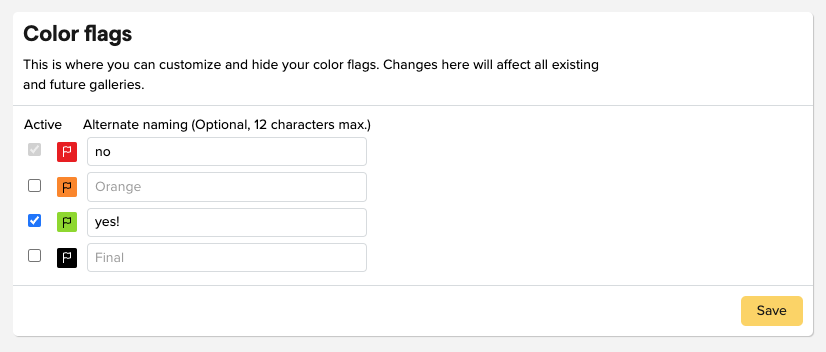
Uncheck the blue checkbox in front of the color flag, like done in the screenshot for the orange and the black color flag. They will then no longer be displayed in all your galleries (including existing ones).
Don't worry: if you have accidentally hidden a color flag, you can of course re-activate it. All files that already had this color flag will keep this color flag.
You want to change the names of the color flags like in the screenshot? You can find the instructions here.
By the way, you can use the function for hiding individual color flags - just like Presentation Mode - starting with the Pro plan.
PS: The red color flag cannot be deactivated. It is needed so that your clients can hide red marked files in Presentation Mode. You can find out how to do this here.
Unfortunately, storing files on Apple mobile devices is not as easy as it is on Android devices. Unfortunately, we have no influence on that. But we want to make it as easy as possible for you and your clients with this guide. Basically, we recommend downloading rather on PC/Macs and not necessarily on mobile devices because our preview function in the galleries on mobile devices is good enough and it makes no difference for your clients if they have downloaded the pictures or not, as long as their mobile device is online and you leave the gallery online for them.
1. open the file in the gallery
2. click on the download button

3. the download screen opens and tells you what's next

4. tap and hold to save it (Haptic Touch) and then press "Add to Photos".
The file is now automatically saved in your "Photos app". You can then find and open it at any time using the Photos app.

1. open the gallery
2. click on the 3 dots in the bottom right corner and choose "Download all files as ZIP"

or choose "Download all files" in the client view

3. confirm the ZIP download in the pop-up menue
4. go to the Downloads folder in the Files app on your Apple device.
(These steps apply for all downloads with devices that use iOS 13 or later versions. For all previous iOS versions, the following note still applies:
after downloading, your files contain a ZIP file. For further processing a ZIP file you or your client need an appropriate app to unpack the files into the Photos app. Winzip is a free tool, which we recommend :-)
If you want to send a gallery to your clients, you can either copy & paste the link to the gallery and send it via any channel. Or you can send a mail using the "Send" button within the gallery. Here picdrop gives you a default general text, which fits every situation, but doesn't look very individual.
If you would like to make this text more personal, you can adjust it in the account settings. Open the part "Your sharing templates" and click on "Create new template".
There you will see the standard text in an editor. In this editor you can customize the mail as you like and save it under a name. Beside the (only visible for you) name of the template and the subject the e-mail is divided into 4 areas:
You can freely edit points 1 and 4 and be creative. It is important that you do not forget to insert the placeholder for the gallery link. All placeholders are already included in our template. However, if you have deleted them and want to insert them again afterwards, you can place them again in the text at any time using the "Insert placeholders" function. Make sure that the placeholders for the "Password" and the "PIN" end up in the respective areas 2 and 3.
You can also freely edit the already mentioned areas 2 and 3.
But: It is important to know that these areas are only inserted into your mail when the respective function is active in the gallery to be sent. The sentence "The password is "password123". (without quotation marks)" is only inserted if a password is active in the gallery. This ensures that you will never forget to send the password for a gallery. picdrop takes care about it for you. The same applies to the PIN to switch to the Edit Mode. So it doesn't make sense to put these topics in item 1 or 4. Just keep them separate and leave the rest to picdrop.
Of course you can create as many templates as you want. Afterwards you can open your templates in the "Share" area of each gallery with one click and save a lot of work with each gallery you send out. When sending, you can then decide whether you want to send the mail via your own mail program or via picdrop.
This function can be used from the Pro plan onwards.
Please note that many mail programs have a maximum character limit and these limits vary quite a bit. The length of the mail usually consists of recipient, subject and body. If your sharing template does not open in your mail program, it is possible that your template is too long - please shorten your sharing template text in this case.
In your account settings ("Your watermarks") you can upload your logo or other graphics and create multiple watermarks with just a few clicks. You can set the place for the watermark and adjust its size and opacity to your needs.
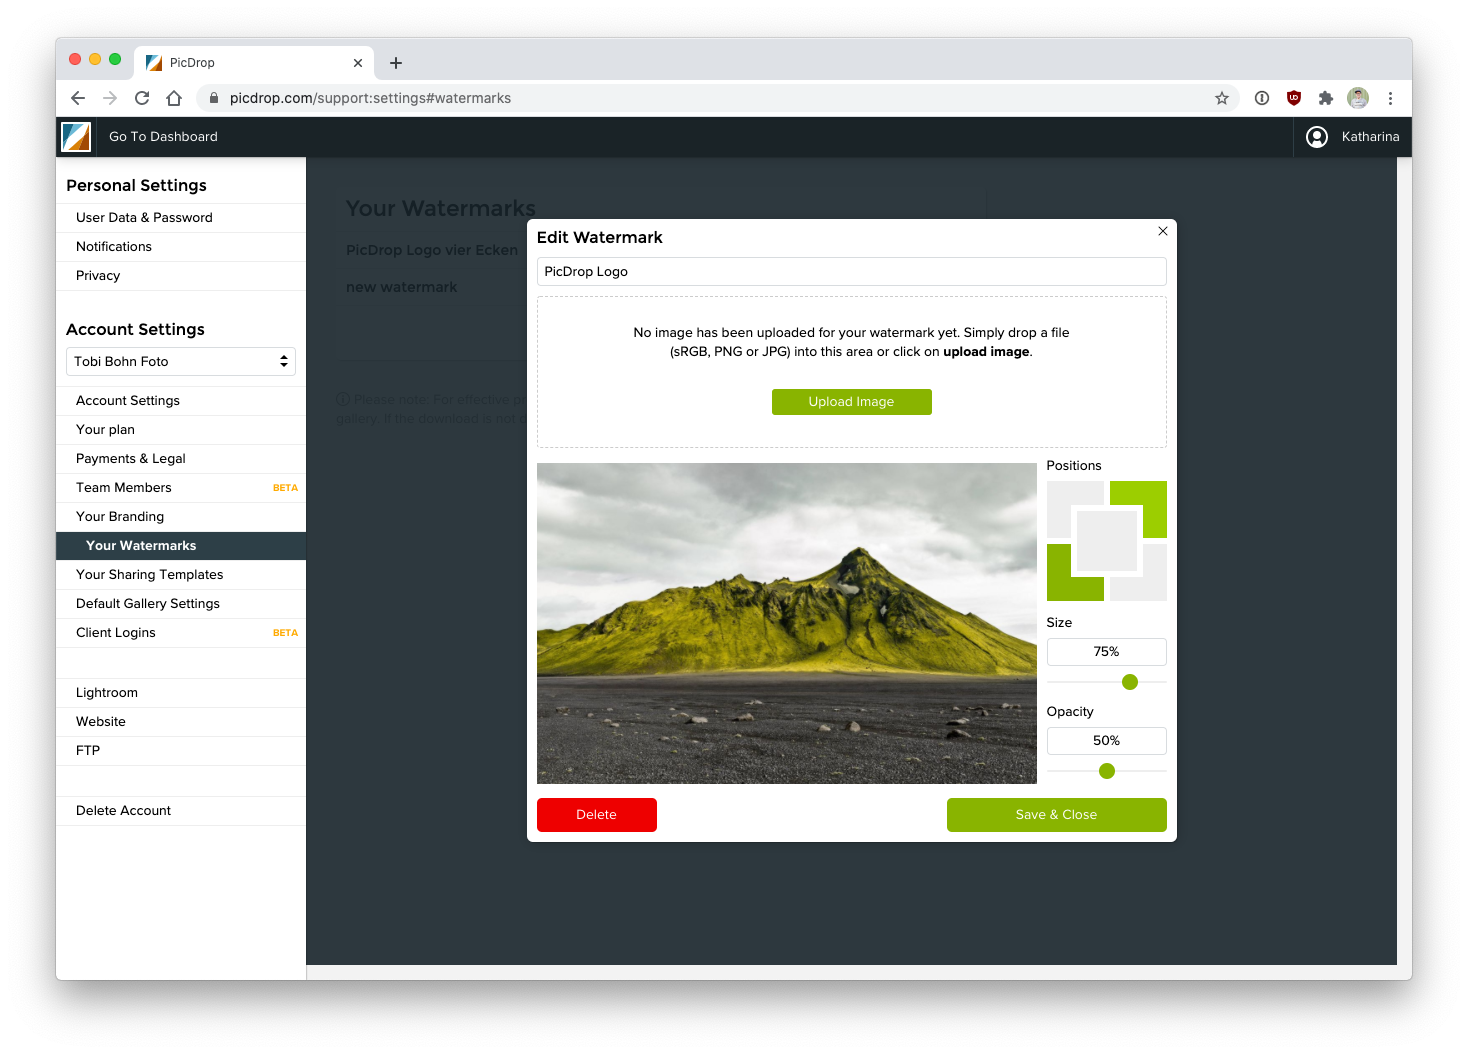
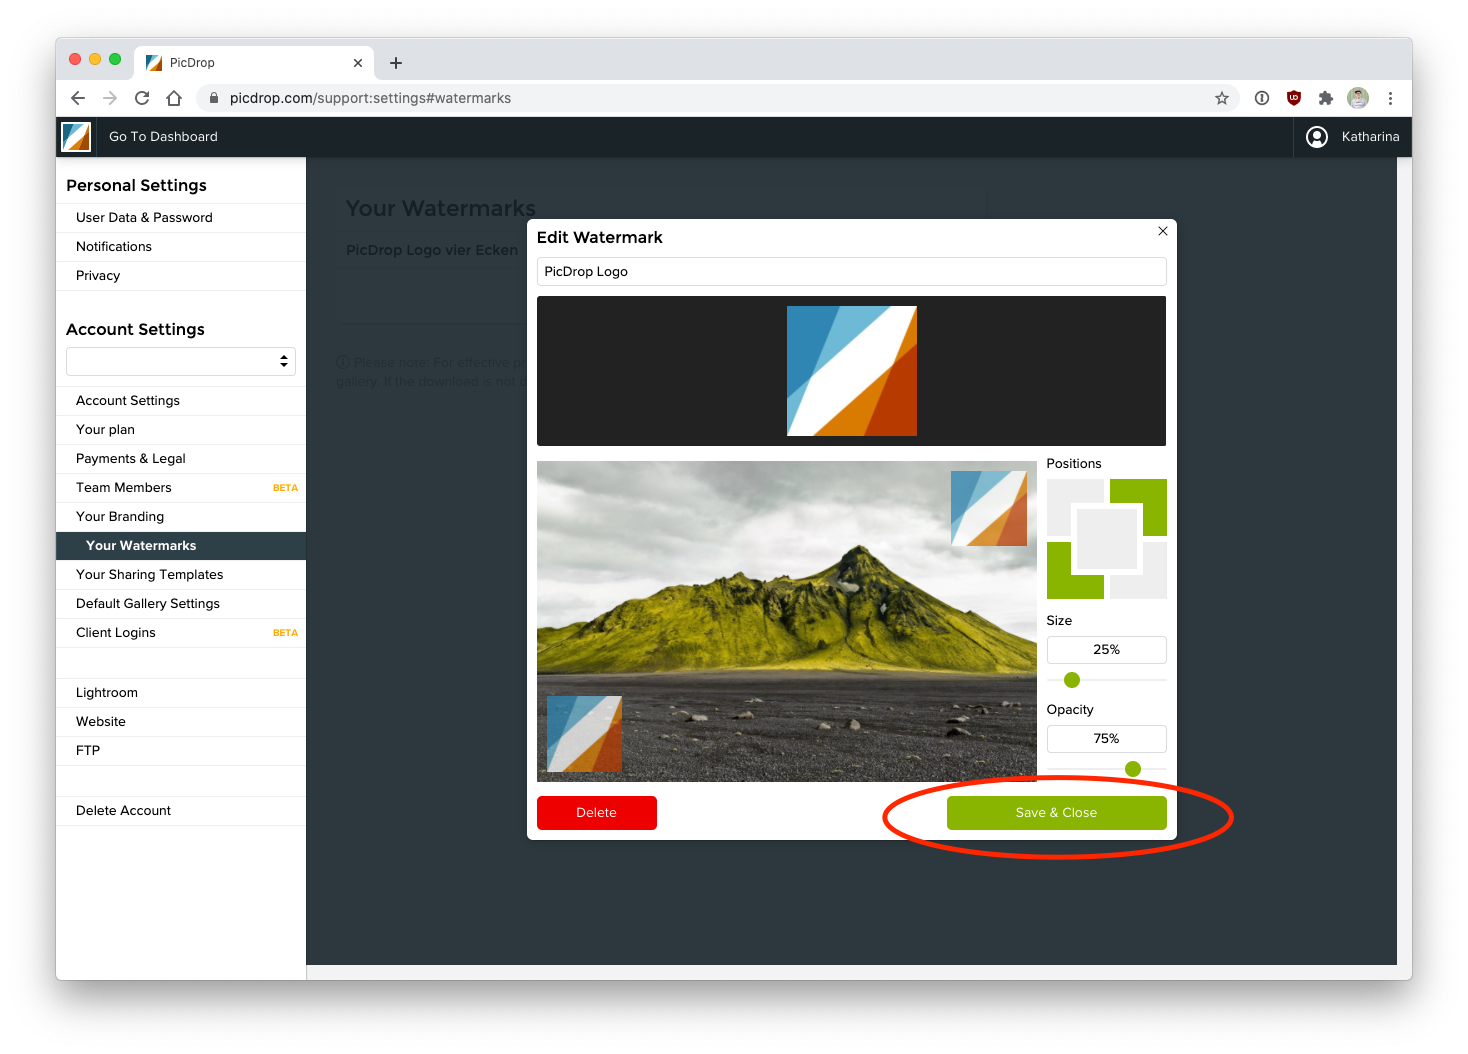
Don’t forget to "Save & Close" your new watermark settings.
To apply watermarks to all the images in a gallery just navigate to the gallery settings of each gallery. You can activate your watermarks in the "Security" section of your gallery settings.
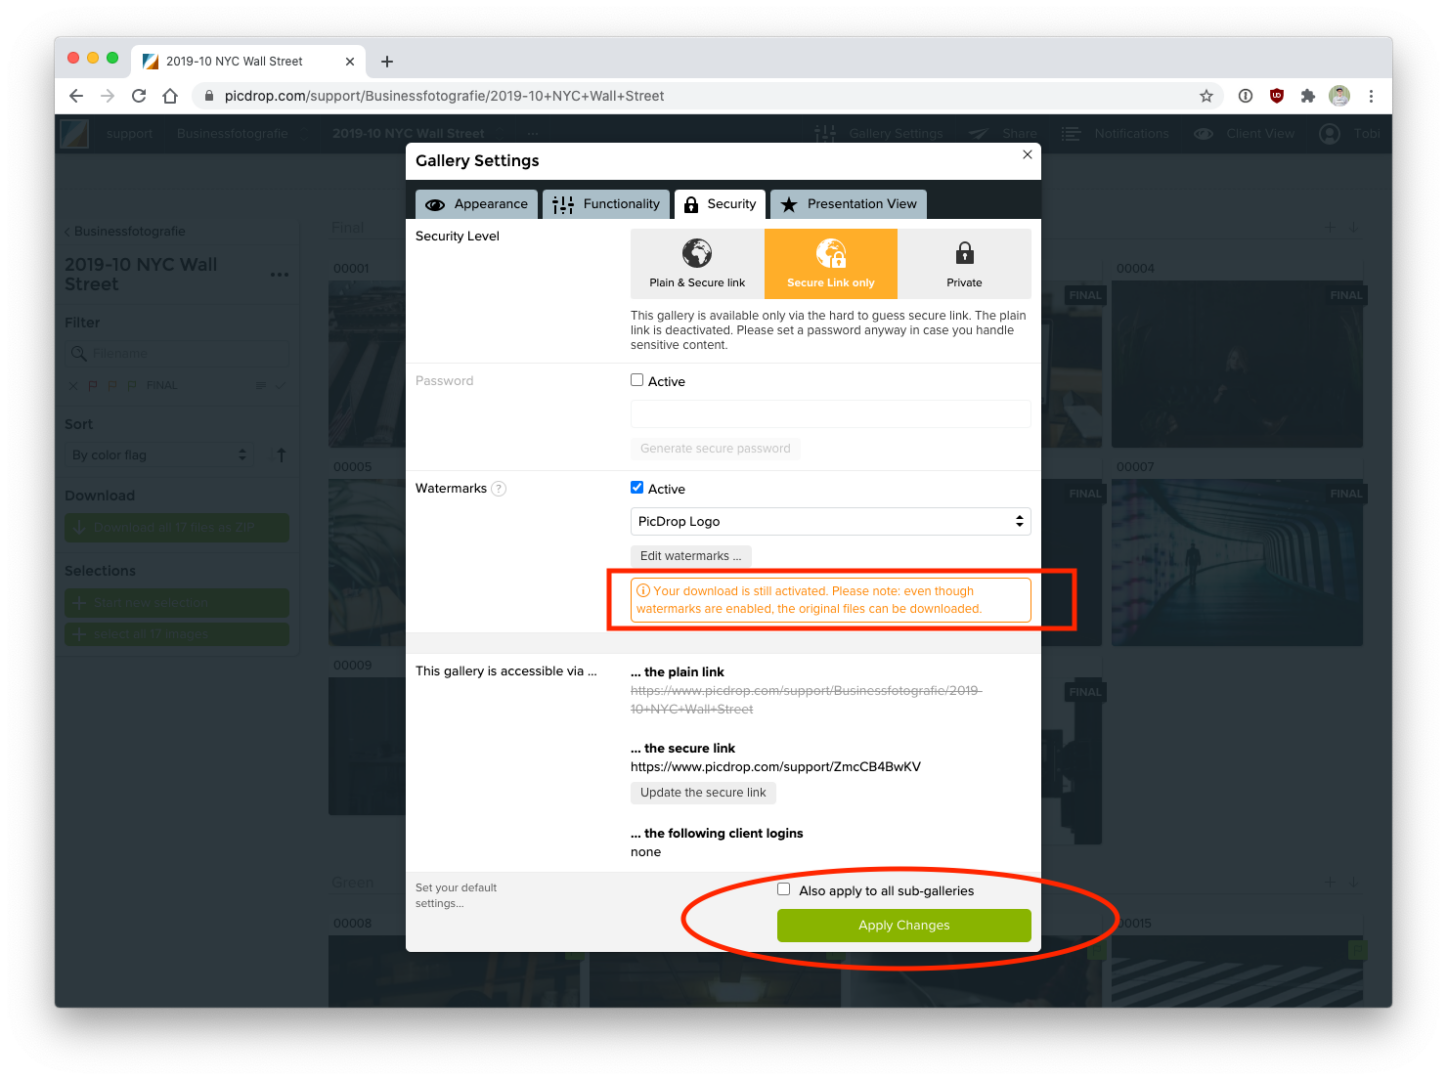
After you hit "Apply Changes" wait for a few seconds to see the watermarks appear on each preview image in your gallery. It couldn't be easier.
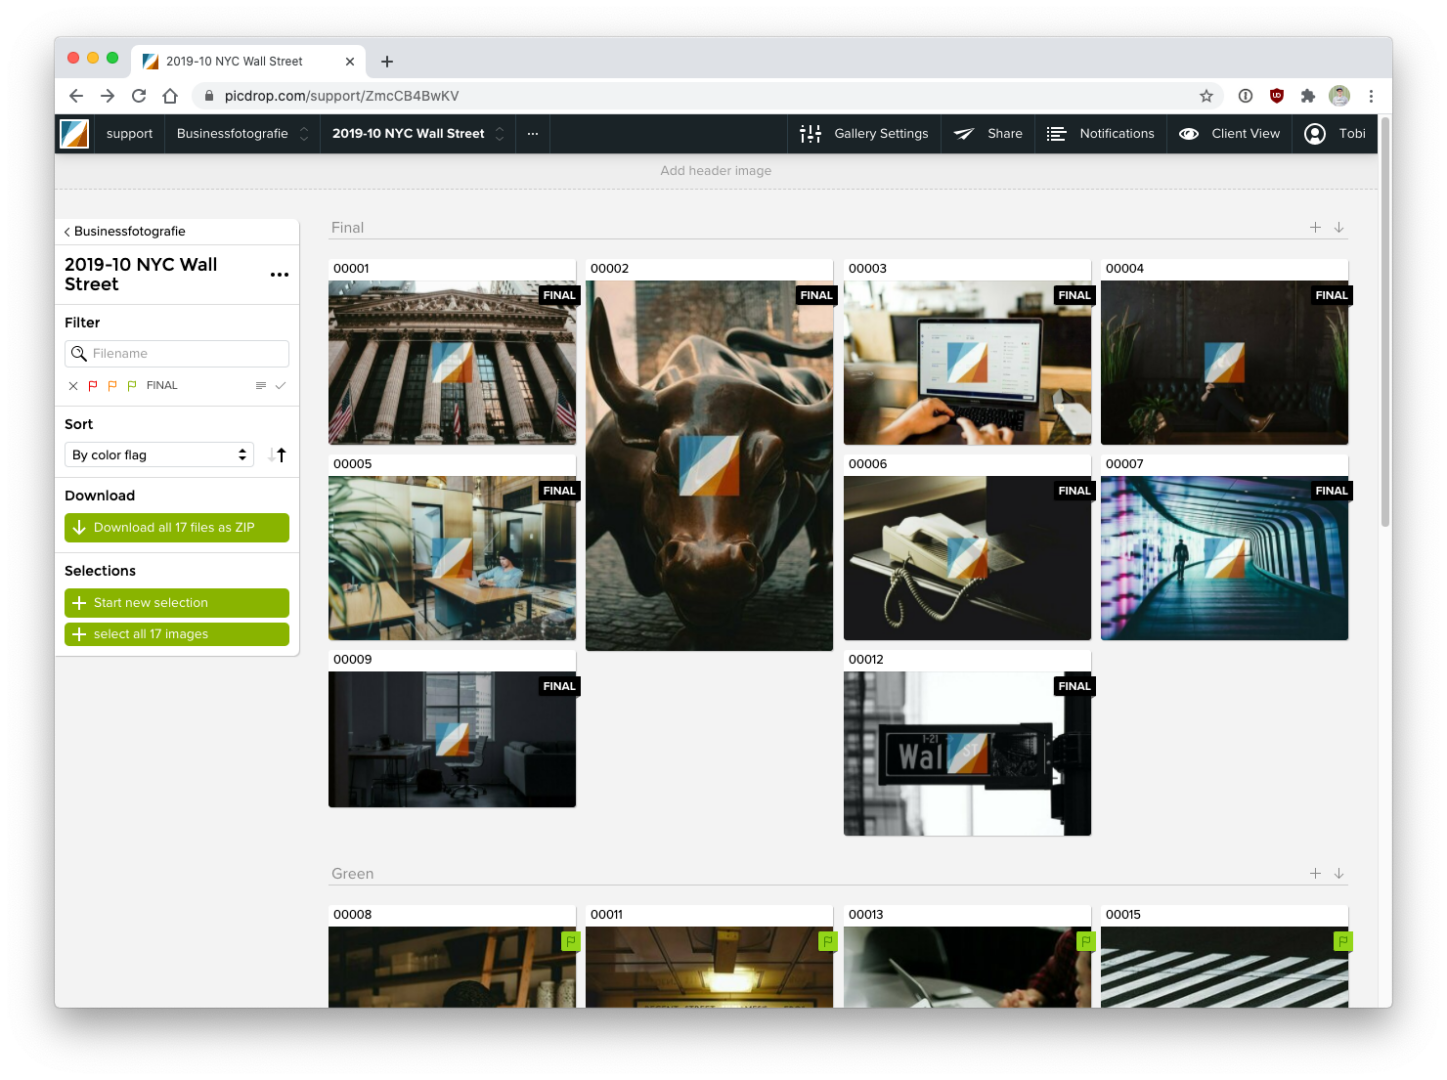
Note: the watermarks will “only” protect the thumbnails and previews in picdrop, so your clients can’t take screenshots or steal the pictures in other ways. If you activate the download of the original images at the same time, these will not be protected by watermarks because picdrop will never modify your originally uploaded images.
Find a German introduction video to our watermarks here:
With picdrop you can also use shortcuts. This saves you a lot of time and it is also much easier for your clients to make a selection quickly. Here are the most important shortcuts and key combinations:
You can use these keyboard shortcuts in the large image view:
| 0 | remove color flag |
| 1 | add red color flag |
| 2 | add orange color flag |
| 3 | add green color flag |
| 4 | add final flag |
| L | add / remove like |
| S | add file to set |
| X | Scribble Mode |
| D | Download file |
| M | Magnifier |
| R + Enter | Delete file |
In the overview of all files within a gallery, you can use the following keyboard shortcuts if you hover your mouse over a file at the same time without clicking on it.
| 0 | remove color flag |
| 1 | add red color flag |
| 2 | add orange color flag |
| 3 | add green color flag |
| 4 | add final flag |
| i | Show file info |
| S | Add file to set |
| D | Download files |
| Cmd + A | Add all currently displayed files to set |
| Cmd + D | Deselect all currently selected files |
Please note, the mouse is not used for selecting/deselecting all files (last two shortcuts).
| Shift | select files |
| alt | deselect files |
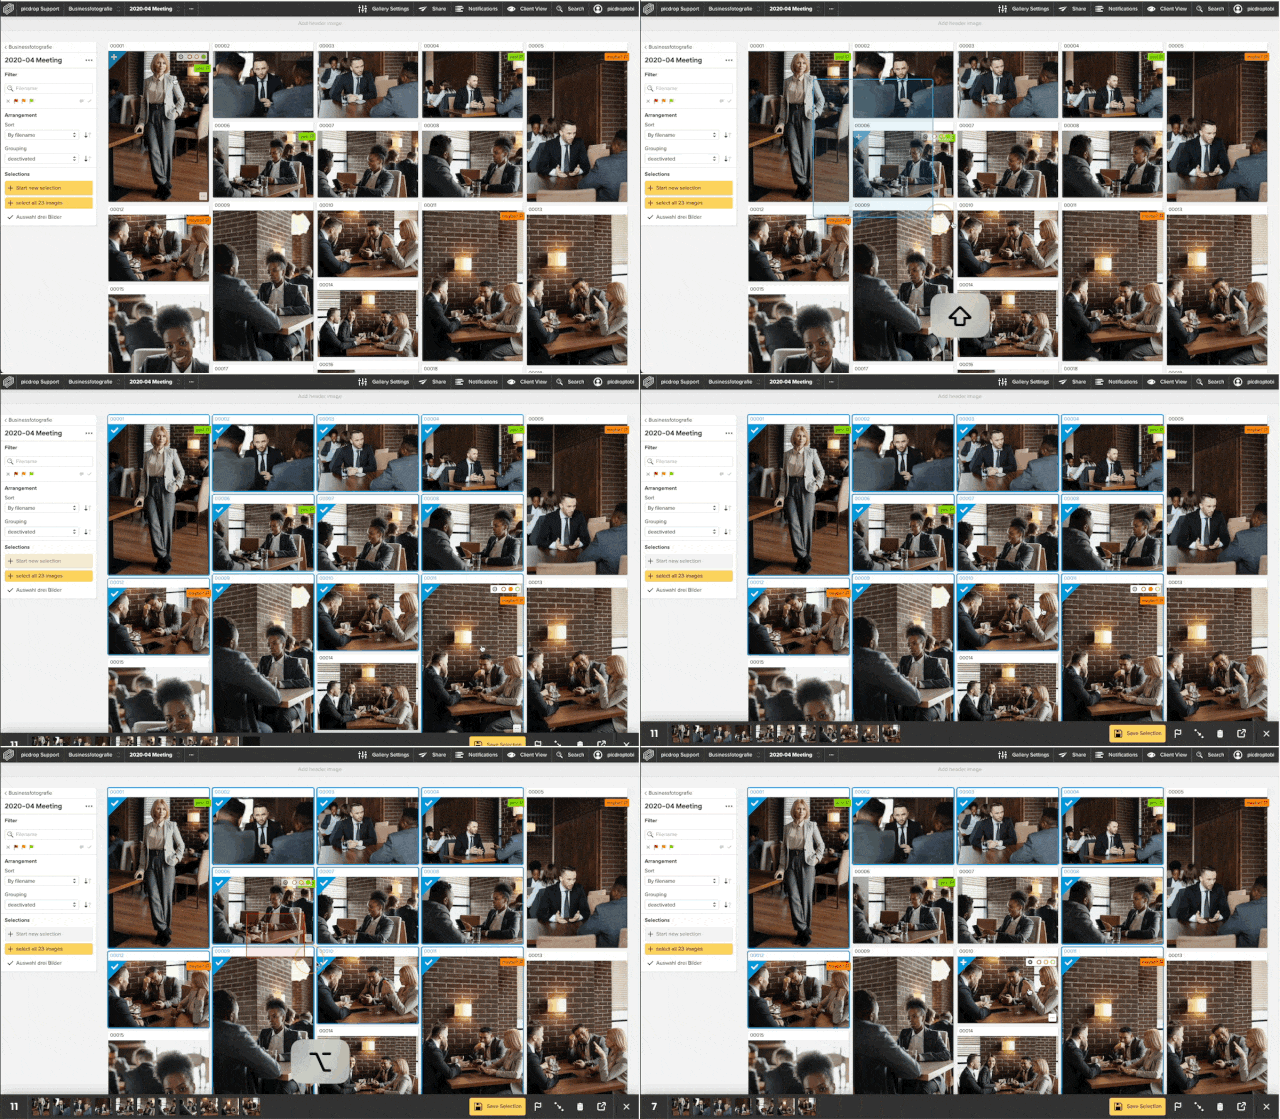
With the Shift key held down, you can click the left mouse button anywhere in the voting mode and draw a blue selection frame. Any file inside the frame will automatically end up in your set bar at the bottom.
With the alt key pressed, you can draw a red frame with the mouse, which works the other way around: all files in the red frame are removed from the current selection at the bottom of the screen.
There are several ways to rename a gallery:
Please note that renaming a gallery will not change the external link of your gallery. If you want to change the external link you can find all the options in the gallery settings in the Security tab. You can find all the details here: The gallery settings in detail.
There are three ways to delete a gallery from your picdrop account:
Important: You must be logged in to your picdrop account in order to delete galleries. It is not possible to delete a gallery as a visitor.
Have you accidentally deleted a gallery? Don't worry! At the bottom left of your gallery overview you will find a recycle bin from which you can restore deleted galleries for a short period of time.
Each gallery you create in picdrop can have a gallery image.
You see the gallery image as an icon for the gallery – just like a cover page.
You are logged in as admin in your picdrop account.
Then you can see the gallery images here:

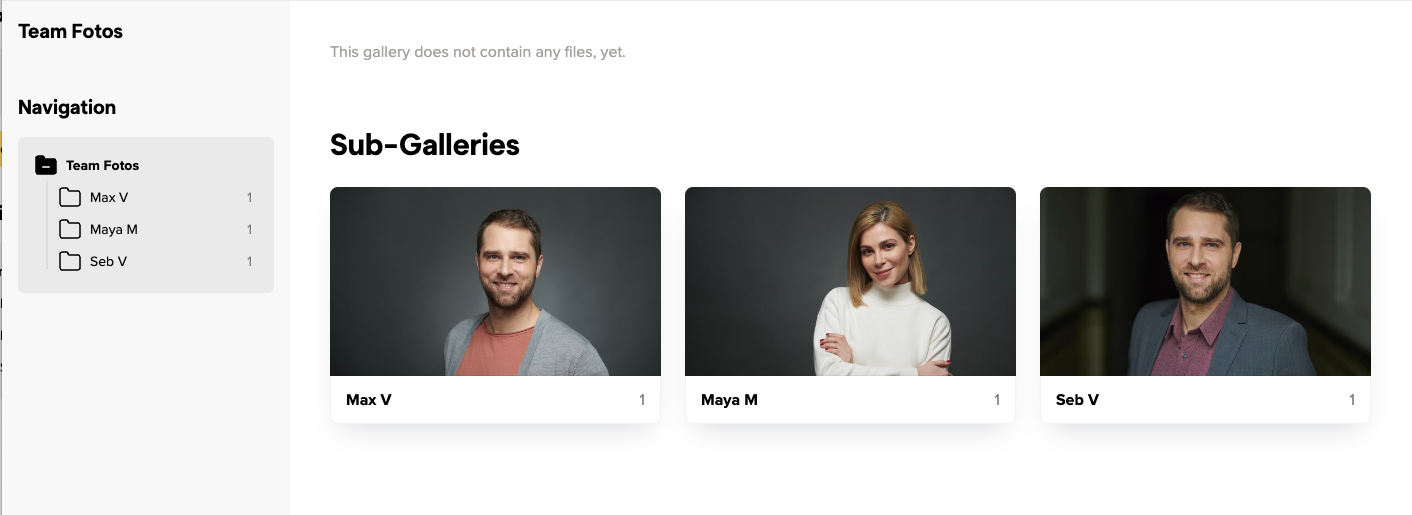
In a gallery that contains subgalleries, visitors will see the gallery images for those subgalleries.
It looks like this for your customers:
Do you work with client logins?
Then your customers will also see the gallery images in their personal gallery overview after they have entered their access code.
We always take the first image loaded into the gallery and automatically set it as the gallery image for you.
Galleries that do not contain images therefore do not get an automatic gallery image. They will be displayed with a folder icon instead.
This happens e.g. with galleries that you use for better organization and that do not contain any images themselves, but only sub-galleries.
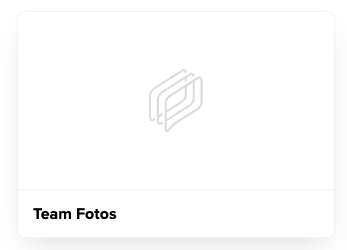
You can set the gallery image yourself for each gallery – this means you overwrite the automatically created gallery image or you replace the folder icon for empty galleries with a better fitting image!
You can change the gallery image in these places:
Click on the three dots at the bottom of the desired image – select "Set as gallery image", confirm with the green Save button, done!
In the same menu you can also click on "Upload image" and set an image from your computer directly as a gallery image. You don't have to upload the image to the gallery.
As a gallery image you can use a picture that is not in the gallery itself.

In your gallery overview, click on the three dots at the bottom right of a gallery or next to the gallery name and select "Set gallery image". You can now upload an image from your hard drive as a gallery image – you don't have to upload the image to the gallery to do this.
If you want to use an image that is already in the gallery as a gallery image, see the description above at 01.
One more tip:
In the menu with the three dots of the gallery you can also delete an already existing gallery image – then the folder icon will be displayed. If you want to chose another gallery image you can do so as described in the sections 01 and 02 above.
We automatically choose a section directly from the center of the image for the gallery image. With a little trick you can create the exact fitting image and upload it as gallery image:
Export from Lightroom (or any other program) an image with a crop in 16:9 format and at least 800px width - upload it as gallery image for your gallery directly from your computer. This way it will fit perfectly into the frame for the gallery image!
Of course, this does not only work with photos: You can also upload your own designs, lettering, etc. as JPG or PNG and use them as gallery images!

To delete multiple files at once, select the files and click on the delete icon in the lower right corner.
To select multiple files at once, press Shift, click the left mouse button and draw a blue selection frame anywhere in edit mode. Any file that is inside the frame will automatically go into your set. The files in the set can then be deleted with one click.
The sub-galleries of a gallery are automatically sorted alphabetically. In many cases it can be helpful to sort the sub-galleries indivdually. For weddings and other events, you may want to reflect the chronological sequence of events in the order of the sub-galleries.
To set the order of the sub-galleries, open the main gallery in which the sub-galleries are located.
As soon as the gallery has more than one sub-gallery, you will find a button for sorting right below the navigation window. Simply change the mode from "Sort alphabetically" to "Sort manually".
Now you can freely determine the order of the sub-galleries using drag & drop.
The galleries in your picdrop account can be either private or externally available.
If you set a gallery to private, this gallery will only be visible to you as the owner of the picdrop account when you are logged in.
If you set the gallery to be available externally (and this will be true in most cases, because you want your customers to be able to see their galleries), then we will always automatically create a randomly generated link for each gallery. This link consists of a random combination of numbers and letters.
For example, an externally available link may look like this: https://www.picdrop.com/username/sKdzPJbtGD
No problem - you can change the randomly generated link for a gallery at any time!
Just type the desired name into the field for the custom link. Save the custom link with the button Apply Changes and from now on the gallery is only accessible via this custom link.
This is how a custom link can look like: https://www.picdrop.com/username/2021-12-XMAS-Shooting-outdoor
You can use the button Insert gallery path as custom link, which you will find directly below the field for the custom link, to automatically insert the name or the entire path to your gallery as a custom link.
ATTENTION The simpler the structure of your custom link, the higher the probability that third parties can get access to your galleries by mere guessing of the link.
That is why we advise you to use only the automatically created, randomly generated links for your galleries.
If you do decide to use custom links, please always use a password for your galleries so that no one can get into your gallery by simply guessing the gallery link.
You can find the current gallery link in three places:
If you have set a password for the gallery, you will find it in the gallery settings or via the send button!
If your client adds new color flags to your files or changes or removes existing ones, you will always receive an email. All new color flags or changes to existing color flags are listed in this mail. Existing color flags that have not changed are not listed there. You can view them at any time in the gallery. The email is always sent 5 minutes after the last color flag was changed.
If you no longer want to receive these emails anymore, you can deactivate them in the notifications section of your account settings.
There are many different reasons why a video cannot be played in your picdrop account.
Below you will find a list of possible reasons:
If you upload a new video and your plan limit allows the processing of a streamable video, picdrop will automatically process different versions of your video, which can then be streamed in your gallery with one click.
This process is very time-consuming and takes about 1 minute per minute of uploaded video material. After the processing is finished, your video is automatically updated and streamable with one click.
Your plan includes a maximum monthly volume of video minutes that can be automatically processed into a streamable video after an upload. The maximum amount of video minutes that can be processed within your plan can be checked in your account preferences. Here you will also find information about the minutes you have already used. If you have already used all your video processing minutes included in your plan, your volume will be topped up again on the 1st of the next calendar month – or you can simply book more monthly video minutes.
The video feature in picdrop was introduced in November 2022. Videos uploaded before that date cannot be streamed. If you want an existing video to be streamable and you are on a plan that includes video streaming you can easily download the video using the download button and then re-upload it. It will then be considered a new video and will be newly processed and made streamable. Please note that the processing of the streamable version will then be deducted from your monthly volume of video processing minutes (see 2.).
Depending on which picdrop plan you use, there is a time limit on how long a video can be to be playable in picdrop. This limit lies at 15 minutes for the Pro plan and 30 minutes for the Business plan. If your video file exceeds this time limit, streaming in picdrop is not possible. In order to watch the video your clients will then have to download it from picdrop first.
In our list of supported file formats you will find an overview of all video formats that picdrop currently supports. Please note that a file extension does not necessarily indicate which codec was used to encode a video.
Nobody is infallible - not even us. If none of the given solutions fit your problem, please write us at hello@picdrop.com and tell us the link to the gallery and the file name directly. We will then take a closer look. Thank you!
Every smartphone and tablet should automatically display the better, mobile version. To switch to the mobile version, tap on the white menu at the bottom right. There you can switch to the desktop view. If you want to switch back from the desktop view, you will find a corresponding option above the gallery.
Yes, of course!
If you are at a wedding, at an event or in a personal conversation with a client, you don't have to send your gallery link via WhatsApp or email – or even have it typed out character by character. Instead, you can find a QR code in the gallery's sharing menu for precisely this purpose.
You can display the QR code on your screen, where it can be scanned immediately by other people using any smartphone camera.
Of course, you can also download the QR code to print it on flyers, business cards, etc. or send it by email.
In a QR code, very different information can be stored in a pattern of black and white squares. This works very similarly to a barcode in the supermarket. The information is stored directly in the pattern of the QR code. The special thing about QR codes: the information stored in a QR code can be read quickly and easily with the camera app of any smartphone.
In the QR codes that are created for your picdrop galleries in the share menu, the link to your gallery is stored in such a way that it can be read with any smartphone. From there, it can be opened directly in the browser.
Would you like to share the link to the gallery directly with the people present during a shoot, for example? Then open the QR code in the gallery and let people scan it directly with their smartphone camera.
If you change the link to one of your galleries, the QR code found in the sharing menu for this gallery will also change automatically.
If you have already shared a QR code for a gallery and now change the gallery link, you must also share the QR code again. The old QR code still refers to the old link, which no longer belongs to the gallery.
You've probably seen how to filter out your clients' image sets in Lightroom, Capture One, Photo Mechanic, Finder, and Explorer. The whole thing is not only possible with image sets but also with all color-coded images.
Many image editing programs allow you to use the file search to display exactly the images of an image set you or your clients made in picdrop. This saves you the trouble of searching for each individual file. Here we show you how to do it:
Filter out all images with the desired color flags using the filter function on the left side. Now you see only the images with the desired color flag.
Click on "select all images" (bottom left) or use the keycombination of cmd-A or Ctrl-A to select all currently displayed images.
You have now created a set that you can use to filter out the images locally on your mac / PC.
Click on the "Export selection" icon in the set menu, bottom right. When you are logged in to your account you will find the various filter texts to filter out this set in Lightroom, Capture One or in your Finder / Explorer.
Optionally, you can save this selection permanently in picdrop to make it easier to find it again later.
Once you have copied the list of filenames to your clipboard, please continue on your computer in your tool of choice:

You can now save the filtered images in a new collection or mark them with stars / colors for your further workflow.
In Capture One, you can search for your images in multiple places using the exported folter text. To do this, open a folder or collection in Capture One with the images you want to filter. Then you have three options:

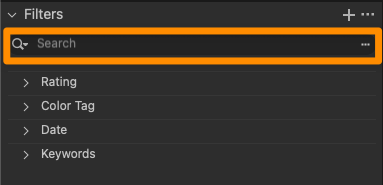
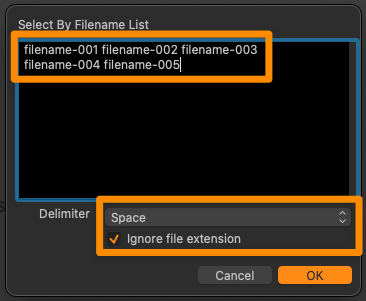
Done! You can now save the displayed images as your own collection or mark them with a color / stars.
Open the corresponding project folder in Photo Mechanic.
Paste the filter text from your clipboard into the search box (via Edit > Find... menu or cmd-F on Mac or Ctrl-F on Windows) and set the following search options:
After clicking "Find" in the lower right corner, Photo Mechanic will now select all photos of your choice from picdrop and you can continue working with them.
Please note that the search in the upper left corner of Photo Mechanic ("Search my Mac") cannot be used for these steps.
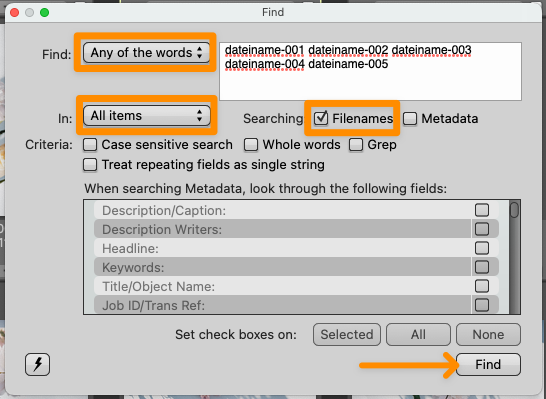
Please note that the filter text in Explorer can only hold a maximum of 259 characters.
The filter text in Finder is limited to 2048 characters or 99 files.
Many image editing programs allow you to use the file search to display exactly the files of a set you or your clients made in picdrop. This saves you the trouble of searching for each individual file. Here we show you how to do it:
Open the set in the gallery that you want to filter out on your computer. Or mark the files with the set tool (blue plus sign in the overview of your gallery).
Click on the "Export set" icon in the set, bottom right. When you are logged in to your account you will find the various filter texts to filter out this set in Lightroom, Capture One or in your Finder / Explorer.
Copy the corresponding file list / filter text to your clipboard.
Now continue on your computer in the program of your choice:

You can now save the filtered files in a new collection or mark them with stars / colors for your further workflow.
In Capture One, you can search for your files in multiple places using the exported folter text. To do this, open a folder or collection in Capture One with the files you want to filter. Then you have three options:

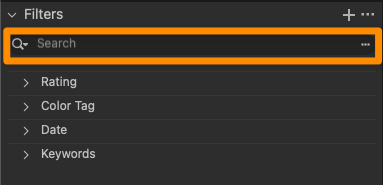

Done! You can now save the displayed files as your own collection or mark them with a color / stars.
Open the corresponding project folder in Photo Mechanic.
Paste the filter text from your clipboard into the search box (via Edit > Find... menu or cmd-F on Mac or Ctrl-F on Windows) and set the following search options:
After clicking "Find" in the lower right corner, Photo Mechanic will now select all files of your choice from picdrop and you can continue working with them.
Please note that the search in the upper left corner of Photo Mechanic ("Search my Mac") cannot be used for these steps.
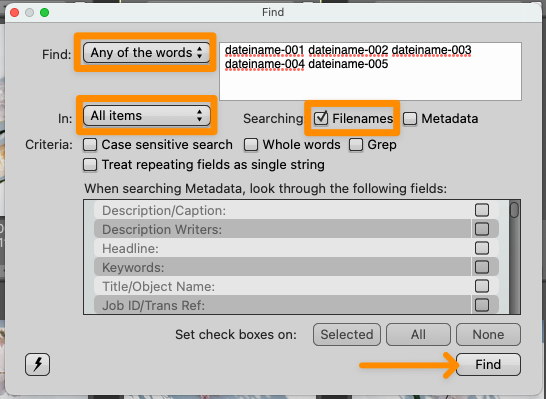
Please note that the filter text in Explorer can only hold a maximum of 259 characters.
The filter text in Finder is limited to 2048 characters or 99 files.
You can easily move or copy files from their current gallery to another gallery in picdrop.
This is a step by step guide on how to do this.
First select the files you want to move or copy. To do so, click on the blue plus sign that appears in the upper left corner of the file when hovering the mouse over it.
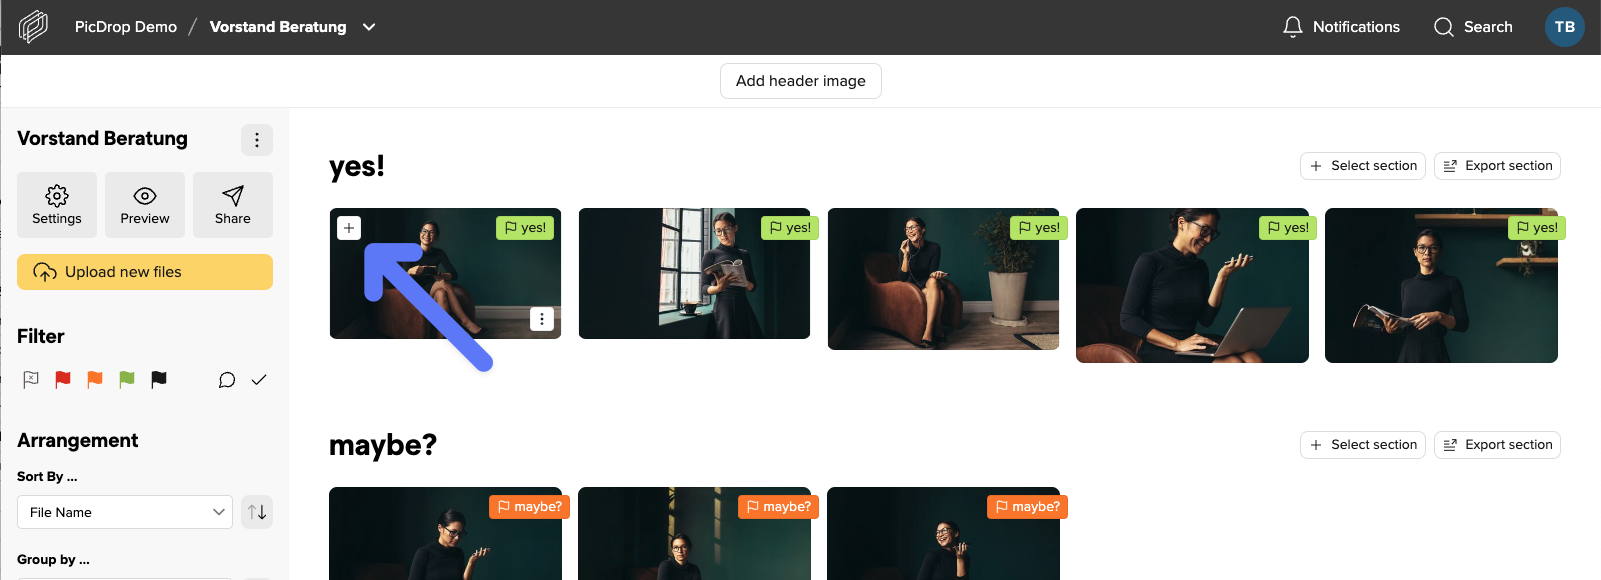
Pro tipp: You can also quickly select any number of files to copy or move from a saved set or any filter set in the filter bar.
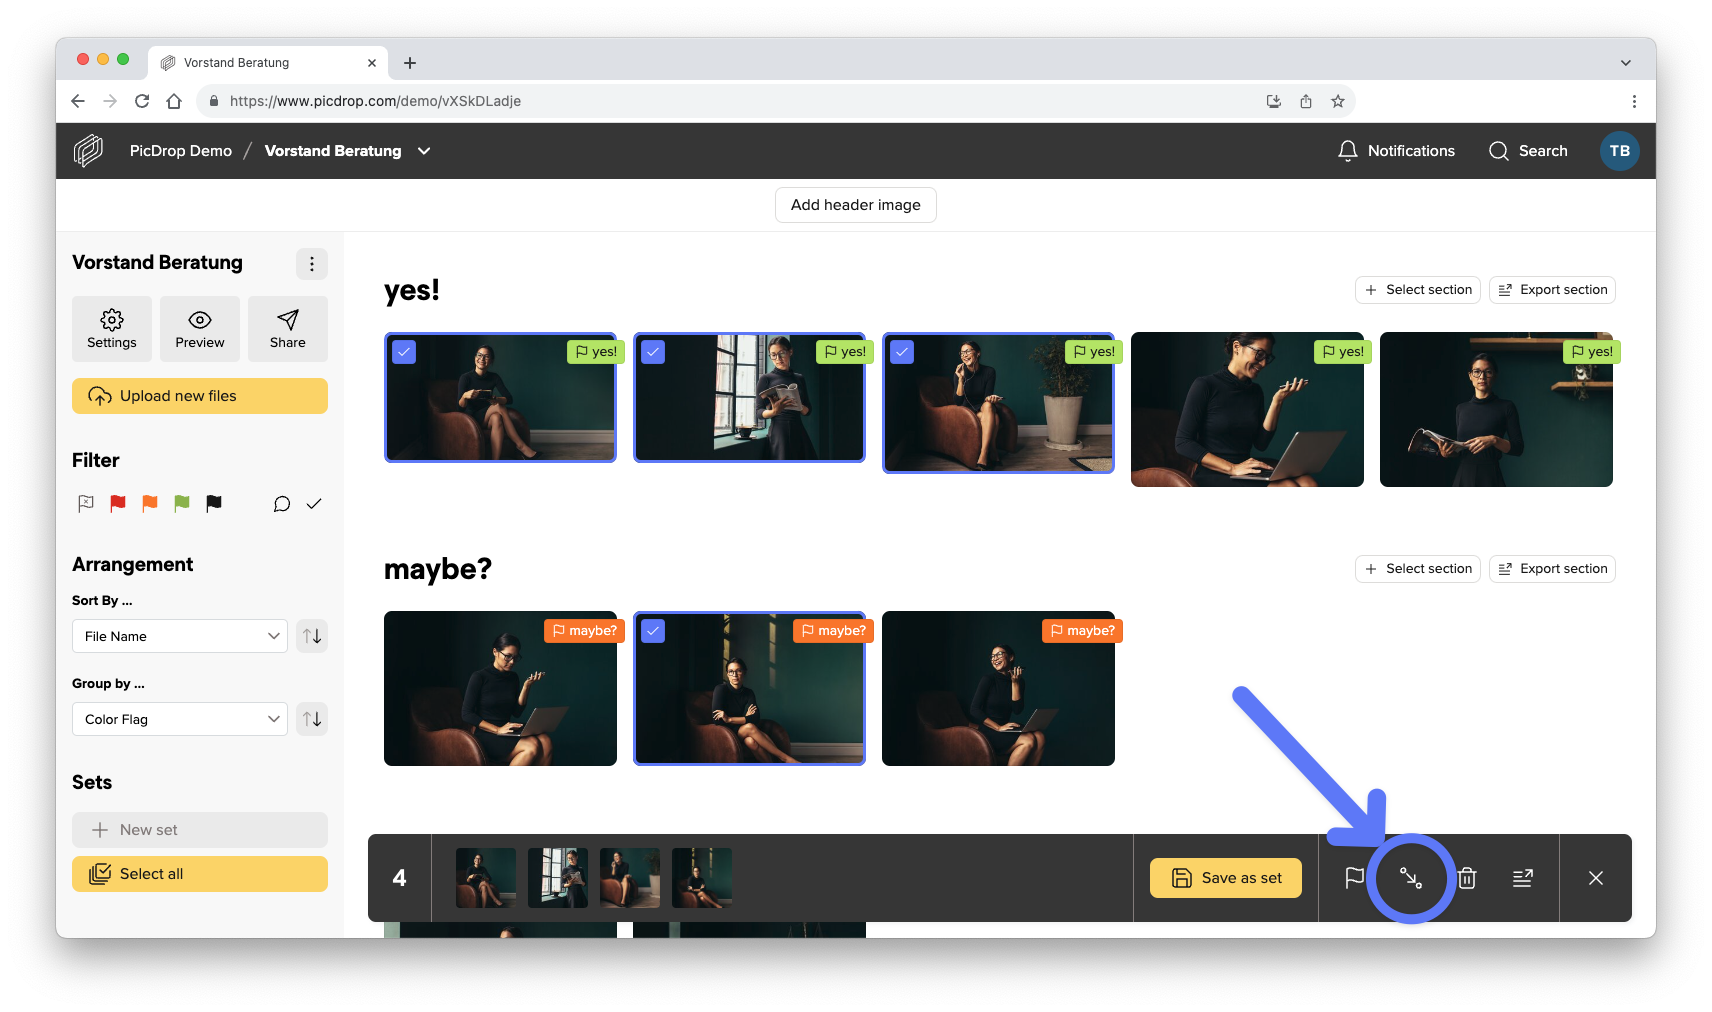
When you have selected all files, click on the Move / Copy icon located in the export bar at the bottom of the screen.
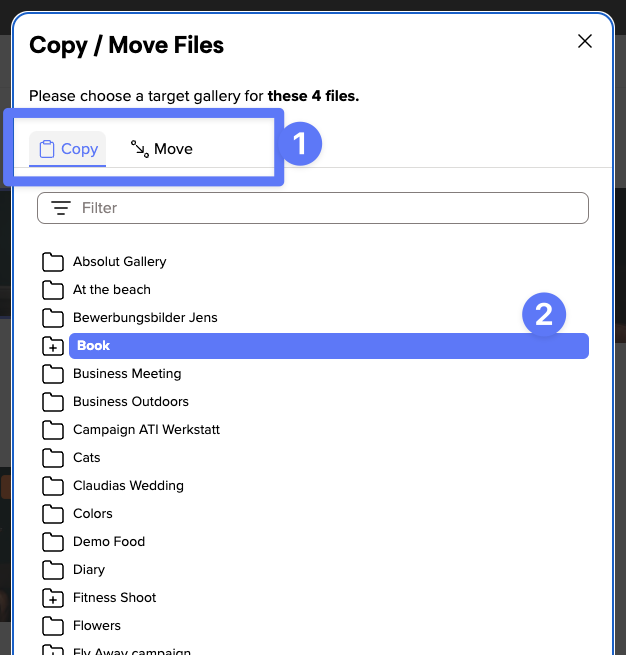
In the opening menu you can now choose whether you want to move or copy the files.
Select the desired target gallery in the list of your galleries or simply create a new gallery in the lower left corner.
Confirm the selected action with the button at the bottom right.
The success message shows you that all files have been copied or moved.
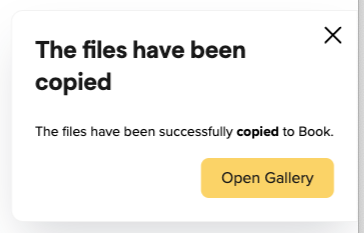
With a click on the button "Go to target gallery" you will be taken directly to the target gallery.
We have included this feature of analogue photography in picdrop, so that every photographer has the possibility to save a contact sheet of his or her galleries from within picdrop. There, e.g. printed out, notes can also be entered by hand.
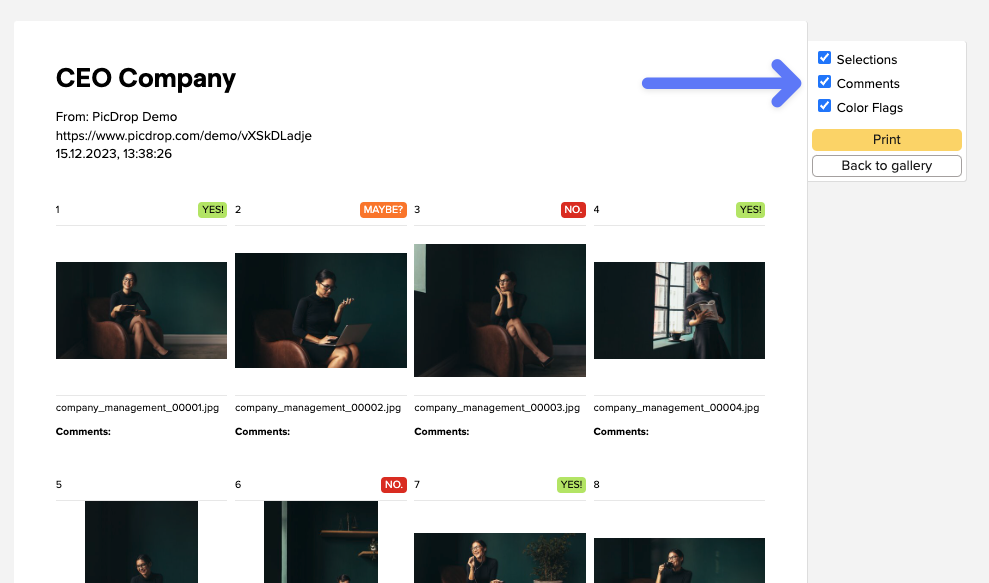
A contact sheet is a great way to compare, evaluate and get an overview of your images - exactly because the images are shown in a small size and all together.
On the contact sheet you have all images of the gallery at a glance and can also choose whether the color markings, comments and selections from picdrop should be directly visible.
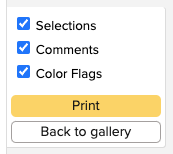
The contact sheet always contains all images of your gallery, as already in analogue times the whole film roll was content of the contact sheet.
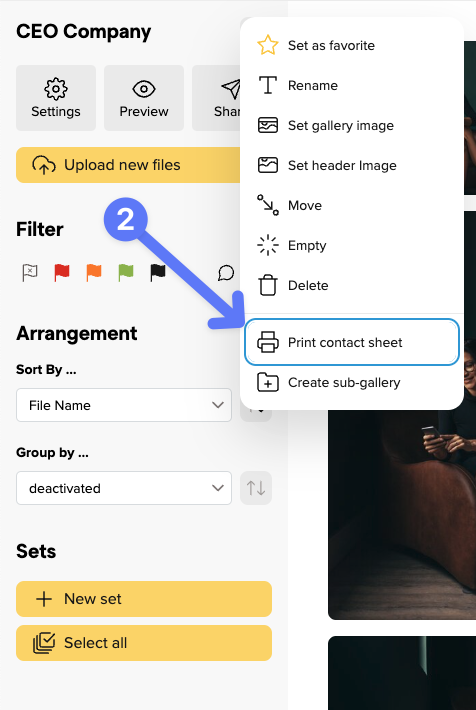
You can create a contact sheet in every gallery by clicking on "print contact sheet" in the gallery menu...
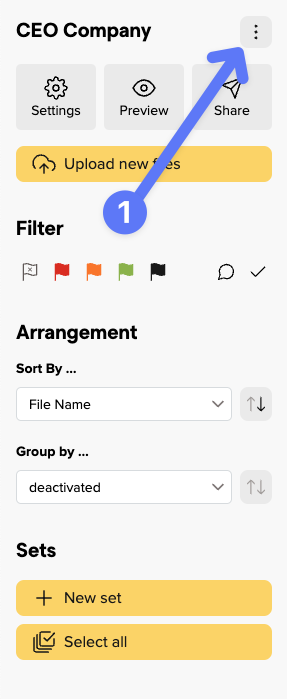
... and then either print it, or save it as PDF with the help of the system dialogue.
There are multiple ways to upload images to picdrop when working with Photo Mechanic.
Export the images from Photo Mechanic to your hard disk and upload them from there via drag and drop in your browser.
You can upload images directly from Photo Mechnanic to picdrop. Simply select alls the images and drag and drop them from Photo Mechanic to the gallery in your browser.
Attention – FTP upload is only available for picdrop accounts registered before June 2022
it is also possible to upload images directly from Photo Mechanic to picdrop. picdrop supports direct upload via FTP and thus all programs that offer an FTP upload.
Here are the necessary steps for a successful upload:
1. Select the images to upload
2. Click on "File" - "Upload...." or "FTP Photos as..."
3. Select "SFTP" as uploader and set all necessary file preferences.
4. Click on "Connections..." and set up your connection here. All the necessary details can be found here.
5. Close the connection and click on "Send" in the lower right corner of the main window.
6. Watch how your pictures are uploaded.
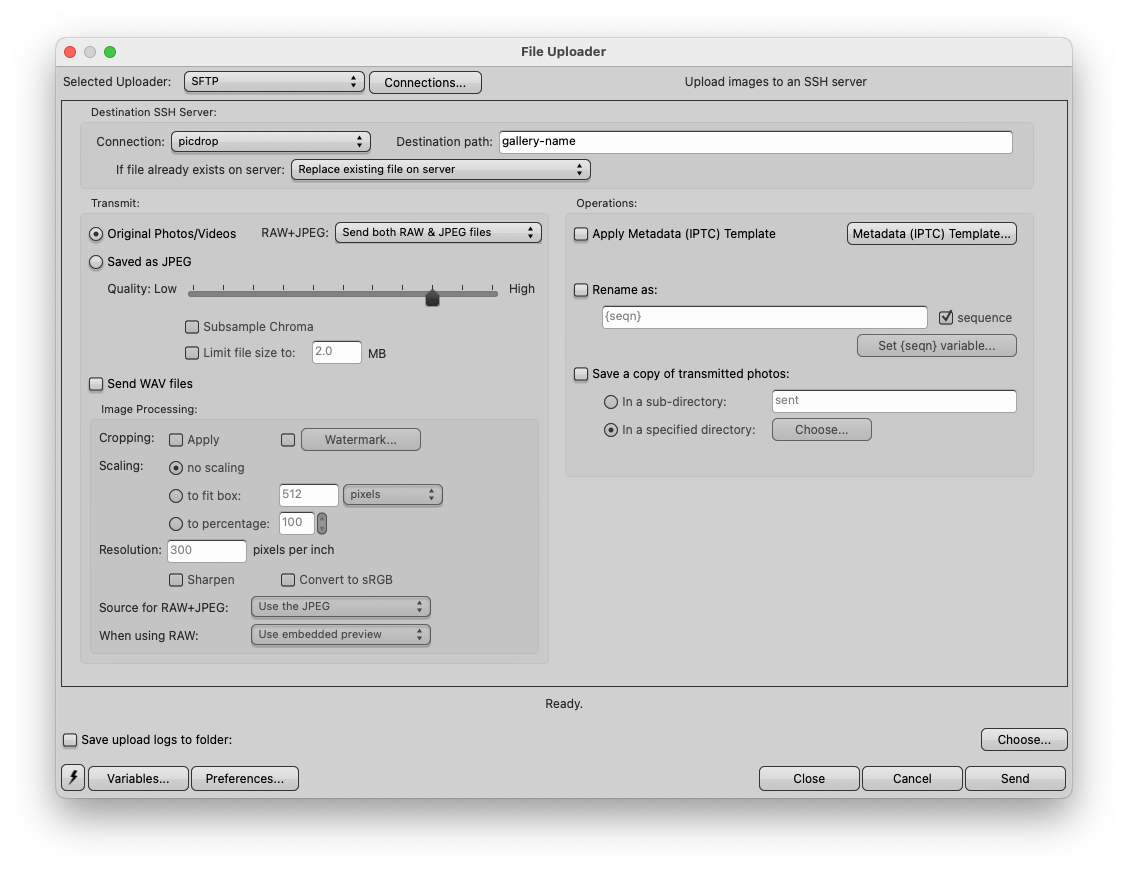
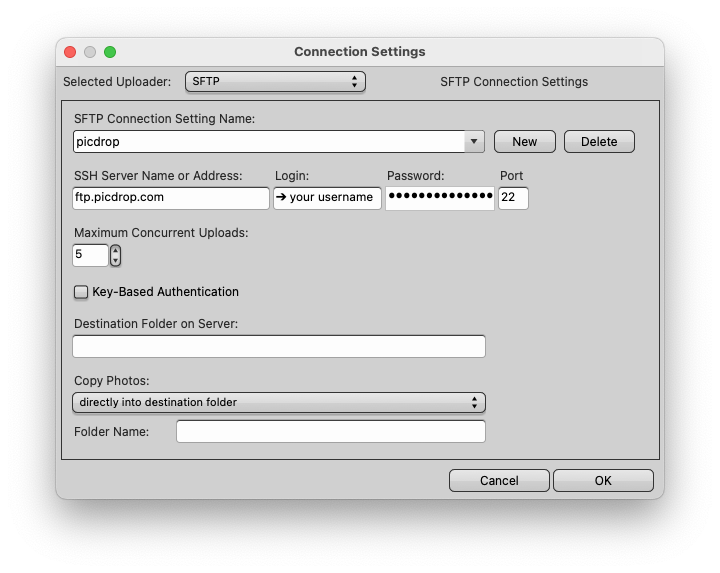
Every gallery you create in picdrop can have a header image. The header image is the first thing you and your gallery visitors see at the top. In Edit Mode the header image is displayed in a narrow landscape format across the entire width. If your gallery starts in Presentation Mode, the header image is displayed as an opener across the entire browser window.
No - unlike the gallery image, which we automatically create for you as soon as you upload images to a gallery, the header image for a gallery is not set automatically. So you are free to decide if you want your galleries to have a header image and which image you want to use for it.
For each gallery you can set the header image in several ways. You can choose a header image that is already uploaded to the gallery. You can also upload an image directly from your hard drive, without it having to be in the gallery.
You can change the header image in these places:
Click on the three dots on the desired image and select "Set as header image" from the menu. In the next step, set the focus point for the header image. Confirm everything with the yellow "Done" button and the header image will be displayed in the gallery.
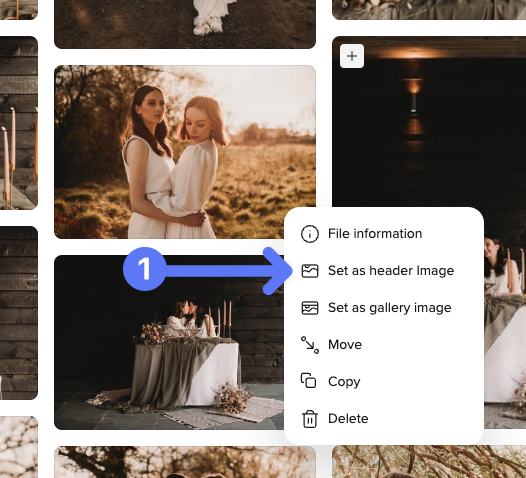
Alternatively, you can simply drag and drop the image into the header image bar at the top of the gallery.
Then just click the gray "Add header image" button at the very top of the gallery.

The dialog for changing the header image will open. You can then drag an image from your computer directly into the dialog or select it from your hard drive using the "Upload image" button.
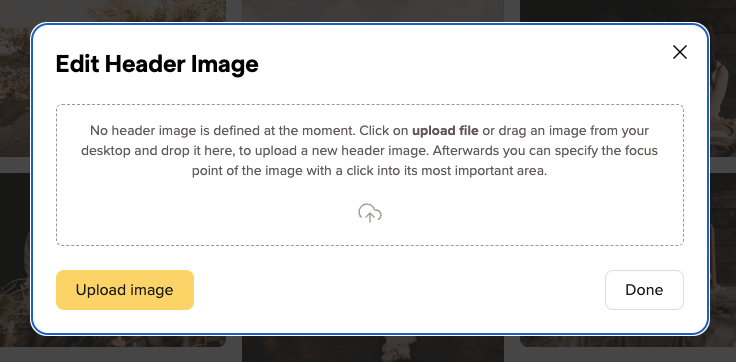
If you want it to be even faster, you can also drag and drop the image from your computer directly onto the header image bar to open the menu.
First, a brief explanation:
We display the header image in a wide variety of places in very different aspect rartios.
To make sure your header image is perfectly tailored for every possible use, you can to set a focus point for your header images. With the focus point you mark the most important part of your image and picdrop automatically creates the right header image for all screen sizes. This is how it works:
With the red circle you click on the most important part of your image that should always be displayed – no matter with which crop and which aspect ratio we display the header image in a gallery.
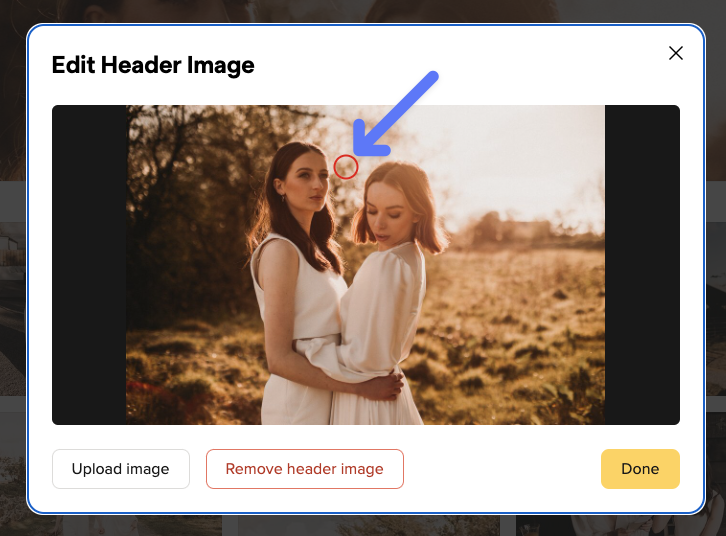
Tip for choosing the header image:
The best photos to use as header images are those that have a clear main subject, ideally set against a relatively calm background. This way, the title of the gallery also has enough space when you set up the gallery in Presentation Mode.
We recommend that you use the highest resolution possible. With 4000px or more in width we have enough resolution for all possible crops of the header image and can display it perfectly - no matter if on a smartphone, tablet or a 4k display.
You can find your dashboard on your personal start page at picdrop.com/youraccount.
On the left-hand side of your dashboard you will always see an alphabetical list of all your galleries.
On the right-hand side, you will find a view of your most recently edited galleries by default – that way you can jump right in to where you last worked.
However, you can also sort your dashboard in several other ways.
picdrop offers you the following sorting options:
You can change the sorting here on your dashboard:
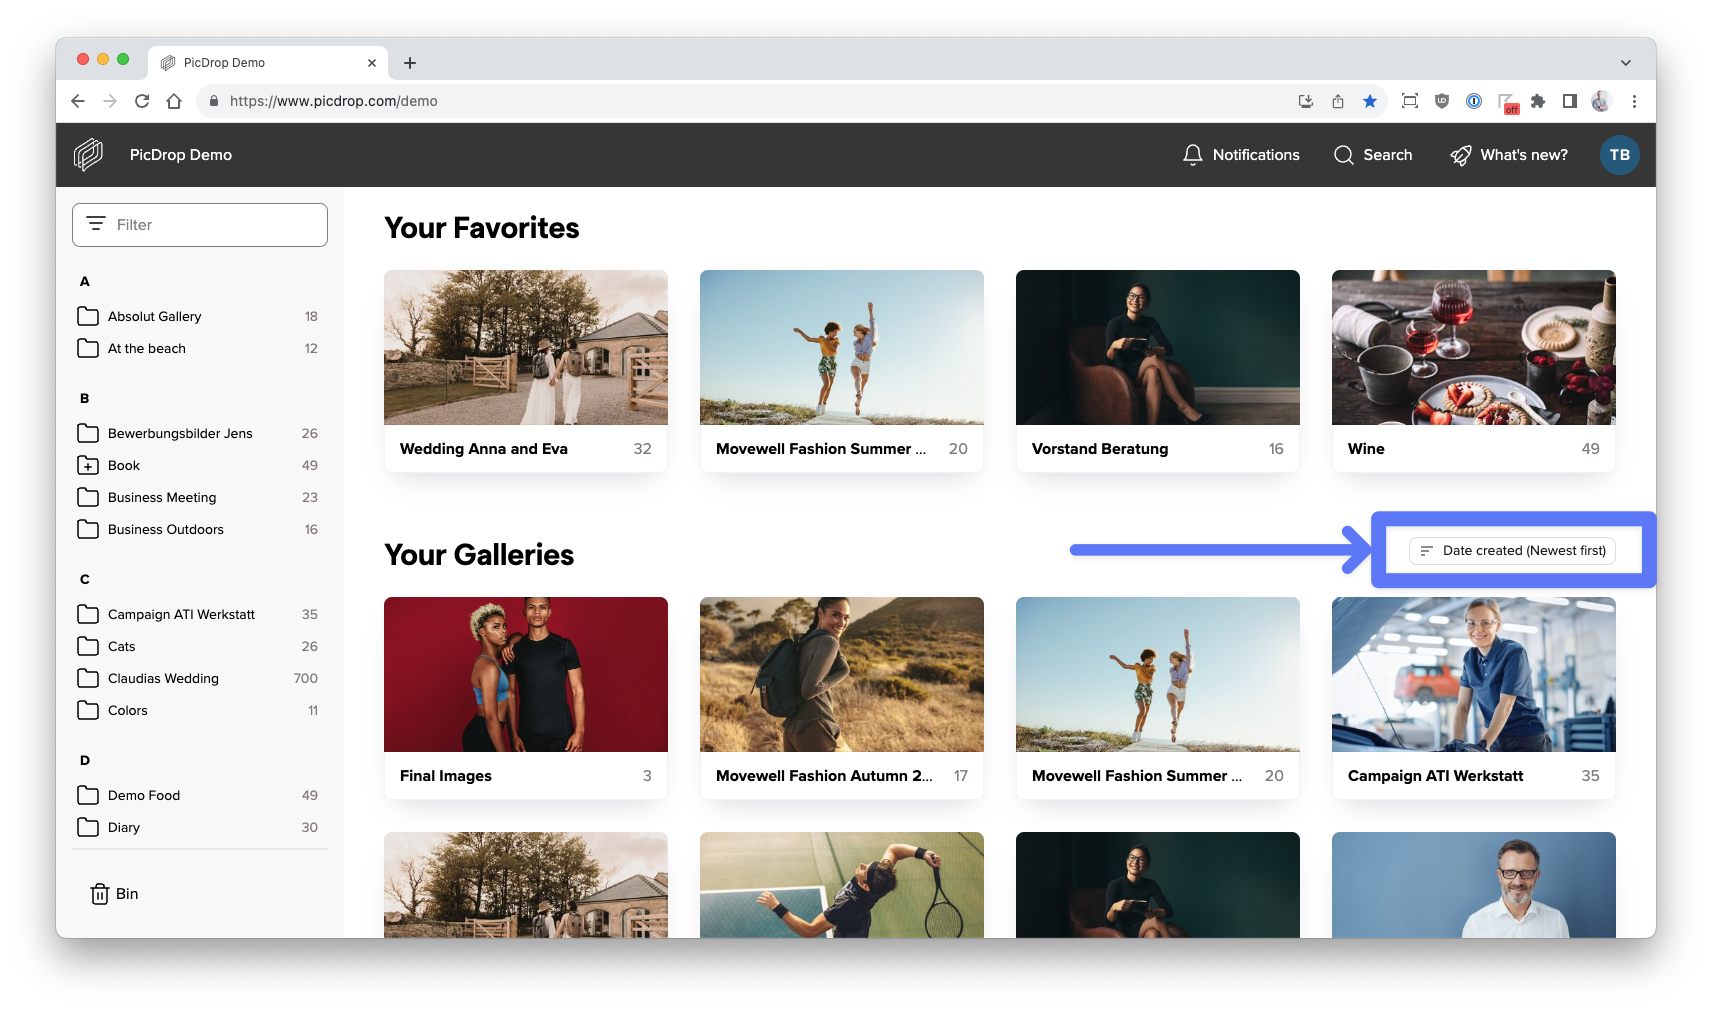
You can also pin your favorite galleries to the top of your dashboard. This is super handy for galleries that you need again and again or that you are currently working on.
To do this, click on the three dots at the top right of a gallery and select "Set as favorite". Alternatively, you can also set a gallery as a favorite by doing this in the gallery in the three-dot menu next to the gallery name.
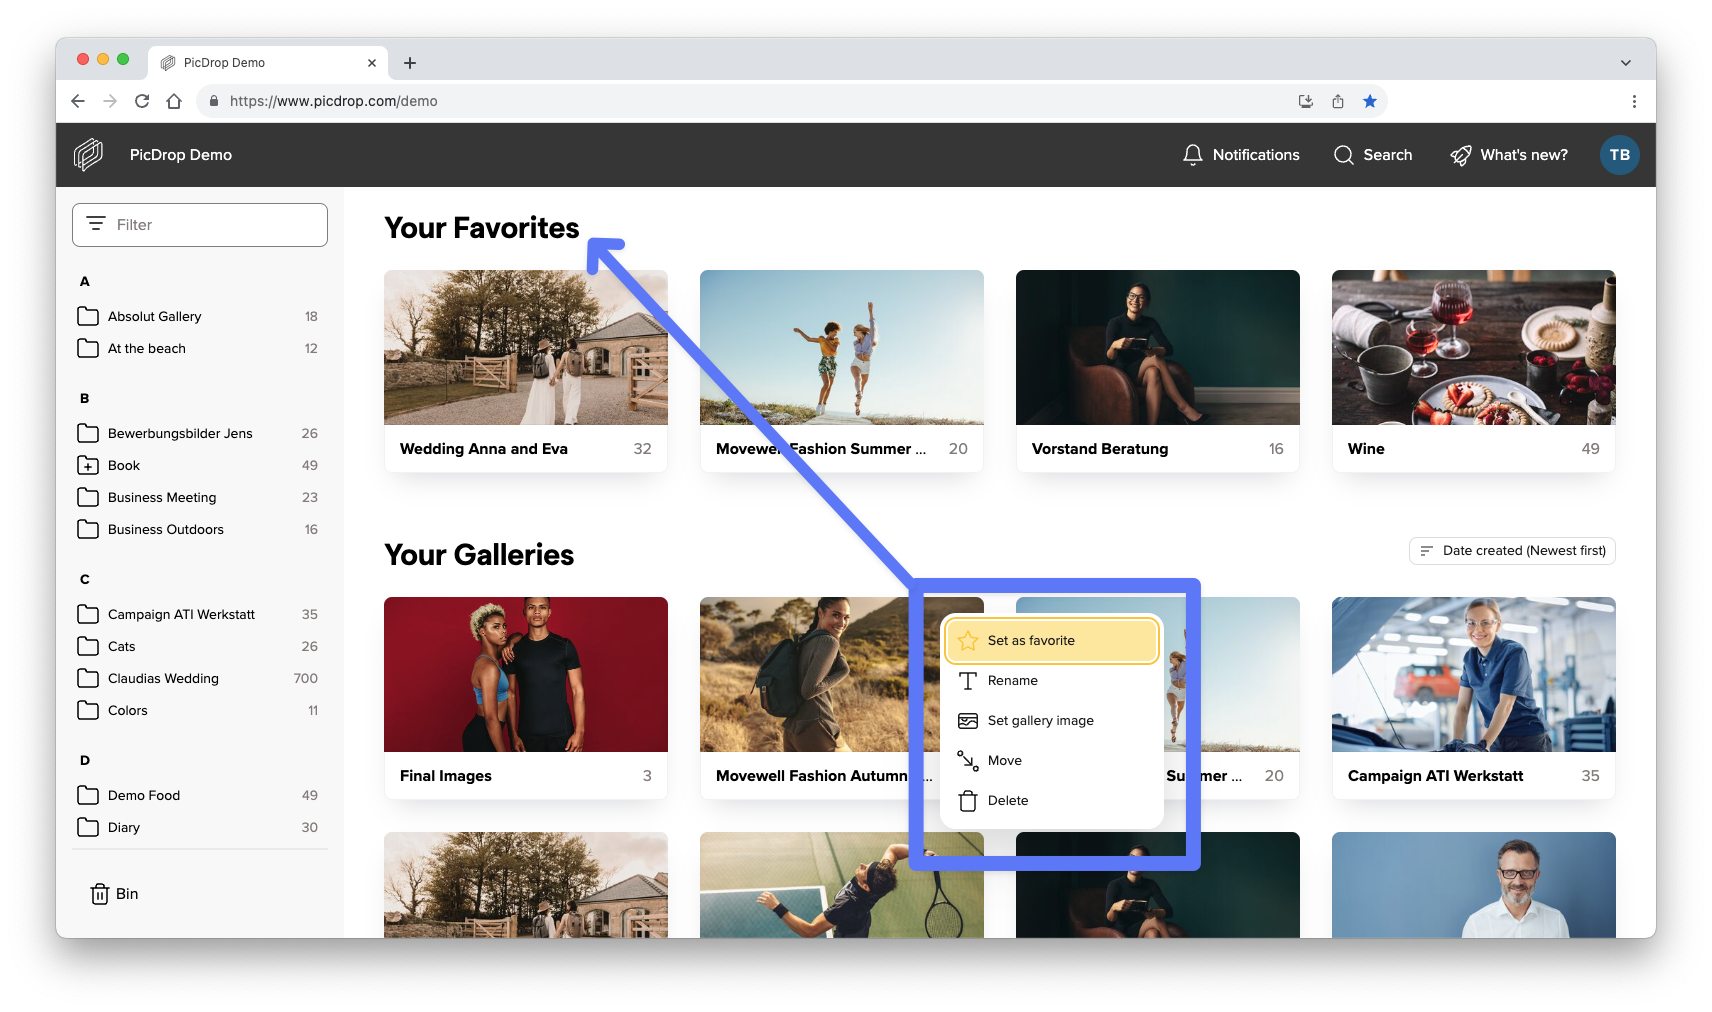
The sets are the tool in picdrop that helps you and your clients to save a certain selection of files permanently in a gallery.
If several people are working in a gallery, each person can compile and save one or more sets of their own.
For a quick communication tool, where only one person in a gallery determines their favorites, we recommend using color flags.
Please follow these three steps:
First, make sure you are in a gallery in Edit Mode. Only there you can create a set. So your gallery should show a filter bar on the left side, like you see it here in the screenshot:
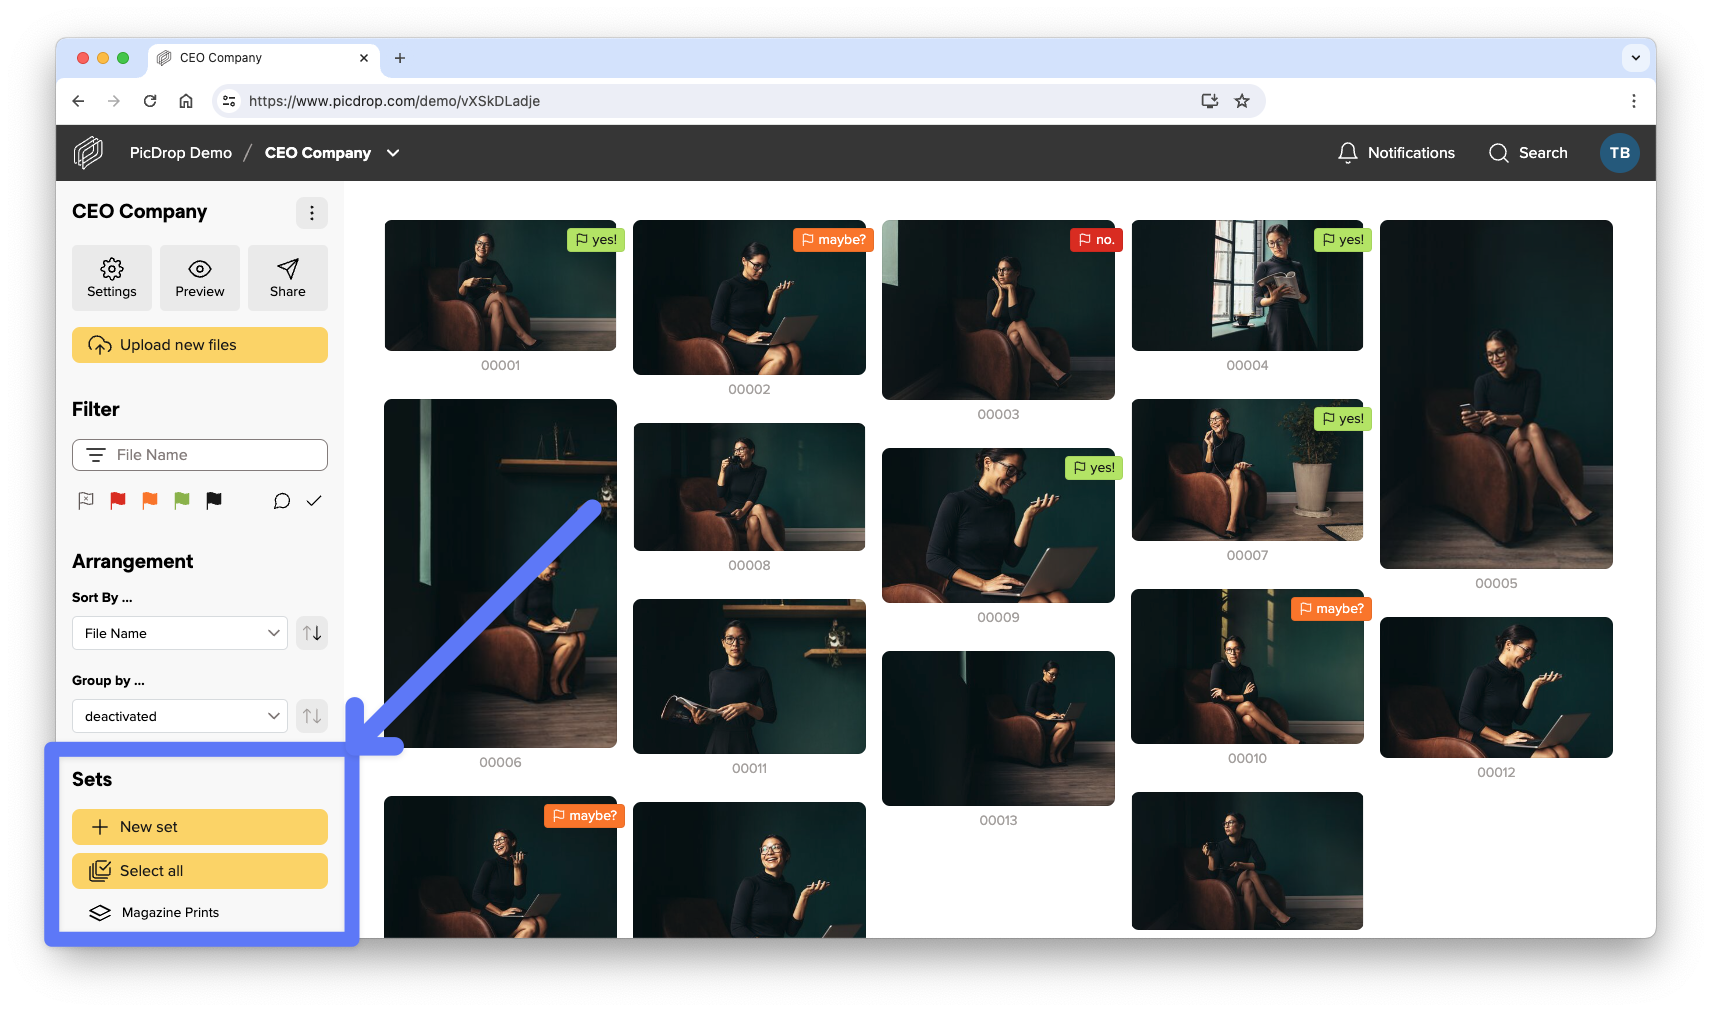
If you don't see the filter bar, the gallery is probably in Presentation Mode and you have to switch to Edit Mode first. If only the button with the hint "Start new set" is missing, then the sets for this gallery are currently not activated.
To start selecting files, click the "Start new set" button or simply click the blue plus sign at the top left of each file you want to select:
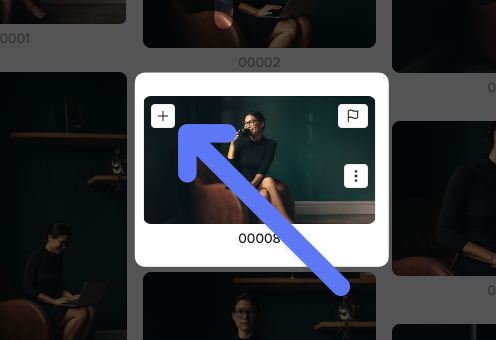
Alternatively, you can select multiple files at once. To do this, hold down the Shift key and click the left mouse button anywhere in Edit Mode to draw a blue selection frame. Each file within the frame will automatically be added to your set bar at the bottom. There you will also find information about how many images are currently in your set.
When you have finished making your set, it is essential to save it. To do this, click on "Save set" at the bottom right of the gallery:

A box will then open for you to add a title, your name and your email address before you save & send your set:
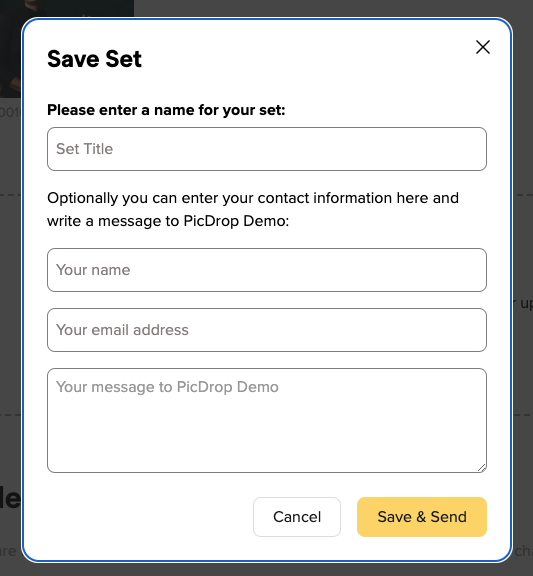
Please choose a unique title for the set. After saving, this title will be visible to all visitors of the gallery in the filter bar on the left.
Please also leave your name and email address so that the set can be clearly assigned. If you like, you can also add a message along with the set.
Finally click on "Save and send set".
As a confirmation the account ownder will receive an e-mail from us with all information about the newly saved set.
In the left filter bar you can now display your set. By clicking on the blue bar with the name of the set, your selected files will be highlighted in the gallery. With a click on the eye icon, you can also view your set in isolation: all files that are not in the set will be hidden in the gallery.
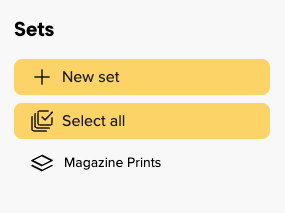
To make changes to a set, you must first activate the set by clicking on its name. All images of the set are again marked with the blue checkmark in the gallery.
Then you can add new files or remove existing ones. Again, don't forget to save the set in the bottom bar so that the changes are permanent.
You will be asked if you want to update the existing set or save the changed set with a new name.
To delete a set, just click on the trash icon in the left column, or on the same icon in the bottom bar when the set is displayed. Don't worry about losing data: Only the person who manages the picdrop account can delete sets from a gallery.
What is our Like feature in picdrop?
The likes are intended to help you and your clients - or you and your team - to vote on which image is rated best by a larger number of people. If several people are working in a gallery and an image or several images with the "highest common denominator" need to be found, the likes are the thing to work with!
For a quick coordination where only one person in a gallery determines their favorites, however, the color flags are better suited.
How do likes work in picdrop?
To activate the likes, simply proceed as follows:
go to the settings of your gallery and you can activate the likes, this can be done in the tab of the edit mode under the item Likes & Voting (1) - don't forget to save the gallery settings afterwards (2).

Once you have done this, your pictures can now be given likes. A small heart symbol will appear on each image when you or your clients hover over it with the cursor. With every picture that is liked, the number of likes for this picture increases and your clients' favorites quickly become visible.

Export selected images to Lightroom, Capture One, Finder, Explorer and more
As usual, selected images can be exported to Lightroom, Capture One, Finder or Windows Explorer with just a few clicks. This saves valuable time! You can find more information in our article on the export function.
Notifications about new likes
To find out if your clients like your pictures, simply click on the notifications in the top bar of your account. We've added the likes there to make it as easy as possible for you to stay up to date.
Sorting by number of likes
To make it even easier for your clients to find their way around, activate automatic sorting by likes in your settings in addition to the likes. Your images in the gallery are then sorted in real time with each like. The more likes a photo receives, the higher its position in the gallery. We recommend that you let your clients know if you have switched on real-time sorting to avoid misunderstandings due to the "moving" images. Of course, you can also sort or filter by likes as usual in the filter bar on the left-hand side without having preset this arrangement in the settings.

Only show pictures with likes
Ib the left-hand filter bar, you can now not only filter by pictures with likes and only display these, but also sort all pictures by their number of likes. To do so, simply click on the heart in the filter bar or select "Likes" in the sorting.

As you can see, working with Likes is easy as pie and if you still have any questions about this feature, just get in touch with our support team and we'll be happy to help you!
Not to worry, we all know that...
Below the login form on your account page just click on "Forgot password?" and have a new password sent to you.
Doesn't work either?
Write us an email at hello@picdrop.com and we will take care of it.
You can change your account name at any time in your account settings.
Please note that with a new account name all old gallery links you have already sent to your clients will become invalid. Clients who should still have access to their galleries need new links after renaming.
Too bad! In the bottom left corner of your account settings, you will find the option: "Delete account". After another click, your account including all pictures will be deleted and you will never hear from us again.
Yes - You can create multiple picdrop accounts with one email address.
Just log in to your existing picdrop account and create a new account in the account settings, in the area "Accounts" via the button ("Create new account").
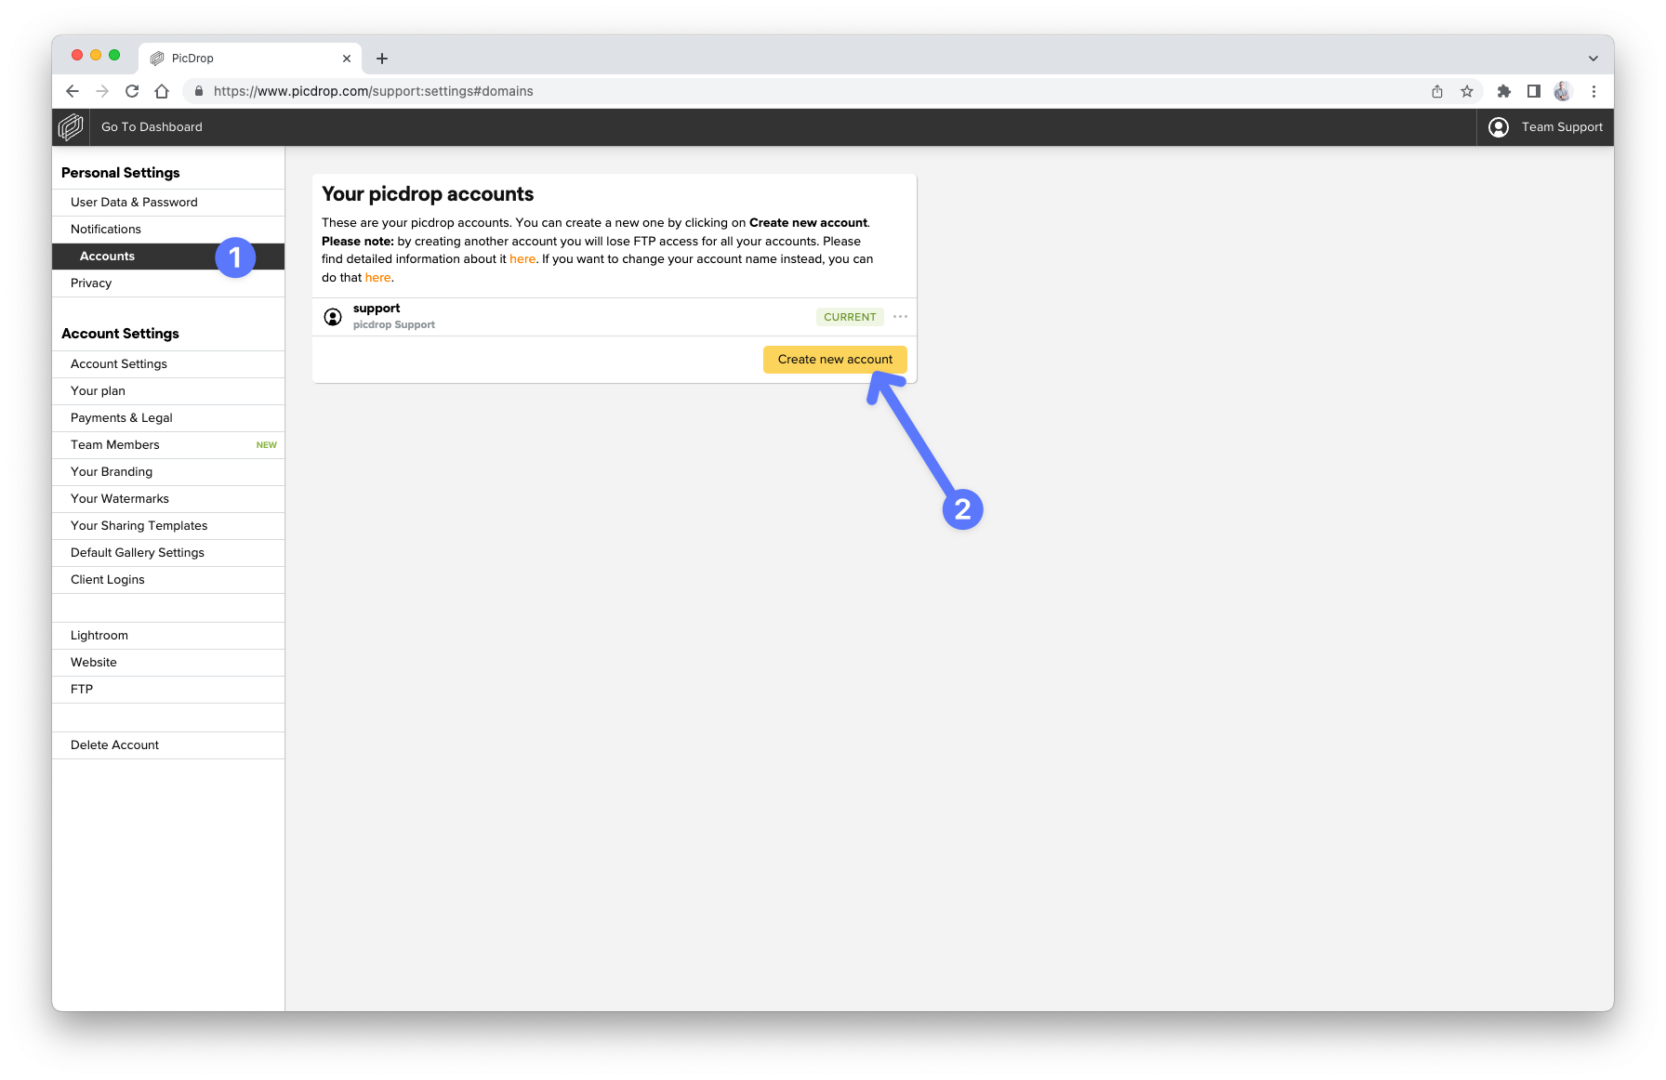
If you log in again with your known login data after that, we will always ask you which of your accounts you want to access.
While you are logged in, you can switch between your accounts via the menu in the upper right corner or in your account preferences without having to log in and out.
Easy as that!
Please note
It's currently not possible to use two or more accounts with one email address AND still have FTP access.
By creating a second account with the same email address you will lose FTP access to all your accounts. Please only use this function if you don't need the FTP access.
You have already created a second account and lost FTP access?
To regain FTP access for your main account please delete all additional accounts. This automatically restores FTP access for your main account.
The color flags are available in green, orange, red and black. In the default settings, they are named yes, no, maybe and final.
Starting with the Pro plan, you can customize the color flags to fit your own workflow and make it perfectly clear to your clients what a color flag means: to do this, you can change the name of the color in the Color flags section of your Default Gallery Settings.
A possible version could look like this:

Please do not forget to save the new names for your color flags.
The name you assign to your color flags will then be displayed to you and your clients on every file that has that color flag.
Please note: Renaming your color flags will affect all color flags in your picdrop account. Even existing color flags in previous galleries will be labeled with the new name after saving.
You don't want to use all four color flags? You only want to activate some of them? This is also possible! You can find more information here.
The default settings for your picdrop account include four color flags: red, orange, green and black. They are named no, maybe, yes and final.
If you want to use color flags in your workflow, e.g. only for a simple YES or NO for individual files, you can always deactivate those colors you don't need in the gallery preferences:

Uncheck the blue checkbox in front of the color flag, like done in the screenshot for the orange and the black color flag. They will then no longer be displayed in all your galleries (including existing ones).
Don't worry: if you have accidentally hidden a color flag, you can of course re-activate it. All files that already had this color flag will keep this color flag.
You want to change the names of the color flags like in the screenshot? You can find the instructions here.
By the way, you can use the function for hiding individual color flags - just like Presentation Mode - starting with the Pro plan.
PS: The red color flag cannot be deactivated. It is needed so that your clients can hide red marked files in Presentation Mode. You can find out how to do this here.
Each gallery you create in picdrop can have a gallery image.
You see the gallery image as an icon for the gallery – just like a cover page.
You are logged in as admin in your picdrop account.
Then you can see the gallery images here:

In a gallery that contains subgalleries, visitors will see the gallery images for those subgalleries.
It looks like this for your customers:

Do you work with client logins?
Then your customers will also see the gallery images in their personal gallery overview after they have entered their access code.
We always take the first image loaded into the gallery and automatically set it as the gallery image for you.
Galleries that do not contain images therefore do not get an automatic gallery image. They will be displayed with a folder icon instead.
This happens e.g. with galleries that you use for better organization and that do not contain any images themselves, but only sub-galleries.

You can set the gallery image yourself for each gallery – this means you overwrite the automatically created gallery image or you replace the folder icon for empty galleries with a better fitting image!
You can change the gallery image in these places:
Click on the three dots at the bottom of the desired image – select "Set as gallery image", confirm with the green Save button, done!
In the same menu you can also click on "Upload image" and set an image from your computer directly as a gallery image. You don't have to upload the image to the gallery.
As a gallery image you can use a picture that is not in the gallery itself.

In your gallery overview, click on the three dots at the bottom right of a gallery or next to the gallery name and select "Set gallery image". You can now upload an image from your hard drive as a gallery image – you don't have to upload the image to the gallery to do this.
If you want to use an image that is already in the gallery as a gallery image, see the description above at 01.
One more tip:
In the menu with the three dots of the gallery you can also delete an already existing gallery image – then the folder icon will be displayed. If you want to chose another gallery image you can do so as described in the sections 01 and 02 above.
We automatically choose a section directly from the center of the image for the gallery image. With a little trick you can create the exact fitting image and upload it as gallery image:
Export from Lightroom (or any other program) an image with a crop in 16:9 format and at least 800px width - upload it as gallery image for your gallery directly from your computer. This way it will fit perfectly into the frame for the gallery image!
Of course, this does not only work with photos: You can also upload your own designs, lettering, etc. as JPG or PNG and use them as gallery images!

You can easily move or copy files from their current gallery to another gallery in picdrop.
This is a step by step guide on how to do this.
First select the files you want to move or copy. To do so, click on the blue plus sign that appears in the upper left corner of the file when hovering the mouse over it.

Pro tipp: You can also quickly select any number of files to copy or move from a saved set or any filter set in the filter bar.
When you have selected all files, click on the Move / Copy icon located in the export bar at the bottom of the screen.

In the opening menu you can now choose whether you want to move or copy the files.
Select the desired target gallery in the list of your galleries or simply create a new gallery in the lower left corner.

Confirm the selected action with the button at the bottom right.
The success message shows you that all files have been copied or moved.

With a click on the button "Go to target gallery" you will be taken directly to the target gallery.
We have included this feature of analogue photography in picdrop, so that every photographer has the possibility to save a contact sheet of his or her galleries from within picdrop. There, e.g. printed out, notes can also be entered by hand.

A contact sheet is a great way to compare, evaluate and get an overview of your images - exactly because the images are shown in a small size and all together.
On the contact sheet you have all images of the gallery at a glance and can also choose whether the color markings, comments and selections from picdrop should be directly visible.

The contact sheet always contains all images of your gallery, as already in analogue times the whole film roll was content of the contact sheet.
You can create a contact sheet in every gallery by clicking on "print contact sheet" in the gallery menu...

... and then either print it, or save it as PDF with the help of the system dialogue.

You accidentally deleted a whole gallery in your picdrop account?
Don't panic!
Sometimes there is a chance that you are able to recover them, as we keep deleted galleries for you for a short period of time in the trash bin of your account.
The only condition for you to be able to restore the gallery is that you did not delete it too long ago and you have not created a new gallery with the same name in your account in the meantime.
Just click on the trash bin symbol on the bottom of your gallery list in your dashboard and from there you can restore any of the listed galleries according to your wishes.
Please note that you may only restore complete galleries and not individual files.
In case of recovery, your gallery will be restored with all color flags, comments and selections.
ATTENTION
This workflow requires an FTP connection to you picdrop account. You can only use FTP connections with accounts that were created before June 2022.
______
With picdrop it is possible to upload your pictures to picdrop while taking pictures or directly from the camera - without the detour via PC or other devices. This is especially practical if you are looking for speed, as in sports or event shootings, or if your client does not want to be personally present at the shooting but still wants to be there live. There are no limits to your imagination.
This article explains how to technically implement the upload to picdrop. Please note that you need a camera with FTP upload capability for this option. All major manufacturers now offer this function, but it is not installed in every model. Some models also require additional FTP devices or battery handles with built-in FTP function. Please check with your dealer, read your camera's manual or ask Google about your camera's capabilities.
picdrop is completely folder-based. This is exactly the way you know it from the folders on your computer. You can retrieve this folder structure with picdrop in your browser or via FTP. Via exactly this FTP channel you can create folders, upload images, move them etc.... This is practical for large amounts of data or when no browser is available.
Above all, however, it is also practical, since some cameras also use this FTP interface. So you need to find out how to activate the FTP upload in your own camera and set it up for personal picdrop access. We have written down instructions for the most common manufacturers: Nikon, Canon, and Sony. In the following, you will find further tips for practical work in everyday life.
Connect the camera to your picdrop:
Instructions for Canon cameras will be added shortly. But until then we recommend this very good video: (English)
https://www.youtube.com/embed/zCvPoUy8V3Y
Our friend and professional photographer, Steffen Böttcher, describes very well (but in German!) in his blog how he uploads pictures directly from his camera to picdrop. Thanks, Steffen! An instruction from us will follow shortly.
Yes, of course!
If you reach the storage limit in your Pro plan or your Business plan, you can book additional storage space for your picdrop account:
In the Pro plan, you can expand your storage space at any time and as often as you like in 250 GB increments.
For each 250 GB you pay 7.99 € net per month in addition to the basic price of your Pro plan.
For your picdrop account in the Business plan, you can expand your storage space in 1 TB increments.
You pay 50,00 € net per month for each 1 TB storage expansion.
Please send us an email to hello@picdrop.com and let us know how much additional storage you need.
You can use team members to invite other people to collaborate in your picdrop account.
You can invite one team member on the Pro+ plan. With our Business plan, it's possible to work with even more people in one picdrop account.
You can find more information about how team members work here.
This function is deliberately not available in picdrop. Therefore, if you want to revoke access to a gallery that has already been shared with clients, please manually set the gallery to ‘private’ in the security settings.
As much as we understand that the feature of an ‘expiration date’ seems tempting at first glance, we would like to ask you to reconsider your request: As a photographer, you should always focus on the satisfaction of your clients. Automatically putting pressure on clients by threatening to lose access to their data at a certain point in time is not a good way to make them happier. Of course, you can continue to communicate your desire for prompt feedback personally with your clients.
You've probably seen how to filter out your clients' image sets in Lightroom, Capture One, Photo Mechanic, Finder, and Explorer. The whole thing is not only possible with image sets but also with all color-coded images.
Many image editing programs allow you to use the file search to display exactly the images of an image set you or your clients made in picdrop. This saves you the trouble of searching for each individual file. Here we show you how to do it:
Filter out all images with the desired color flags using the filter function on the left side. Now you see only the images with the desired color flag.
Click on "select all images" (bottom left) or use the keycombination of cmd-A or Ctrl-A to select all currently displayed images.
You have now created a set that you can use to filter out the images locally on your mac / PC.
Click on the "Export selection" icon in the set menu, bottom right. When you are logged in to your account you will find the various filter texts to filter out this set in Lightroom, Capture One or in your Finder / Explorer.
Optionally, you can save this selection permanently in picdrop to make it easier to find it again later.
Once you have copied the list of filenames to your clipboard, please continue on your computer in your tool of choice:

You can now save the filtered images in a new collection or mark them with stars / colors for your further workflow.
In Capture One, you can search for your images in multiple places using the exported folter text. To do this, open a folder or collection in Capture One with the images you want to filter. Then you have three options:


Done! You can now save the displayed images as your own collection or mark them with a color / stars.
Open the corresponding project folder in Photo Mechanic.
Paste the filter text from your clipboard into the search box (via Edit > Find... menu or cmd-F on Mac or Ctrl-F on Windows) and set the following search options:
After clicking "Find" in the lower right corner, Photo Mechanic will now select all photos of your choice from picdrop and you can continue working with them.
Please note that the search in the upper left corner of Photo Mechanic ("Search my Mac") cannot be used for these steps.

Please note that the filter text in Explorer can only hold a maximum of 259 characters.
The filter text in Finder is limited to 2048 characters or 99 files.
Many image editing programs allow you to use the file search to display exactly the files of a set you or your clients made in picdrop. This saves you the trouble of searching for each individual file. Here we show you how to do it:
Open the set in the gallery that you want to filter out on your computer. Or mark the files with the set tool (blue plus sign in the overview of your gallery).
Click on the "Export set" icon in the set, bottom right. When you are logged in to your account you will find the various filter texts to filter out this set in Lightroom, Capture One or in your Finder / Explorer.
Copy the corresponding file list / filter text to your clipboard.
Now continue on your computer in the program of your choice:

You can now save the filtered files in a new collection or mark them with stars / colors for your further workflow.
In Capture One, you can search for your files in multiple places using the exported folter text. To do this, open a folder or collection in Capture One with the files you want to filter. Then you have three options:


Done! You can now save the displayed files as your own collection or mark them with a color / stars.
Open the corresponding project folder in Photo Mechanic.
Paste the filter text from your clipboard into the search box (via Edit > Find... menu or cmd-F on Mac or Ctrl-F on Windows) and set the following search options:
After clicking "Find" in the lower right corner, Photo Mechanic will now select all files of your choice from picdrop and you can continue working with them.
Please note that the search in the upper left corner of Photo Mechanic ("Search my Mac") cannot be used for these steps.

Please note that the filter text in Explorer can only hold a maximum of 259 characters.
The filter text in Finder is limited to 2048 characters or 99 files.
We have included this feature of analogue photography in picdrop, so that every photographer has the possibility to save a contact sheet of his or her galleries from within picdrop. There, e.g. printed out, notes can also be entered by hand.

A contact sheet is a great way to compare, evaluate and get an overview of your images - exactly because the images are shown in a small size and all together.
On the contact sheet you have all images of the gallery at a glance and can also choose whether the color markings, comments and selections from picdrop should be directly visible.

The contact sheet always contains all images of your gallery, as already in analogue times the whole film roll was content of the contact sheet.
You can create a contact sheet in every gallery by clicking on "print contact sheet" in the gallery menu...

... and then either print it, or save it as PDF with the help of the system dialogue.

Collections are a clever method to centrally organize similar images from various galleries. Do you have images on similar topics? Simply create a matching collection and keep track of your work.
We'll explain exactly how collections work in the following steps.
You can add images to a collection by clicking on the three dots of any image in your gallery and selecting "Add to Collection". You can also do the same in the large single image view.
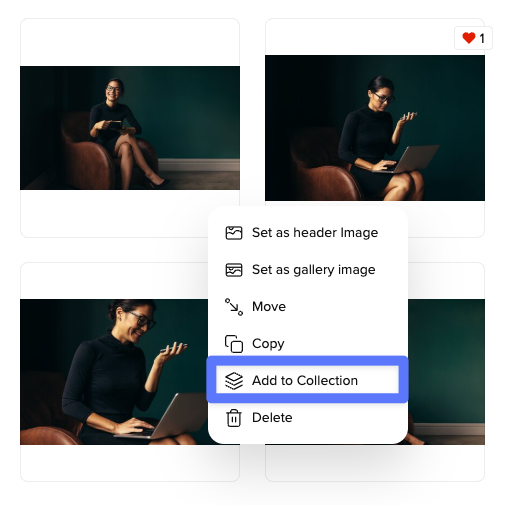
You want to add multiple images at once? Use the set bar.

Your collections are always accessible in the bottom left of your gallery overview. Here, you can create, edit, and manage your collections.

With existing collections, you can download, rename, delete, or export them as a gallery with a click on the three-dot menu. Additionally, you can easily copy the link to your collection and share it with your team members.
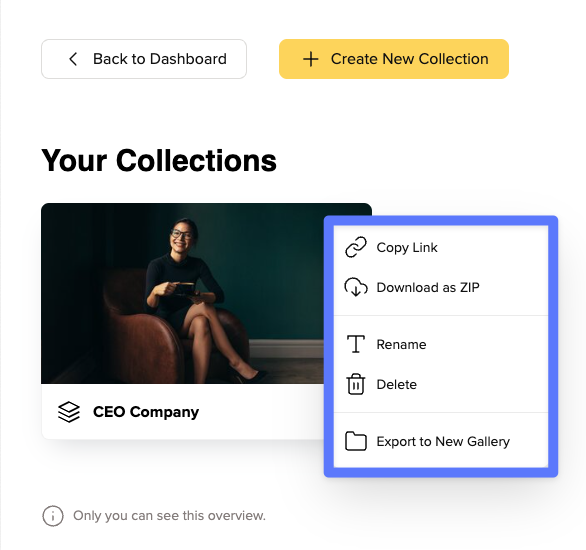
Do you like a collection so much that you want to create your own gallery from it? No problem - just click "Export to New Gallery".

Afterwards, you can pick the destination in your workspace where you want to save your gallery and give it a suitable name right away.
In the Free and Lite plan, you can have one collection per account.
In the Pro plan you can save up to five collections per account, and in the Business plan you can create unlimited collections.
Please be aware that the client login function is no longer included for accounts created from 04.11.2024!
The function has been deactivated for new accounts because it has repeatedly led to misunderstandings. Nevertheless, we explain below how to understand the client login function in picdrop and how you can make good use of it, especially for picdrop users who still have the function available in their account.
So don't worry, client logins can be helpful if you keep a few things in mind.
The most important thing you need to know is that within the client login function some important gallery settings will not be taken into account. These include the password setting and the setting for navigating between the gallery levels.
You should definitely keep this in mind if you decide to use a client login with recurring customers and also always check these settings again before you send the login data out so everything works exactly as you want it.
Then you (or your clients) surely have been in the situation to search for the exact link that belongs to the current shoot from a long list of gallery links.
With a client login, you give these clients a place where they can find all their galleries at any time with just one login code - no more saving or searching for individual gallery links.
In the account settings of your picdrop account, you can set up this client login. Just enter the name, an access code and add all the galleries that should be accessible via the client login.
Your clients will receive their individual access code from you. They enter this access code on the login page of your picdrop account at picdrop.com/your-username.
After clicking on "Login" your clients will see a personal dashboard page listing all the galleries you have shared with them.
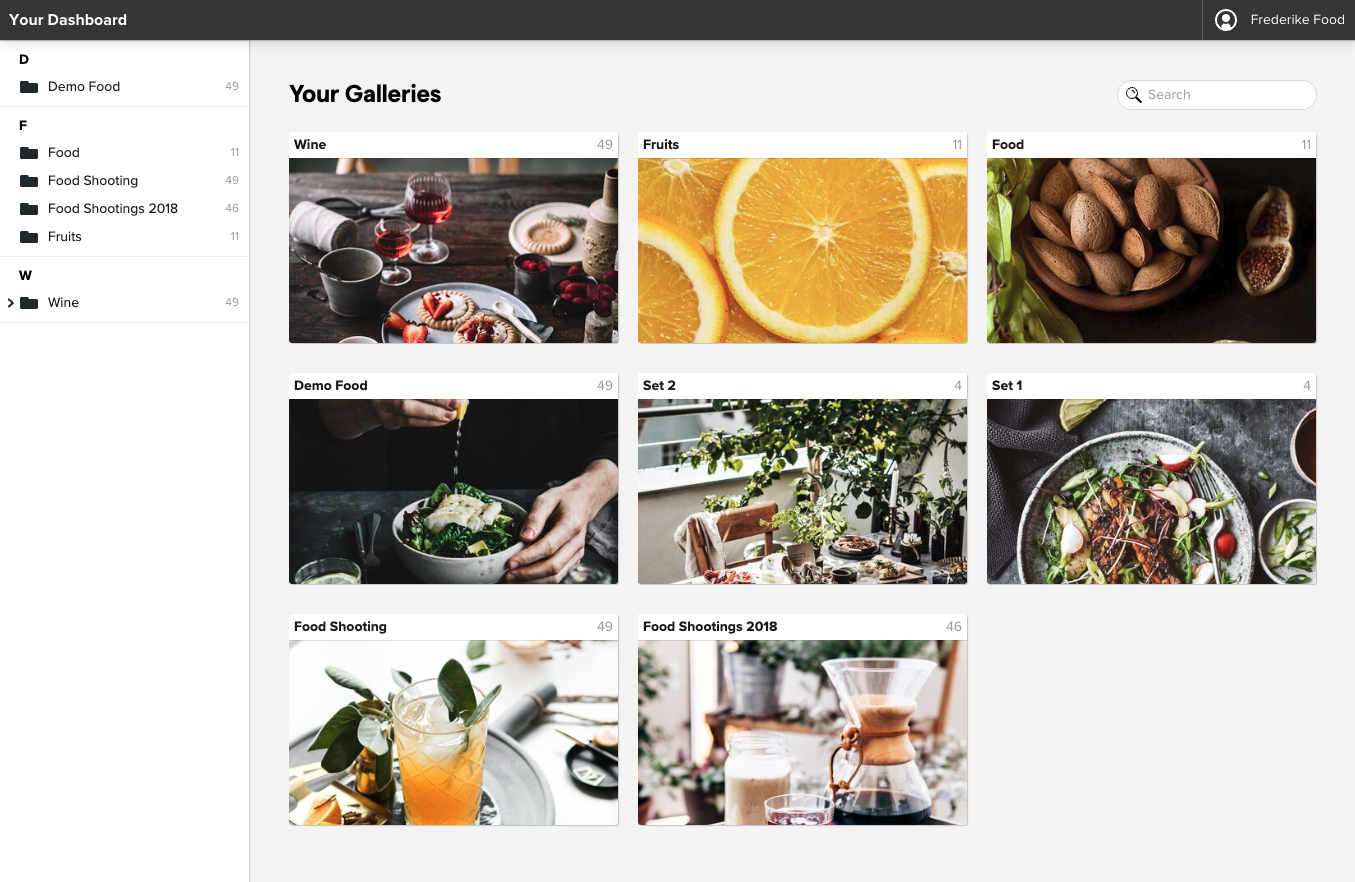
Of course, you can also use the client login in a completely different way.
For example, create a client login to which you add all your portfolio galleries with a specific theme. Then you just send the appropriate access code to potential buyers. Or if you regularly sell your images or licenses for your images, you may combine all your galleries that you offer for licensing into one client login.
ATTENTION
You can only use the FTP connection to your picdrop account if your picdrop account was registered before June 2022.
For accounts registered after June 2022, please use the upload directly in your browser.
______
Your FTP login data can be found in your account settings.
Setting up your FTP accounts isn’t rocket science and in most cases the same procedure. There are differences in the applications though. We compiled a list of the most common FTP clients and provide you with a step by step guide on how to set them up.
One more thing before you start: if your FTP program has problems uploading using Windows, please disable the option to run uploads in .filepart format. (Applies mainly to WinSCP/Putty)
Click on “New Connection” on the top right
Enter the following details:
Click on “Connect”
Your picdrop-account can now be found in your bookmarks and can be opened anytime.
Click on “Favorites”
Click the + sign on the bottom edge
Enter the following details:
Click on “Save”
Double click the just created item to connect to picdrop
Your picdrop-account can now be found in your bookmarks and can be opened anytime
Attention: When renaming and moving files and folders in Transmit there might be some issues. This is a Transmit issue, we can not solve on our. Additonally, only the latest version of Transmit is compatible with picdrop. Version 4 and older will produce an error when uploading to picdrop’s servers.
Click on the star in the “Favorites” menu at the top
Click the + sign on the bottom edge
Enter the following details:
Click on “Save”
Double click the just created item to connect to picdrop
Your picdrop-account can now be opened anytime via the “Favorites” in Forklift.
Click on “File”
Click on “Servermanager”
Click on “New Server”
Enter the following details:
Click on “Connect”
You can now use the new picdrop-login via the Server Manager.
To learn many useful details of picdrop, we have put together a guide for advanced picdrop users. You can find it here.
Have fun exploring and trying it out!
As a visitor to a picdrop gallery, you have various options of communicating with your photographer about your pictures. Below we explain our three tools for collaboration, so that you can get started right away:
You will find detailed instructions in the following sections.
Would you like to download a short version of these instructions?
You can find a PDF version in this gallery: User tips as PDF
Has your photographer asked you to use color flags on pictures in your gallery to let her know which ones are your favorites? Then the following instructions will help you to understand how you can use color flags in picdrop.
You can use the color flags to mark images that you consider to be finished, for example, with the color “green”. Or you can mark images in “orange” if there are still changes to be made. The name of the color flag can give you an indication of what you can use a particular color flag for. You should discuss the exact use with your photographer.
It is also important to know that each image can only be marked with one color at a time.
How do I use the color flags?
01 - Open the gallery
Your gallery should look like the screenshot so that you can get started straight away.If your gallery starts with a screen-filling header image, click once on “To Edit Mode" to start with the color flags.
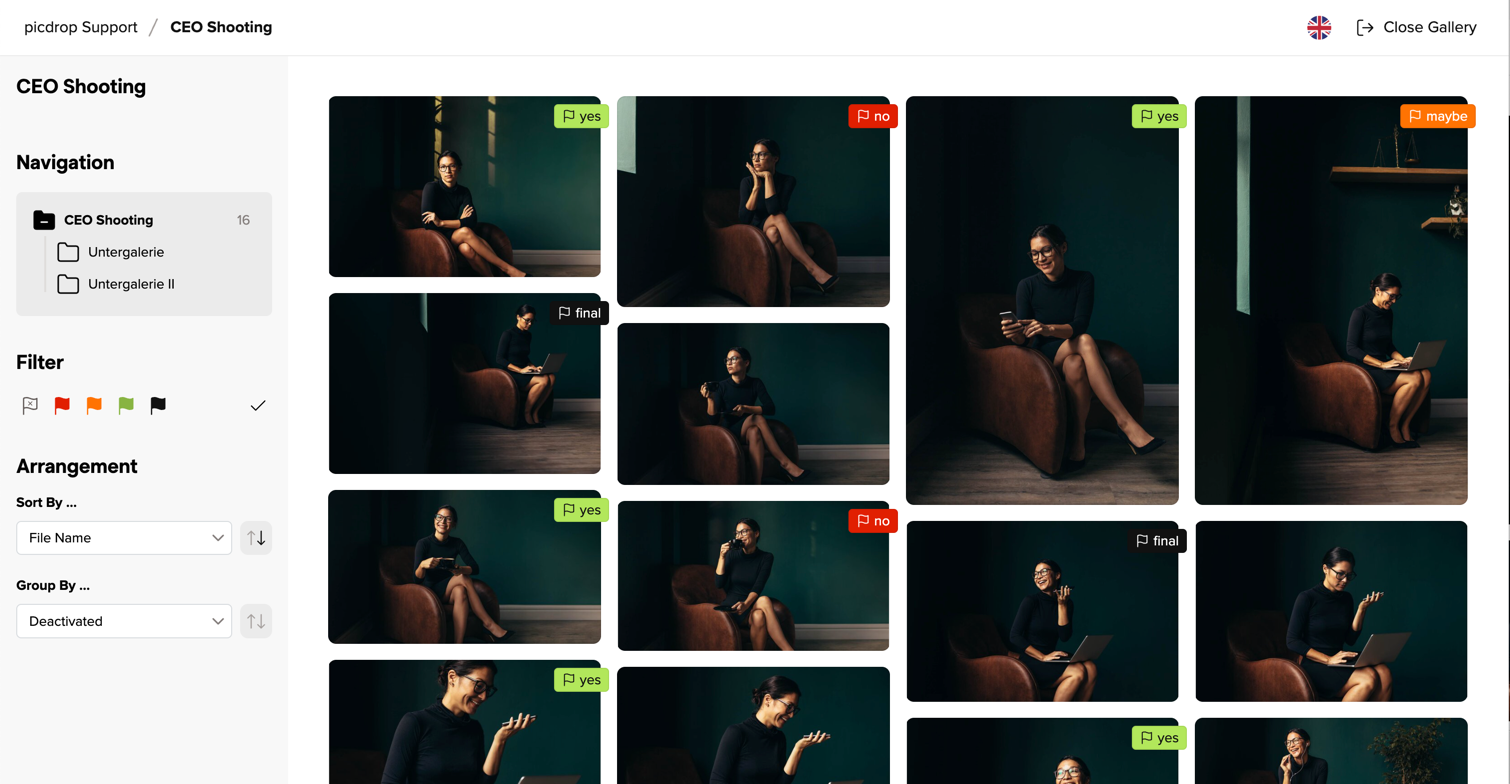
02 - Setting color flags
You will find the color flags at the top right of each image.
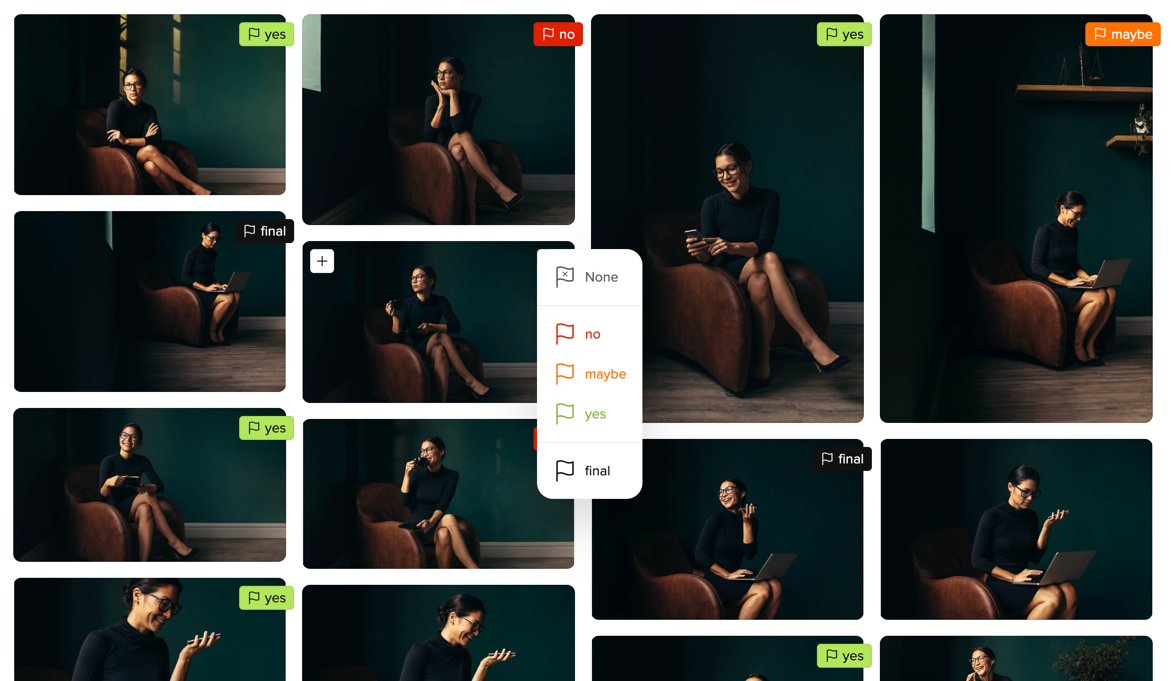
If you move the mouse over an image in the gallery, the flag symbol for the color flags appears in the top right-hand corner. Click on it to open the menu to then select the color. You will then see the color flag attached directly to the image.
You can also set a color flag in the large single image view.
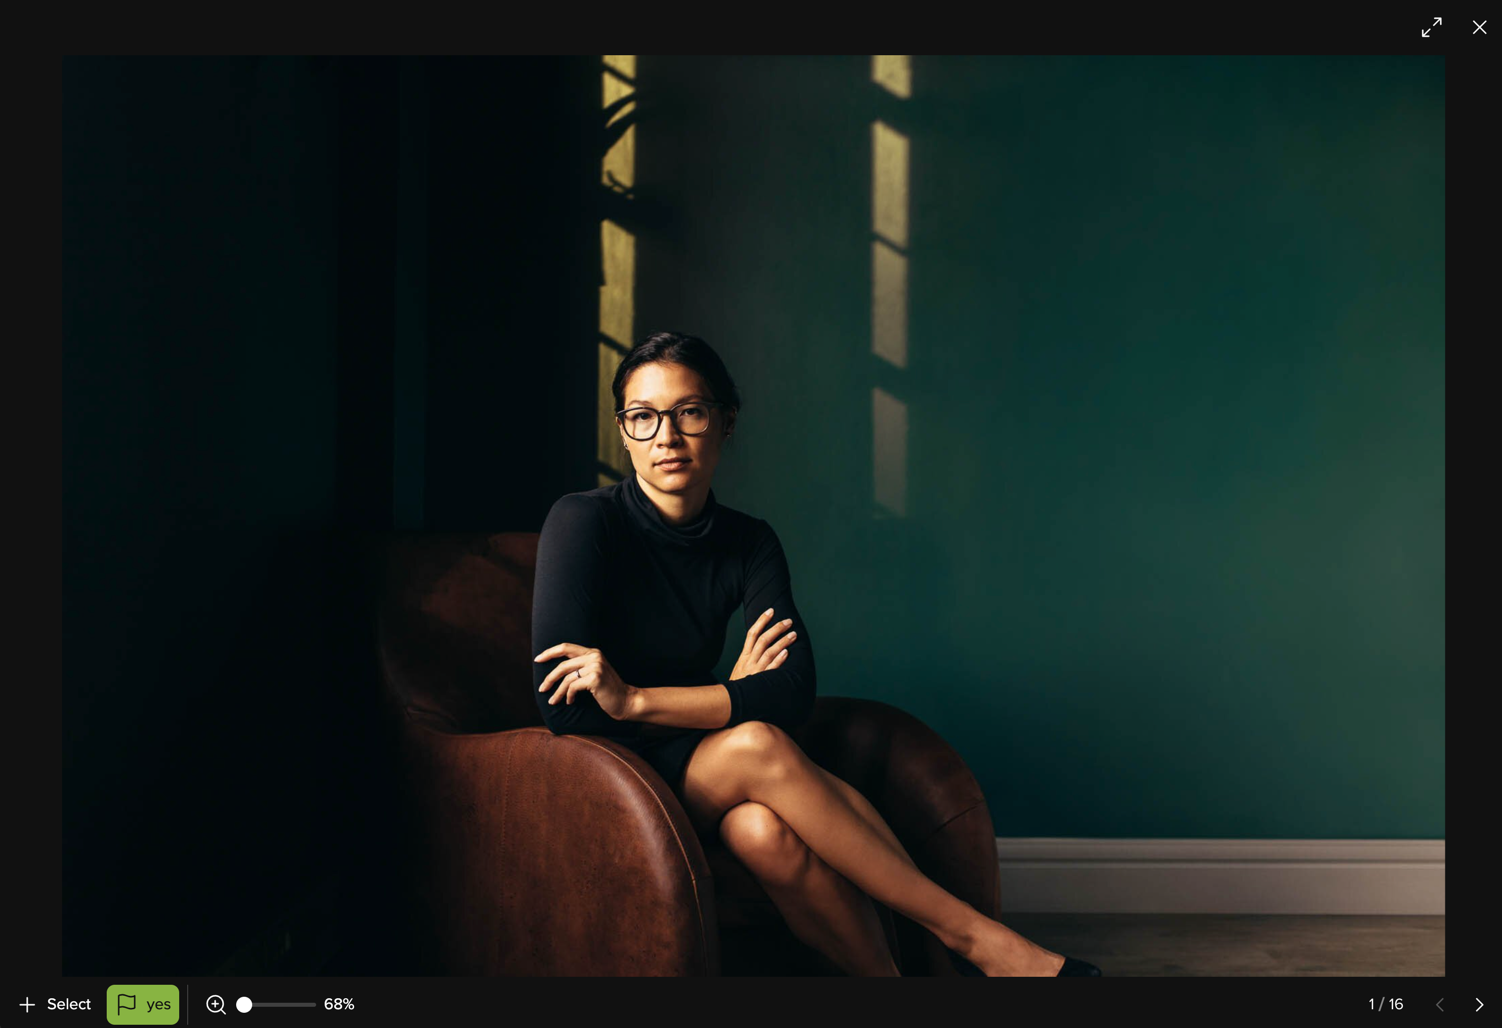
By the way, you don't have to save the color flags. Your photographer will receive an e-mail from us to keep them up to date with any changes to the gallery whenever changes are made.
We hope these instructions have helped you to find your way around picdrop. If you have any questions, you can always contact your photographer or us at hello@picdrop.com
Has your photographer asked you to create a set in your gallery?
The following step-by-step guide will explain how to create a set in picdrop.
How do I create a set?
01 – Open gallery
Your gallery should look like the screenshot so that you can get started straight away.
If your gallery starts with a screen-filling header image, click on the "To Edit Mode" button to start with your selection.
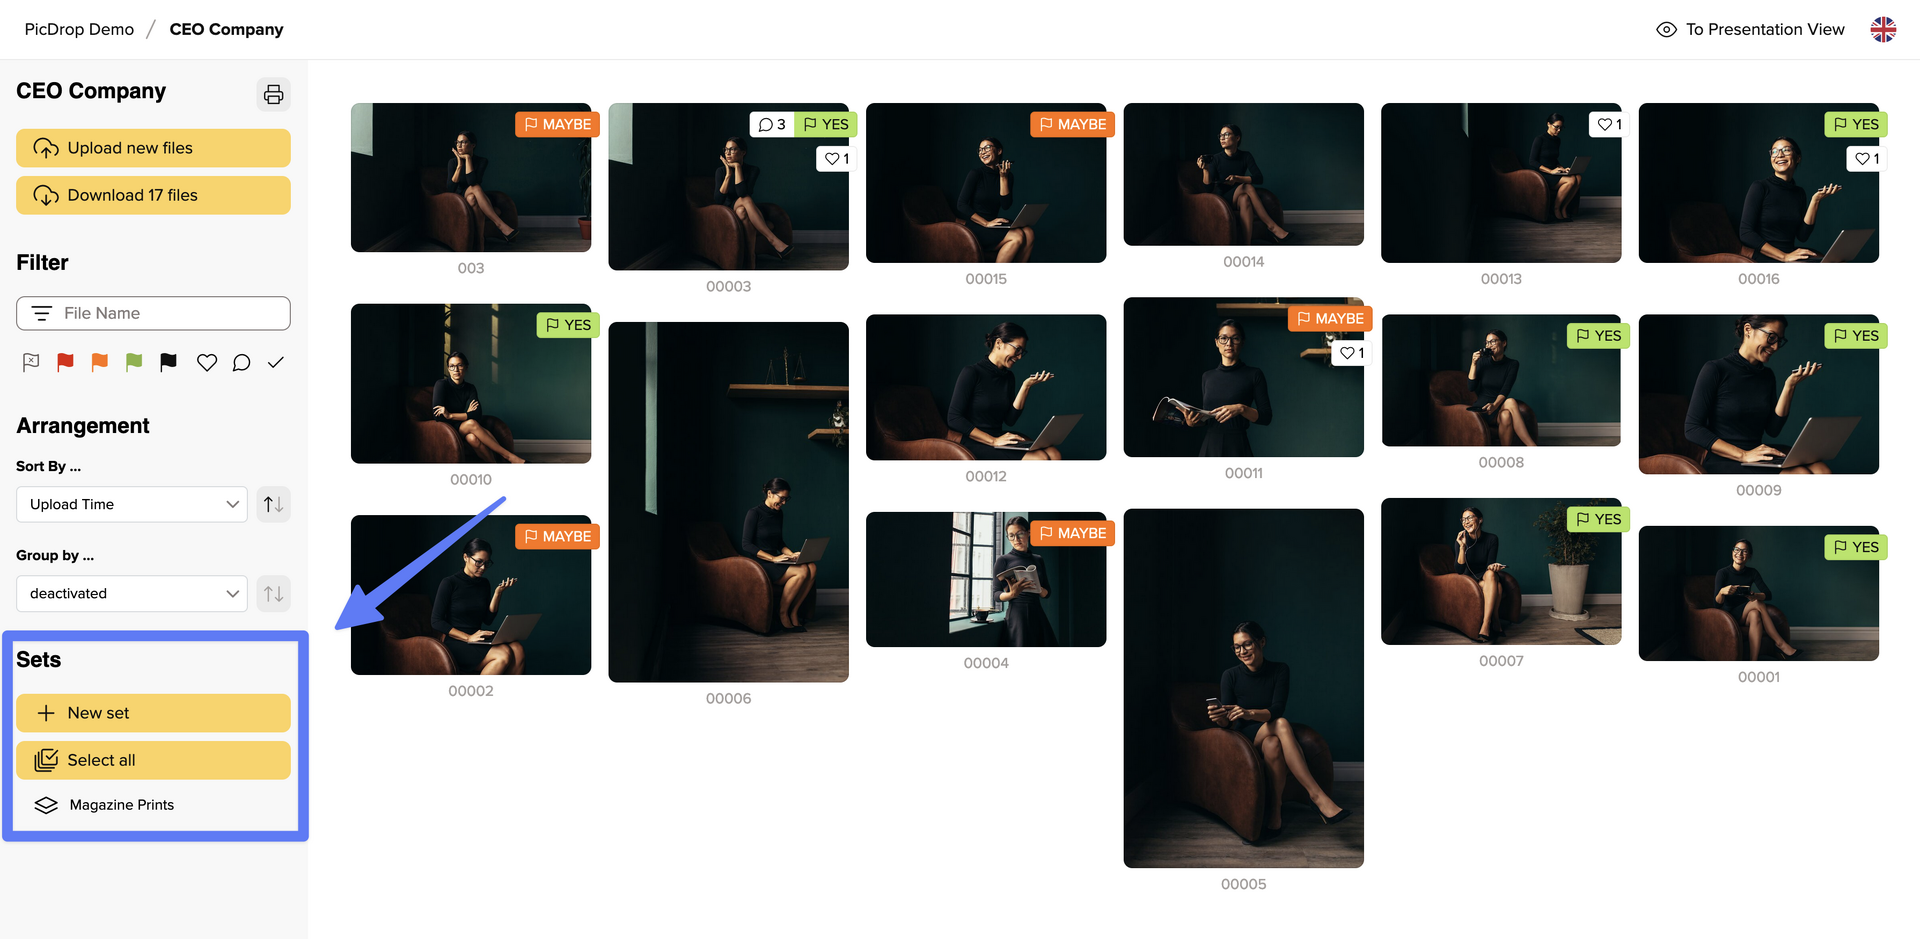
02 – Select images
To start with the selection, click on the "New set" button in the sidebar on the left or simply click directly on the blue plus sign at the top left of each image.
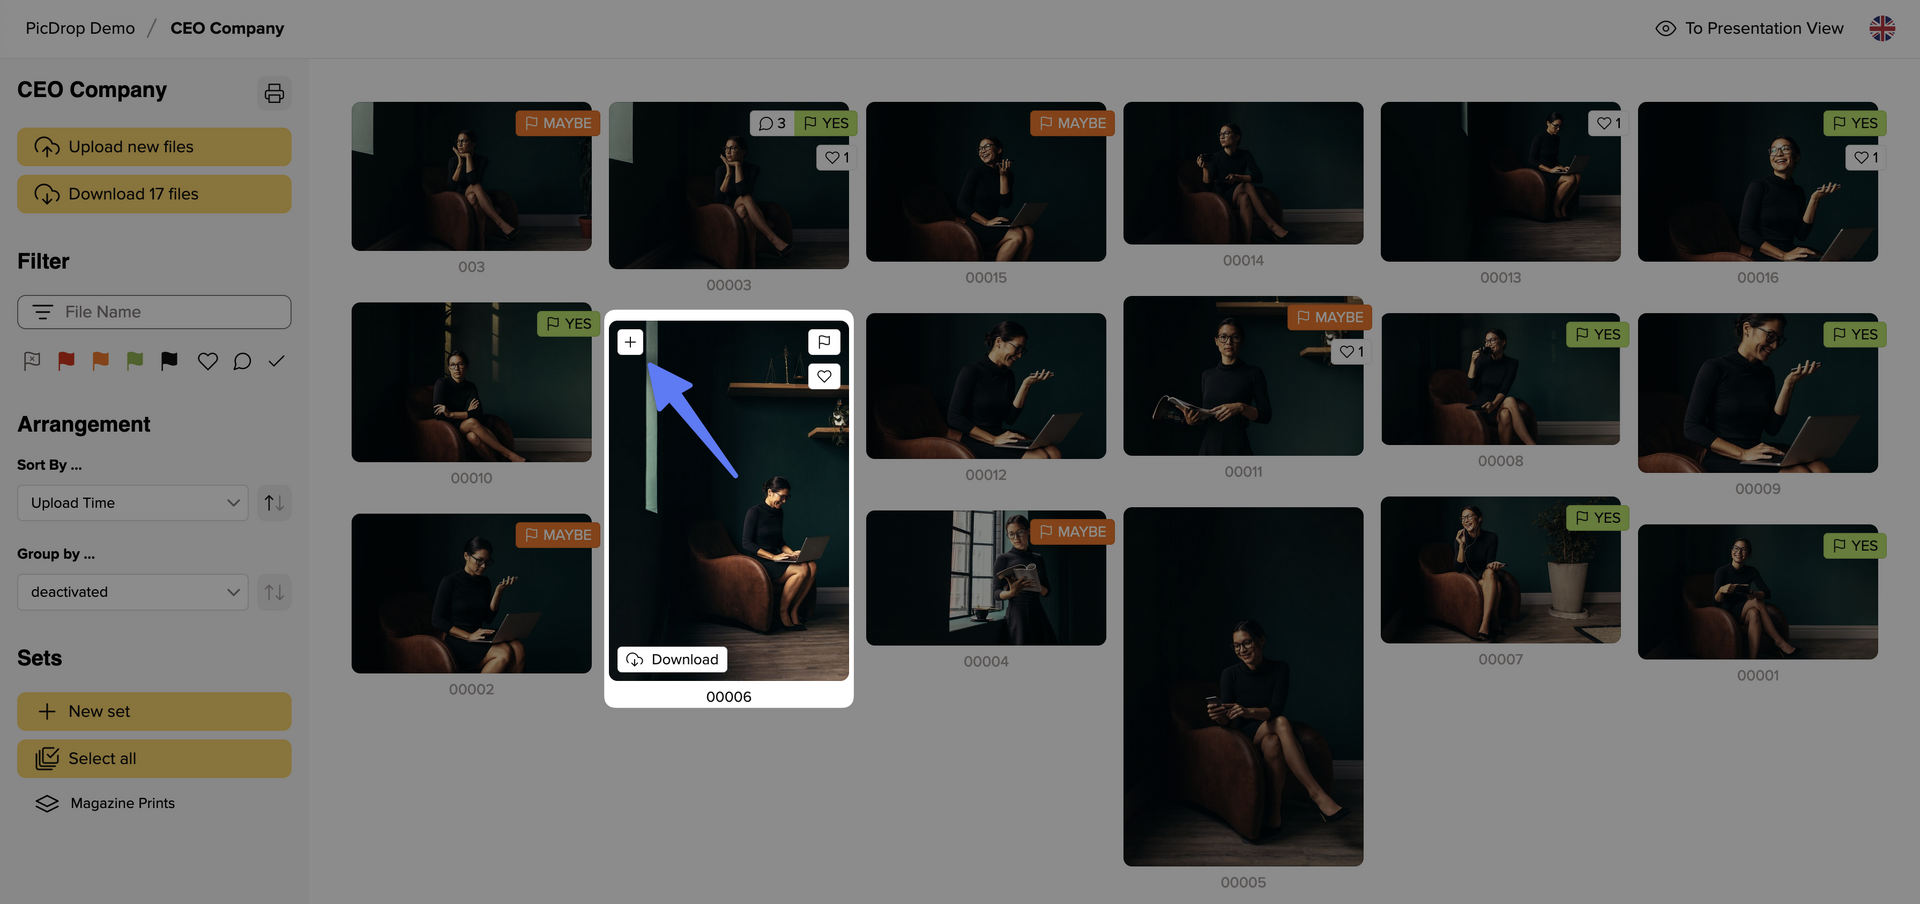
Alternatively, you can also click directly on the image to open the large single image view and select the image there by clicking on "+ Select".
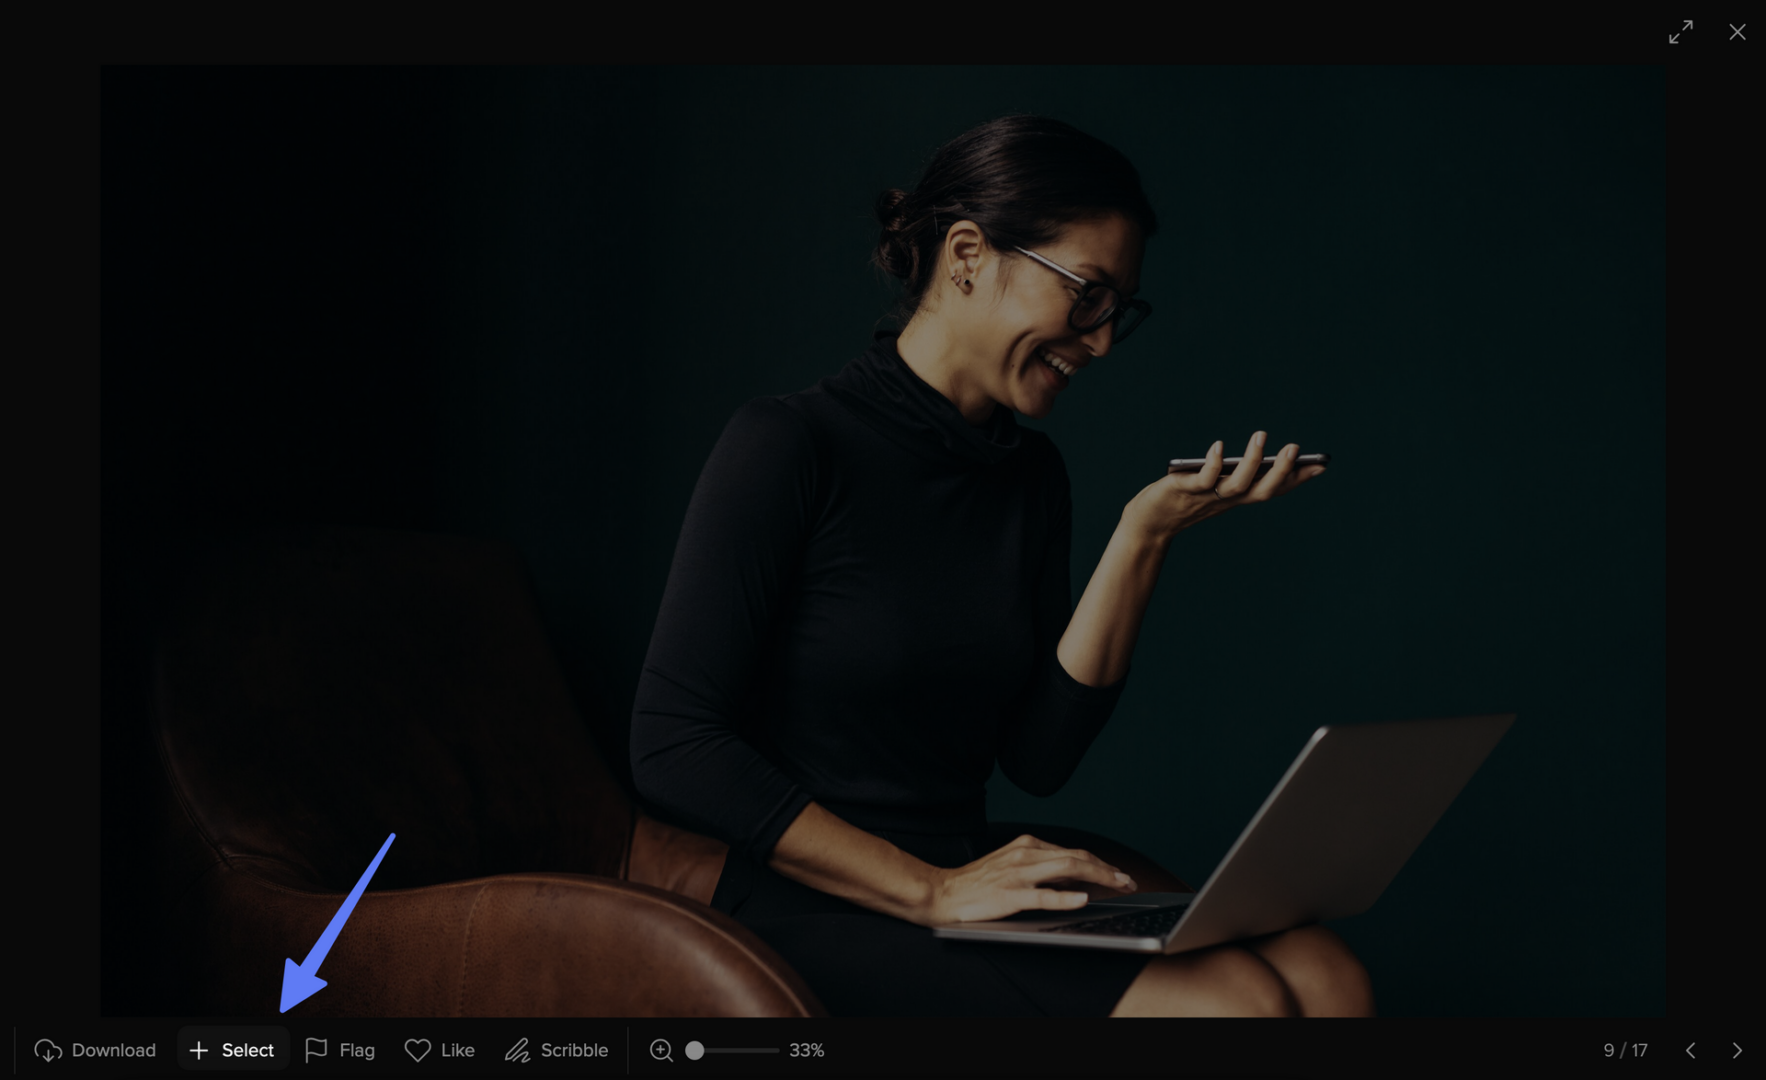
If you then close the single image view again and are back in the gallery, you will see your selected images in the bar at the bottom. There you will also find the information how many images are currently included in your set.
03 – Don't forget to save your set
Once you have selected all your favorite images, it is essential to save them. To do so, click on "Save as set” at the bottom right, as shown in screenshot:
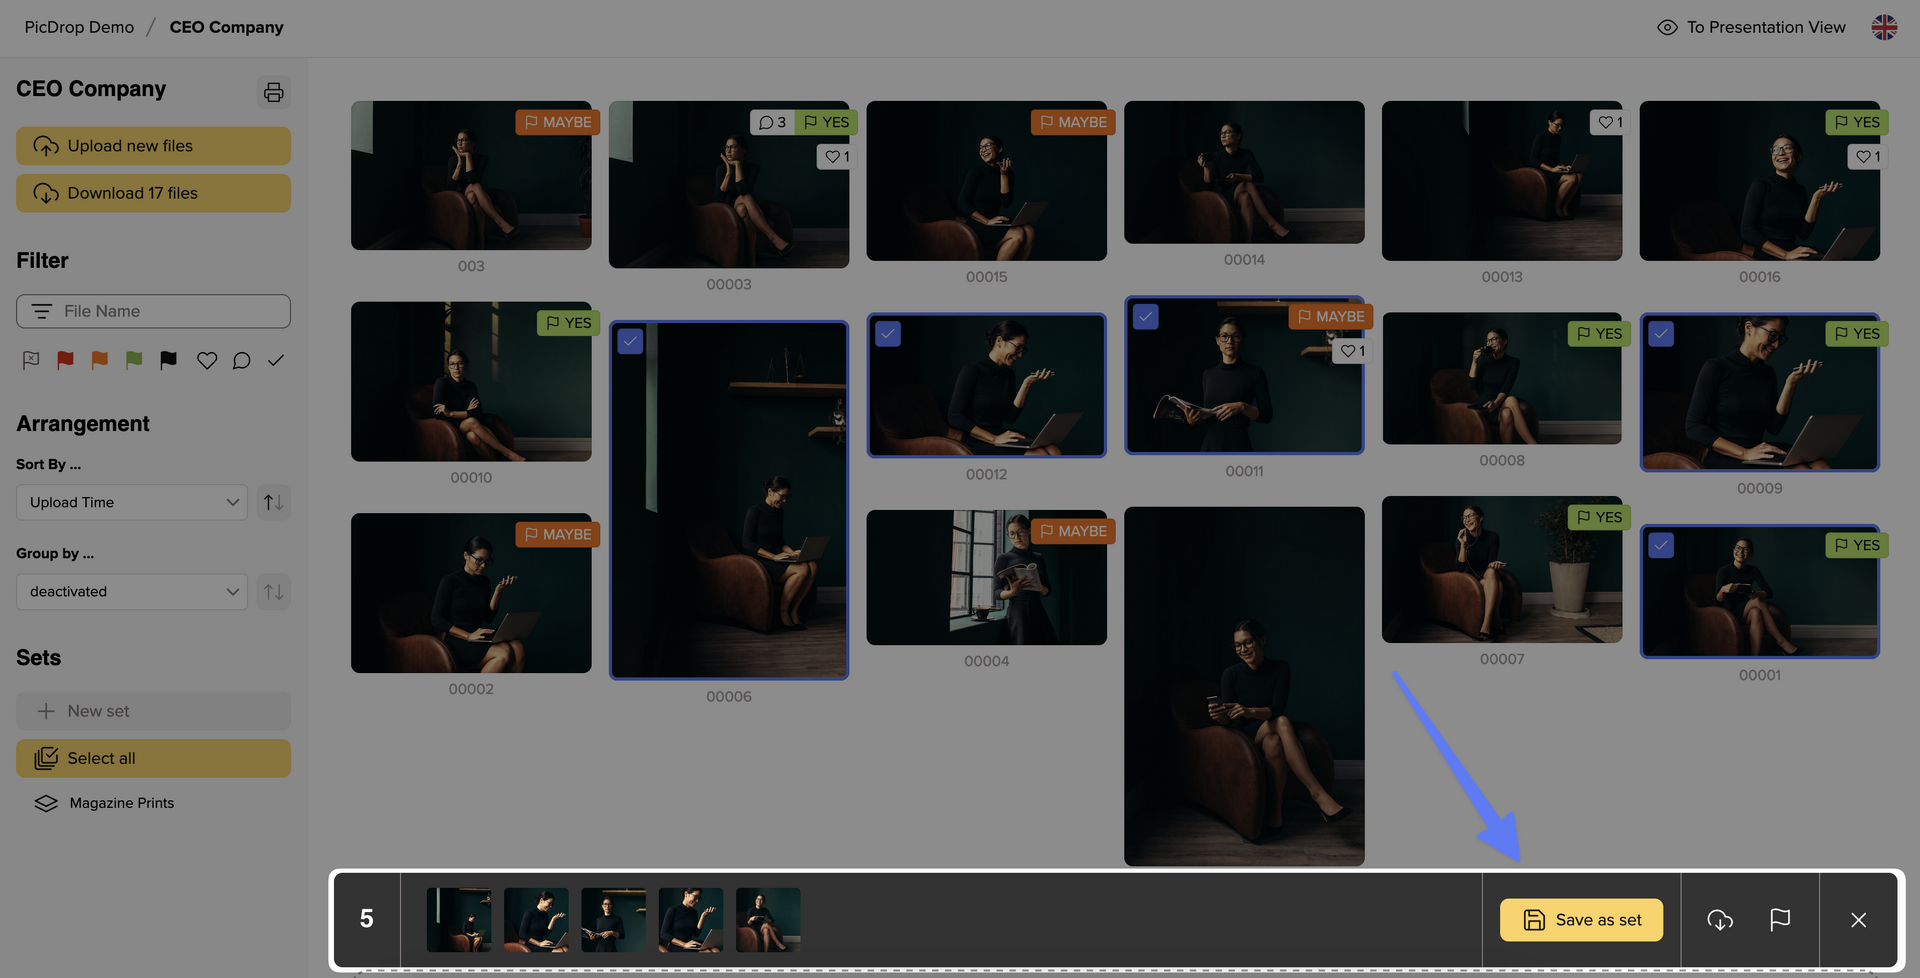
A pop-up menu will then open to save, name and send your set:
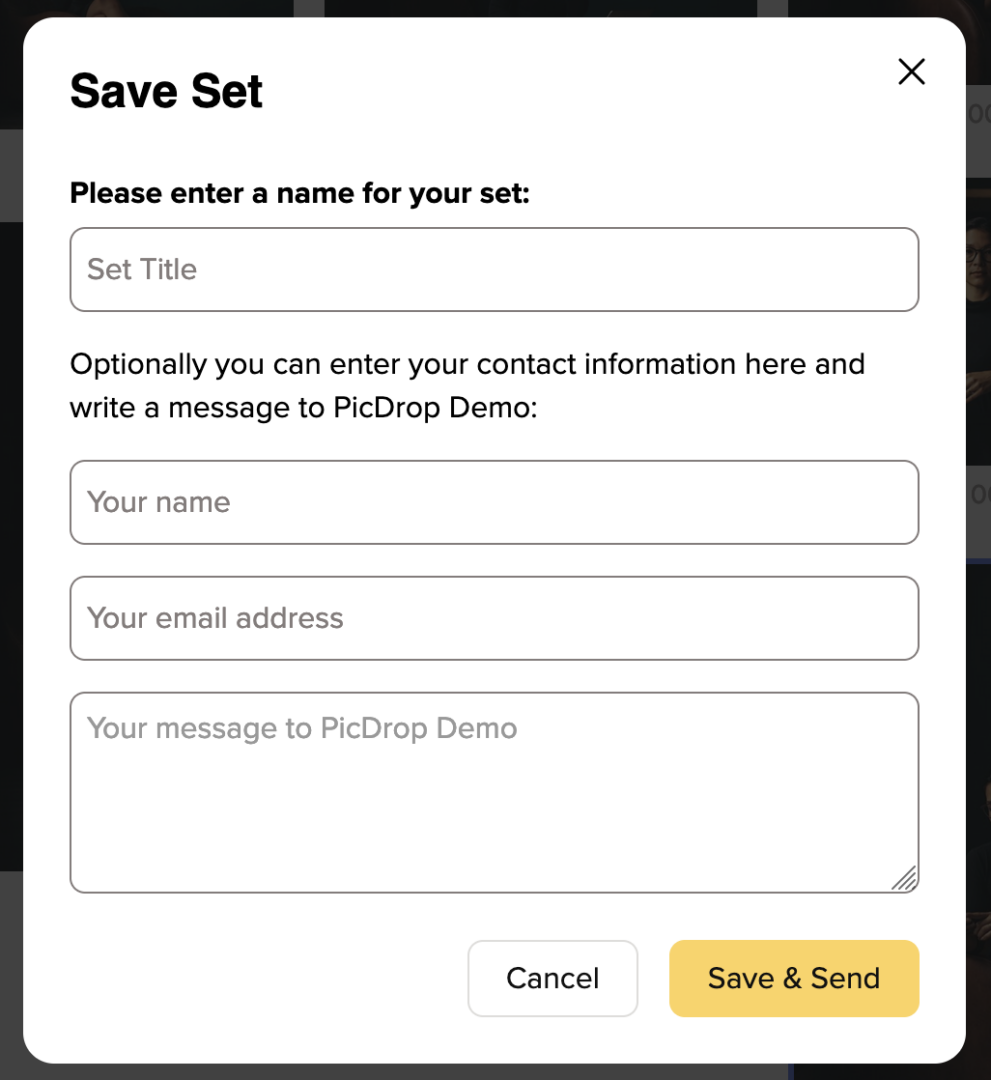
Now choose a unique title for the set. After saving, the title will be visible to all gallery visitors in the sidebar on the left.
Please also leave your name and e-mail address so that the set can be clearly assigned to you by your photographer. If you like, you can also send a message along with the set. Finally, click on "Save & Send". We will then send your photographer a confirmation e-mail with all the information about the newly saved set.
Please note that you can also create multiple sets and that other gallery visitors may also do so.
04 – Display and correct sets
Once you have created your set, you will find it in the left sidebar of the gallery. Click on it to display the images you have selected.
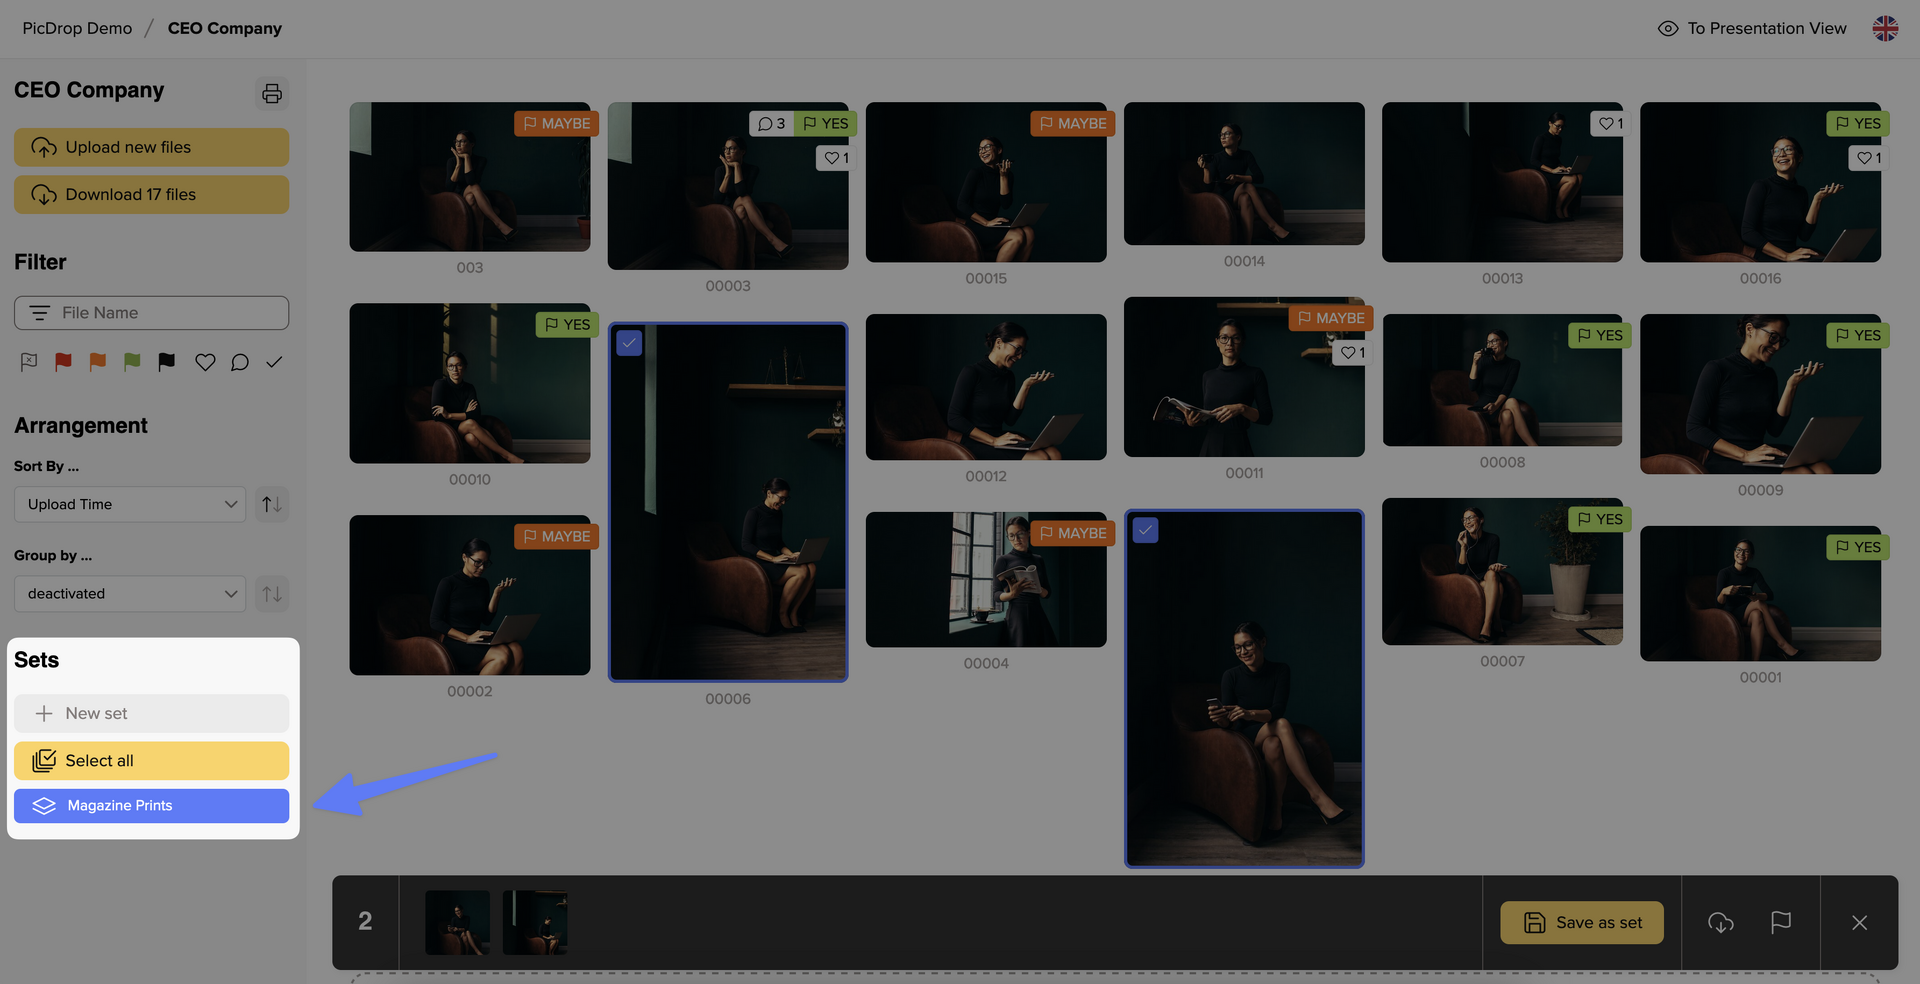
You can of course also make changes to your set later. To do so, add a new image to the set and then click on "Save as set" again. You will now be asked whether you want to update the existing set or save a new one.
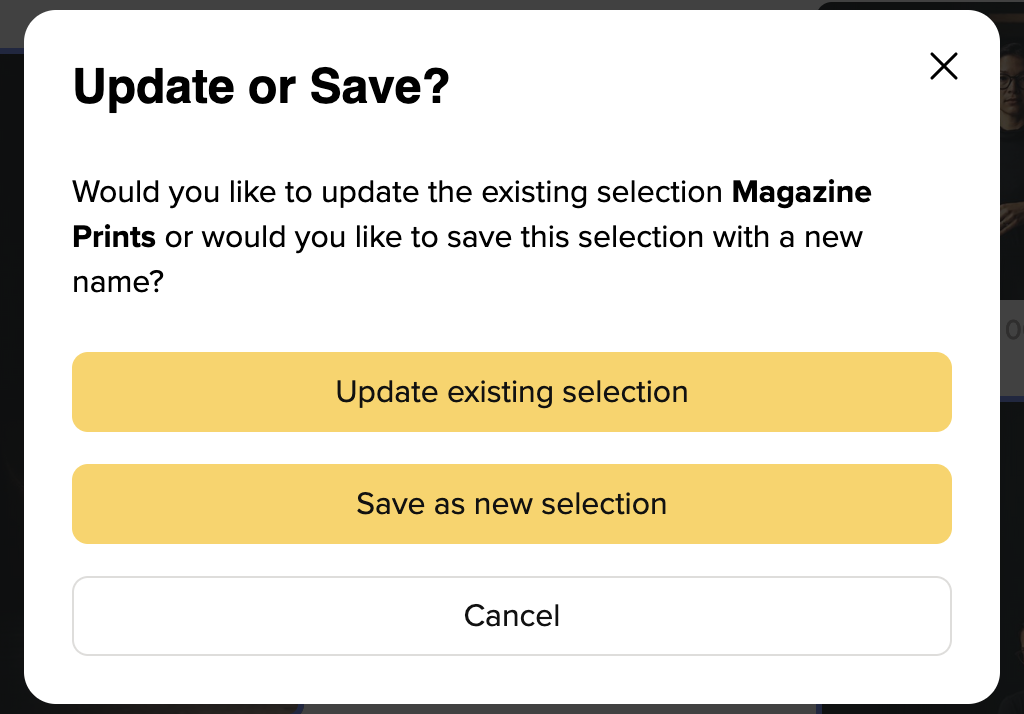
We hope this guide has helped you finding your way around picdrop. If you have any questions, you can always contact your photographer or us at hello@picdrop.com
Has your photographer asked you to vote for images with our Like feature? Then the following instructions will help you on how to create likes in picdrop.
Likes are great if you want several people to vote on pictures and find common ground. They are also super easy for you to use, almost like on social media.
How do I use Likes?
01 – Open gallery
Your gallery should look like the screenshot so that you can get started right away.
If your gallery starts with a screen-filling header image, click once on "To Edit Mode" to start with your likes.
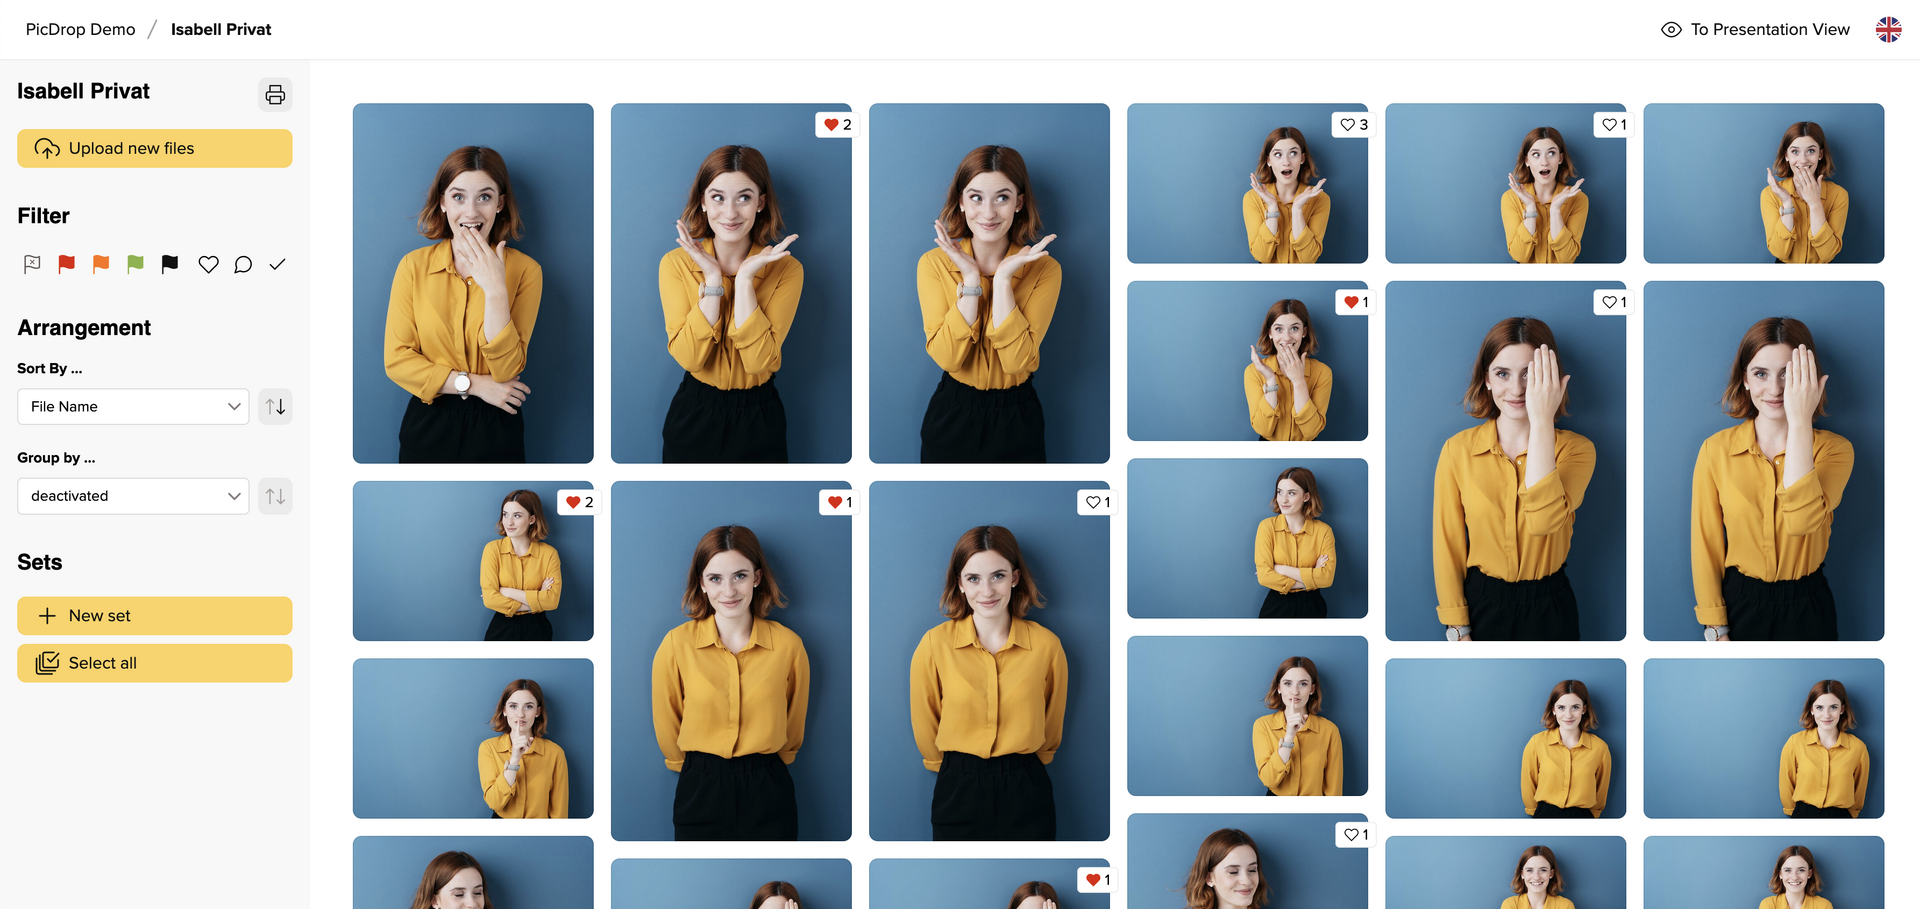
02 – Add Likes
A small heart symbol appears on each picture when you move the mouse over it.

Simply click on the heart for your favorites.
This allows the photographer to quickly find out which pictures are favored by the most people and are the most popular. You can also give and see your likes under each image in the large single image view.
You don't need to save your likes separately.
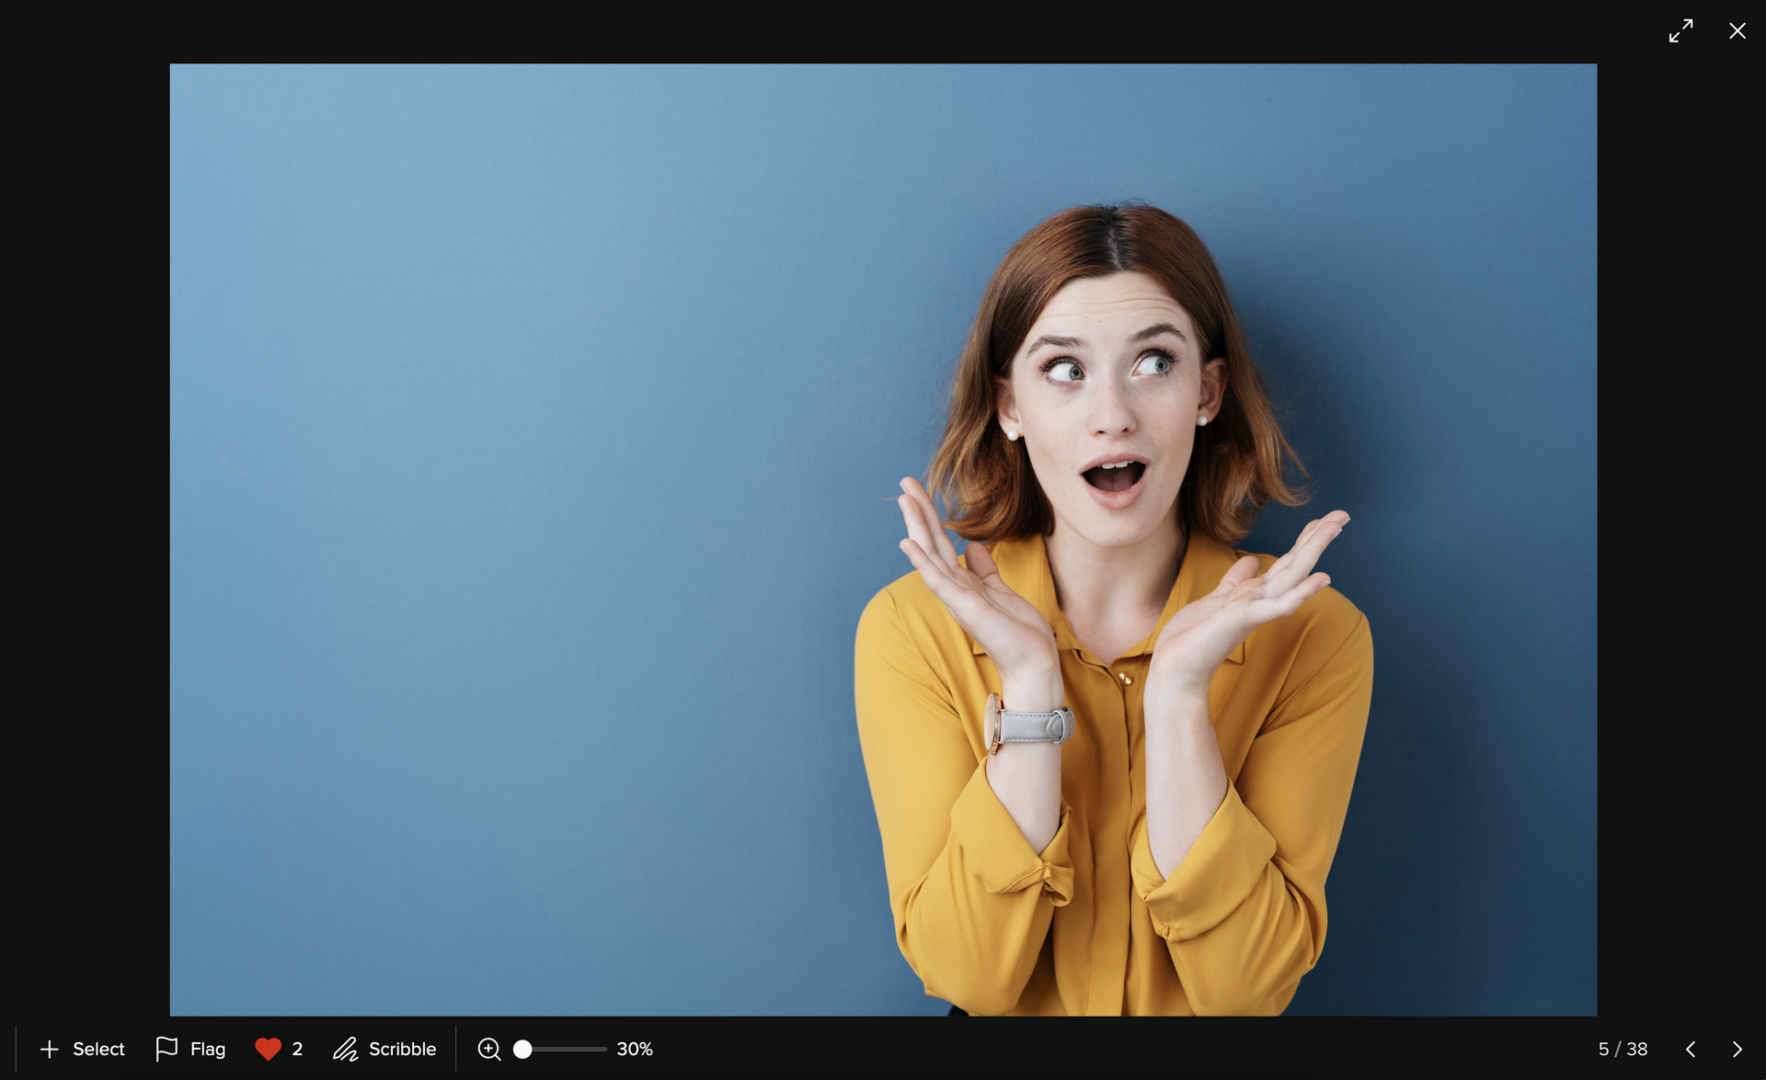
We hope these instructions have helped you find your way around picdrop. If you have any questions, you can always contact your photographer or us at hello@picdrop.com
Unfortunately, storing files on Apple mobile devices is not as easy as it is on Android devices. Unfortunately, we have no influence on that. But we want to make it as easy as possible for you and your clients with this guide. Basically, we recommend downloading rather on PC/Macs and not necessarily on mobile devices because our preview function in the galleries on mobile devices is good enough and it makes no difference for your clients if they have downloaded the pictures or not, as long as their mobile device is online and you leave the gallery online for them.
1. open the file in the gallery
2. click on the download button

3. the download screen opens and tells you what's next

4. tap and hold to save it (Haptic Touch) and then press "Add to Photos".
The file is now automatically saved in your "Photos app". You can then find and open it at any time using the Photos app.

1. open the gallery
2. click on the 3 dots in the bottom right corner and choose "Download all files as ZIP"

or choose "Download all files" in the client view

3. confirm the ZIP download in the pop-up menue
4. go to the Downloads folder in the Files app on your Apple device.
(These steps apply for all downloads with devices that use iOS 13 or later versions. For all previous iOS versions, the following note still applies:
after downloading, your files contain a ZIP file. For further processing a ZIP file you or your client need an appropriate app to unpack the files into the Photos app. Winzip is a free tool, which we recommend :-)
Yes, of course!
If you are at a wedding, at an event or in a personal conversation with a client, you don't have to send your gallery link via WhatsApp or email – or even have it typed out character by character. Instead, you can find a QR code in the gallery's sharing menu for precisely this purpose.
You can display the QR code on your screen, where it can be scanned immediately by other people using any smartphone camera.
Of course, you can also download the QR code to print it on flyers, business cards, etc. or send it by email.
In a QR code, very different information can be stored in a pattern of black and white squares. This works very similarly to a barcode in the supermarket. The information is stored directly in the pattern of the QR code. The special thing about QR codes: the information stored in a QR code can be read quickly and easily with the camera app of any smartphone.
In the QR codes that are created for your picdrop galleries in the share menu, the link to your gallery is stored in such a way that it can be read with any smartphone. From there, it can be opened directly in the browser.
Would you like to share the link to the gallery directly with the people present during a shoot, for example? Then open the QR code in the gallery and let people scan it directly with their smartphone camera.
If you change the link to one of your galleries, the QR code found in the sharing menu for this gallery will also change automatically.
If you have already shared a QR code for a gallery and now change the gallery link, you must also share the QR code again. The old QR code still refers to the old link, which no longer belongs to the gallery.
No.
Your clients only need Internet access and a reasonably up-to-date browser such as Firefox, Chrome or a current Internet Explorer (from version 9).
Definitely. Just open "Gallery Settings", click on "Security" and define the password your client or everyone else has to enter before entering your gallery.
As long as you want.
picdrop never interferes with your data. This means: we do not change or delete any data unless you explicitly request us to do so. All galleries remain online until you delete them yourself when you no longer need them.
This also holds true for our free plan: all your previously created galleries and all uploaded files will remain in your account. However, if the total amount of files or the number of galleries exceeds the amount included in your plan, the files or galleries can no longer be downloaded nor accessed by third parties, i.e. your clients.Link to this entry
If you want, you can also allow your clients to upload flies to your galleries.
Open the gallery (or create a new one just for this purpose) and open the Gallery Settings. Activate "Client Upload" in the "Edit Mode" tab:
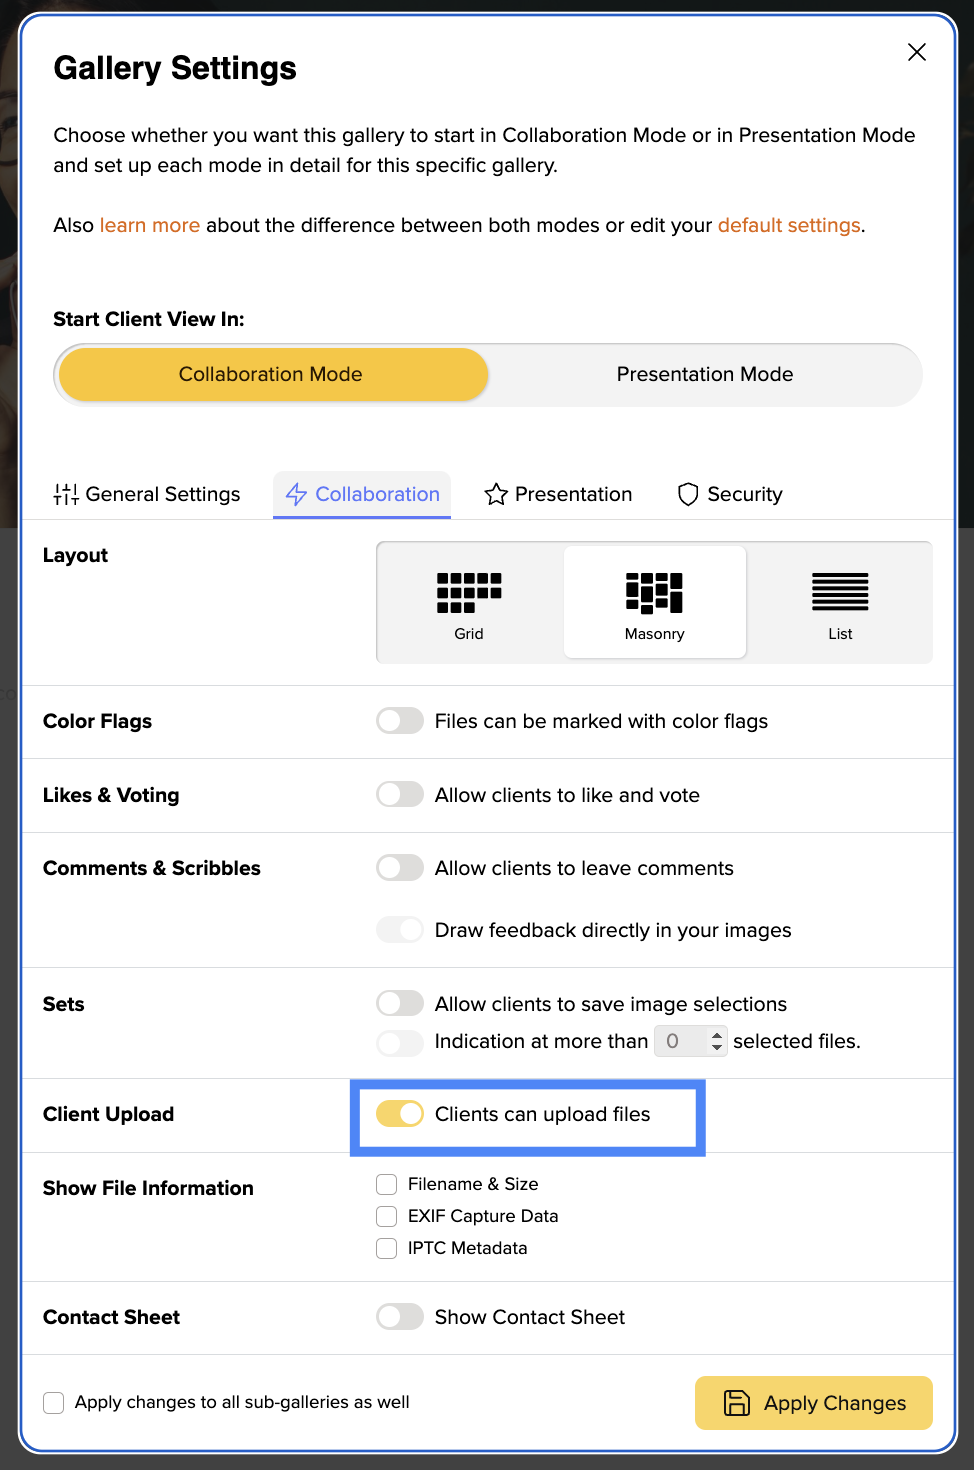
Then you can send your clients the link to the gallery. They can now upload their own files at any time by drag & drop or by clicking the upload button.
No. Only you can delete files from a gallery in your account. (The only exception is that you may also give team members the right to do so.)
Yes, as far as uploading is concerned, your clients have exactly the same possibilities as you have with this option and can therefore simply overwrite files of the same name.
No, If you want your clients to be able to download files again, activate "Downloads" in the gallery settings as usual.
Yes, you will receive an email every time your client uploads files.
If a client only receives an error message instead of the desired gallery, this can have various reasons:
Every gallery you create in picdrop can have a header image. The header image is the first thing you and your gallery visitors see at the top. In Edit Mode the header image is displayed in a narrow landscape format across the entire width. If your gallery starts in Presentation Mode, the header image is displayed as an opener across the entire browser window.
No - unlike the gallery image, which we automatically create for you as soon as you upload images to a gallery, the header image for a gallery is not set automatically. So you are free to decide if you want your galleries to have a header image and which image you want to use for it.
For each gallery you can set the header image in several ways. You can choose a header image that is already uploaded to the gallery. You can also upload an image directly from your hard drive, without it having to be in the gallery.
You can change the header image in these places:
Click on the three dots on the desired image and select "Set as header image" from the menu. In the next step, set the focus point for the header image. Confirm everything with the yellow "Done" button and the header image will be displayed in the gallery.

Alternatively, you can simply drag and drop the image into the header image bar at the top of the gallery.
Then just click the gray "Add header image" button at the very top of the gallery.

The dialog for changing the header image will open. You can then drag an image from your computer directly into the dialog or select it from your hard drive using the "Upload image" button.

If you want it to be even faster, you can also drag and drop the image from your computer directly onto the header image bar to open the menu.
First, a brief explanation:
We display the header image in a wide variety of places in very different aspect rartios.
To make sure your header image is perfectly tailored for every possible use, you can to set a focus point for your header images. With the focus point you mark the most important part of your image and picdrop automatically creates the right header image for all screen sizes. This is how it works:
With the red circle you click on the most important part of your image that should always be displayed – no matter with which crop and which aspect ratio we display the header image in a gallery.

Tip for choosing the header image:
The best photos to use as header images are those that have a clear main subject, ideally set against a relatively calm background. This way, the title of the gallery also has enough space when you set up the gallery in Presentation Mode.
We recommend that you use the highest resolution possible. With 4000px or more in width we have enough resolution for all possible crops of the header image and can display it perfectly - no matter if on a smartphone, tablet or a 4k display.
The Presentation Mode is a view trimmed to a pure and beautiful presentation of your work. It is perfect for images and videos of weddings, events and other special occasions.
You can give your customers the ability to hide individual files in Presentation Mode.
In the gallery settings, please activate the functions "Allow switch to Edit Mode" and "Do not show red flagged files in Presentation Mode".
When visiting the gallery, your customers can now switch from Presentation Mode to Edit Mode by clicking the button at the top. Adding the red color flag to a file in Edit Mode will automatically hide those images Presentation Mode.
If you want, you can change the name of the red color flag, e.g. to "hide", so that it is even clearer for your customers what adding the color flag will do.
In each gallery you will find a tab called Presentation Mode in the Gallery Settings.
To activate Presentation Mode, activate the checkbox next to Start in Presentation Mode at the top.
Your gallery will automatically start in Presentation Mode for all visitors of the link. You can see the Presentation Mode yourself by clicking on the button Client View in the upper right corner. Or you can open the link to the gallery in a new browser window where you are not logged in to your picdrop account.
After you have activated the Presentation Mode in the Gallery Settings, the gallery looks the same as before. To test the new view, click on "Preview" under the name of your gallery on the left side of the screen. There the gallery will appear exactly as your client will see it when opening the gallery.
The Presentation Mode is best suited for sharing your images and videos from weddings, events and all other moments where you need a perfect first impression and an impressive presentation of your work.
For each gallery in Presentation Mode you can choose how the thumbnails of your images and videos should be presented.
Open the gallery settings, click on the tab Presentation Mode and activate it at the top with the respective check mark.
Scroll all the way down and you will find the settings for the image previews:
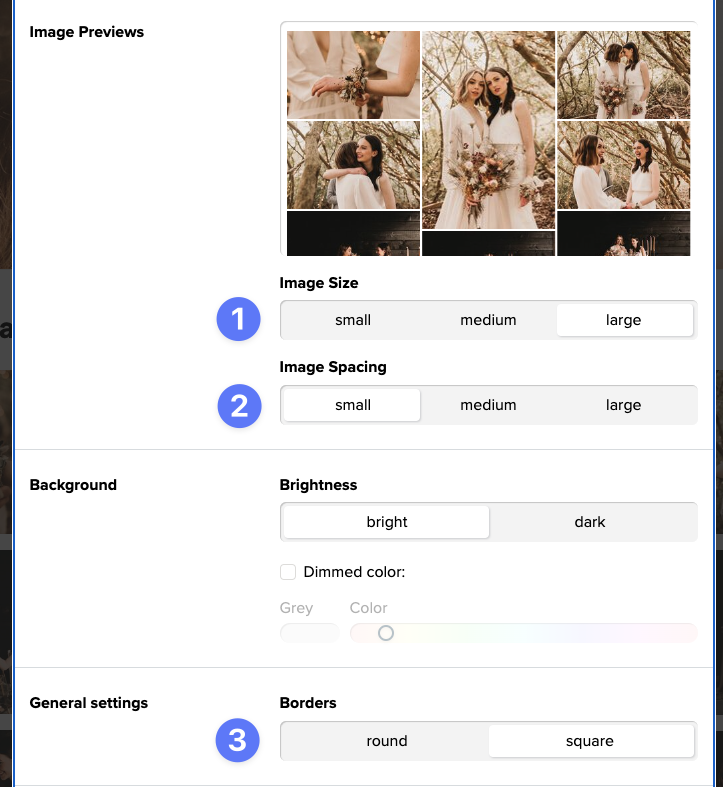
Here you can
You can see all changes live in the preview directly above the settings.
At the end, don't forget to save your changes by clicking the "Apply Changes" button at the bottom!
A tip: with a click on Client View at the top of the gallery you can immediately see how the gallery will look like for your clients once they first open it!
The Presentation Mode is used for pure presentation and download of your pictures.
If you want to give your clients more functions, you can activate the "Allow switch to edit mode" function in your "Gallery Settings".
If this point is active, your clients can switch to the usual mode by clicking a button on the top right corner of their gallery.
Entering the edit mode they will find all the practical functions of picdrop.
All gallery settings you've set will apply here.
With just one click, your clients can return to the presentation mode at any time if they wish to do so.
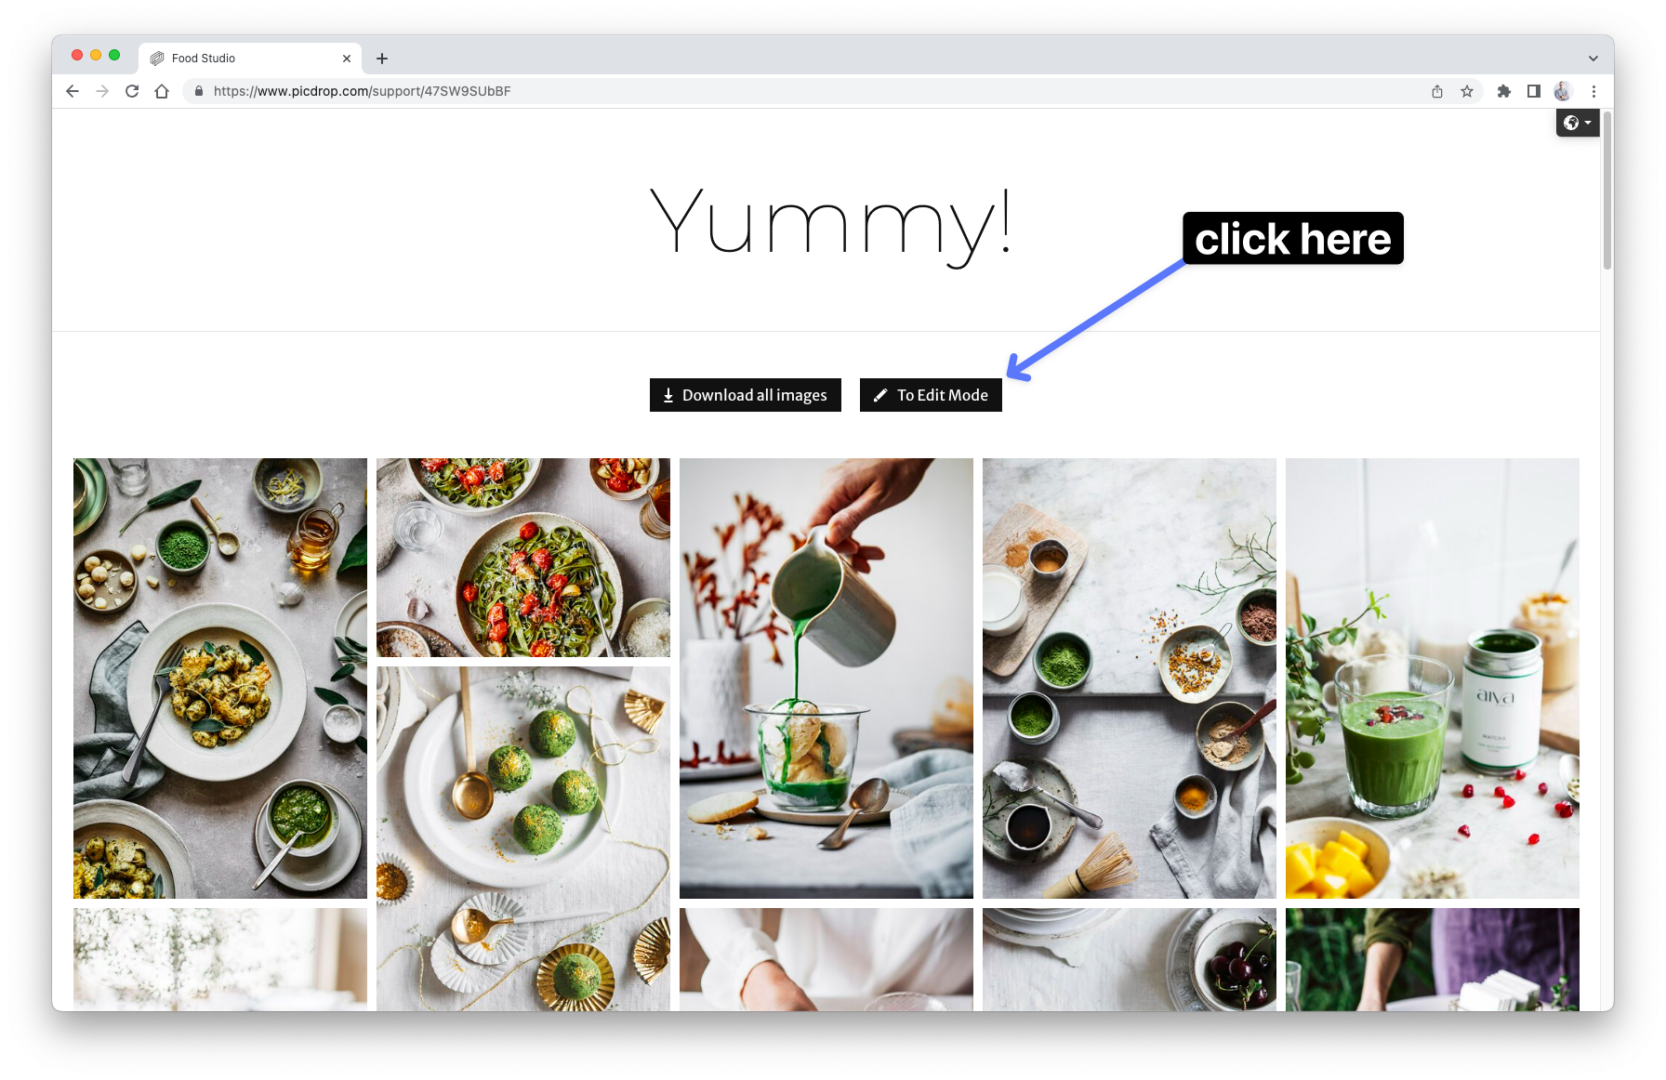
Your gallery is beautifully trimmed in the Presentation Mode.
The range of functions is reduced to the most necessary to avoid distraction from the most important things: your images & videos.
What remains is a pure, beautiful gallery view without annoying sidebar. With an impressive, large header image, larger preview images, horizontal navigation, large gallery title, individually colored image view and so on.
Only the download function is usable if you have enabled it in the Gallery Settings.
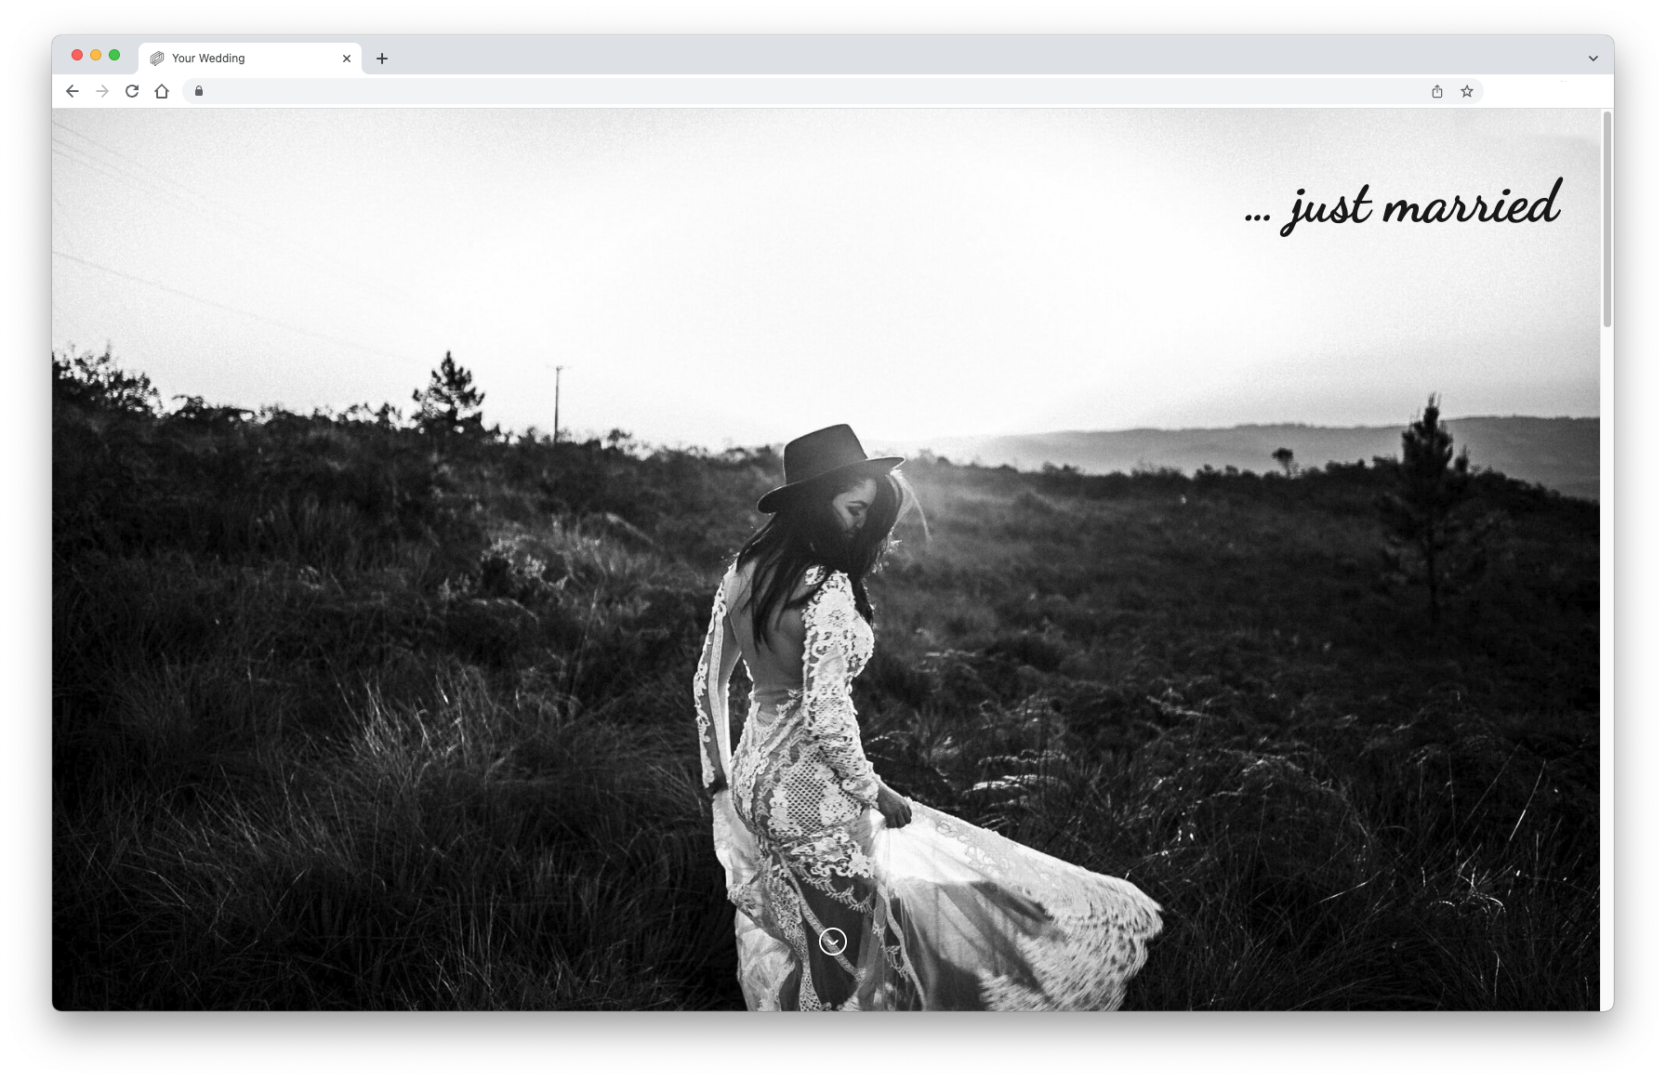
picdrop allows you to customize all the details of your galleries to best suit you and your clients.
With the following settings you can create your personal gallery look:
✅ select a font
✅ adjust the position and size of the gallery title
✅ set the brightness for the gallery title
✅ an alternative title for your gallery
✅ a suitable "Open gallery" button

✅ the background color of the gallery
✅ the size of the thumbnails
✅ the spacing of the thumbnails
✅ the choice between a round or square look
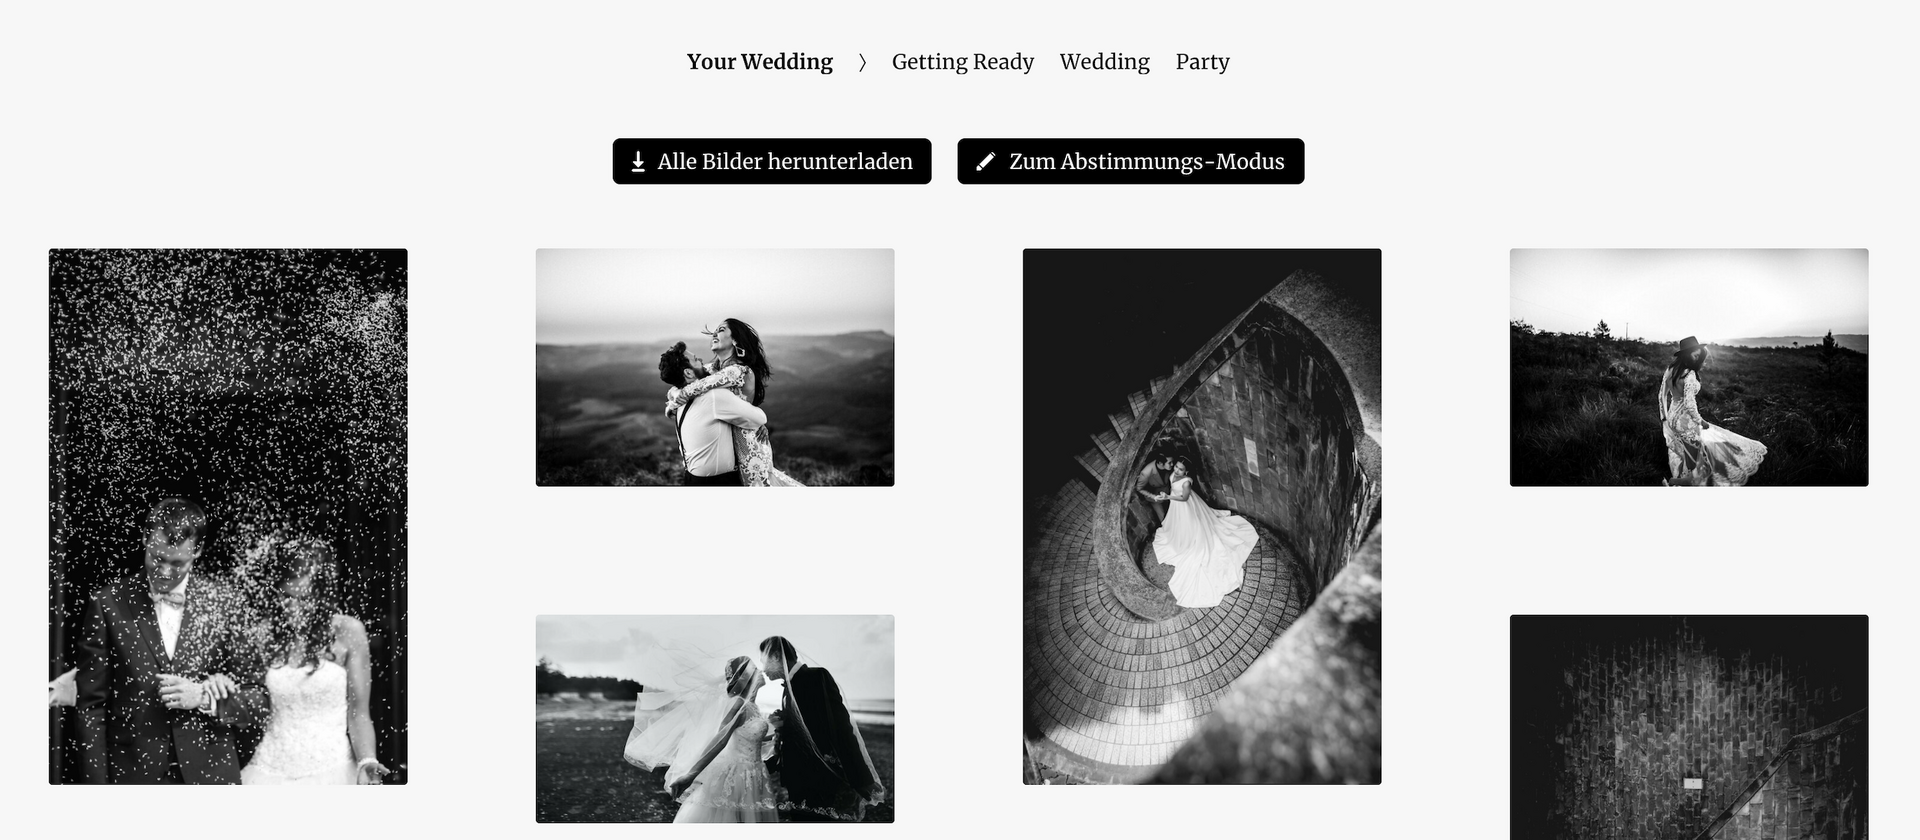
All buttons in the gallery adjust automatically to your color and font selection.
You can set the background color for your galleries individually for each gallery. To do this, go to the Gallery Settings and open the Presentation Mode tab.
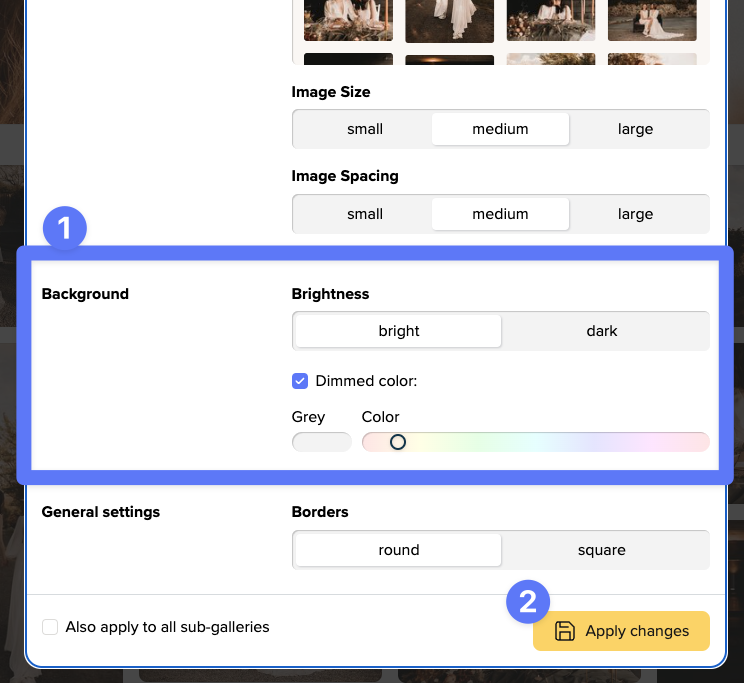
First you decide on the brightness - bright or dark.
If you activate the "Dimmed color" option, you can use the button on the left to choose a grey background. Depending on your choice of brightness, this will be a light or a dark grey.
With the slider to the right you can choose a light coloring for your background.
If you don't activate the "Dimmed color", the background of your gallery is simply white or black.
In the small preview below you can directly see the color effect in combination with your images and videos.
At the end you save your desired color at the bottom with the button "Apply Changes".
This way you're sure to find the perfect background that makes your work look best!
For each gallery you can customize how the title should look like.
First, you activate a header image for your gallery. Here is a detailed instruction on how to set a header image.
Then open the gallery settings, click on the tab Presentation Mode and activate it.
Then scroll down a bit in the gallery settings and you will find the settings for the opener:
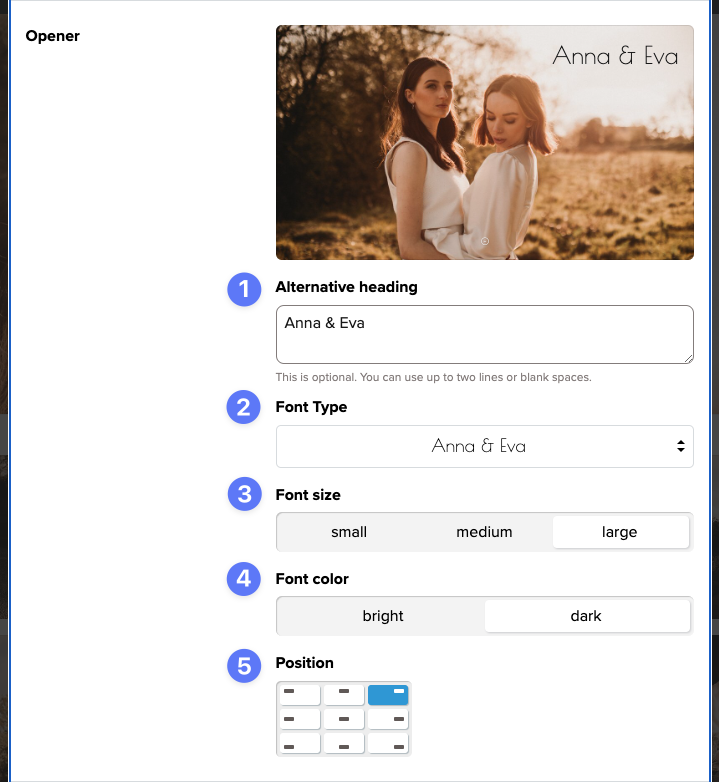
Here you can
You can see all changes live on the small preview image.
All these functions enable you to find the right look for each and every client - from wedding to interior design shoots.
At the end, don't forget to save your changes by clicking the "Apply Changes" button at the bottom!
A tip: with one click on “Client View” at the top of the gallery, you can immediately see how the gallery will look for your clients when they first open it!
The search function can be used by Account Owners and Team Members (within their access scope).
Regular visitors of a gallery cannot use the search function. For them, however, the filter bar on the left side of the gallery is still available in Edit Mode. It can be used to search and find filenames in the current gallery.
You can use the new search function in picdrop to search for gallery names, file names and most IPTC metadata.
The following IPTC metadata fields can be displayed and searched for in picdrop:
After your search results are listed, you can jump to the desired image with one click.
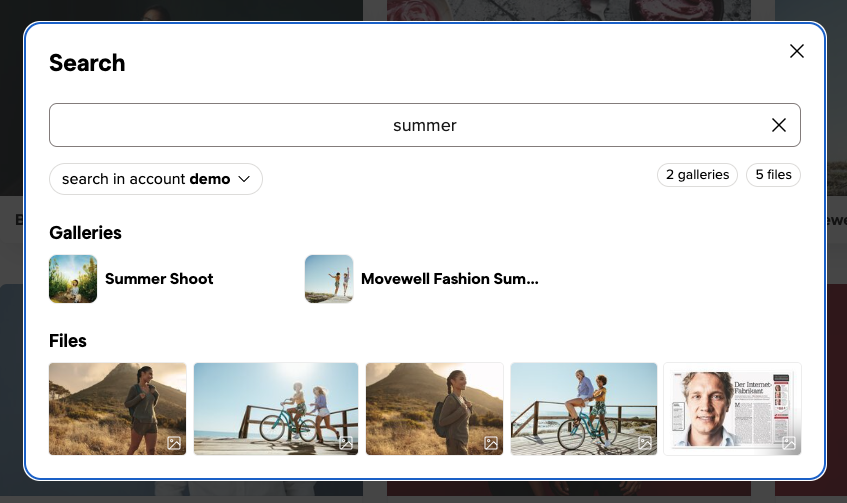
You can also open each of the results in a separate tab with CMD-click or right-click.
Need to find images fitting multiple keywords / search terms? You can use a comma-separated search for multiple keywords.
If you want to search for a very precise term, just put it in "quotation marks", so you can search for a specific image name or an image description.
Your picdrop account is equipped with a search function. This can be accessed at any time via the bar at the top of the screen when you are logged into your account. Click on the magnifying glass icon in the upper right corner:

You can also start the search with the keyboard shortcut cmd-F / ctrl-F.
If you start a search while you are in the gallery dashboard, your entire account will be searched for your search term.
When searching within a gallery, you can choose to search the entire account or just the current gallery.
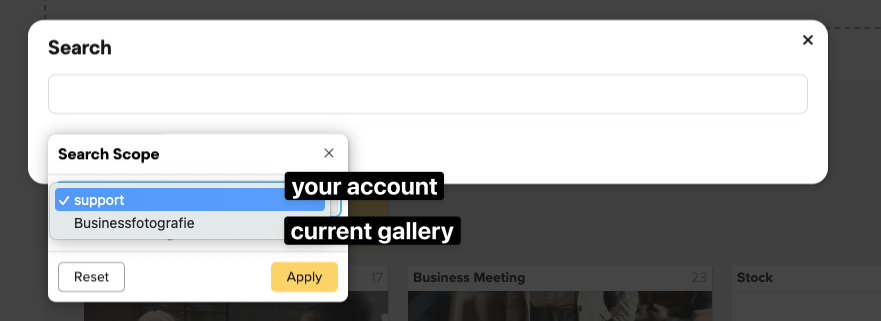
If you only want to search the current gallery, you can also select whether the sub-galleries should be included in your search or not.
In picdrop there are two search and filter tools:
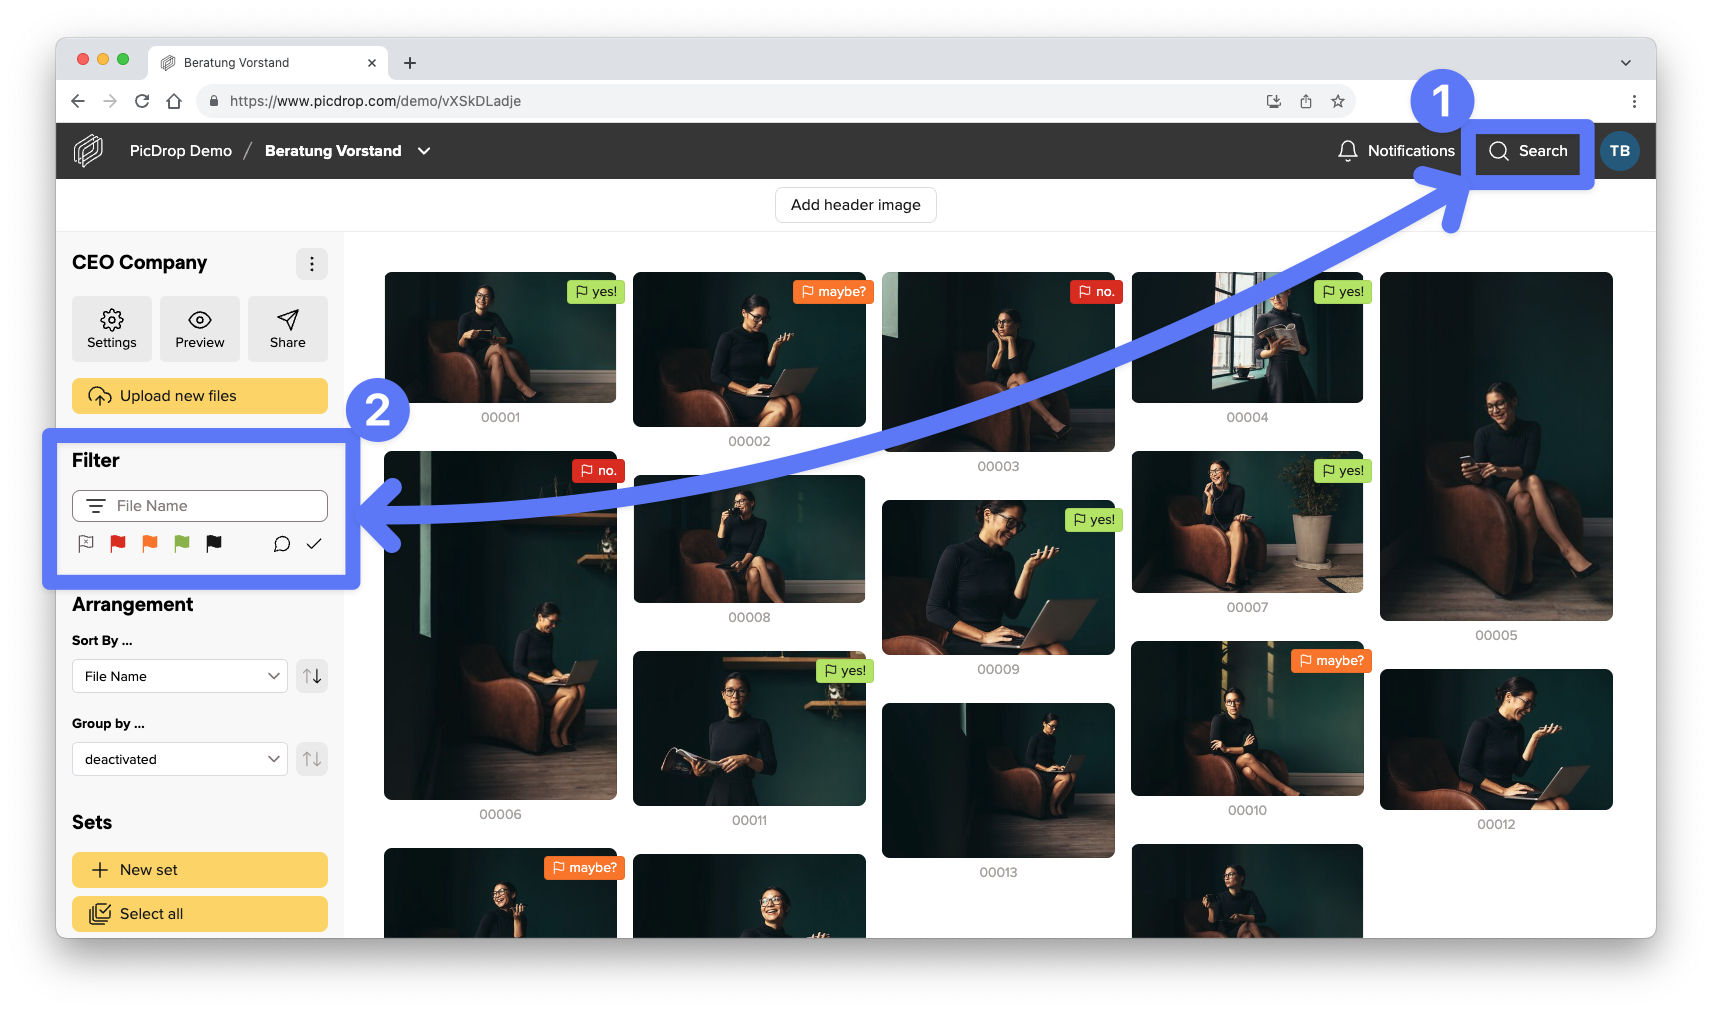
These differ in who has access to them, what can be searched for and from which area results are found.
Here you can find a short list of who can use what – and where to search for what:
The search bar (through the magnifying glass symbol)
… is available for Account Owners and Team Members.
… searches file names, gallery names and IPTC metadata.
… finds results in the whole account or only the current gallery and its sub-galleries (depending on which section you have selected).
The filter bar
… is accessible for Account Owners, Team Members, and your regular clients who use a gallery link.
… only filters the filenames of the gallery you are currently in.
… shows results directly the gallery you are in at the moment.
You can of course completely skip the picdrop.com address for sharing your galleries and use your own internet address instead. This way you can share a link in your emails, WhatsApp chats, Instagram DMs etc. that perfectly matches your branding.
With picdrop’s Web Forwarder, picdrop remains invisible when you share your gallery links. For example, www.picdrop.com/johndoe/gallery becomes johndoe.de/clients/gallery
If you are already registered with picdrop, you can find the installation files here and the instructions for installing the Web Forwarder here.
Here we explain briefly what the picdrop Web Forwarder does. Perhaps this will make it easier for you to decide for or against it?
All galleries and the associated gallery links that were created before the Web Forwarder was installed will remain accessible after the installation as they were before. The links will not change when the Web Forwarder is installed on your server.
The picdrop gallery link will continue to be displayed in the address bar of your browser even after the Web Forwarder has been installed. In the Share menu of each gallery, however, you will now find your own Web Forwarder link to the gallery. Both links always work in parallel.
Very important: picdrop cannot be installed directly on your server. This is because picdrop is a very complex program that we are constantly working on for you. Furthermore, perfectly adapted servers and the interaction of several functions are part of the perfect picdrop, which is why it is not possible to use it on other servers.
You can find the Web Forwarder and instructions on how to install it in your picdrop account settings under the Web Forwarder menu item.
If your server fulfills all basic requirements (Apache, PHP support and a valid SSL certificate), but still displays error messages during installation, please send us an email to hello@picdrop.com. Please send us the exact address where your (non-functioning) Web Forwarder is installed. We will then be happy to help you solve the problem.
You have managed to install the Web Forwarder on your server. The gallery overview can be called up via the new address (www.deineseite.de/picdrop/) without any problems, but when calling up individual galleries via their addresses (www.deineseite.de/picdrop/galerie), your website only spits out errors.
The solution is usually quite simple: please also upload the ".htaccess" file, which is included in the ZIP of our Web Forwarder. It seems to be missing in your case.
Unfortunately, uploading this file is often skipped as it is not displayed on many PCs & Macs. Some operating systems see the .htaccess file as part of their system files and therefore hide it. If you cannot find the file, show the "hidden files" (or similar) in the settings of your operating system or your FTP program. You will then be able to see the .htaccess file and upload it to your Web Forwarder folder on your server.
If this does not work or you need further help, you can always contact us at hello@picdrop.com.
You have installed the Web Forwarder from picdrop on your server according to our instructions and stumble across this phenomenon:
In this case, everything indicates that you have installed the Web Forwarder correctly on your server. A file with the name .htaccess has also ended up in your Web Forwarder folder. Apparently there is another .htaccess file in a main folder on your server that is getting in the way of the Web Forwarder.
An .htaccess file is a configuration file for Apache servers, among other things. Several functions can be controlled in an .htaccess file: e.g. password protection for individual areas of your server, rules for the automatic redirection of URLs, etc.
If you use Wordpress for your website, then you most likely already have an .htaccess file on your server that ensures that the appropriate file is always loaded on your server for a specific URL. If the htaccess file does not find a suitable result on your server, a 404 error page will be displayed. This is also regulated in the .htaccess file.
The Web Forwarder from picdrop also provides an .htaccess file. This file specifies, for example, how the links to your galleries must be redirected in the background so that your galleries can be displayed.
Now it can happen that the .htaccess file in your main folder cannot find a rule for a gallery URL and is then always automatically redirected to an error page. The .htaccess file in your Web Forwarder directory is therefore bypassed and cannot resolve a gallery.
To do this, you need to make changes to the .htaccess file in the main folder that belongs to your website. You need to add an exception there that explicitly excludes the Web Forwarder directory from being handled by your .htaccess file.
Unfortunately, we cannot offer a universal solution for this, as it can look different on every website. If you are not very familiar with this yourself, the person who usually takes care of your website, i.e. your webmaster, is the right address here! Feel free to forward the link to this article so that you can quickly find the right approach!
Especially with WordPress installations, it can also happen that plugins, e.g. to speed up your site or for search engine optimization, repeatedly make changes to the .htaccess - so even Web Forwarders that previously worked can suddenly point to the 404 error page due to a plugin update. It is therefore a good idea to search for the causes of these plugins too!
Installation instructions
For these installation instructions, you need a basic understanding of how to operate a website. If you have nothing to do with your website and prefer to let your webmaster do such things, we recommend that you send him/her the ZIP file and a reference to these instructions. The installation should be done quickly for him/her.
Go to the Web Forwarder page in your account settings and choose whether you want to install the web forwarder as a subfolder on your website (method 1) or whether you would prefer to use a subdomain or the main folder of your website (method 2).
Enter the desired subfolder and click on "Download Web Forwarder".
Unzip the downloaded ZIP file - you will receive a folder with the name you entered under 1.
Log in to your own web server via FTP.
Call up your root directory there, i.e. the directory in which the index.hml or index.php file of your website is also located. (You should never overwrite these files!)
Load the complete folder from step 2 into exactly this directory. Attention: the folder also contains an invisible .htaccess file, which is not displayed on many systems but is hidden instead. Important: Be sure to upload the complete folder, not just the file in the folder!
Call up your gallery overview at https://www.yoursite.com/picdrop/ or replace "picdrop" here with the name of the folder you specified in step 1.
That's it! Your galleries can now be accessed via your web forwarding! You can find the link for each gallery in the Share menu.
Select "Installation as subdomain or in main directory" and click on "Download Web Forwarder".
Unzip your downloaded ZIP file.
Log in to your own web server via FTP.
Call up the directory you want to use for your Web Forwarder.
Load the contents of your picdrop folder into this directory. Attention: there is also an invisible .htaccess file in the folder, which is not displayed on many systems.
Call up the desired URL or subdomain that points to the directory with the Web Forwarder you have just uploaded.
Done! Your galleries can now be accessed via your web redirect! You can find the link for each gallery in the Share menu.
Is that it?
Yup.
Important notes
Please continue to upload your images, videos and other files to your picdrop account after installation and not to your own server. The Web Forwarder you have just installed there is "only" a redirect to picdrop, which ensures that you can share picdrop links with your own address. picdrop itself continues to run on our secure servers.
How do I get rid of the Web Forwarder?
If you want to use picdrop again via the normal picdrop URL, simply delete the folder with the Web Forwarder from your web space. However, this is not absolutely necessary as it is sufficient to call up your picdrop via your picdrop URL to have the normal address displayed again in the "Share" menu and in the gallery settings. If you still see a Web Forwarder URL there, you can reset the saved address in your picdrop account settings in the Web Forwarder section with one click. The corresponding browser cookie that defines the address will be deleted and the picdrop URL will be displayed everywhere again.
With Scribbles, you and your customers can draw comments and annotations directly into the images in a gallery. Scribbles are displayed on the image and saved together with a comment, making them visible to all visitors to the gallery.
Scribbles are the perfect tool for marking retouching requests in an exact location, leaving post-production instructions for certain areas of the image or simply for drawing ideas and thoughts into the image.
You can either place a circle in the image or draw your own shapes freely with the pen tool.
This is what Scribbles look like:

Scribbles can be created and changed in the desktop version of picdrop. In the mobile version of picdrop on tablets and smartphones, you can view scribbles and their comments.
You've probably seen how to filter out your clients' image sets in Lightroom, Capture One, Photo Mechanic, Finder, and Explorer. The whole thing is not only possible with image sets but also with all color-coded images.
Many image editing programs allow you to use the file search to display exactly the images of an image set you or your clients made in picdrop. This saves you the trouble of searching for each individual file. Here we show you how to do it:
Filter out all images with the desired color flags using the filter function on the left side. Now you see only the images with the desired color flag.
Click on "select all images" (bottom left) or use the keycombination of cmd-A or Ctrl-A to select all currently displayed images.
You have now created a set that you can use to filter out the images locally on your mac / PC.
Click on the "Export selection" icon in the set menu, bottom right. When you are logged in to your account you will find the various filter texts to filter out this set in Lightroom, Capture One or in your Finder / Explorer.
Optionally, you can save this selection permanently in picdrop to make it easier to find it again later.
Once you have copied the list of filenames to your clipboard, please continue on your computer in your tool of choice:

You can now save the filtered images in a new collection or mark them with stars / colors for your further workflow.
In Capture One, you can search for your images in multiple places using the exported folter text. To do this, open a folder or collection in Capture One with the images you want to filter. Then you have three options:


Done! You can now save the displayed images as your own collection or mark them with a color / stars.
Open the corresponding project folder in Photo Mechanic.
Paste the filter text from your clipboard into the search box (via Edit > Find... menu or cmd-F on Mac or Ctrl-F on Windows) and set the following search options:
After clicking "Find" in the lower right corner, Photo Mechanic will now select all photos of your choice from picdrop and you can continue working with them.
Please note that the search in the upper left corner of Photo Mechanic ("Search my Mac") cannot be used for these steps.

Please note that the filter text in Explorer can only hold a maximum of 259 characters.
The filter text in Finder is limited to 2048 characters or 99 files.
Many image editing programs allow you to use the file search to display exactly the files of a set you or your clients made in picdrop. This saves you the trouble of searching for each individual file. Here we show you how to do it:
Open the set in the gallery that you want to filter out on your computer. Or mark the files with the set tool (blue plus sign in the overview of your gallery).
Click on the "Export set" icon in the set, bottom right. When you are logged in to your account you will find the various filter texts to filter out this set in Lightroom, Capture One or in your Finder / Explorer.
Copy the corresponding file list / filter text to your clipboard.
Now continue on your computer in the program of your choice:

You can now save the filtered files in a new collection or mark them with stars / colors for your further workflow.
In Capture One, you can search for your files in multiple places using the exported folter text. To do this, open a folder or collection in Capture One with the files you want to filter. Then you have three options:


Done! You can now save the displayed files as your own collection or mark them with a color / stars.
Open the corresponding project folder in Photo Mechanic.
Paste the filter text from your clipboard into the search box (via Edit > Find... menu or cmd-F on Mac or Ctrl-F on Windows) and set the following search options:
After clicking "Find" in the lower right corner, Photo Mechanic will now select all files of your choice from picdrop and you can continue working with them.
Please note that the search in the upper left corner of Photo Mechanic ("Search my Mac") cannot be used for these steps.

Please note that the filter text in Explorer can only hold a maximum of 259 characters.
The filter text in Finder is limited to 2048 characters or 99 files.
Do you see too many results when using picdrop’s filter texts? Or do you get no results at all? There are several reasons why this might happen – and these are the solutions:
Lightroom, Windows Explorer, Apples Finder, etc. cannot filter out files that contain spaces. Before uploading, you should make sure that your file names consist only of letters, numbers, and underscores or hyphens.
Basically, the files on your hard disk must have the same file name as the files in your picdrop Gallery and the set you want to filter out locally. So you should make sure that e.g. Lightroom does not rename the files when uploading.
If additional images are filtered out instead of your set, this is often due to missing "fill zeros" in your file names. From the beginning, for example, if you filter to "File-2," Lightroom and Co will display all files that contain the "File-2" section in their names. Unfortunately, this section is also found in other file names such as "File-24". The result, both files (or even much, much more...) are displayed.
To solve this problem permanently, we recommend naming files from the memory card to the hard disk so that the trigger number always has at least 4 digits at the end of the file. Shorter digits before should always be filled with zeros. So "File-2" would become "File-0002" and the number is always and everywhere completely unique, even when filtering in Lightroom. For example, using this method, the "File-0002" file can no longer be part of the "File-0024" file name, as it was before.
This procedure helps you in many other programs besides Lightroom, including picdrop.
The filter text in the Explorer can contain a maximum of 259 characters. The filter text in the Finder is limited to 2048 characters or 99 files.
Capture One offers multiple ways to search for files. Please use the function in the menu Select > Select by > Filename List ...
Here is a detailed description of how to use this function: How do I filter color-coded images in Lightroom, Capture One, Photo Mechanic, Finder and Explorer?
Photo Mechanic offers two different search tools. Please use the search via "Edit & Find..." in the menu to filter your set. Here you will find the required settings for Photo Mechanic's search window.
You heard about the Lightroom plugin for picdrop but can't find it in your picdrop account?
The Lightroom plugin for picdrop is automatically activated for all accounts created before June 2022.
If your account was created after June 2022, you won't find the plugin in your account settings.
But don't worry, if you can't do without the Lightroom plugin for your work, please email us at hello@picdrop.com and we'll be happy to help.
Once the Lightroom plugin is activated for your account, you can find the installation instructions here in your account settings under Lightroom.
Important info about the Lightroom plugin.
The Lightroom plugin from picdrop is automatically activated for all accounts created before June 2022. If your account was created after June 2022, you will not find the plugin in your account settings.
But don't worry: if you can't do without the Lightroom plugin for your work, please email us at hello@picdrop.com and we'll be happy to help.
Attention: If you are using the outdated operating system macOS Mojave the Lightroom plugin will only work with Lightroom Classic version 10.2 or older. Newer versions of Lightroom Classic require at least macOS Catalina for you to be able to use the plugin.
Go to the "Account Settings" in your picdrop account and download the plugin under "Lightroom".
Save the ZIP file to your hard drive - preferably in a place where you won't accidentally delete it later. It's a good idea to put the plugin in the same place where you already store your Lightroom library. Your Lightroom installation folder is also a suitable place.
Here you unzip the file. The result is a file called "picdropftpupload.lrplugin", which you simply leave there.
Now you have to add the downloaded and unzipped plugin to Lightroom. It works like this:
Before your first upload with the plugin you have to configure the FTP settings for the plugin. Don't worry: this step is only necessary once!
To configure the plugin, select one or more images in Lightroom and open the Export dialog. This is the same dialog you use to save images to your hard drive.
In the Export dialog you will see the following window:

Select "picdrop FTP Upload" from the dropdown menu at the top.
Then, at the bottom, below the settings for your files, in the "FTP Server" area, click on the dropdown menu with the name Zielserver.
Select "Edit ..." and a new window with the title "Configure FTP file transfer" will open. In this window, fill in all the fields exactly as shown below.
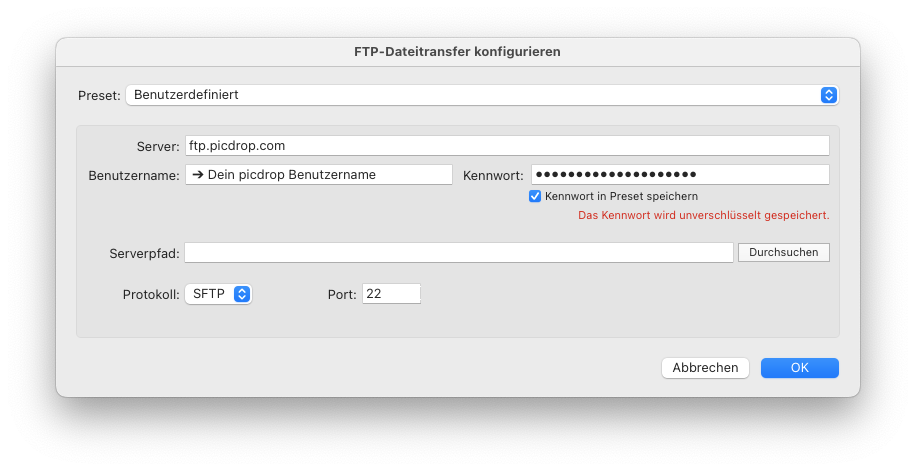
Important!
Make sure to click Custom at the top of the Preset section and select Save Current Settings as New Preset ...

Enter the name "picdrop" and click on "Create".
After that click on "OK".
This is the only way to save your settings permanently and you don't have to enter them every time you export.
If you have followed all the steps, you can now select images in Lightroom at any time and upload them directly to your picdrop account using the "Export" function.
To do this, select "picdrop FTP Upload" at the top and adjust your settings for image size, sharpness, etc. as usual.
At the very bottom of the Export dialog at FTP-Server you set "picdrop" as destination server and use the settings you just created with this tutorial.
Now you just have to enter the name of a new or existing gallery where you want to upload the pictures.
Please enter the gallery name in the pattern shown below. Please do not use the secure link or similar shortcuts.
Of course you can also just create a new gallery. All you need to do is to type its name. It is also possible to create sub-galleries from within the export dialog.
Example:
The destination folder "Wedding”
becomes
www.picdrop.com/yourUsername/wedding
The destination subfolder "Wedding/Cake" becomes
www.picdrop.com/yourUsername/wedding/cake
IMPORTANT: Please do not use special characters in folder names (&, $, /, é, à, etc...).
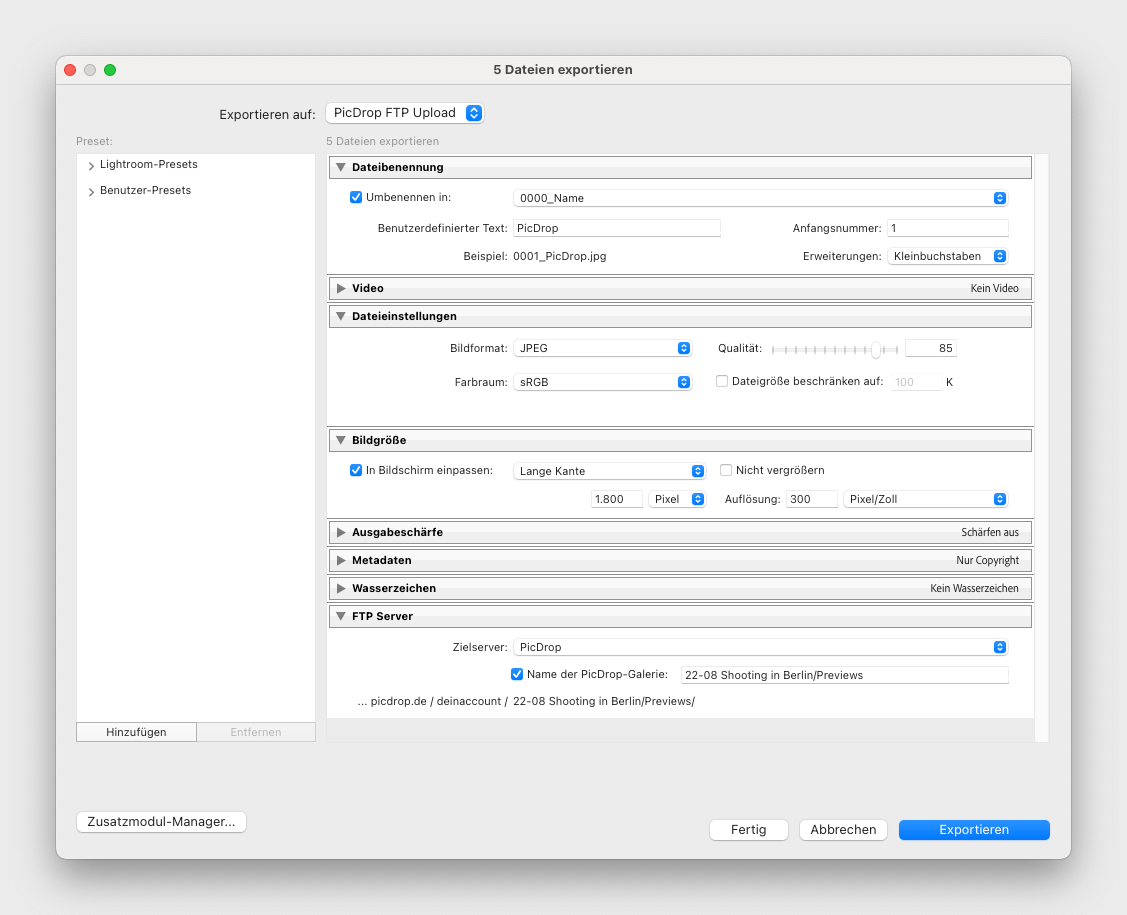
Finally, click on the blue Export button at the bottom right and the upload to your picdrop gallery will start!
After the successful upload you will find all pictures in your picdrop account in the gallery you chose in Lightroom.
There are problems with the upload or you get an error message? Please read this article carefully. If the solutions from the article don't help, just write us at hello@picdrop.com and we'll see together how we can solve the problem.
PS: The plugin is not required to use picdrop. You can also always upload images via drag & drop or any other FTP client. But it is handy, isn’t it?
In the Lightroom plugin, you have to use the server address ftp.picdrop.com for your uploads to picdrop. If you have had the plugin installed for a while, there is a good chance that it is still configured to use ftp.picdrop.de.
The switch to ftp.picdrop.com is done in three quick steps, so you can continue to use the plugin without any interruption:
To do this, select at least one image in your Lightroom library and click on the Export … button at the bottom left.
To do this, select Export to: picdrop FTP Upload from the drop-down menu at the top.
At the bottom right in the FTP Server area, click on the menu for the destination server (Zielserver).
And click Edit … In the drop-down menu.
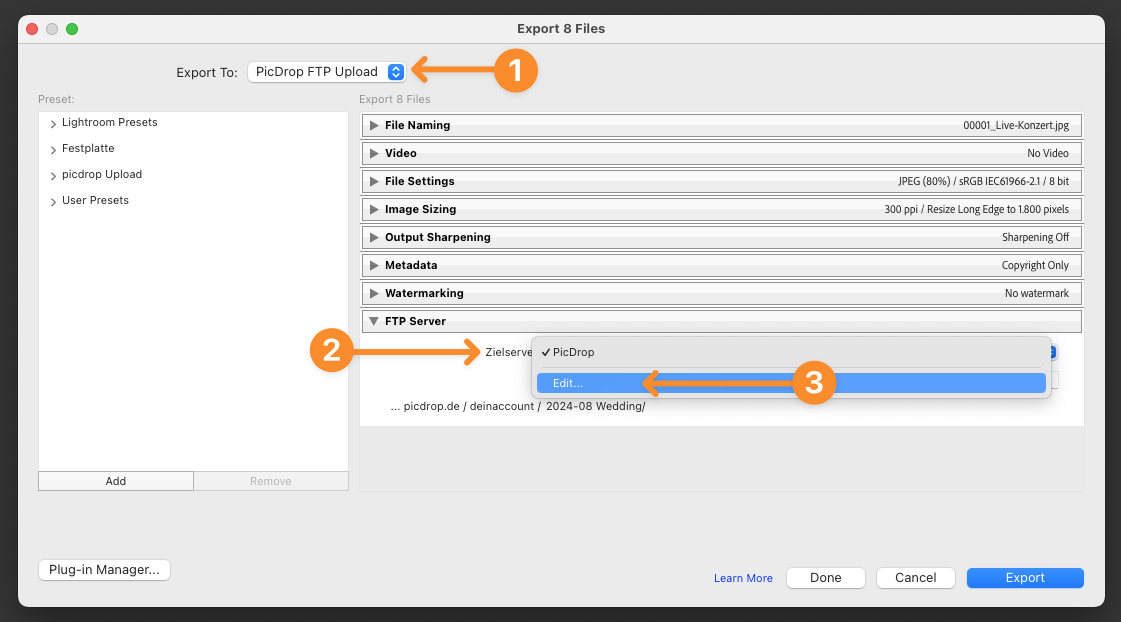
Change the server to ftp.picdrop.com
Leave the entries for username, password, protocol and port unchanged.
Attention: Do not click OK yet, but first click on Preset: picdrop (edited) and…
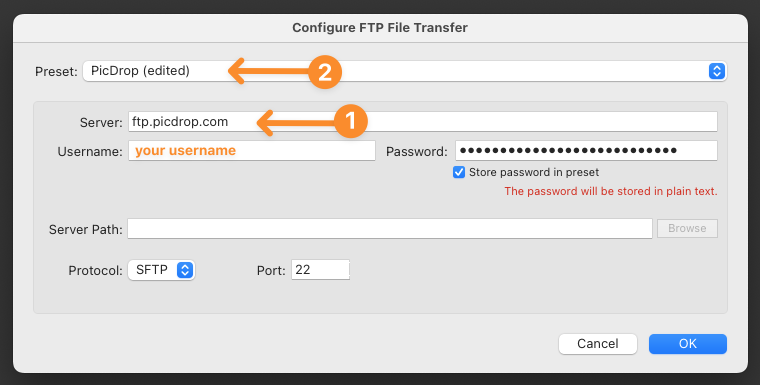
... select the last item in the drop-down menu, Update Preset “picdrop”
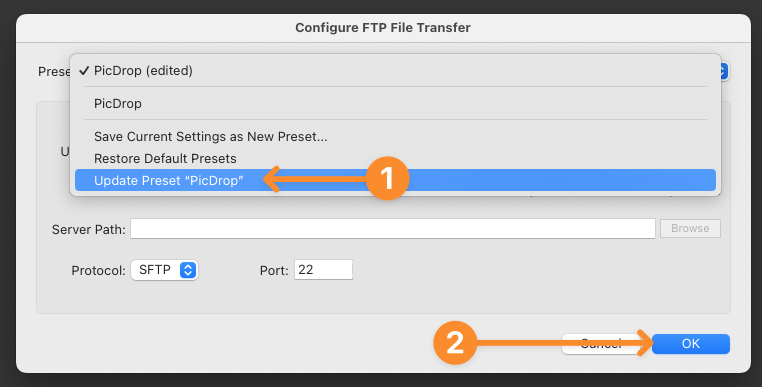
Now click OK at the bottom and …
The new server address ftp.picdrop.com is now permanently stored in your preset and you can continue to use the upload from Lightroom!
With today's update (16.11.21), you can create individual "custom links" independently of the gallery name. Sharing new galleries via the previous "plain links" linked to the gallery names will no longer be possible. Existing galleries with active plain links can still be opened until December 15th. To increase the security of your galleries, we take a logical step here.
Read more about what you can and should do to ensure that your clients can still access their galleries in this article.

Plain Links are links that don't look like this: picdrop.com/username/3zj7uG6ZR, but for example like this: picdrop.com/username/grandmas-birthday.
In the security settings of your galleries you could choose between both variants. The Plain Link variant was used to get more readable URLs. However, for the last 4 years the second variant, the "secure link", is the default setting for all new picdrop users.
So if you are part of the majority of our users who always use the "secure link" to share galleries, you can stop reading here. Nothing will change for you!
If you use Plain Links regularly or have used them in the past, please note that these plain links will STOP working as of Wednesday, December 15th. This also applies to links that have already been sent. If you currently sent out links to clients, you have 2 options:
Go to the gallery settings and edit the Custom Link according to your wishes. You can e.g. use the gallery name as before or enter a completely individual name. Please note, however, that this link is then again less secure than the randomly generated link. To increase security, we strongly advise you to always set a password as well.
At picdrop we regularly take security precautions, check our application for improvement possibilities and implement them. In the security settings of each gallery we inform you that Plain Links are not as secure as the "secure links" and can be "guessed". Until now, we have relied more on your personal responsibility in deciding which link you choose and let all photographers decide for themselves what type of link you want to use for your galleries. In the future, we want to support you even more and hope that users will use this function much more consciously than before.
Yes, the time of automatically generated links Plain Links is over - unless you consciously decide to keep using them. In this case you can now edit the address of the link by clicking into the address field and name it individually. This is a new option with a similar result: a readable text link. So you can still create nice URLs for galleries that should be public, for example. But now you are no longer locked into automatically using the name of the gallery as the link! This way you can make sure that a link you sent to your clients in the last days remains available after the change on December 15th.

Of course, we know that in some cases there are a lot of plain links that need to continue working under their old address. In cases where the number of links is too large to check the settings yourself, or where you do not have an exact overview, we are happy to help. Please contact us at hello@picdrop.com so that we can work with you to convert your old plain link galleries to the new custom links. We are happy to help you!
No problem! Write us at hello@picdrop.com and we will be happy to answer all your questions.
To ensure that visitors of a gallery do not have access to existing sub-galleries, the item "View Sub-Galleries" in the parent gallery must be inactive. Thus no one in the parent gallery can see the lower galleries - and vice versa.
See also: How do I prevent visitors to a gallery from accessing the parent gallery?
To ensure that visitors to a sub-gallery in the left menu do not have access to the parent gallery, the option "Navigation to sub-galleries and vice versa" must be inactive in this parent gallery. Therefore, no one in the parent gallery can see the sub-galleries - and vice versa.
Are you using Custom Links for your gallries? In order to additionally prevent a "clever" visitor from shortening the address of a sub-gallery by one level and still being able to access the parent gallery, we recommend only using the automatically generated random link. This link consists of only one random code and does not allow any conclusions on your folder structure. You can find it in the "Send" section.
In your account settings ("Your watermarks") you can upload your logo or other graphics and create multiple watermarks with just a few clicks. You can set the place for the watermark and adjust its size and opacity to your needs.


Don’t forget to "Save & Close" your new watermark settings.
To apply watermarks to all the images in a gallery just navigate to the gallery settings of each gallery. You can activate your watermarks in the "Security" section of your gallery settings.

After you hit "Apply Changes" wait for a few seconds to see the watermarks appear on each preview image in your gallery. It couldn't be easier.

Note: the watermarks will “only” protect the thumbnails and previews in picdrop, so your clients can’t take screenshots or steal the pictures in other ways. If you activate the download of the original images at the same time, these will not be protected by watermarks because picdrop will never modify your originally uploaded images.
Find a German introduction video to our watermarks here:
The galleries in your picdrop account can be either private or externally available.
If you set a gallery to private, this gallery will only be visible to you as the owner of the picdrop account when you are logged in.
If you set the gallery to be available externally (and this will be true in most cases, because you want your customers to be able to see their galleries), then we will always automatically create a randomly generated link for each gallery. This link consists of a random combination of numbers and letters.
For example, an externally available link may look like this: https://www.picdrop.com/username/sKdzPJbtGD
No problem - you can change the randomly generated link for a gallery at any time!
Just type the desired name into the field for the custom link. Save the custom link with the button Apply Changes and from now on the gallery is only accessible via this custom link.
This is how a custom link can look like: https://www.picdrop.com/username/2021-12-XMAS-Shooting-outdoor
You can use the button Insert gallery path as custom link, which you will find directly below the field for the custom link, to automatically insert the name or the entire path to your gallery as a custom link.
ATTENTION The simpler the structure of your custom link, the higher the probability that third parties can get access to your galleries by mere guessing of the link.
That is why we advise you to use only the automatically created, randomly generated links for your galleries.
If you do decide to use custom links, please always use a password for your galleries so that no one can get into your gallery by simply guessing the gallery link.
You can find the current gallery link in three places:
If you have set a password for the gallery, you will find it in the gallery settings or via the send button!
Definitely. Just open "Gallery Settings", click on "Security" and define the password your client or everyone else has to enter before entering your gallery.
In general, every person who is given the external address to a gallery can also access it. This means that you are responsible for who can see your galleries.
For this reason we recommend two things:
With these two precautions you are on the safe side!
PicDrop GmbH is a purely German company. All our servers are located at large and well-known providers in Germany. Your data is therefore subject to strict German data protection regulations.
For the reliable delivery of data and for our communication with clients (newsletters, customer support, credit card payments, etc.) we use further, international services and tools from industry-leading companies. It is important to us that each of these companies is contractually bound to the same GDPR obligations towards us, you and your clients.
You can find more information about this in our privacy policy. Furthermore you can sign a Data Processing Agreement (DPA) with us in your account under "Payments & Legal" that lists all companies and service providers we use.
You can conclude and print out a Data Process Agreement (DPA) here in your picdrop. Of course, we offer this agreement independent of your chosen plan and without additional costs.
If you process personal data of your clients with the help of a service provider (e.g. picdrop), it is a Data Processing Agreement (in the past this was called order data processing or ADV; but in principle, it is the same thing). This data processing must be regulated by contract, which ensures that the service provider (i.e. us) adheres to the rules of the GDPR and also ensures the protection of your data (and that of your clients) if it is passed on to third parties.
The conclusion of such an agreement with us is voluntary. The decisive criterion is rather whether you process "personal data" of your clients (i.e. "information that refers to an identified or identifiable natural person"; §4 GDPR) via picdrop. According to some experts, this term could already include portrait photos. Depending on the nature of your work, however, this may not be necessary. The deciding factor is always the specific individual case. To find out whether this applies to your work, please contact your lawyer or your photographers' association directly.
Either way, it cannot hurt to conclude a Data Processing Agreement with us.
On May 25 2018, the General Data Protection Regulation (GDPR) was enforced in the EU. This standardizes the strict data protection laws of all European countries and thus ensures an even better and more effective protection of your data as well as the data of your clients.
Actually, not much has changed. German legislation on data protection has already been very strict, so the changes are more in the details. The protection of your data has always been an important concern for us, in which we invest a lot of money and effort. Your photos at picdrop are automatically subject to German jurisdiction and data protection.
The changes for you can be divided into two areas. The first area concerns your picdrop account. Not much will change here. We will have revised our data protection regulations at the latest by the time the GDPR is enforced and will inform you in good time. Since your rights as a client are significantly strengthened with the GDPR, this is only to your advantage.
For example, in order to send a newsletter or to debit money for the monthly services from your account, we use other but serious and reliable service providers who support us like any other website. We carefully select these service providers and ensure through contracts that your data is also secure there and that all parties involved are adhering to the high legal data protection standards.
As part of the order processing agreement, we accurately list the service providers we work with and keep you informed of any changes.
Yes!
Our servers are connected to the rest of the world several times, backed up and monitored around the
clock, so that we can guarantee a network availability of at least 95%.
Your data is backed up daily.
In case of failures, you can be sure, it is in our own interest to get picdrop back up and running as soon as possible.
Note: Your data is safe with us. Nevertheless, we do not see picdrop as a backup solution for you, but as a tool for communicating with your clients.
Solid backups are a completely different subject, and as a photographer, you should always keep in mind delimited backups and a solid data architecture. Your images & vidoes are your most valuable asset.
By the way, the American photographer Chase Jarvis has a detiled blog post about this topic.
Yes, as of May 25 photographers also became obligated to comply with the GDPR. Although you have already been obliged to do many things within the framework of strict German laws, from May 25 data processing that does not comply with the GDPR may result in harsh penalties.
We would be happy to advise you here, but unfortunately, we are not lawyers. Therefore, we ask you to contact your lawyer or a professional consultant for the necessary updates of your website, contract templates, etc. A first step for the rough understanding of GDPR can be found on the Podcast "Uncle Bobcast" by wedding photographers by Nils Hasenau and Manuel Gutjahr. They spoke with an attorney on the topic of GDPR. (German)
You accidentally deleted a whole gallery in your picdrop account?
Don't panic!
Sometimes there is a chance that you are able to recover them, as we keep deleted galleries for you for a short period of time in the trash bin of your account.
The only condition for you to be able to restore the gallery is that you did not delete it too long ago and you have not created a new gallery with the same name in your account in the meantime.
Just click on the trash bin symbol on the bottom of your gallery list in your dashboard and from there you can restore any of the listed galleries according to your wishes.
Please note that you may only restore complete galleries and not individual files.
In case of recovery, your gallery will be restored with all color flags, comments and selections.
If you see an error message when sending your gallery mails from picdrop, it may be that you have hit one of our spam protection mail limits.
A brief explanation:
We've set up mail-limits for sending emails via picdrop to prevent the emails from ending up in your customers' spam folders. This is because sending masses of emails can quickly lead to the email program marking the picdrop emails as spam and all following emails also end up in the spam folder. We and you certainly want to avoid this as much as possible.
However, if you reach one of these limits, you are welcome to contact us at any time and we will temporarily increase the limits for you. Just send a short email to hello@picdrop.com.
Do you see too many results when using picdrop’s filter texts? Or do you get no results at all? There are several reasons why this might happen – and these are the solutions:
Lightroom, Windows Explorer, Apples Finder, etc. cannot filter out files that contain spaces. Before uploading, you should make sure that your file names consist only of letters, numbers, and underscores or hyphens.
Basically, the files on your hard disk must have the same file name as the files in your picdrop Gallery and the set you want to filter out locally. So you should make sure that e.g. Lightroom does not rename the files when uploading.
If additional images are filtered out instead of your set, this is often due to missing "fill zeros" in your file names. From the beginning, for example, if you filter to "File-2," Lightroom and Co will display all files that contain the "File-2" section in their names. Unfortunately, this section is also found in other file names such as "File-24". The result, both files (or even much, much more...) are displayed.
To solve this problem permanently, we recommend naming files from the memory card to the hard disk so that the trigger number always has at least 4 digits at the end of the file. Shorter digits before should always be filled with zeros. So "File-2" would become "File-0002" and the number is always and everywhere completely unique, even when filtering in Lightroom. For example, using this method, the "File-0002" file can no longer be part of the "File-0024" file name, as it was before.
This procedure helps you in many other programs besides Lightroom, including picdrop.
The filter text in the Explorer can contain a maximum of 259 characters. The filter text in the Finder is limited to 2048 characters or 99 files.
Capture One offers multiple ways to search for files. Please use the function in the menu Select > Select by > Filename List ...
Here is a detailed description of how to use this function: How do I filter color-coded images in Lightroom, Capture One, Photo Mechanic, Finder and Explorer?
Photo Mechanic offers two different search tools. Please use the search via "Edit & Find..." in the menu to filter your set. Here you will find the required settings for Photo Mechanic's search window.
Within a gallery, picdrop automatically scans your images for repetitive behavior in the file names. These name parts, which are always the same from file to file, are then hidden in the image overview. This ensures that only the relevant file numbers are displayed. Your gallery will be clearer and communication with your clients will be easier. Of course, the complete file name is always displayed in the large image view.
If you don't like the automatic file shortcut, you can simply disable it in your account settings.
There can be several reasons for this. The most common error is that JPG compression was used instead of ZIP compression when saving the TIFF. This kind of compression is not 100% compatible with many image processing programs and also with picdrop. We therefore recommend saving with ZIP compression. This method also has the advantage that, unlike JPG compression, it does not reduce the quality of your image data, but still effectively reduces the file size.
There can be several reasons for this error:
1. Disabled cookies for you or your clients:
Make sure that cookies are activated in your browser and that your clients have also activated cookies for picdrop. Access to password-protected areas is not possible without cookies. Alternatively, deactivate the password to allow your client access to the gallery.
2. Completely outdated browsers:
Some clients, especially in large corporations, unfortunately still use completely outdated browsers. The reason for this is usually strict security regulations from the IT department. They like to use "secure" old browsers instead of laboriously converting all computers in a company to newer, modern browsers. We try hard to get picdrop to work on ancient browsers, but we can't guarantee it on browsers that are ten years old. If your client might have this problem, simply ask him to use another browser.
3. Very sharp security settings:
Large companies and corporations, especially in the banking, aviation and pharmaceutical sectors, extremely protect their employees' PCs from external dangers such as viruses or unknown websites with potential traps. This often means that only a handful of websites can be accessed. All other pages, whether news, football or image transfer pages, i.e. picdrop, will then remain blocked or only function incompletely. Unfortunately, we have no influence on this. If your company or your client's company is affected, a discreet hint to the IT department will help to put picdrop on the "Whitelist".
Important info about the Lightroom plugin.
The Lightroom plugin from picdrop is automatically activated for all accounts created before June 2022. If your account was created after June 2022, you will not find the plugin in your account settings.
But don't worry: if you can't do without the Lightroom plugin for your work, please email us at hello@picdrop.com and we'll be happy to help.
Current restriction November 2023:
with the update to Lightroom version 13, the export/upload status is no longer displayed with reliable information. However, the upload to picdrop works in the background. Adobe needs to make further improvements here.
Do you see get the error message
"An internal error has occurred: ?:0: attempt to call field 'AgNetIO' (a nil value)"
this is probably because you still have the old macOS Mojave operating system installed on your computer, but you are using a current version of Lightroom.
The Lightroom plugin can only be used on macOS Mojave up to Lightroom version 10.2. Please update your computer to a newer operating system or downgrade to Lightroom 10.2 or older.
Do you see one of the following error messages?
“Unable to upload because Lightroom cannot ascertain if the target destination exists.”
or
“The specified FTP preset is incomplete and cannot be used.”
In most cases these messages are caused by incorrect login credentials or FTP settings. To eliminate these errors please follow this checklist step by step. Even if some of the steps seem trivial or funny to you.
In this case, it is very likely that your ISP has blocked the FTP Port. This is occasionally the case in public WLANs, in hotels and holiday homes, at airports etc... Some ISPs may also block FTP connections to prevent the misuse of "their" Internet connection, but unfortunately also block serious services such as your upload. Please try SFTP and port 22 (see point 7).
Have you already looked for another internet connection or just tested it with friends, colleagues or neighbors?
We also recommend that you upload via your browser. This cannot be blocked and thanks to our convenient drag & drop upload this should be very easy for you.
If none of this works, just write us at hello@picdrop.com and we'll see how we can help you.
For problems with very slow uploads, aborts or incomplete uploads etc. we recommend the following procedure:
We recommend in this order: Chrome, Firefox, Safari.
If you have tried all of the above and your upload still doesn't work correctly, please send us an e-mail to hello@picdrop.com with as much information as possible. Thank you!
Please check the speed of your internet connection. Unfortunately, it is still the case that even the fastest lines (DSL, cable, etc.) have a rapid download, but the upload speed is only a fraction of this speed. You can find out how this works for you in the contract details of your Internet provider or you can just test it. At speedtest.net you can test the speed of your line and send us the results of the test in case of further questions.
If you have the possibility to test another computer or to test your computer via another internet connection, we can also recommend this to detect the error.
An alternative?
Have you already looked for another internet connection or just tested it with friends, colleagues or neighbors?
If your gallery has a password and your clients cannot enter the gallery, this may be because your clients' browsers do not have cookies enabled. Without activated cookies, access to password-protected areas is not possible. Your clients must therefore accept the cookies from picdrop.com in their browser. Alternatively, deactivate the password to give your clients access to the gallery.
Team Members allows you to work together with several people in one picdrop account. Each Team Member uses his own login data and can access galleries and settings of the picdrop account with individually adjustable access rights.
Team members can be used in Pro+ and and in our Business Plans. All details about setting up and using the team member function can be found here: Team Members in picdrop’s FAQ
Our Business plan is the best way to work together with all your image and video files as a team.
Our Business plan includes all the advanced features of picdrop. Additionally, this plan allows you to invite multiple team members into your picdrop account to be able to work together, smarter and more effectively.
Your advantages with the Business plan:
The picdrop Business plan S already includes 3 team members, Business M includes up to 10 team members and Business L up to 15 team members. Further team member accesses and more storage can be booked flexibly with the Business XL plan at any time. You can find an overview of our Business plans here.
Yes - You can create multiple picdrop accounts with one email address.
Just log in to your existing picdrop account and create a new account in the account settings, in the area "Accounts" via the button ("Create new account").

If you log in again with your known login data after that, we will always ask you which of your accounts you want to access.
While you are logged in, you can switch between your accounts via the menu in the upper right corner or in your account preferences without having to log in and out.
Easy as that!
Please note
It's currently not possible to use two or more accounts with one email address AND still have FTP access.
By creating a second account with the same email address you will lose FTP access to all your accounts. Please only use this function if you don't need the FTP access.
You have already created a second account and lost FTP access?
To regain FTP access for your main account please delete all additional accounts. This automatically restores FTP access for your main account.
For every picdrop account in the Business plan there is an account owner who can invite new Team Members. Who that is in your team, you will surely find out from the other Team Members.
As soon as you are invited to a picdrop account as a Team Member, you will receive an email from us with an invitation to work in a picdrop account.
Click on the blue Accept invitation button in the email. Attention: this link is only valid for seven days.
You will land on the start page and can enter your first name and last name. This data is visible to account owners and all other Team Members - so stick to a name that you will be recognized by. Click on the blue Join Account button and you will land directly on the gallery overview in your shared picdrop account.
Once you've done that, we'll send your temporary password to the same email address. Please change the password here in your account settings.
No problem: after clicking on the link Accept Invitation in the invitation e-mail you will directly land in the shared picdrop account to which you have just been invited as a team member. Your access data will not change. And you can switch back and forth between your own account and the new team member account via the menu in the upper right corner.
Please follow these steps: How do I invite a new team member to join my picdrop account?
No, team members do not need their own picdrop account!
If you send an invitation to a new team member, we will check if there already exists a picdrop account under this e-mail address.
If yes, the new team member can simply use the existing picdrop account and the new team membership to your picdrop account simultaneously without having to log in and out.
If not, we will send the new team member a link to create an account which will only have access to your shared picdrop account. We do not force your team members to create their own, independent picdrop account.
When you are finished working with a team member, or if you want to remove a team member from your account for other reasons, you can easily do so in your account settings in the Team Members area.
The former team member will then receive one last e-mail confirming that he/she no longer has access to your picdrop account. All uploaded data, created galleries, selections, color flags etc. of the team member will of course remain in your picdrop account.
You create a gallery and your other team members don't have access? Please contact the account owner - he/she can manage the access for all galleries for all team members. This way, each team member does not have to take care of it individually - and no one can accidentally remove existing access rights for other Team Members.
Details about the different permissions can be found here: What is the difference between the access rights for Team Members?
Create a gallery link for the gallery in the gallery settings and send it to the people who should get access. External users will only get access to this gallery (and subgalleries). For them you can set all functions, what exactly is allowed in the gallery e.g. downloads, comments etc., in the gallery settings.
Yes, if you have writing access to the galleries as a Team Member, you can
– in every gallery that your account owner has shared with you.
Our Business plan S already includes three team members.
If you need more, you can of course add more team members to your picdrop account at any time.
Just go ahead and book our Business Plan M with 10 Team Members or our Business Plan L with up to 15 Team Members included.
You need even more Team Members?
Just contact us at hello@picdrop.com and we will be happy to set this up for you individually.
We want to make collaboration as easy as possible: as a team member in a picdrop account, you don't have to worry about the individual access rights to your galleries.
Only account owners can set and change the access rights for the team members. The account owner is usually the person who added you as team members to the shared picdrop account.
Therefore, if you create a sub-gallery within an existing gallery, it will always be immediately visible to all other team members who already have access to the original top gallery.
So you don't have to worry about additional access settings when creating a new gallery and you can be sure that all other team members can work with you immediately.
When you create a new gallery on the top level of the picdrop account, all team members who already have access to all galleries on the top level of the account will have access to this gallery.
Every picdrop account has exactly one account owner. Team members can be added indefinitely.
The access rights for team members can be set individually: Explanation of the different access rights for team members
The account owner of the picdrop account, on the other hand, always has full, writing access to:
Team members cannot get access to the administration of other team members or the billing details and plans.
With both functions you can invite other people to your picdrop account. However, the functionalities differ strongly in the permissions others may use in your account.
By creating a client login, you can give clients their own gallery dashboard of all galleries approved for them with just one login. Please note: client logins always have read-only access and cannot create, delete or edit galleries. For accounts that were created in November 2024 or later the client login feature is no longer available.
With the team members function you can actively let other members of your team or other people (freelancers, project members, suppliers etc.) work in the galleries that have been shared with them. They can also create new galleries as well as delete or edit data and settings if you allow them to do so. Team members are included in the picdrop Business plan. One team member can be invited in the Pro+ plan.
| Client logins (clearly defined) |
Team members (customisable) |
|
| View shared galleries and files | ✅ | ✅ |
| Create, delete, move & copy galleries | X | ✅ |
| Create, delete, move & copy files | X | ✅ |
| Manage gallery settings, comments, selections, notifications etc. | X | ✅ |
| Manage account preferences | X | ✅ |
In your account settings in the Team Members section, you can see how many team members are included in your plan, which team members are already working in your account and you can also add new team members to your picdrop account.
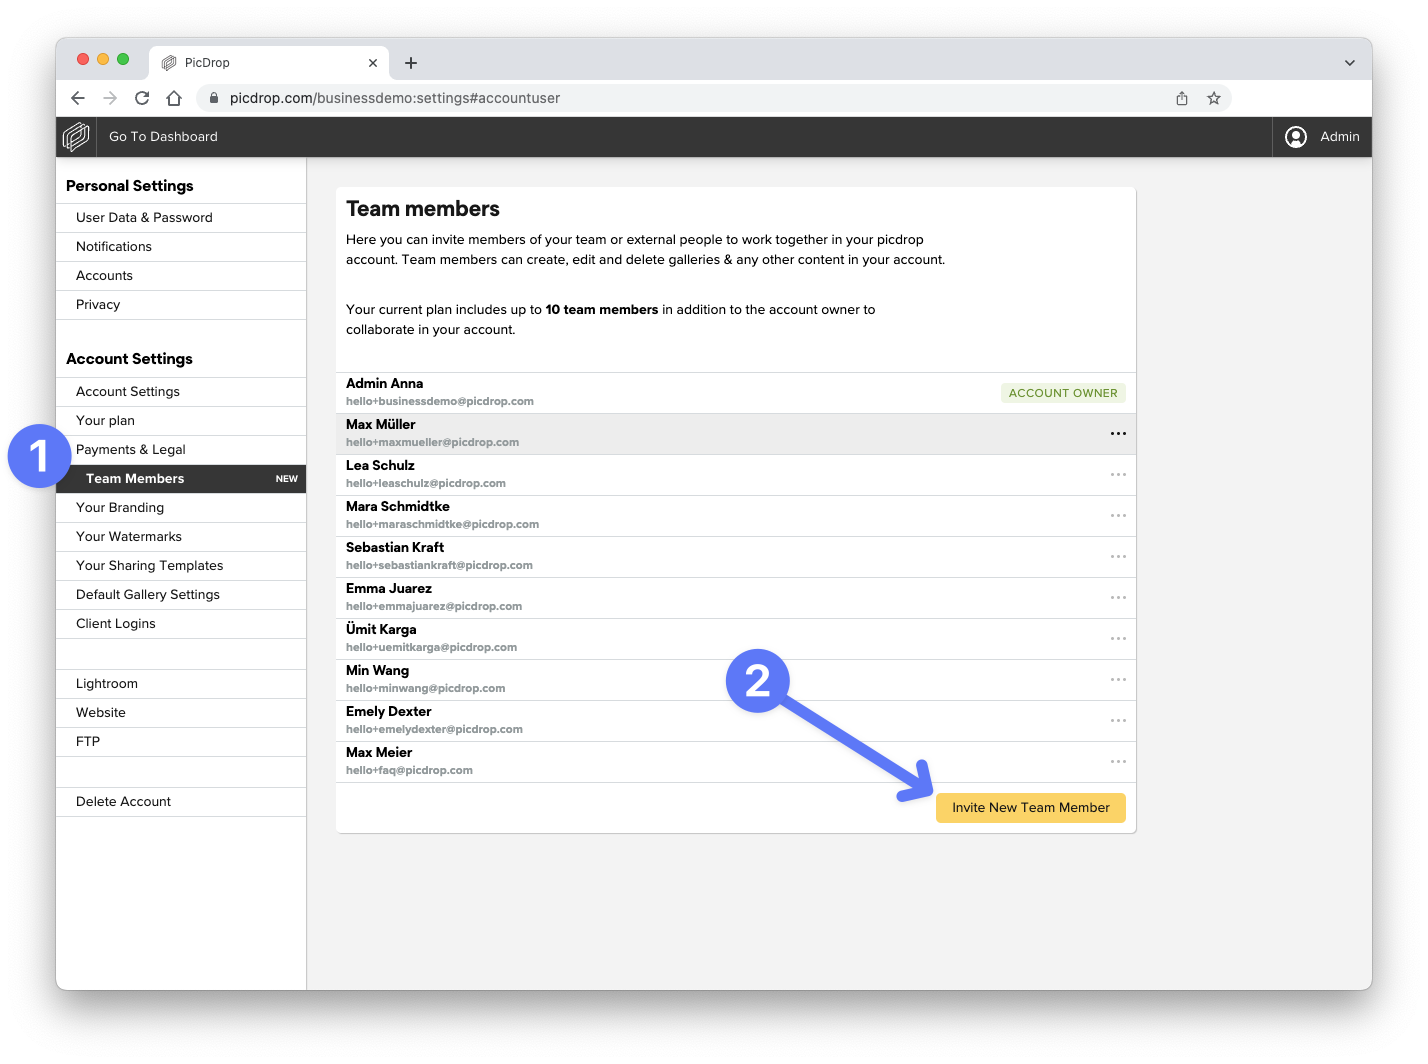
Your new team member will receive an email with an invitation to join your picdrop account. It doesn't matter if the new team member already uses his/her own picdrop account or not.
As soon as the new team member has accepted the invitation, we will send him/her the necessary access details in a separate email. You will also be informed as soon as your invitation has been accepted.
You can always change the access rights and access scopes for existing team members in your account settings.
At the same place you can delete team members from your picdrop account by clicking on the three dots next to the team member’s name.
You can find an overview of the differences between Client Logins and Team Members right here.
When inviting a new team member to your picdrop account, you can define which access rights the team member should have.
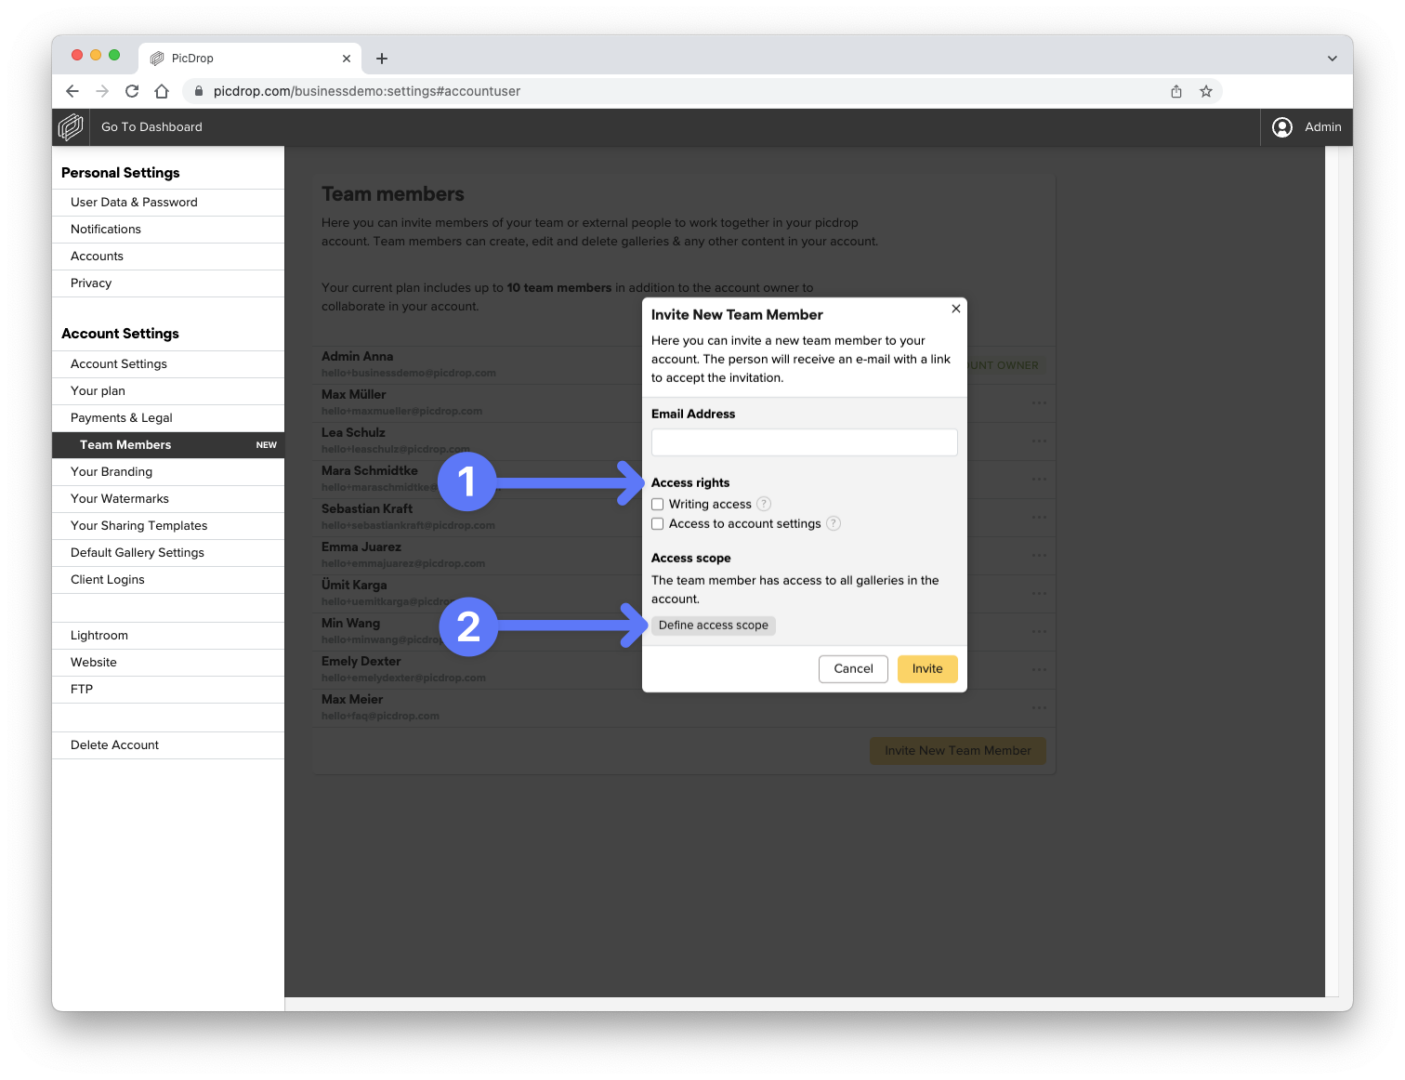
For active team members you can edit the access rights whenever you want. Just click on the three dots next to the name of the team member in the team members section of your account settings.
The following settings are available:
With writing access enabled, a team member can create and delete galleries in your picdrop account, upload and delete data and change the gallery settings of any gallery that is shared with her/him. Of course access to notifications, sending galleries and all other functions within a gallery are also available.
If you deactivate writing access for a team member, he/she can visit all the galleries that are shared with him/her. The team member can view notifications and send galleries. In addition, comments, selections and color flags can be added. Access to the gallery settings, uploads and creating and deleting galleries is not possible.
With additionally activated access to the account settings, the team member also gets access to the following areas:
A team member will never have access to billing-relevant details of the picdrop account such as invoices, addresses and means of payment.
Every team member has access to the settings that affect their own account: their user data & password, their own user accounts and privacy settings.
Find out how you can define access to all or only certain galleries of your picdrop account for individual team members right here: https://www.picdrop.com/web/faq/how-can-i-define-the-galleries-a-team-member-has-access-to
The combination of access rights and access scopes allows you to individually set up the rights for all your team members.
When creating a new team member, you can specify which galleries the team member can access.
You can also customize the so-called Access scope for already active team members. To do so, click on the three dots next to the name of the team member in your account settings in the Team Members section.
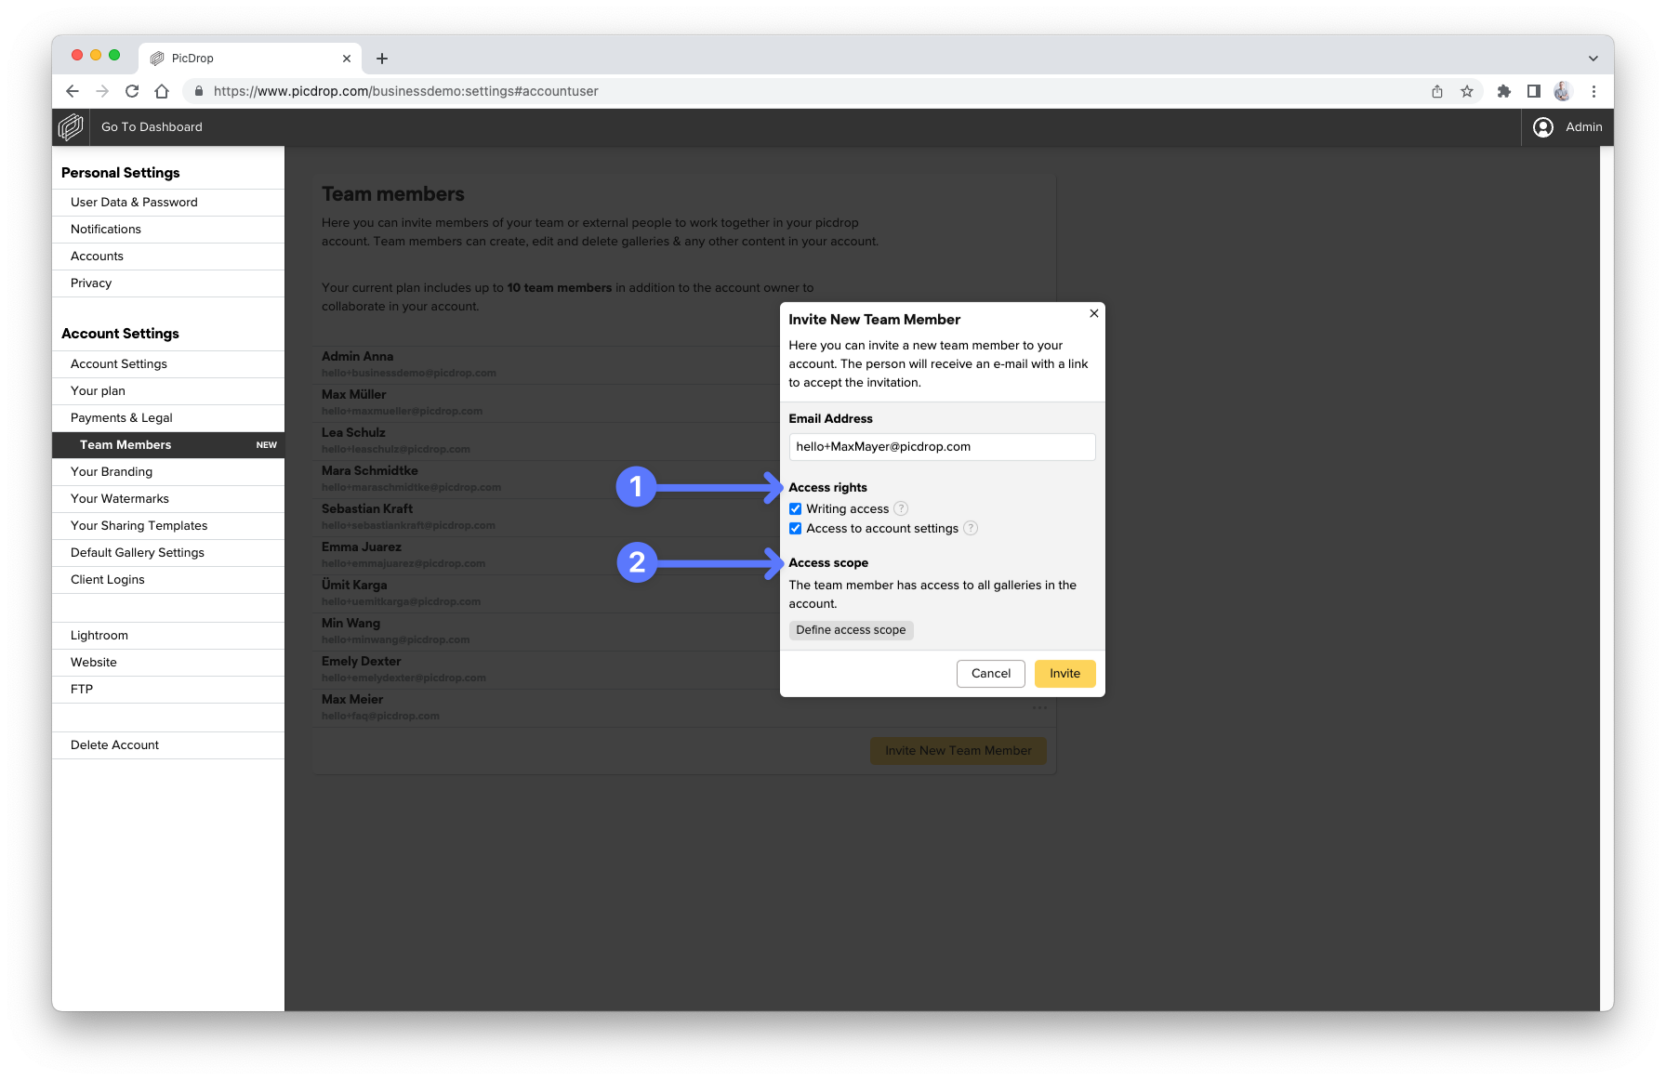
By default, new team members always have access to all galleries in the picdrop account.
You can use the button "Define access scope" to define that a team member can only access selected galleries. If you set a parent gallery as access scope, the team member will always have access to all sub galleries below it. Click on the name of your account in this screen to re-activate access to all galleries.
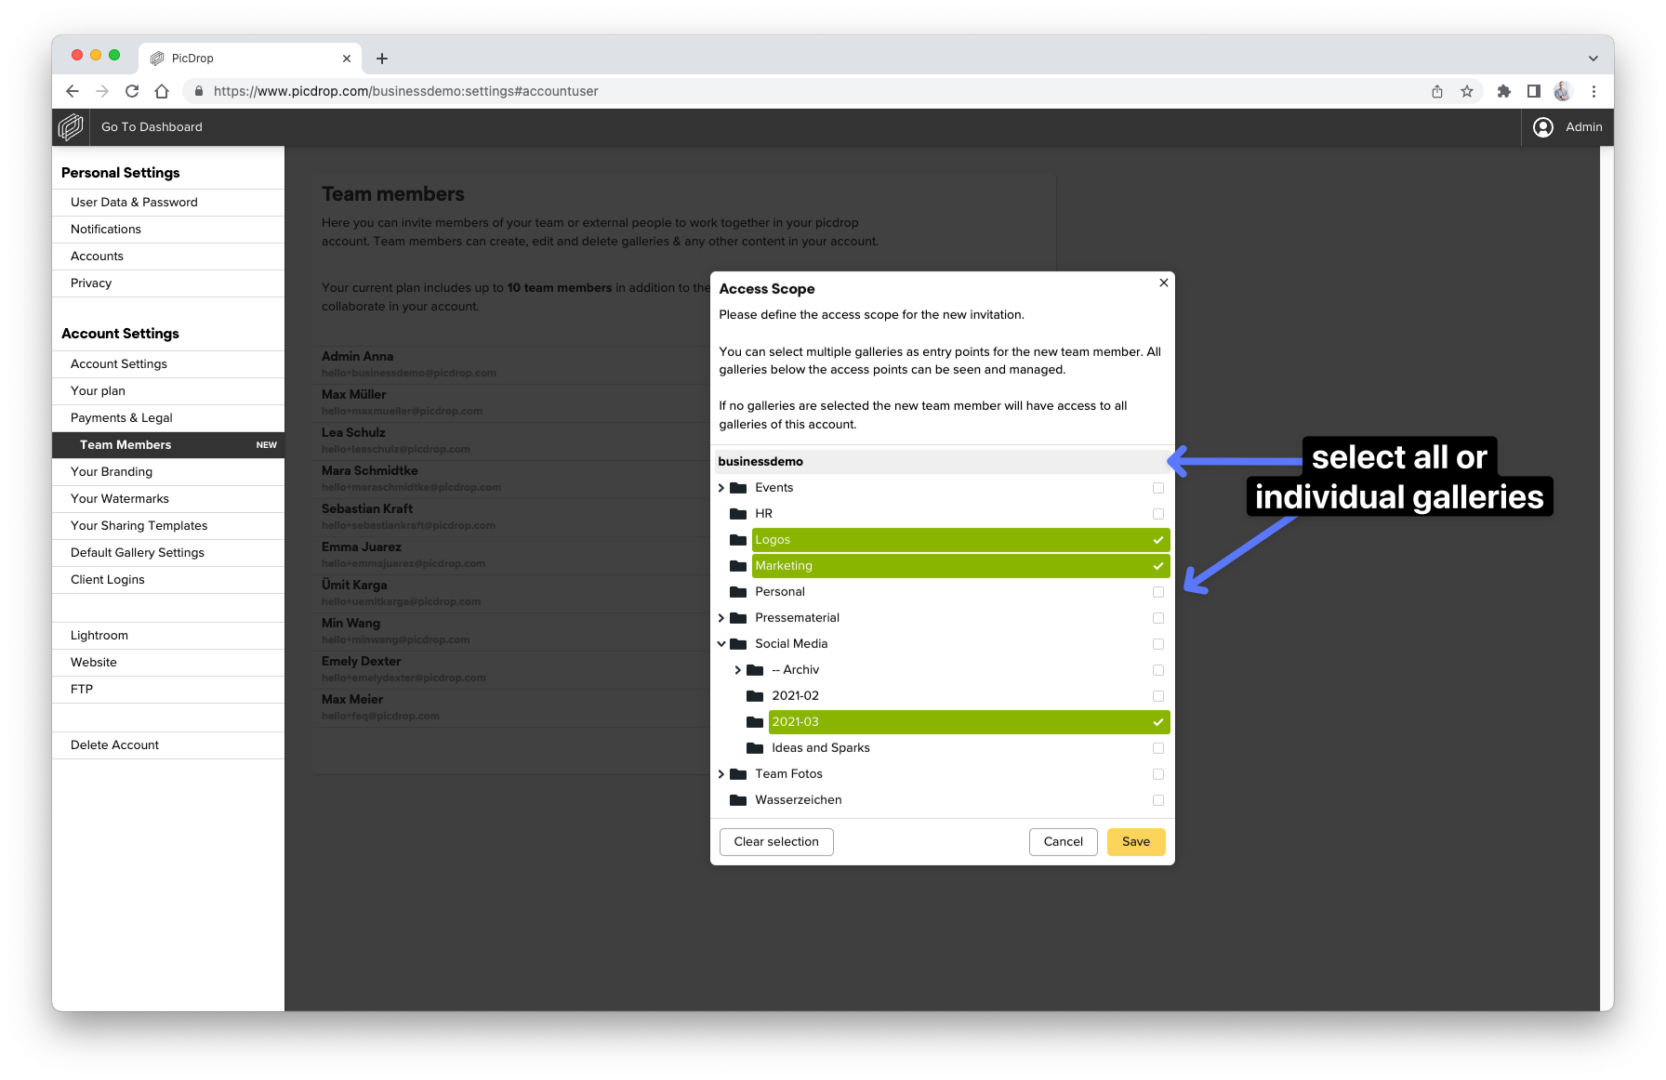
By combining access rights and access scope you can easily control which rights team members have in the assigned galleries. Find more info here.
Here’s why:
For technical and security reasons, the email address of a deleted account remains blocked for 30 days. During this time, no new access can be created or invited using the same email address.
What can you do?
Not sure if someone’s access is still active? Just drop us a message at hello@picdrop.com – we’re happy to help!
In general, there are no individual prices at picdrop, but a transparent price structure for our affordable plans. You can view this in our plans overview: https://www.picdrop.com/web/pricing
If you need a quote for one of our plans or are interested in a Business XL plan, please send us an e-mail to hello@picdrop.com with the key data of your planned usage and we will gladly create the corresponding quote document for you.
We would be happy to provide you with a formal quote for your desired plan at picdrop. Simply send us an e-mail to hello@picdrop.com. Tell us your desired plan and the address details to which you'd like us to issue the quote and we'll create and send the corresponding document for you directly.
We are happy to help you book a Business XL plan and set up your account according to your wishes with the appropriate number of team members and storage.
To book a Business XL plan, please send us an e-mail to hello@picdrop.com with the key details of your planned usage. We will then quickly provide you with the corresponding price or create the corresponding quote if required.
Just like individual terms of delivery, we cannot sign individual DPAs from our customers, but offer you our DPA to sign in return. We always ensure that our DPA complies with current standards and is regularly legally reviewed and revised.
You can find our DPA in the account preferences of your picdrop account. However, if you need it before creating an account, we will be happy to help you with a blank version for viewing at hello@picdrop.com. Unfortunately, individual changes to our DPA are not possible for individual users.
In the account preferences of your picdrop account, you can enter a customer reference in addition to the billing address. We will then be happy to take this into account and show it on your invoice.
Important to know: This information must be entered in your account BEFORE we create an invoice so that we can show it on your invoice. So please remember to enter the order number for your picdrop plan in your account in beforehand. Thank you!
As a small team and company, picdrop does not (yet) have a formal certification to a specific standard, as a certification process is currently beyond the capacity of our team.
But don't worry, we do of course have carefully established internal processes for all relevant topics that we at picdrop follow strictly. You can find more detailed information in our privacy policy, our terms and conditions and the DPA, which is available for signing in every account.
In order to keep the billing effort as low as possible for both you and picdrop, we currently support payment by direct debit or credit card. If it is not possible for your company to pay your picdrop plan using one of these payment methods under any circumstances, please contact us at hello@picdrop.com. We can't promise anything, but we are of course always interested in finding a good solution for everyone involved.
All relevant points are already regulated fairly and in accordance with applicable standards in our GTC, our privacy policy and our AVV. Unfortunately, we cannot confirm or sign your terms and conditions for suppliers, as these may conflict with our terms and conditions, which you must accept when registering at picdrop and booking a plan for your account.
As a small team of 20 people, it is unfortunately not possible for us to make exceptions to this, as reviewing individual delivery conditions and contractual regulations takes up a lot of time, which we rather invest in our product for you.
You can find the AVV in the account preferences of your account, where you can also conclude it yourself. If you would like to check it before creating your account, or if it is even a prerequisite for opening an account in your company, we will be happy to help you with a blank version for viewing at hello@picdrop.com.
Here’s why:
For technical and security reasons, the email address of a deleted account remains blocked for 30 days. During this time, no new access can be created or invited using the same email address.
What can you do?
Not sure if someone’s access is still active? Just drop us a message at hello@picdrop.com – we’re happy to help!
We are so glad to hear!
You will find the most important information about us on our contact page and via picdrop.team.
You can also reach us directly by phone via +493055574793 and also by email. Feel free to reach out to us with any questions you may have.
All news and updates about picdrop can always be found in your picdrop account in the What's new? section, on Facebook, on Instagram, and on X (Twitter).
picdrop is an idea by designer Tobias Friese and photographer Andreas Chudowski. In 2012 they started picdrop to finally offer photographers a smart tool for their image transfer. Wanna know more? Check out our About us page or send us an email at hello@picdrop.com.