Of course!
If you reach the storage limit included in your picdrop plan, you can book additional storage space for your picdrop account. The amount of extra storage you can add depends on your current plan:
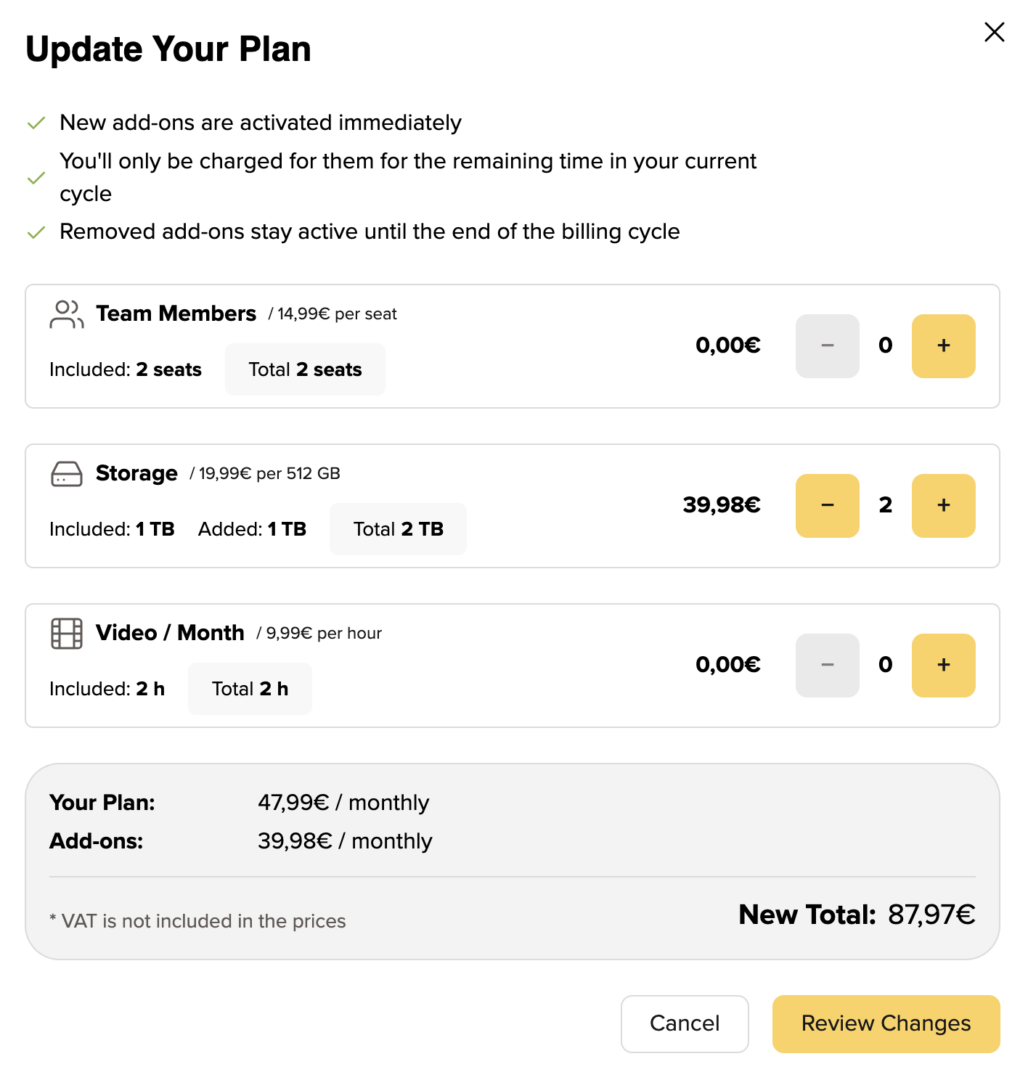
With the Pro plan, you can expand your storage by 250 GB. This means a maximum total of 750 GB storage is available in the Pro plan.
For an additional 250 GB, you pay €7.99 net per month on top of the base price of your Pro plan.
With the Advanced plan, you can expand your storage in 500 GB increments. A maximum total of 2.5 TB storage is available in the Advanced plan.
For each additional 500 GB, you pay €19.99 net per month on top of the base price of your Advanced plan.
With the Business plan, you can expand your storage by 1 TB. This means a maximum total of 4 TB storage is available in the Business plan.
For an additional 1 TB, you pay €49.99 net per month on top of the base price of your Business plan.
With the Enterprise plan, you can expand your storage in 1 TB increments.
For each additional 1 TB, you pay €49.99 net per month on top of the base price of your Advanced plan.
You can book additional storage yourself at any time in your account settings under Your Plan. In the “Your Account Usage” section, you will find the “Update Add-ons” button.
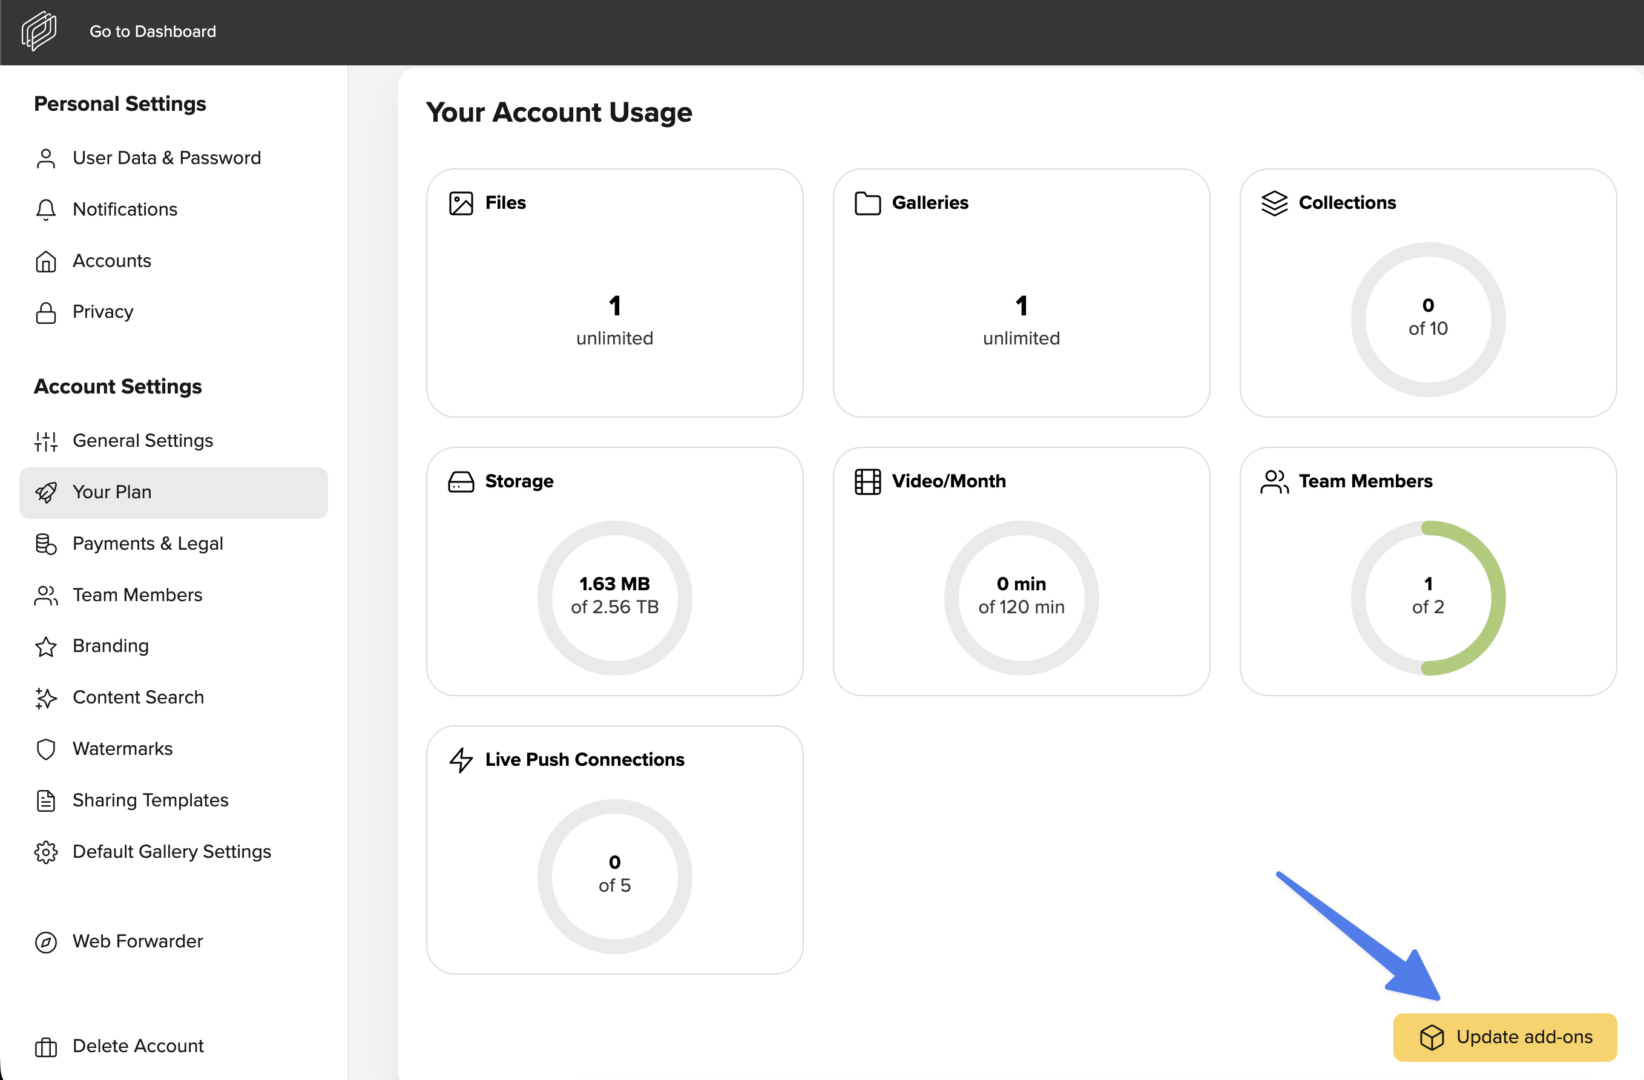
There, you can choose how much additional storage you would like to add.
You will immediately receive an invoice for your new plan, with any remaining credit from your previous invoice of course being applied automatically.
After confirming the booking, your additional storage will be available instantly.
You can use team members to invite other people to collaborate in your picdrop account.
You can invite up to 2 team member on the Advanced plan. With our Business plan, you have 5 team members included and can expand those to up to 9 additional team members and with our Enterprise plan it's possible to work with even more people in one picdrop account.
You can find more information about how team members work here.
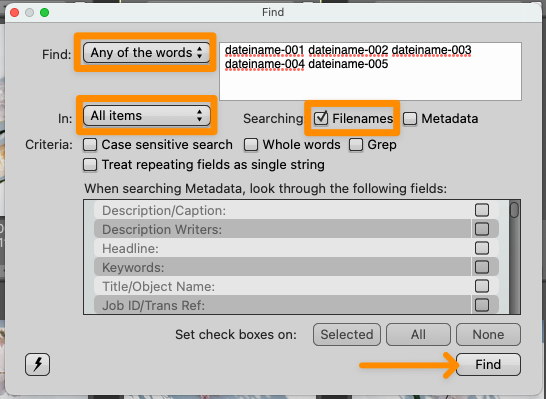
You've probably seen how to filter out your clients' image sets in Lightroom, Capture One, Photo Mechanic, Finder, and Explorer. The whole thing is not only possible with image sets but also with all color-coded images.
Many image editing programs allow you to use the file search to display exactly the images of an image set you or your clients made in picdrop. This saves you the trouble of searching for each individual file. Here we show you how to do it:
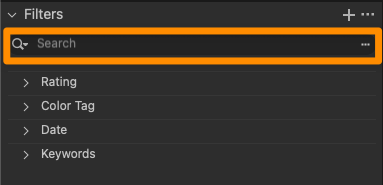
Filter out all images with the desired color flags using the filter function on the left side. Now you see only the images with the desired color flag.
Click on "select all images" (bottom left) or use the keycombination of cmd-A or Ctrl-A to select all currently displayed images.
You have now created a set that you can use to filter out the images locally on your mac / PC.
Click on the "Export selection" icon in the set menu, bottom right. When you are logged in to your account you will find the various filter texts to filter out this set in Lightroom, Capture One or in your Finder / Explorer.
Optionally, you can save this selection permanently in picdrop to make it easier to find it again later.
Once you have copied the list of filenames to your clipboard, please continue on your computer in your tool of choice:

You can now save the filtered images in a new collection or mark them with stars / colors for your further workflow.
In Capture One, you can search for your images in multiple places using the exported folter text. To do this, open a folder or collection in Capture One with the images you want to filter. Then you have three options:

Done! You can now save the displayed images as your own collection or mark them with a color / stars.
Open the corresponding project folder in Photo Mechanic.
Paste the filter text from your clipboard into the search box (via Edit > Find... menu or cmd-F on Mac or Ctrl-F on Windows) and set the following search options:
After clicking "Find" in the lower right corner, Photo Mechanic will now select all photos of your choice from picdrop and you can continue working with them.
Please note that the search in the upper left corner of Photo Mechanic ("Search my Mac") cannot be used for these steps.

Please note that the filter text in Explorer can only hold a maximum of 259 characters.
The filter text in Finder is limited to 2048 characters or 99 files.
Many image editing programs allow you to use the file search to display exactly the files of a set you or your clients made in picdrop. This saves you the trouble of searching for each individual file. Here we show you how to do it:
Open the set in the gallery that you want to filter out on your computer. Or mark the files with the set tool (blue plus sign in the overview of your gallery).
Click on the "Export set" icon in the set, bottom right. When you are logged in to your account you will find the various filter texts to filter out this set in Lightroom, Capture One or in your Finder / Explorer.
Copy the corresponding file list / filter text to your clipboard.
Now continue on your computer in the program of your choice:
You can now save the filtered files in a new collection or mark them with stars / colors for your further workflow.
In Capture One, you can search for your files in multiple places using the exported folter text. To do this, open a folder or collection in Capture One with the files you want to filter. Then you have three options:


Done! You can now save the displayed files as your own collection or mark them with a color / stars.
Open the corresponding project folder in Photo Mechanic.
Paste the filter text from your clipboard into the search box (via Edit > Find... menu or cmd-F on Mac or Ctrl-F on Windows) and set the following search options:
After clicking "Find" in the lower right corner, Photo Mechanic will now select all files of your choice from picdrop and you can continue working with them.
Please note that the search in the upper left corner of Photo Mechanic ("Search my Mac") cannot be used for these steps.
Please note that the filter text in Explorer can only hold a maximum of 259 characters.
The filter text in Finder is limited to 2048 characters or 99 files.
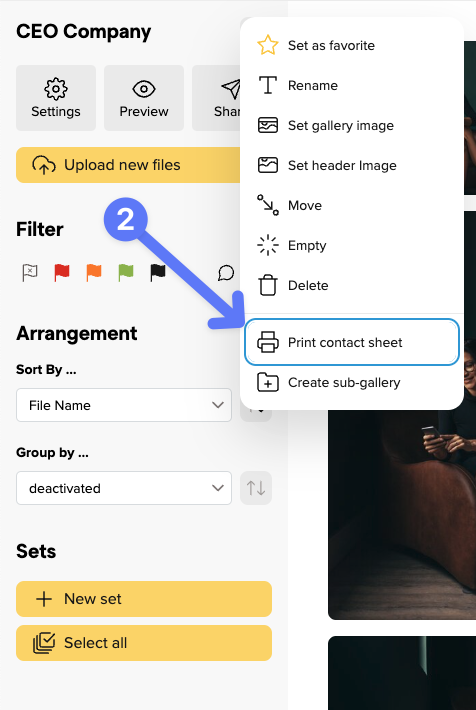
We have included this feature of analogue photography in picdrop, so that every photographer has the possibility to save a contact sheet of his or her galleries from within picdrop. There, e.g. printed out, notes can also be entered by hand.
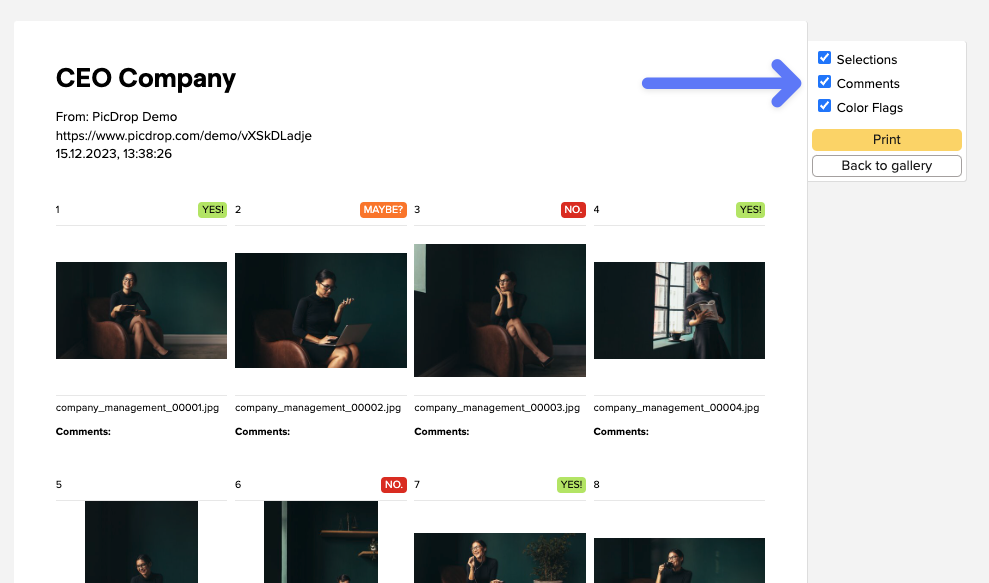
A contact sheet is a great way to compare, evaluate and get an overview of your images - exactly because the images are shown in a small size and all together.
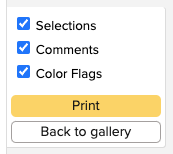
On the contact sheet you have all images of the gallery at a glance and can also choose whether the color markings, comments and selections from picdrop should be directly visible.
The contact sheet always contains all images of your gallery, as already in analogue times the whole film roll was content of the contact sheet.
You can create a contact sheet in every gallery by clicking on "print contact sheet" in the gallery menu...
... and then either print it, or save it as PDF with the help of the system dialogue.
Please be aware that the client login function is no longer included for accounts created from 04.11.2024!
The function has been deactivated for new accounts because it has repeatedly led to misunderstandings. Nevertheless, we explain below how to understand the client login function in picdrop and how you can make good use of it, especially for picdrop users who still have the function available in their account.
So don't worry, client logins can be helpful if you keep a few things in mind.
The most important thing you need to know is that within the client login function some important gallery settings will not be taken into account. These include the password setting and the setting for navigating between the gallery levels.
You should definitely keep this in mind if you decide to use a client login with recurring customers and also always check these settings again before you send the login data out so everything works exactly as you want it.
Then you (or your clients) surely have been in the situation to search for the exact link that belongs to the current shoot from a long list of gallery links.
With a client login, you give these clients a place where they can find all their galleries at any time with just one login code - no more saving or searching for individual gallery links.
In the account settings of your picdrop account, you can set up this client login. Just enter the name, an access code and add all the galleries that should be accessible via the client login.
Your clients will receive their individual access code from you. They enter this access code on the login page of your picdrop account at picdrop.com/your-username.
After clicking on "Login" your clients will see a personal dashboard page listing all the galleries you have shared with them.
Of course, you can also use the client login in a completely different way.
For example, create a client login to which you add all your portfolio galleries with a specific theme. Then you just send the appropriate access code to potential buyers. Or if you regularly sell your images or licenses for your images, you may combine all your galleries that you offer for licensing into one client login.
ATTENTION
You can only use the FTP connection to your picdrop account if your picdrop account was registered before June 2022.
For accounts registered after June 2022, please use the upload directly in your browser.
______
You'll find your new login details in your account settings under FTP.
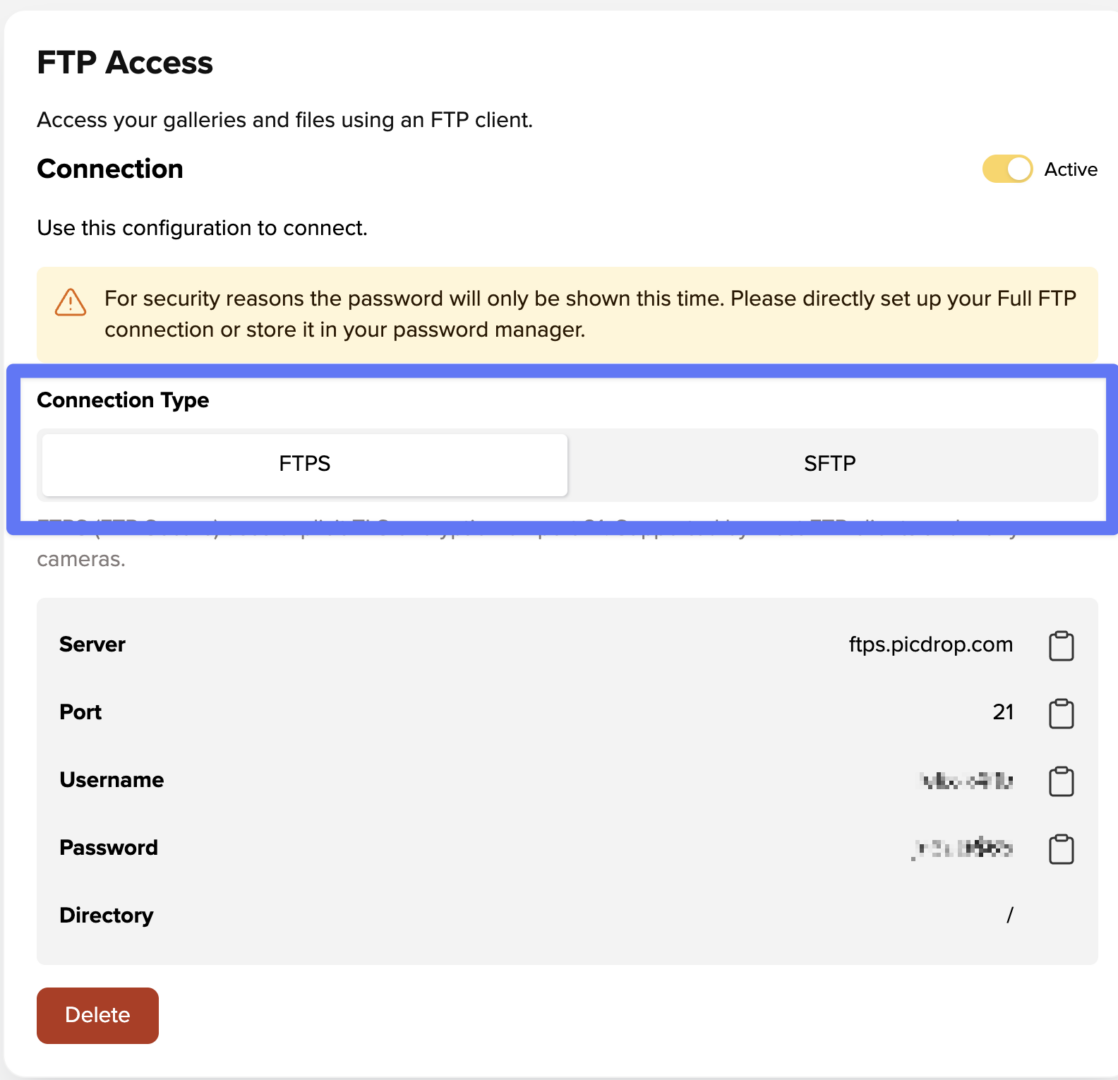
Setting up your FTP accounts isn’t rocket science and in most cases the same procedure. There are differences in the applications though. We compiled a list of the most common FTP clients and provide you with a step by step guide on how to set them up.
One more thing before you start: if your FTP program has problems uploading using Windows, please disable the option to run uploads in .filepart format. (Applies mainly to WinSCP/Putty)
Click on “New Connection” on the top right
Enter the following details:
Click on “Connect”
Your picdrop-account can now be found in your bookmarks and can be opened anytime.
Click on “Favorites”
Click the + sign on the bottom edge
Enter the following details:
Click on “Save”
Double click the just created item to connect to picdrop
Your picdrop-account can now be found in your bookmarks and can be opened anytime
Attention: When renaming and moving files and folders in Transmit there might be some issues. This is a Transmit issue, we can not solve on our. Additonally, only the latest version of Transmit is compatible with picdrop. Version 4 and older will produce an error when uploading to picdrop’s servers.
Click on the star in the “Favorites” menu at the top
Click the + sign on the bottom edge
Enter the following details:
Click on “Save”
Double click the just created item to connect to picdrop
Your picdrop-account can now be opened anytime via the “Favorites” in Forklift.
Click on “File”
Click on “Servermanager”
Click on “New Server”
Enter the following details:
Click on “Connect”
You can now use the new picdrop-login via the Server Manager.
Collections are a clever method to centrally organize similar images from various galleries. Do you have images on similar topics? Simply create a matching collection and keep track of your work.
We'll explain exactly how collections work in the following steps.
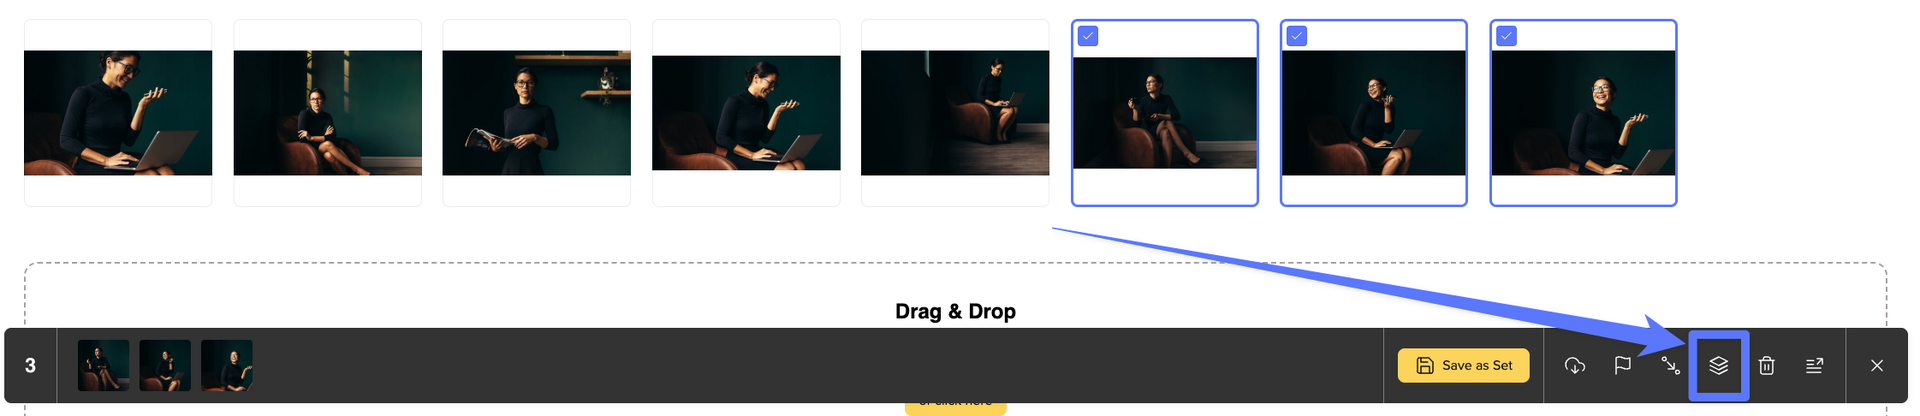
You can add images to a collection by clicking on the three dots of any image in your gallery and selecting "Add to Collection". You can also do the same in the large single image view.
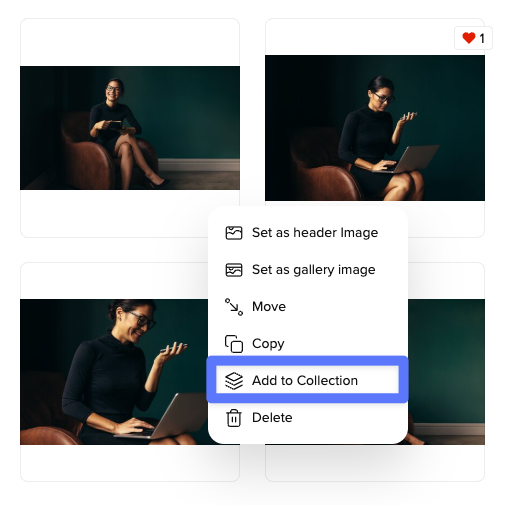
You want to add multiple images at once? Use the set bar.
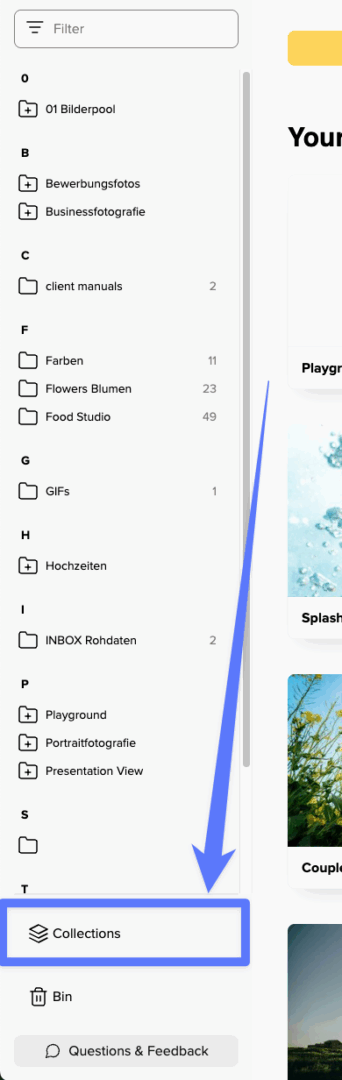
Your collections are always accessible in the bottom left of your gallery overview. Here, you can create, edit, and manage your collections.
With existing collections, you can download, rename, delete, or export them as a gallery with a click on the three-dot menu. Additionally, you can easily copy the link to your collection and share it with your team members.
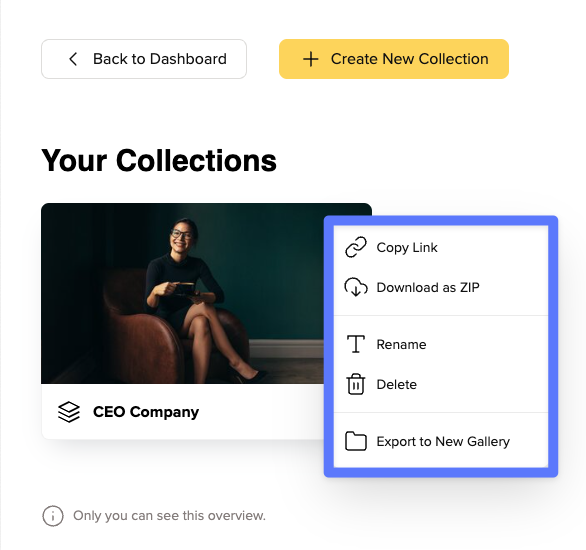
Do you like a collection so much that you want to create your own gallery from it? No problem - just click "Export to New Gallery".
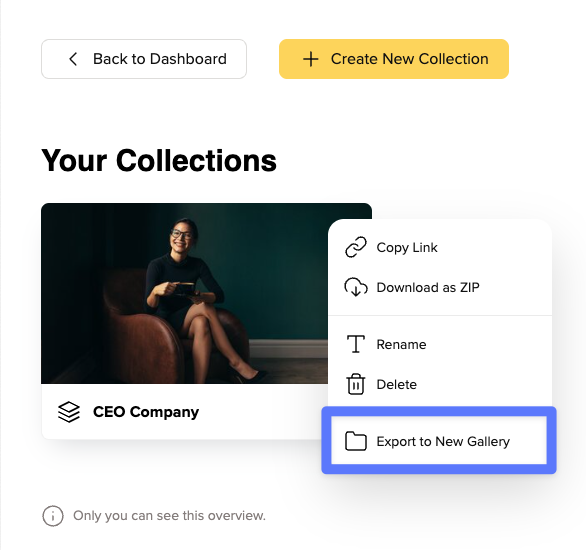
Afterwards, you can pick the destination in your workspace where you want to save your gallery and give it a suitable name right away.
In the Free plan, you can have one collection per account.
In the Pro plan you can save up to five collections per account, in the Advanced plan 10 and in the Business and Enterprise plans you can create unlimited collections.
Please note that collections are for internal use only and can only be seen by you and your team members.
Currently we don't have the option to implement a API in picdrop.
You can rename files in your galleries by hovering your mouse cursor over an image and then clicking on the three-dot menu. There you can conveniently change the name by clicking on "Rename file." Once you have changed the name, simply click on "Rename" and you're done!
This is also possible in the three-dot menu in the single image view.
It's important to note that the filter function within Lightroom and other tools will no longer work if you have changed the file names. Because it is obviously necessary that the file names remain identical to those in your other tool e.g. Lightroom.
You can only use this feature if you purchased a Pro, Advanced, Business or Enterprise plan.
You can also rename multiple files at once. You first select the files you'd like to rename, then pick the rename option in the toolbar. Now you can type in the name and a rename with ongoing numbers for example.
You can make your galleries accessible to your clients for a limited period of time. In the gallery settings, you can define the timeframe during which the gallery is available.
Once this period expires, the gallery is automatically set to private, making it visible only to you and your team members. External visitors will no longer have access. A built-in countdown shows both you and your clients how much time is left.
Additionally, you’ll receive an email notification three days before the gallery expires.
If your client should need access to an expired gallery, you can either set it from "Private" to "Externally available" or create a new expiration date to make it accessible again.
The expiration date feature is available starting from the Pro plan.
With the @Mentions feature, you can tag other people directly in a comment to quickly notify them about important notes, questions, or approvals. The @Mentions feature is available in all of our plans – with no limitations. Whether you’re working solo or in a team, you can tag people at any time and include them directly in your feedback and review process.
How does it work?
Simply type @ inside a comment. You can then:
What is it useful for?
What happens after someone is mentioned?
The tagged person receives:
Under Branding, you define how your entire Picdrop account appears to your clients. These settings apply account-wide and only need to be configured once.
Your Logo
Here you can upload your logo.
Your Wallpaper
Under “Your Wallpaper”, you can set a custom background for certain pages of your account (e.g., the password-entry page).
Social Links
Here you can add your contact information and links to your social media profiles.
Branding features are available starting from the Pro plan.
If you want to arrange the images in your gallery in a manual order, there are two ways to do this:
Go to your gallery settings, select “Sort by …” under “Arrangement,” and set it to “Custom” Then click on “Edit order.” You can now easily move your images using your mouse. Once you click “Save order,” the changes will take effect immediately.
Alternatively, open the gallery and use the left sidebar. Under “Arrangement,” choose “Sort by” and then “Custom” and click on “Edit order.” A dialog will open where you can arrange the images in your preferred order.
In both cases, the image order is then fixed for the gallery and will be visible to your clients as well.
If you upload complete folder structures to your picdrop galleries, the existing structure including all subfolders will remain fully intact and will be transferred to picdrop without any changes.
To do this, first open any gallery. Then click “Upload new files” → “Upload folder”.
Alternatively, you can drag and drop your folders directly into the gallery.
The entire folder structure will be preserved exactly as it is.
The current limit for uploading folder structures to picdrop is 500 folders with a total of 20,000 files.
The folder upload is freely useable on desktop devices, but not currently on all mobile versions of picdrop and not for iPadOS, which is due to browser-restrictions of the respective device.
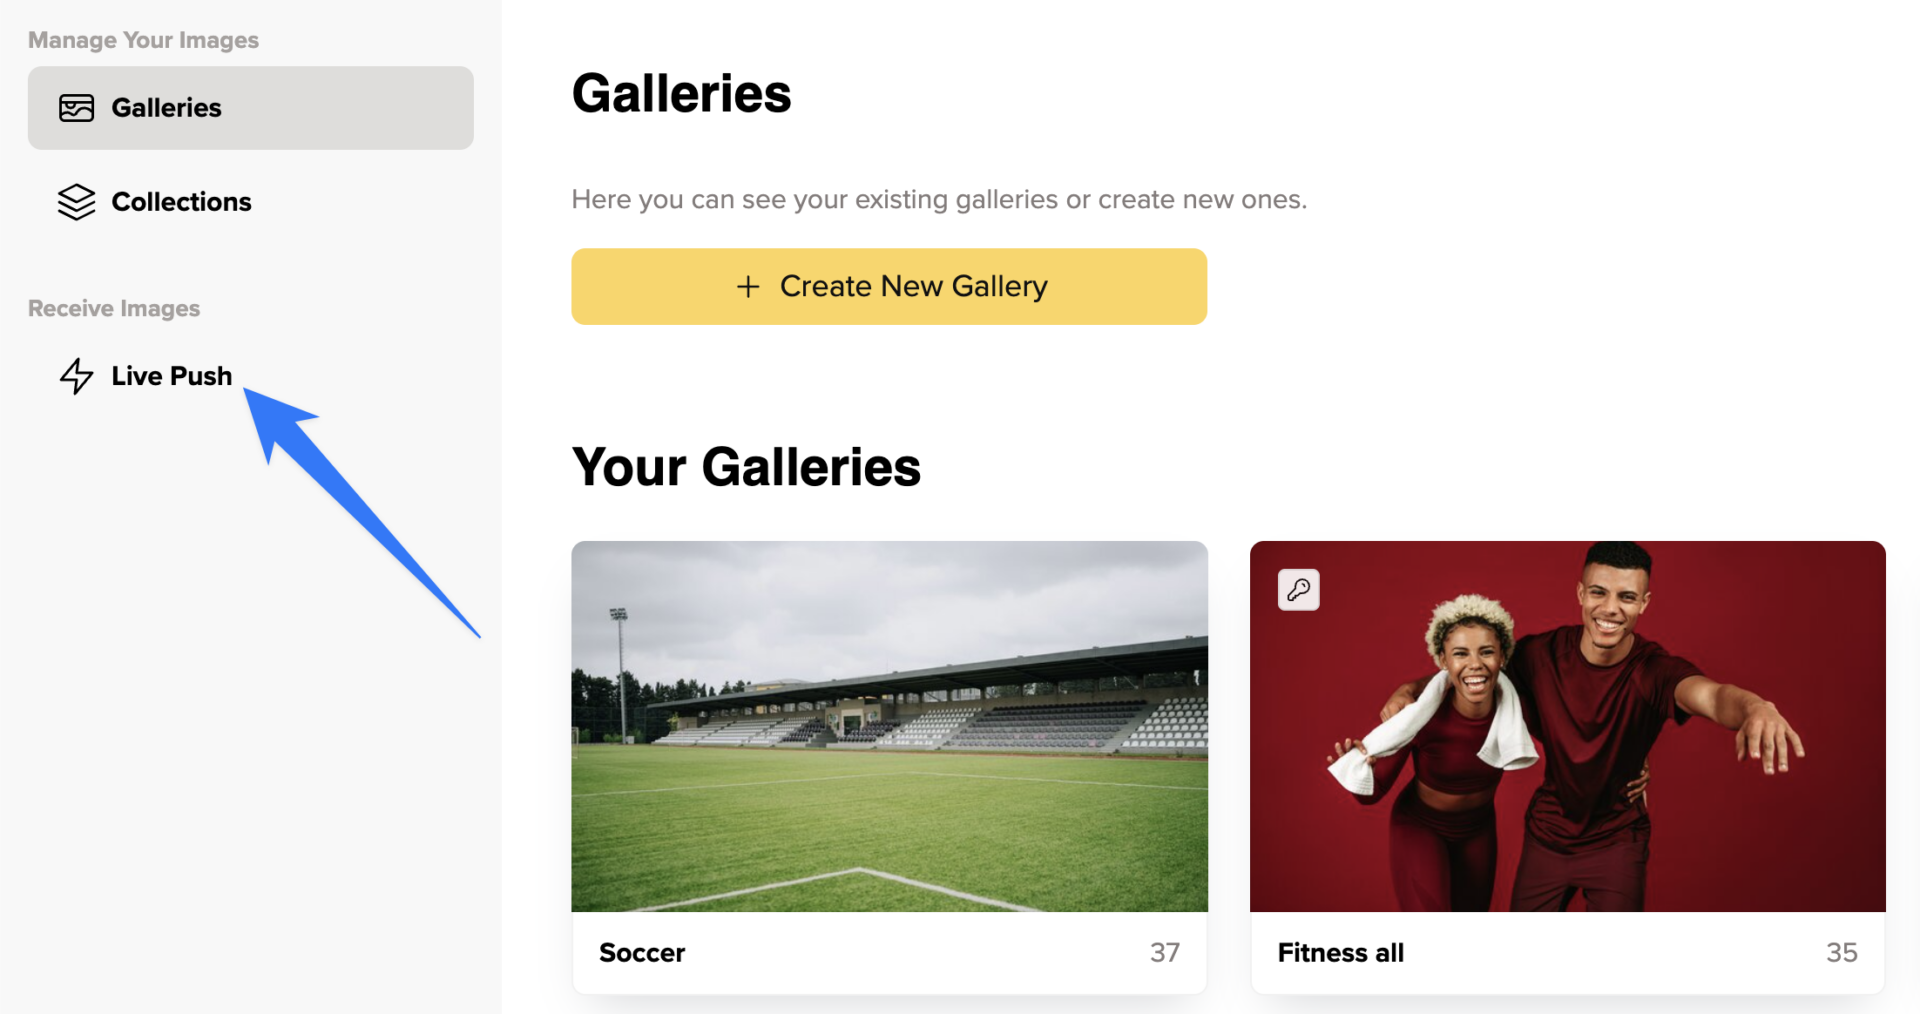
You want to upload your images directly from the camera to your picdrop gallery and you need your shots in picdrop as fast as possible? Then our new Live Push feature is perfect for you.
What is the Live Push feature in picdrop?
With Live Push, images can be transferred directly from a camera to your picdrop account via FTP (FTPS). While you’re shooting, your images are automatically uploaded into a selected gallery. Live Push can be used to receive images from external photographers without sharing your picdrop login credentials — or to connect your own camera(s) directly to galleries in picdrop. The FTP access you create for this is restricted to uploading into the configured gallery only.
Where can I find the Live Push feature in picdrop?
You can create and manage Live Push connections via the gallery overview in the “Live Push” section.
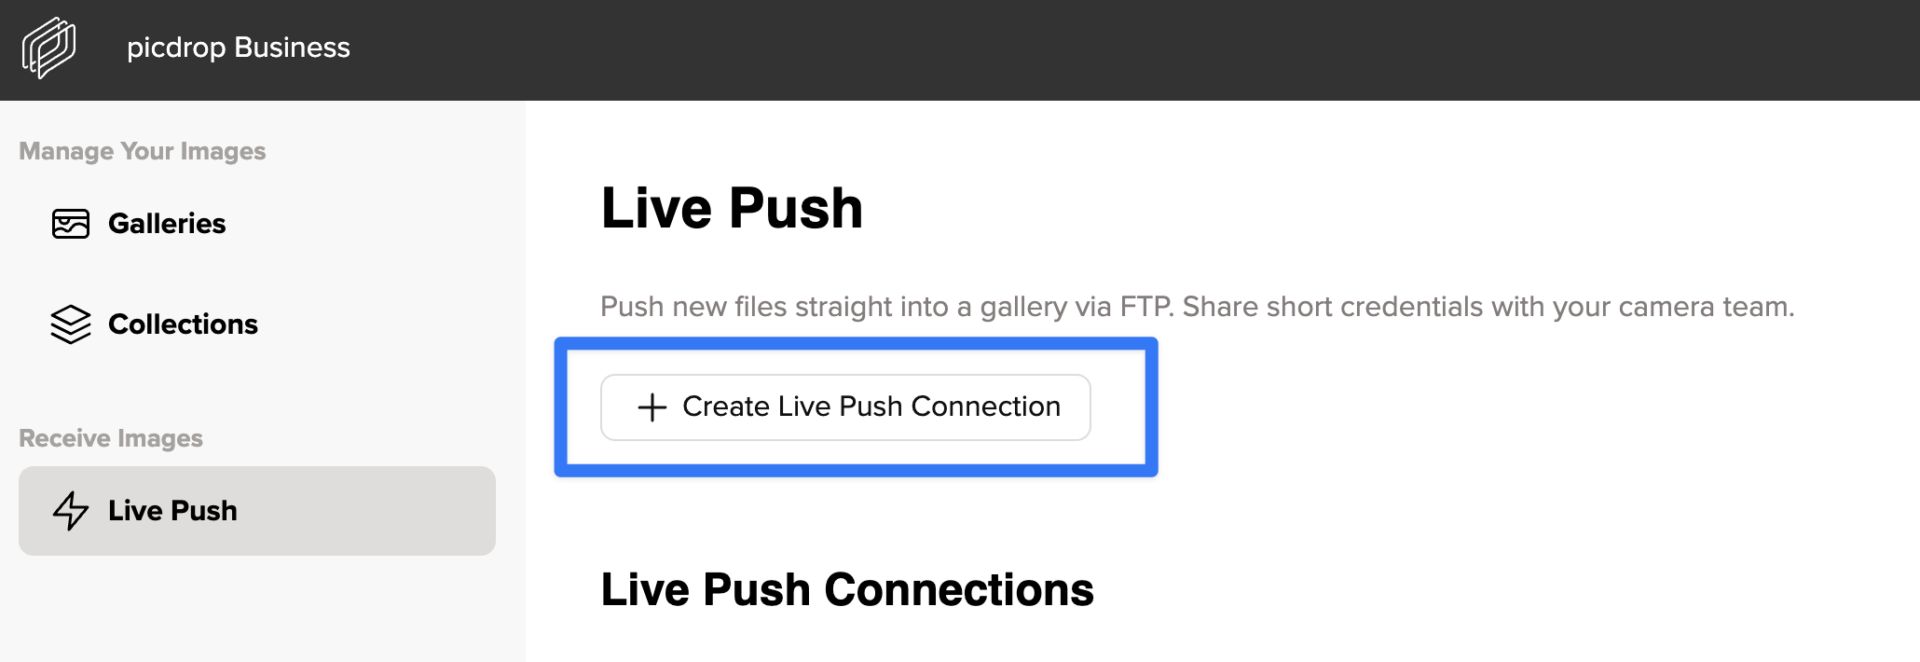
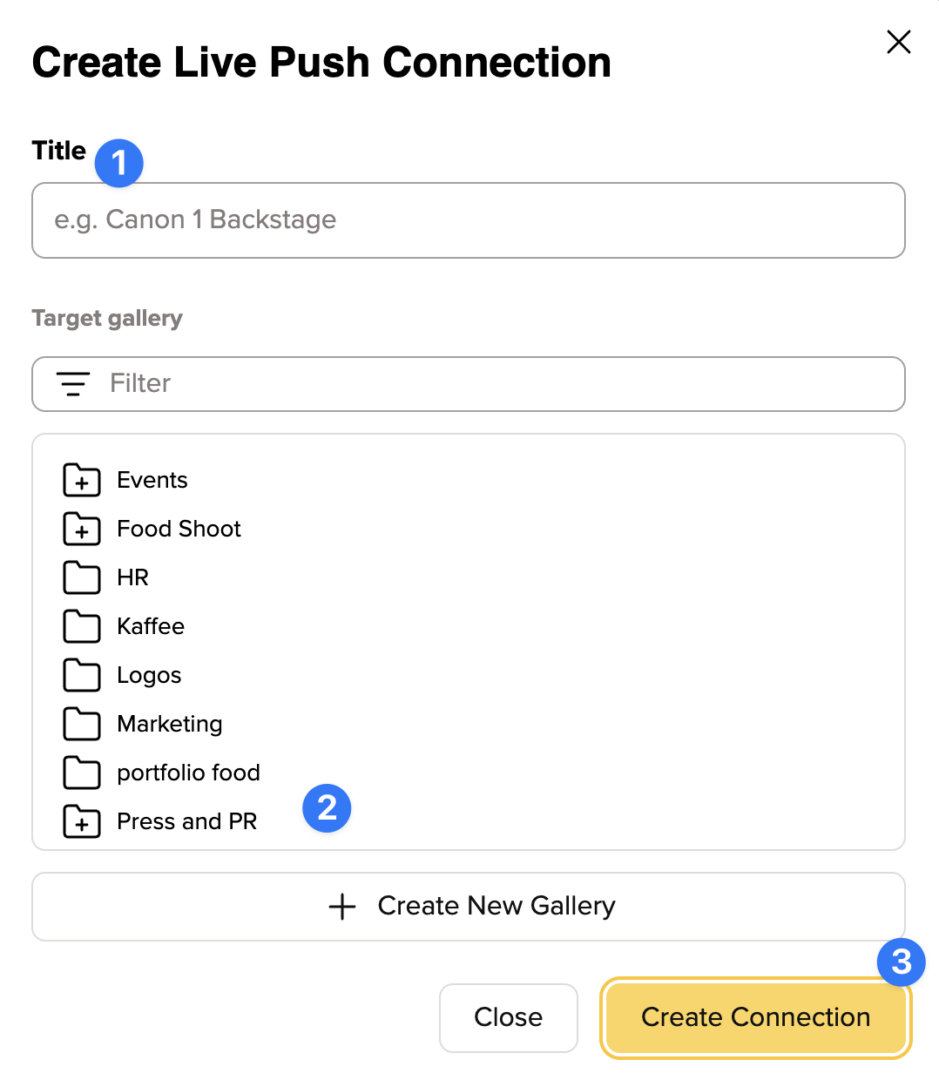
When creating a new connection, you assign a title (1) and select a target gallery (or create a new one, 2) before setting up the connection (3).
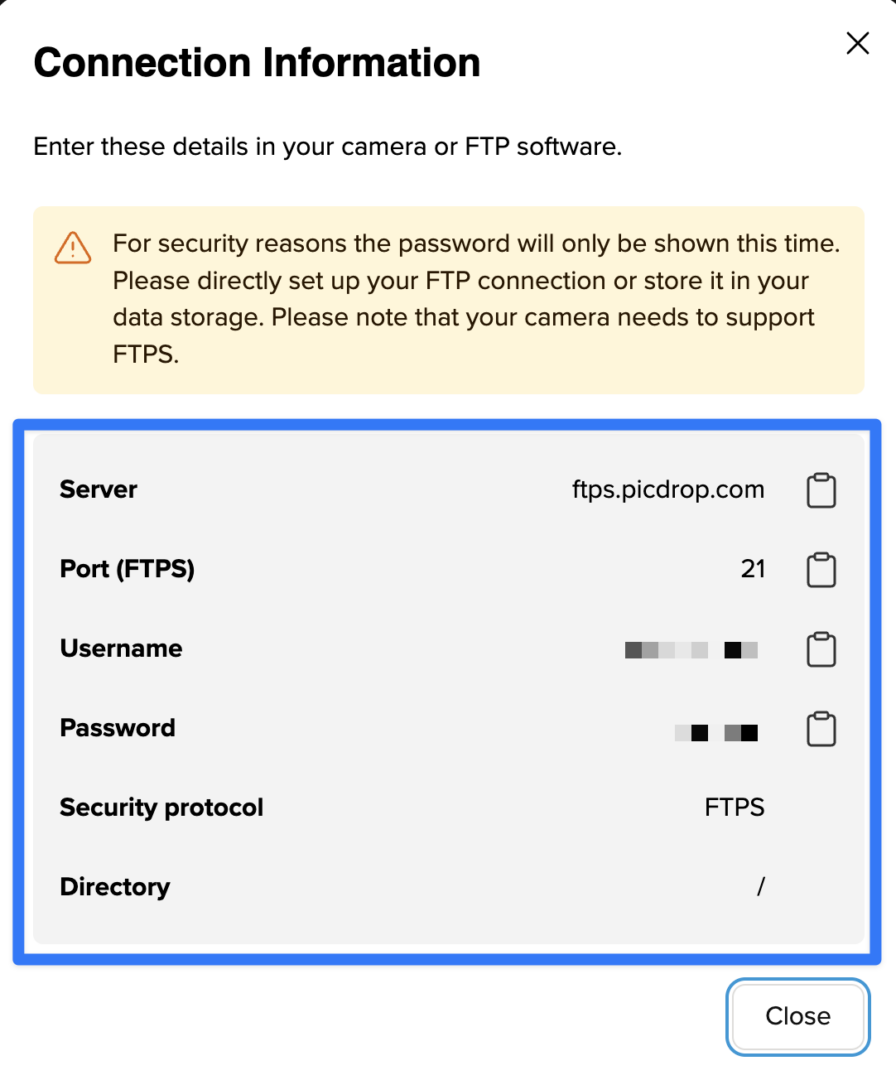
After that, you’ll receive the connection credentials that you or your photographers need for setting up the connection from the camera to the defined picdrop gallery.
You can edit existing connections at any time via the three dots on the right side of each connection.
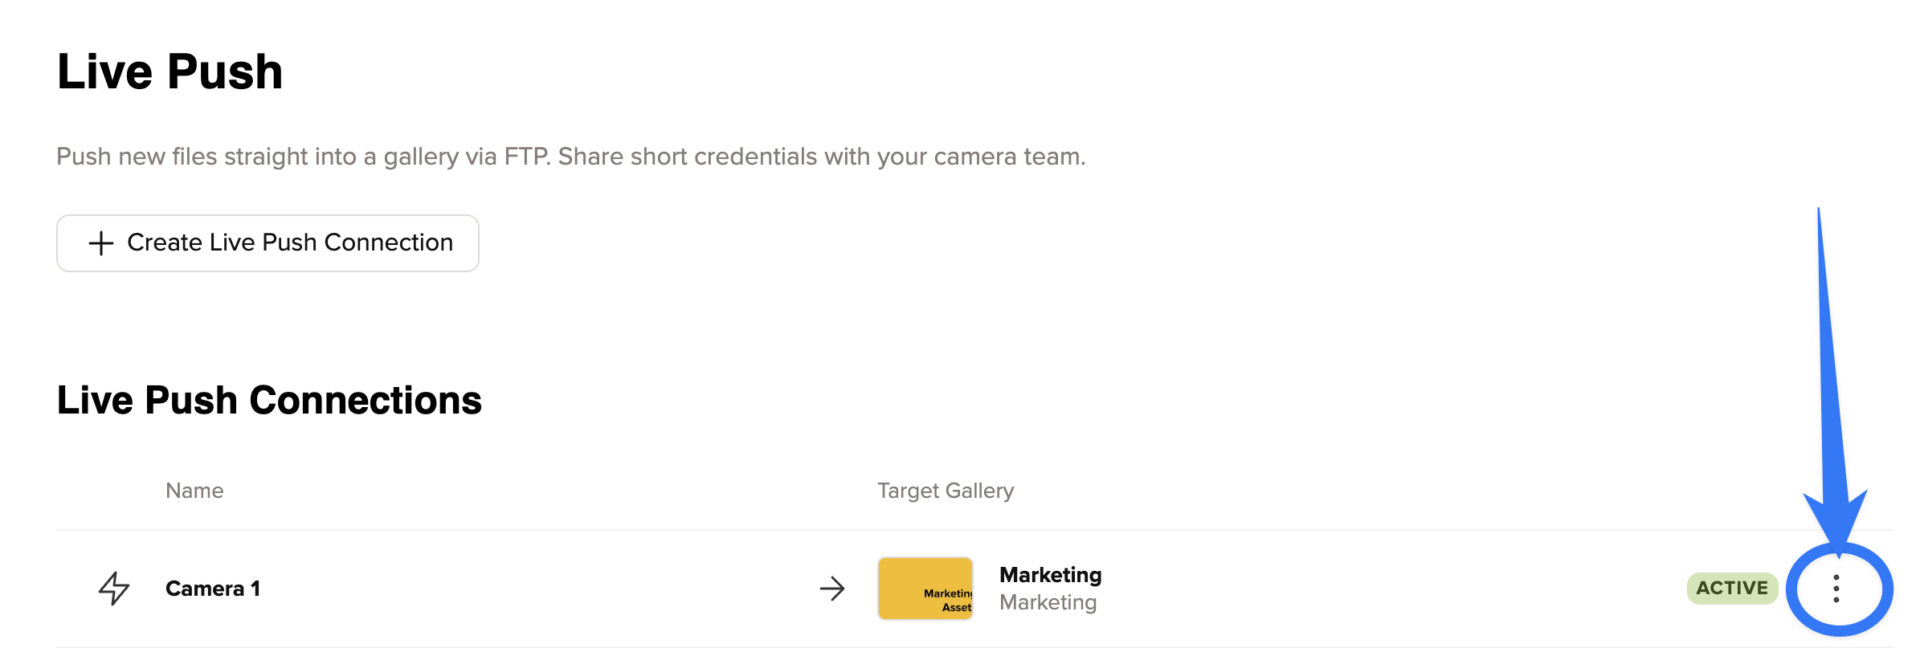
From the menu that appears, you can reset the password, deactivate or delete the connection, view the credentials, or jump straight to the target gallery.
Which plans include the Live Push feature?
Depending on your plan, you get a different number of Live Push connections. The Business plan includes unlimited connections, the Advanced plan has 5 connections and the Pro plan includes one connection. Live Push is not available in our Free plan.
Which cameras can I use with Live Push?
Live Push works with cameras that support FTPS (FTP over SSL).
This includes models such as:
– Canon: EOS R5, EOS R6, EOS-1D X Mark III
– Nikon: Z6 II, Z7 II, D6
– Sony: Alpha 1 (A1), A9 II, A7R V
Setup is done directly in the camera’s network settings.
You can find detailed instructions in the official manuals from the manufacturers:
Canon: https://cam.start.canon
Nikon: https://downloadcenter.nikonimglib.com
Sony: https://www.sony.de/electronics/support/cameras-camcorders
And in various videos, for example:
Canon R5 – https://www.youtube.com/watch?v=AYZdluI-9d8
Nikon Z8 & Z9 – https://www.youtube.com/watch?v=T3rkXeCo-W4
Sony Alpha 1 – https://www.youtube.com/watch?v=RHfU3eklSr0
Please note that the exact steps may vary depending on the camera model. For a reliable use of Live Push, your camera must support FTPS and have a stable internet connection during the shoot.
More Tips:
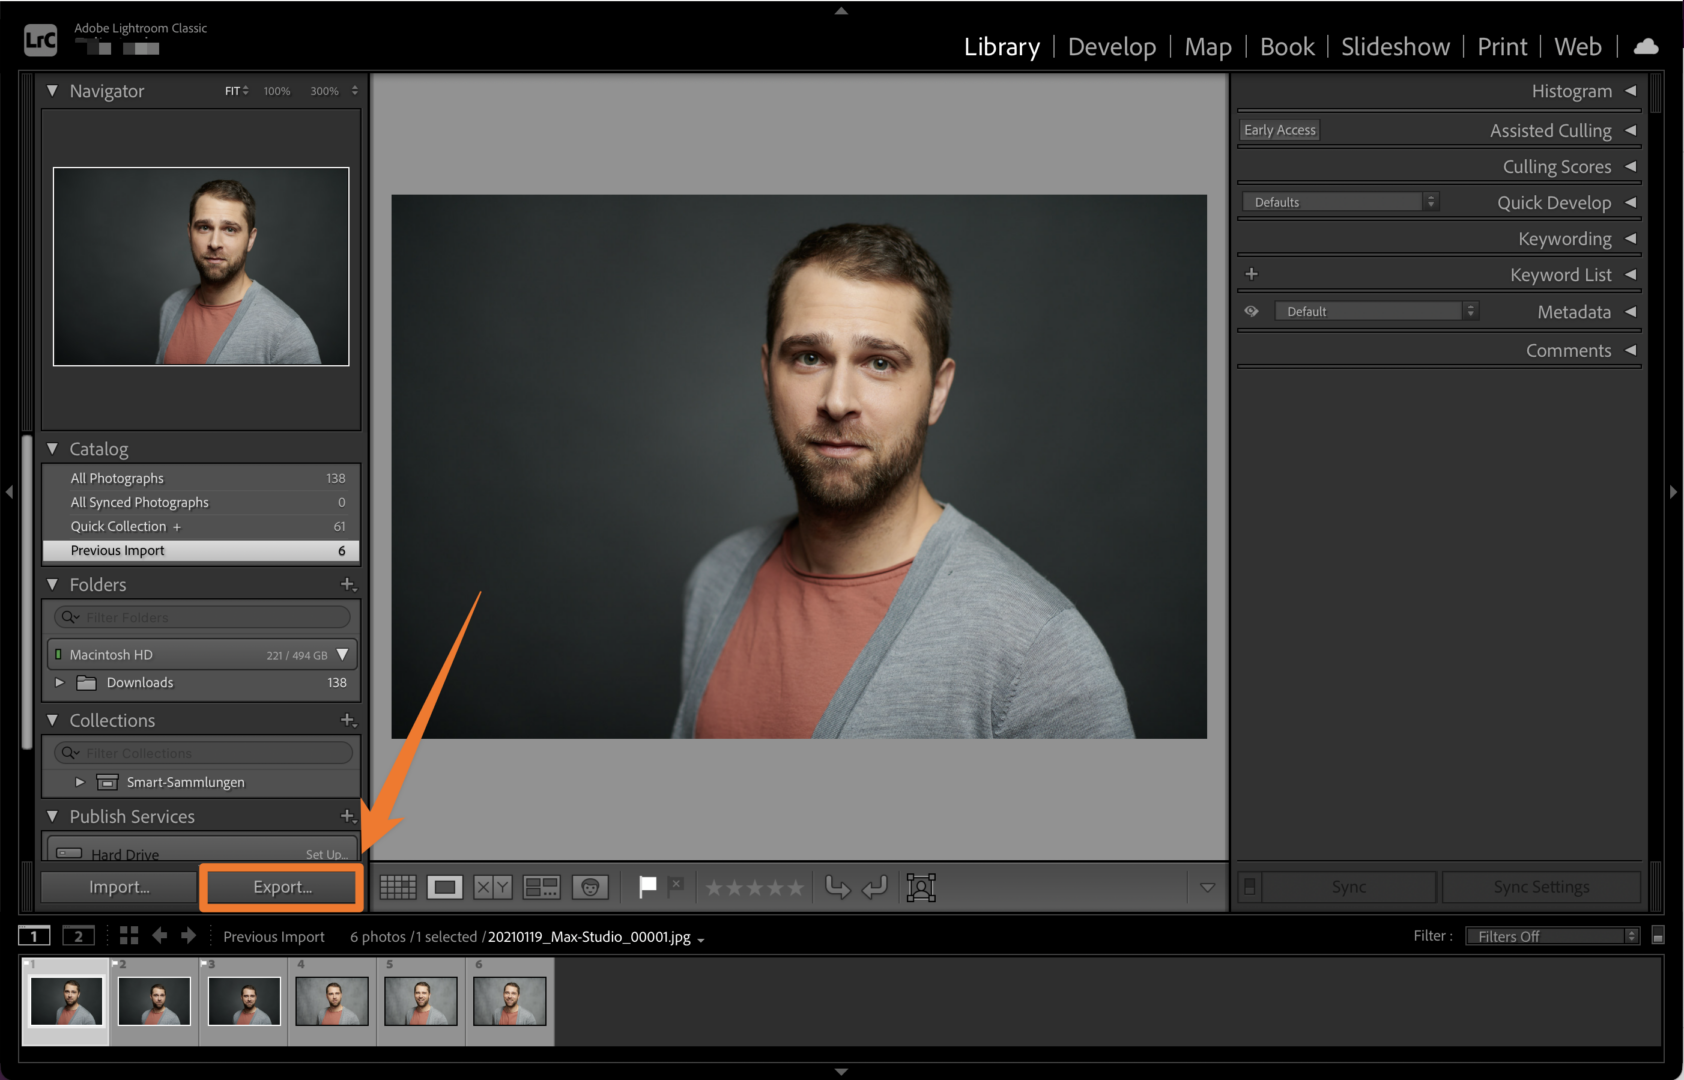
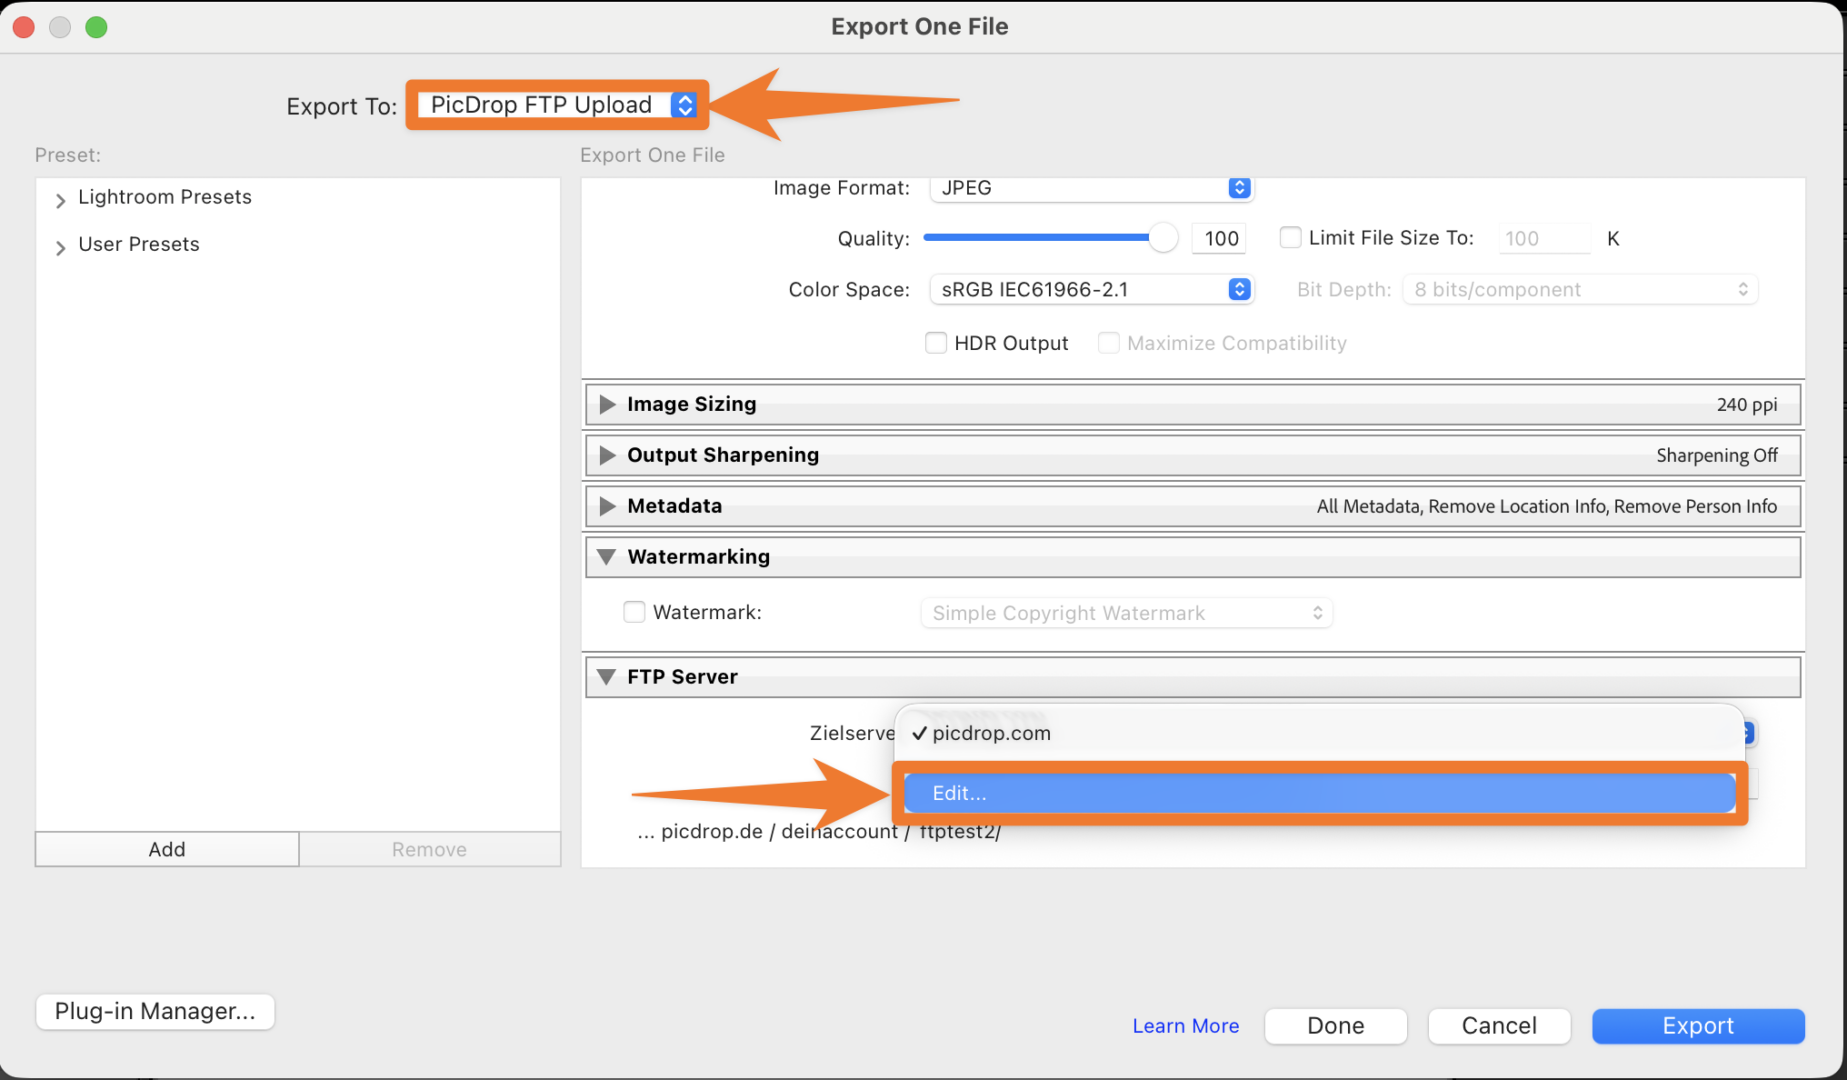
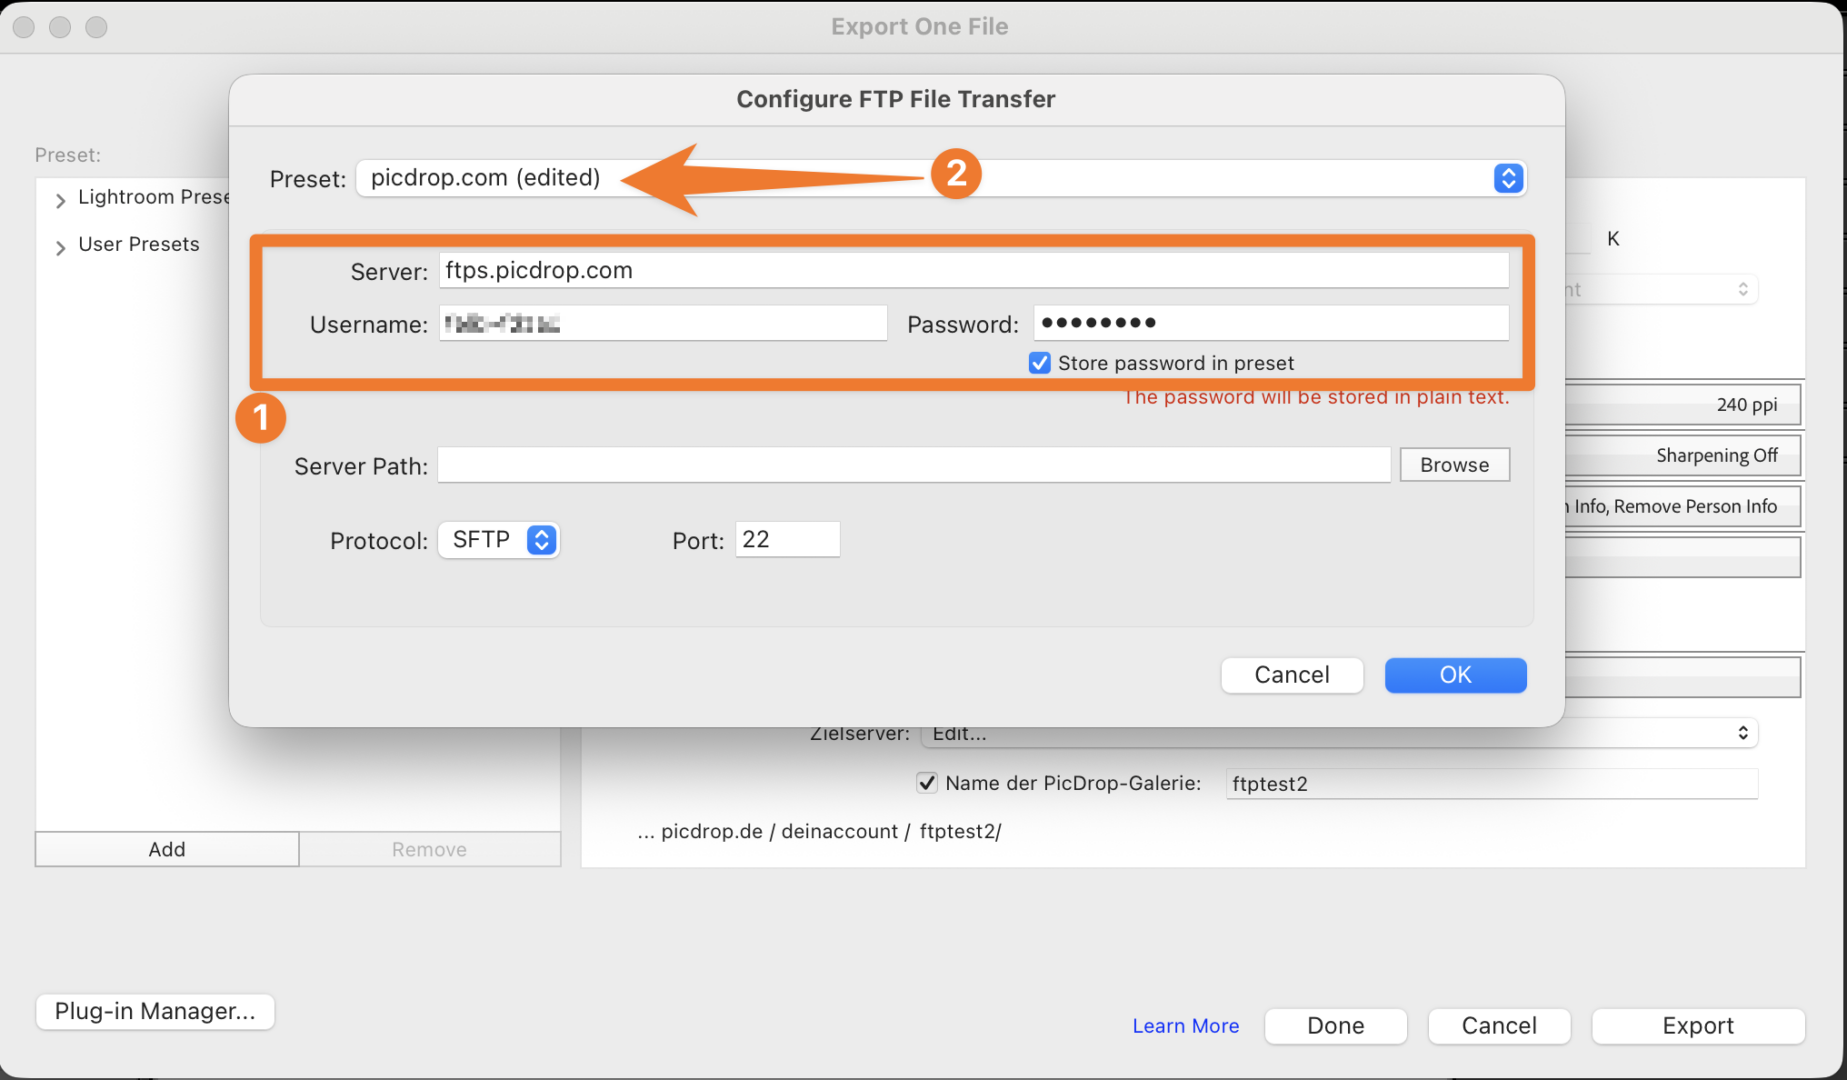
We updated our FTP system, which means you’ll need to adjust the corresponding login credentials in your FTP program or for your Lightroom Plugin.
You'll find your new login details in your account settings under FTP.
This article shows:
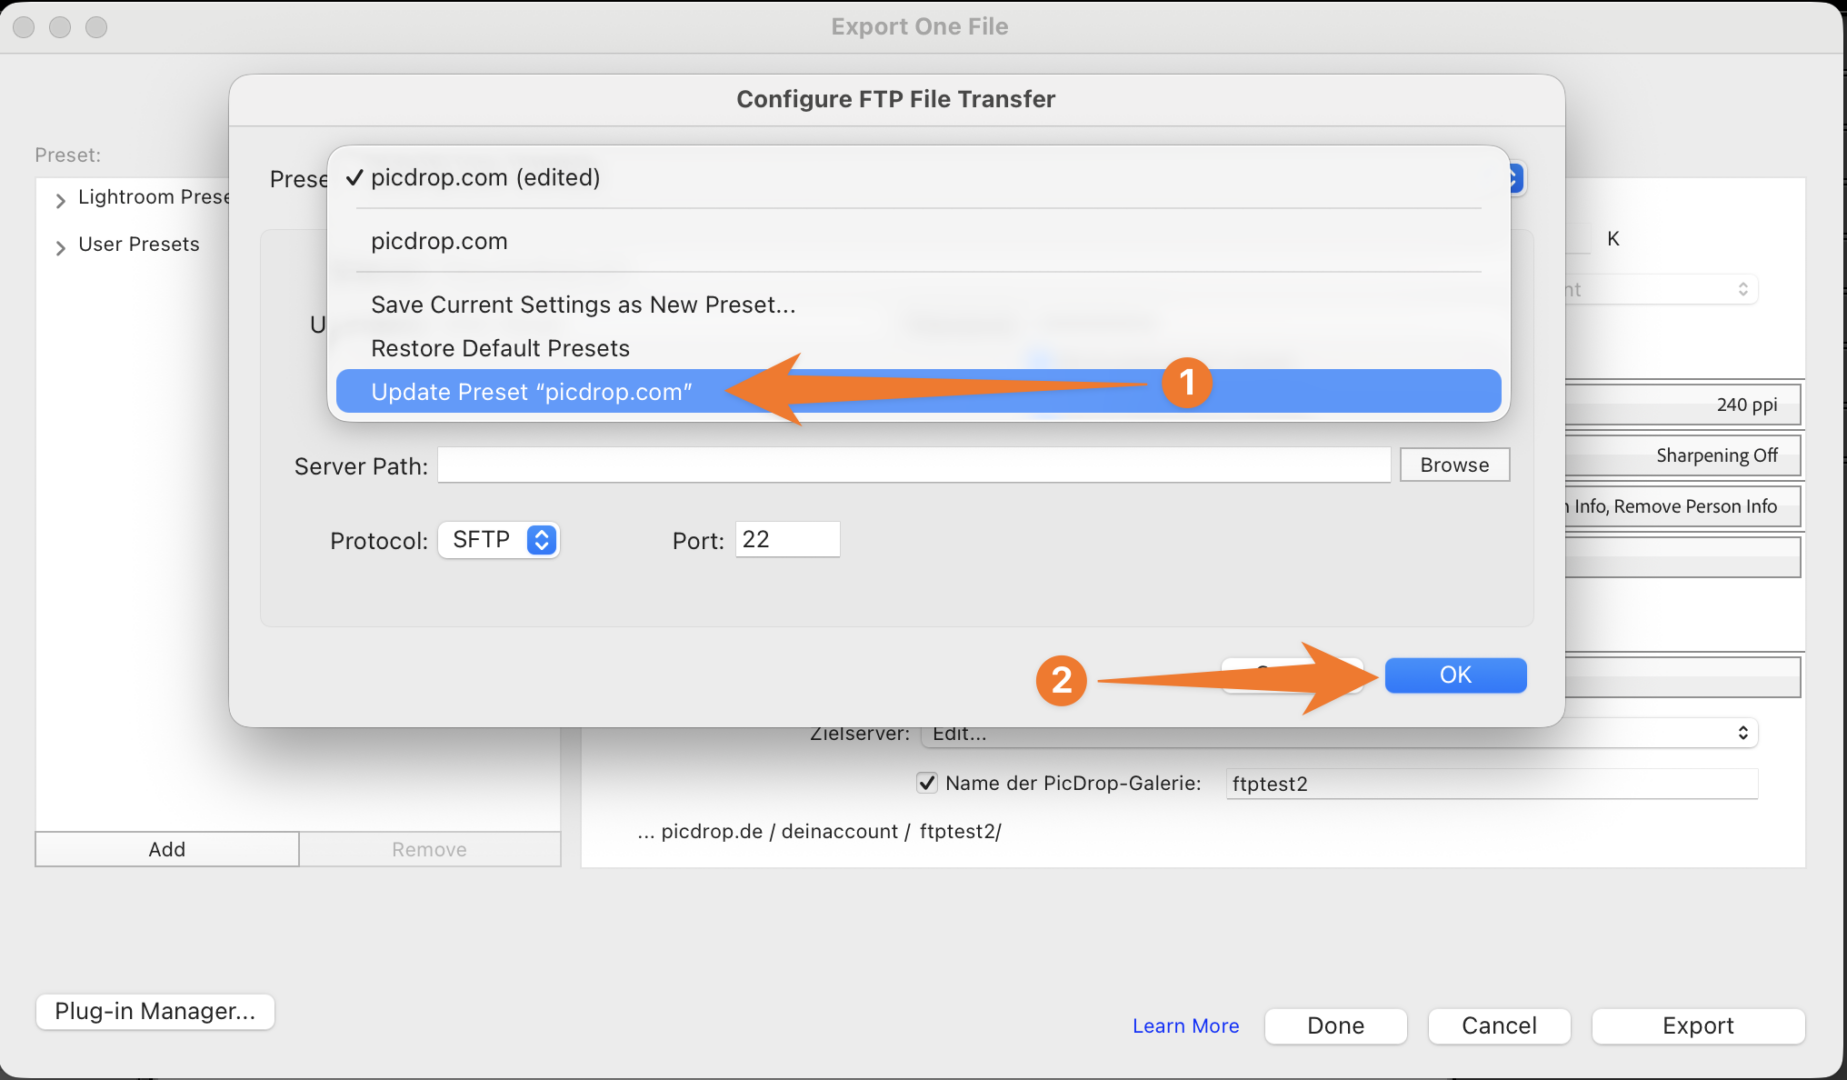
Cyberduck:
FileZilla:
Transmit:
Forklift:
If you upload your images directly from your camera to picdrop, we recommend using our Live Push feature.
You can find all information about it here: https://www.picdrop.com/web/faq/live-push
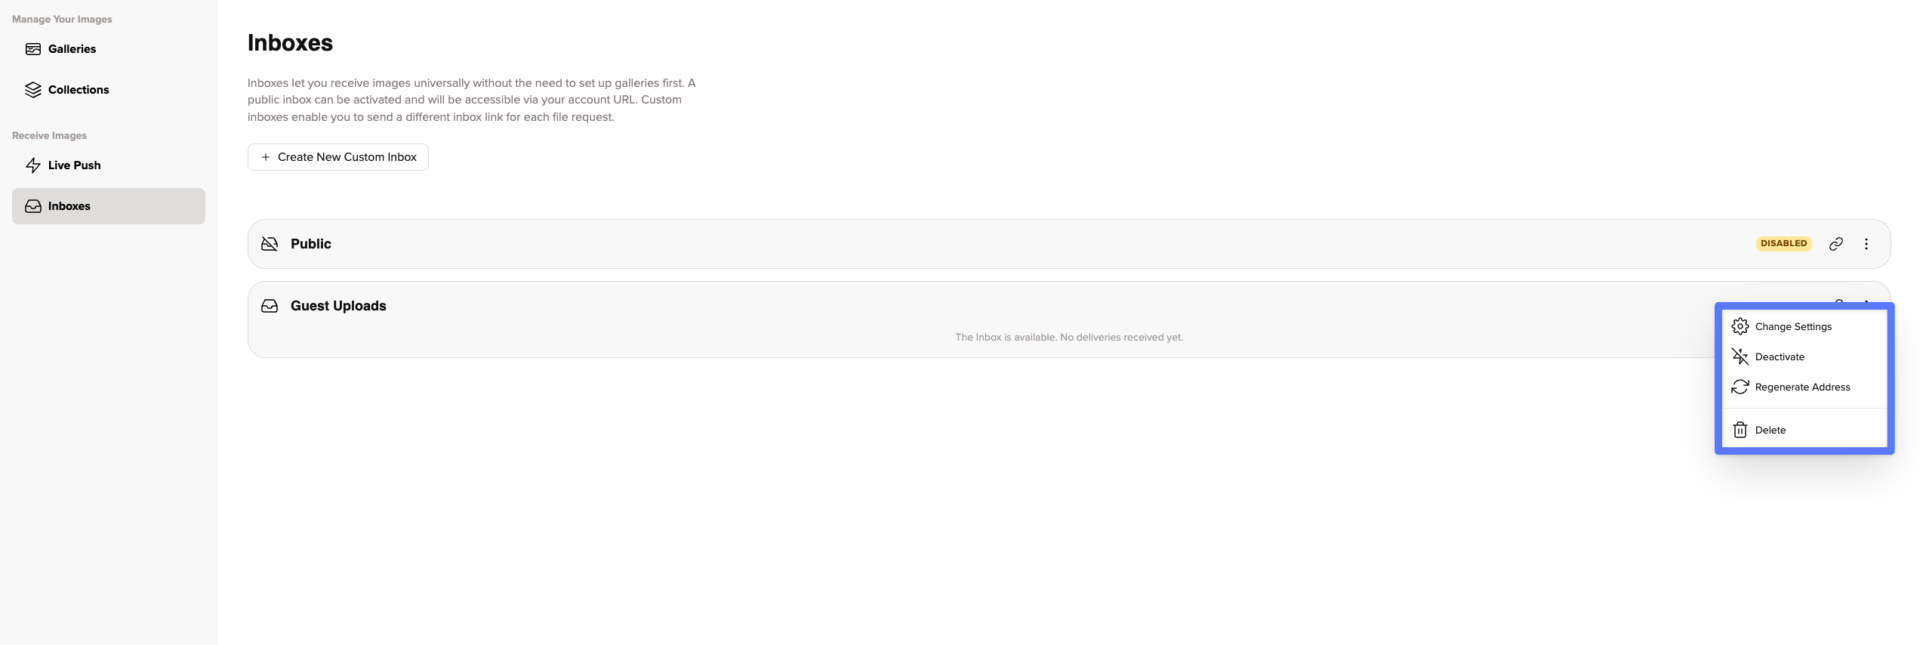
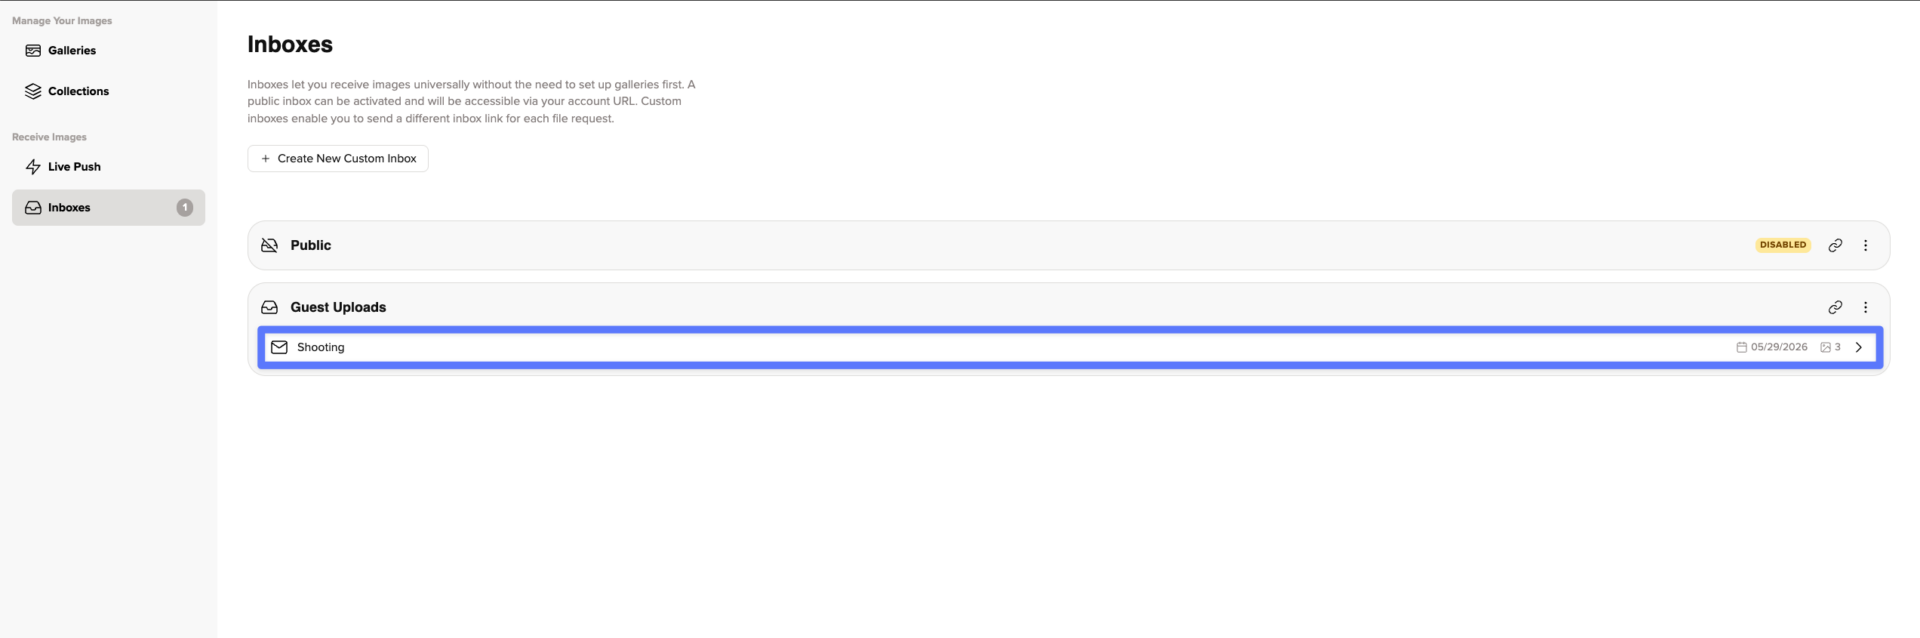
With picdrop Inbox, you can collect files from clients, service providers, or other freelancers — simply by sharing an Inbox link.
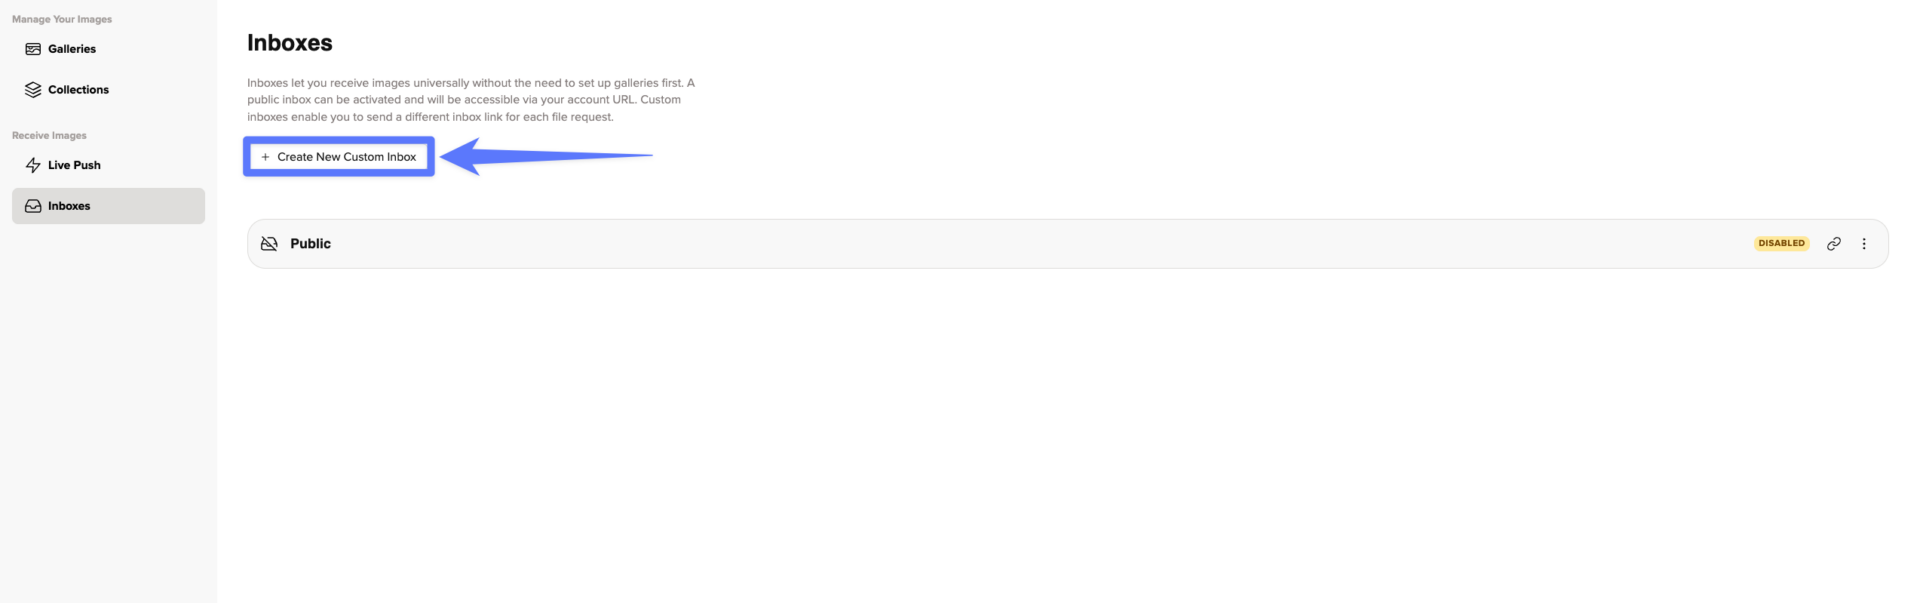
Your Inbox can be found in the left sidebar of your gallery overview. Every account includes a public Inbox ("Public") by default. This Inbox can be disabled, but not deleted.
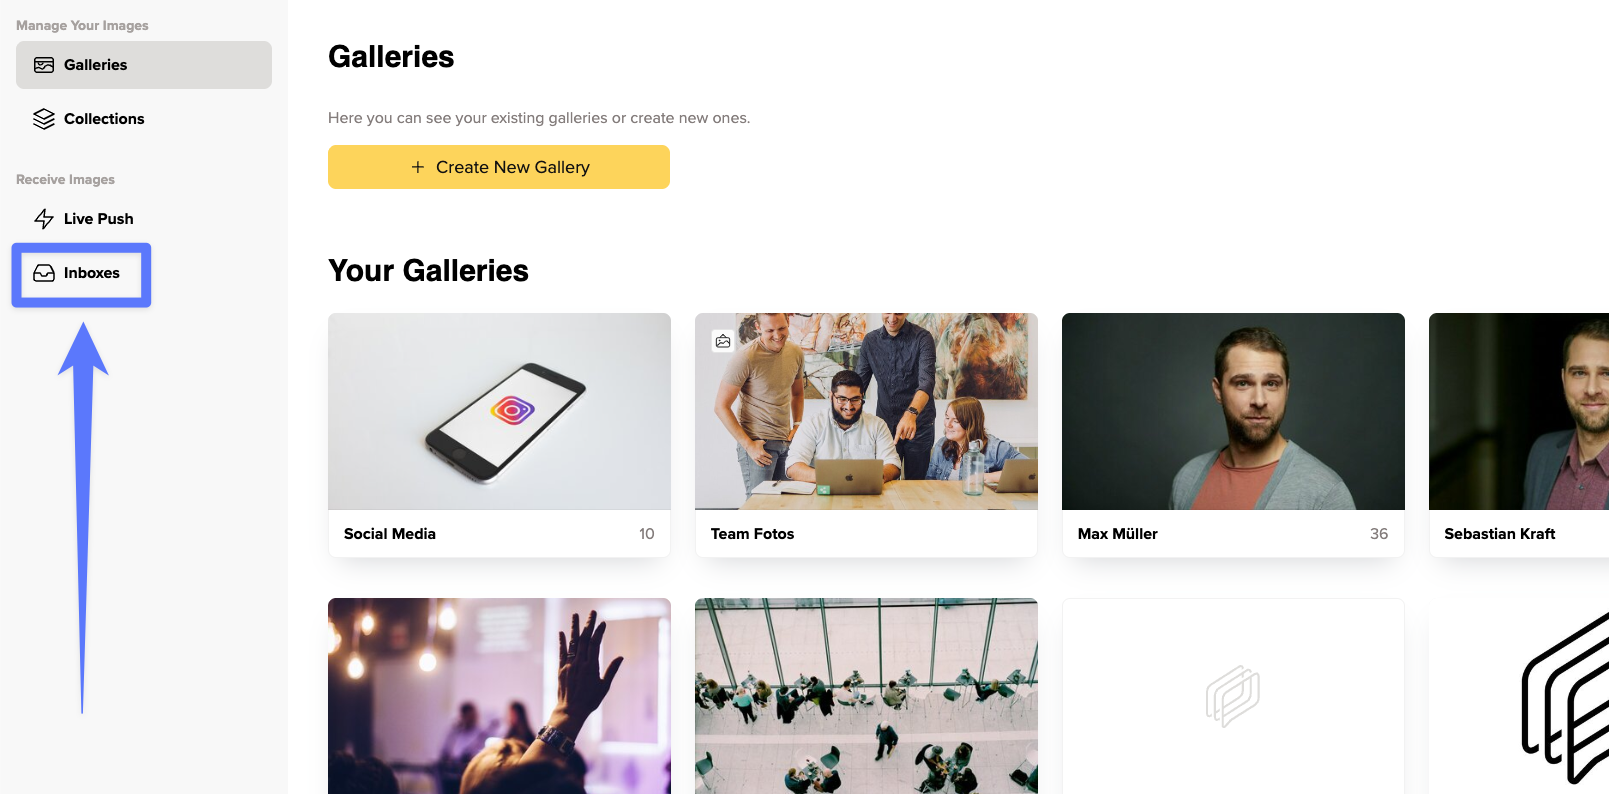
You can also create additional Inboxes for specific shoots, projects, or clients. Simply click "Create New Custom Inbox" to set one up.
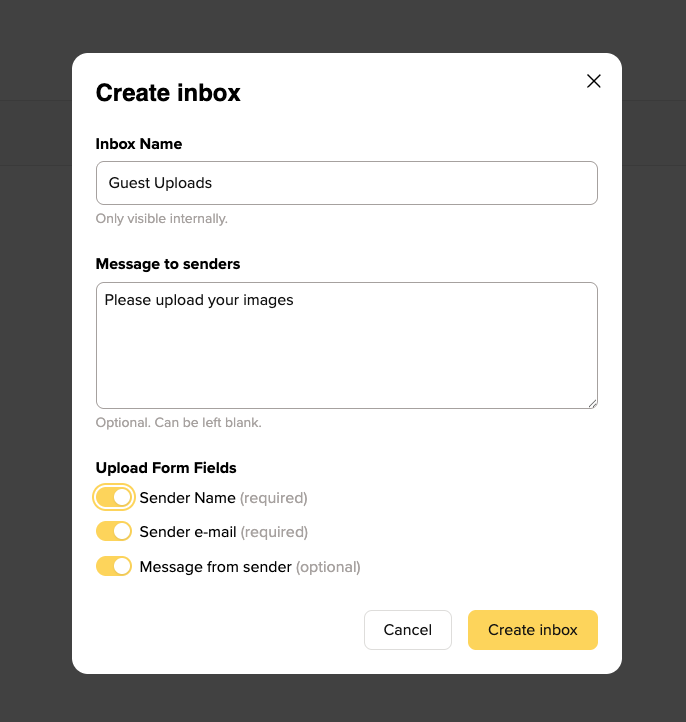
When creating an Inbox, you can configure a name, a personal welcome message and optional required fields for file submissions
For example, you can choose whether people uploading files must provide their name, email address, and/or a message.
You can change an Inbox's settings at any time. You can also:
To give someone access to an Inbox, simply copy its link using the button next to the Inbox and send it to them.
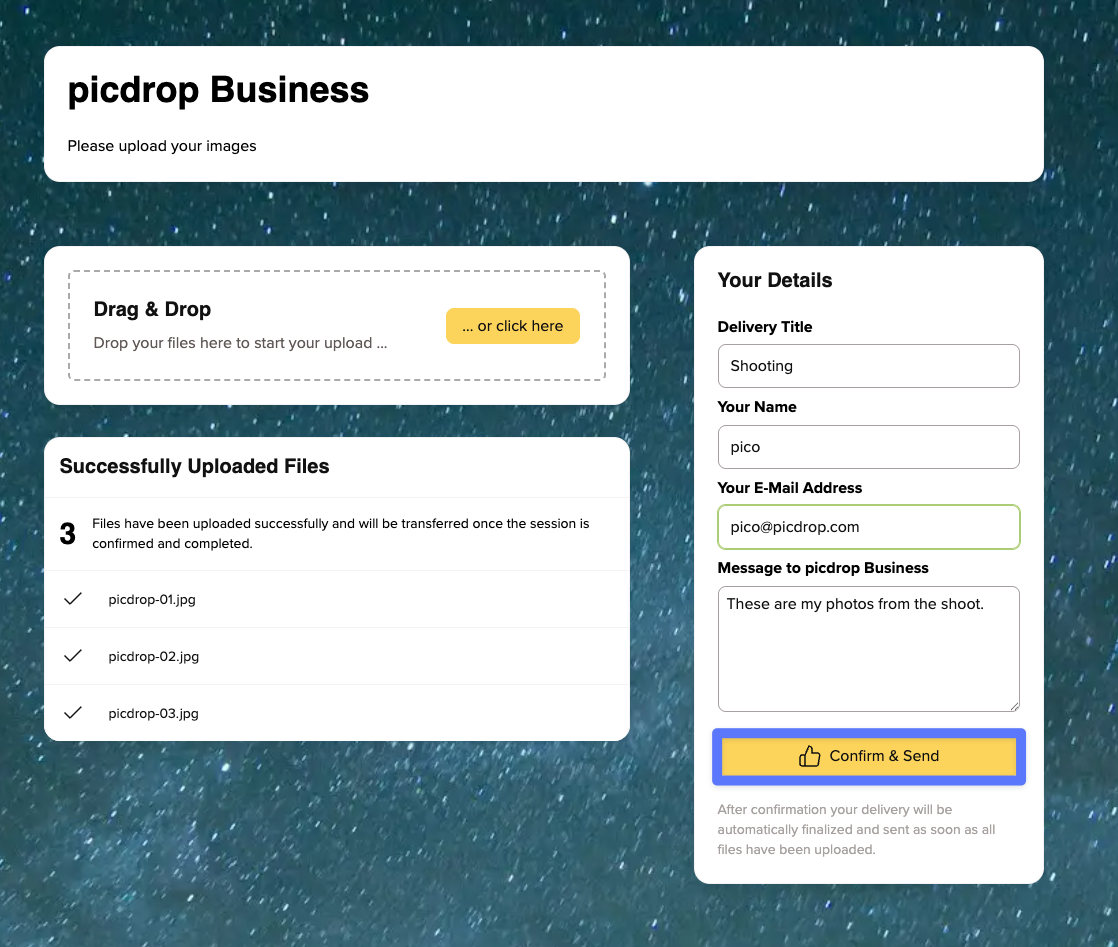
This is what the Inbox looks like for people uploading files:
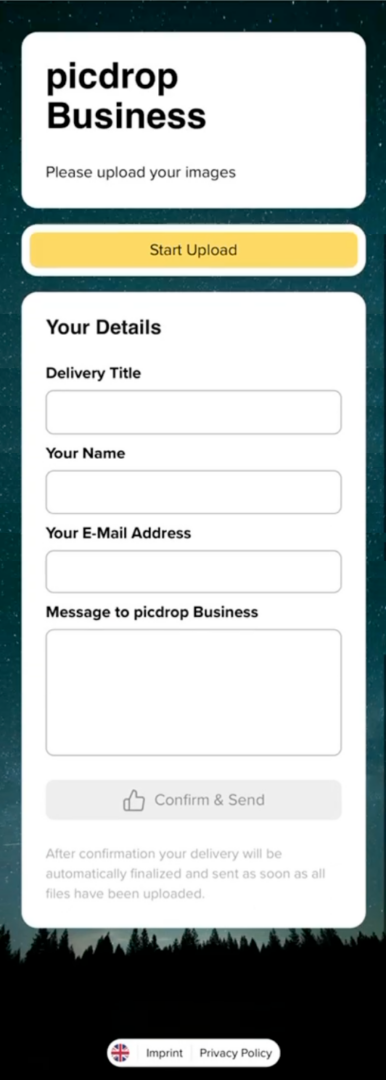
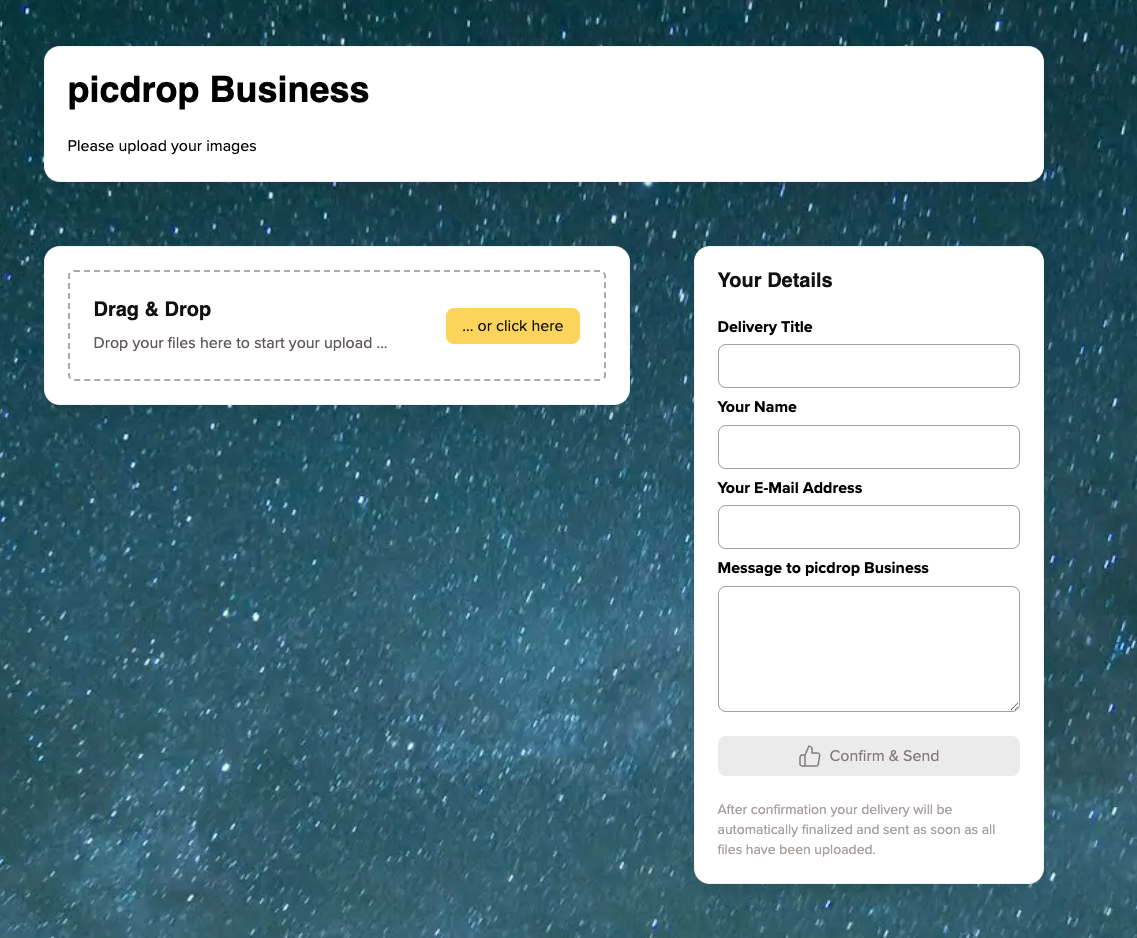
Visitors can then upload their files and submit them directly to your Inbox.
As soon as files are uploaded, you'll receive an email notification and a number will appear next to the corresponding Inbox.
This number indicates how many open submissions are waiting for review and remains visible until you accept or reject them. To review a submission, open the corresponding Inbox.
There you'll find:
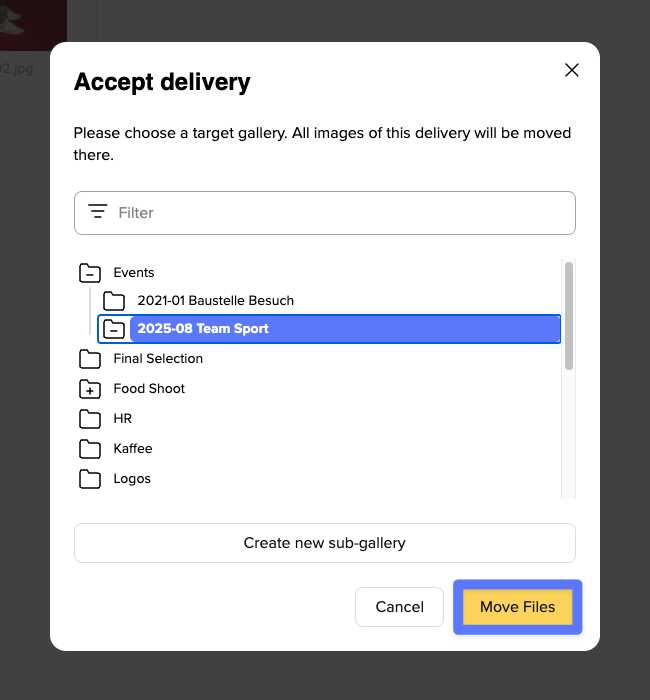
You can move submissions from the Inbox into an existing gallery, create a new gallery from them, or reject them.
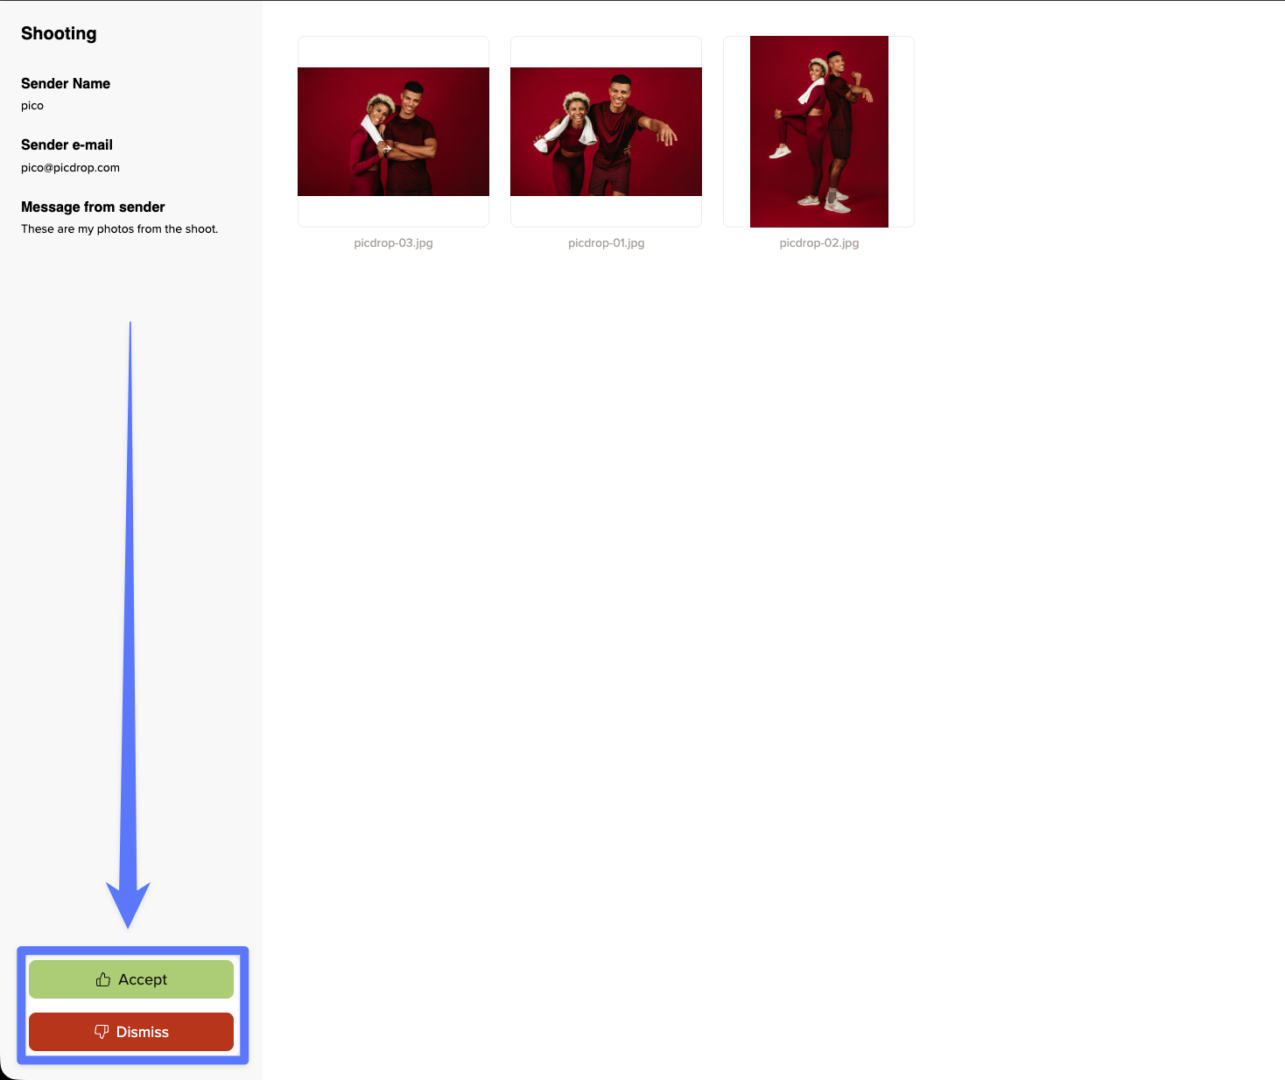
If you reject a submission, all uploaded files will be permanently deleted.
Once files have been accepted and moved into a gallery, the submission disappears from the Inbox and the Inbox becomes empty again.
If you no longer need an Inbox, you can delete it using the three-dot menu.
If a project is only paused, you can simply disable the Inbox and reactivate it later.
Your Inbox is part of your picdrop account and therefore counts toward your available storage.
This means that uploads can only be accepted if they fit within your available storage space.
Files uploaded through Inbox must also be in a format supported by picdrop. For a complete list of supported file types, see our file format FAQ.
Inbox availability depends on your subscription:
Inbox is not available in our Free plan.