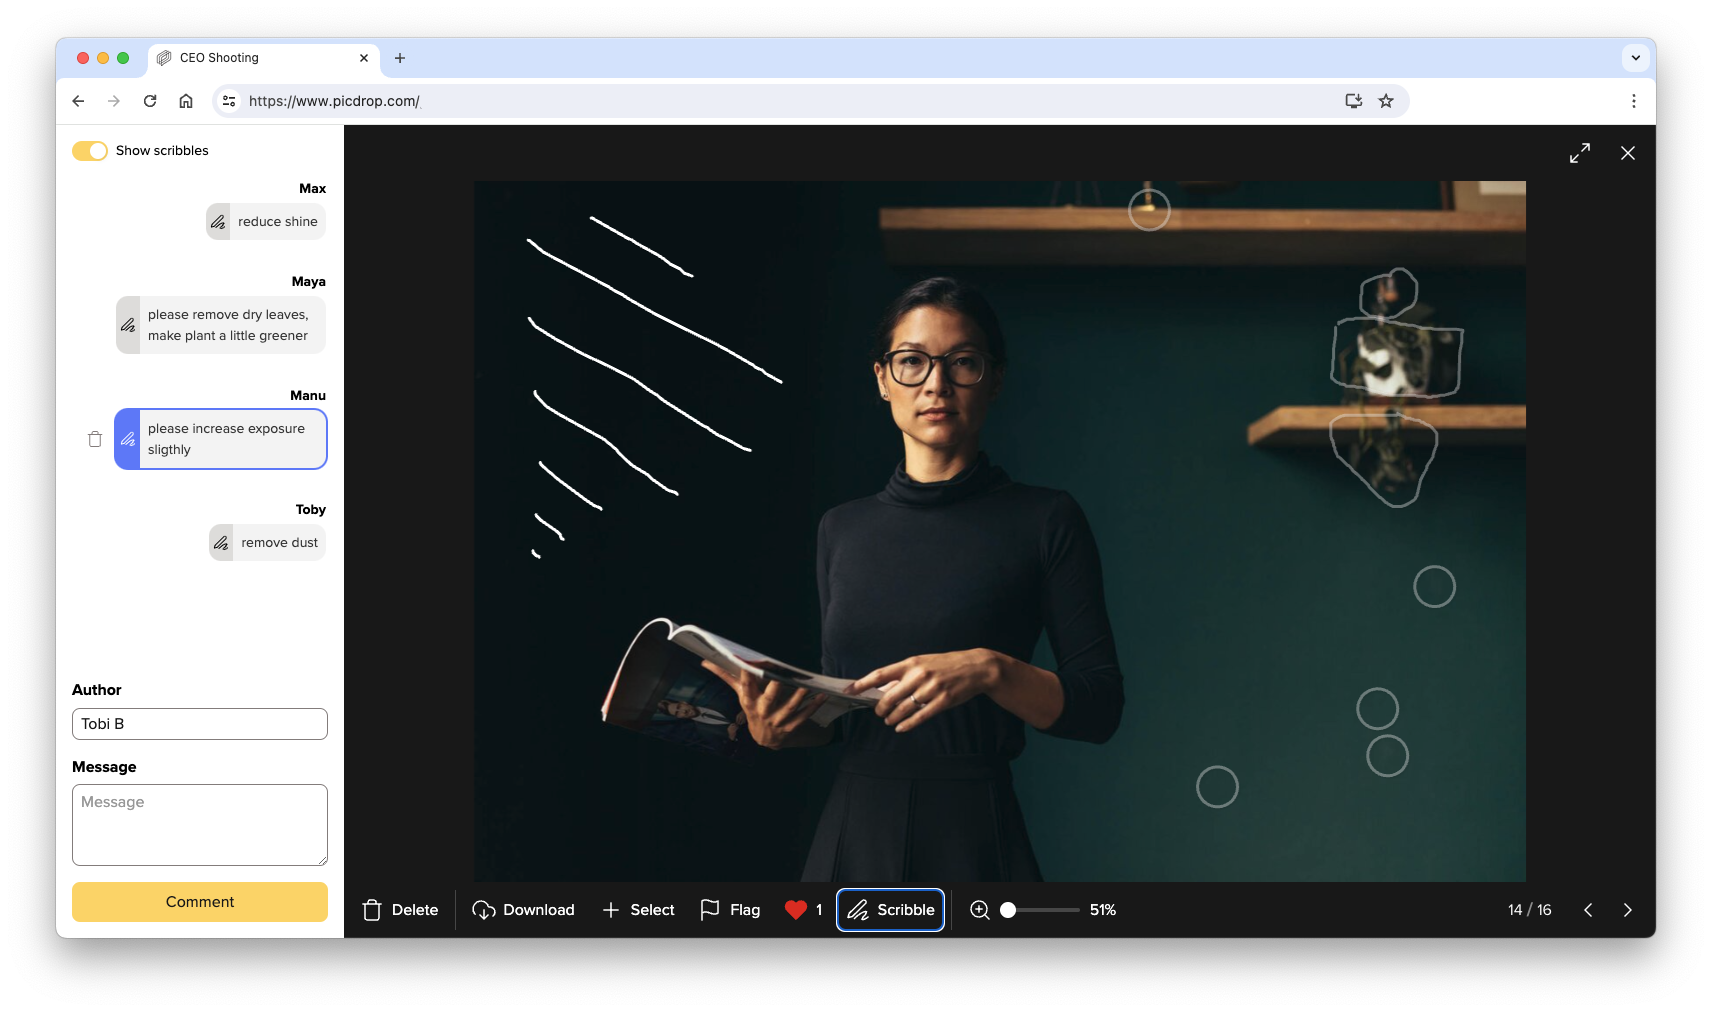
With Scribbles, you and your customers can draw comments and annotations directly into the images in a gallery. Scribbles are displayed on the image and saved together with a comment, making them visible to all visitors to the gallery.
Scribbles are the perfect tool for marking retouching requests in an exact location, leaving post-production instructions for certain areas of the image or simply for drawing ideas and thoughts into the image.
You can either place a circle in the image or draw your own shapes freely with the pen tool.
This is what Scribbles look like:
Scribbles can be created and changed in the desktop version of picdrop. In the mobile version of picdrop on tablets and smartphones, you can view scribbles and their comments.
You've probably seen how to filter out your clients' image sets in Lightroom, Capture One, Photo Mechanic, Finder, and Explorer. The whole thing is not only possible with image sets but also with all color-coded images.
Many image editing programs allow you to use the file search to display exactly the images of an image set you or your clients made in picdrop. This saves you the trouble of searching for each individual file. Here we show you how to do it:
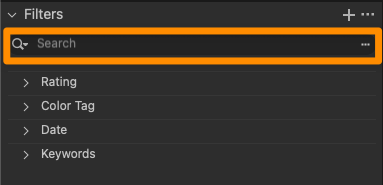
Filter out all images with the desired color flags using the filter function on the left side. Now you see only the images with the desired color flag.
Click on "select all images" (bottom left) or use the keycombination of cmd-A or Ctrl-A to select all currently displayed images.
You have now created a set that you can use to filter out the images locally on your mac / PC.
Click on the "Export selection" icon in the set menu, bottom right. When you are logged in to your account you will find the various filter texts to filter out this set in Lightroom, Capture One or in your Finder / Explorer.
Optionally, you can save this selection permanently in picdrop to make it easier to find it again later.
Once you have copied the list of filenames to your clipboard, please continue on your computer in your tool of choice:

You can now save the filtered images in a new collection or mark them with stars / colors for your further workflow.
In Capture One, you can search for your images in multiple places using the exported folter text. To do this, open a folder or collection in Capture One with the images you want to filter. Then you have three options:

Done! You can now save the displayed images as your own collection or mark them with a color / stars.
Open the corresponding project folder in Photo Mechanic.
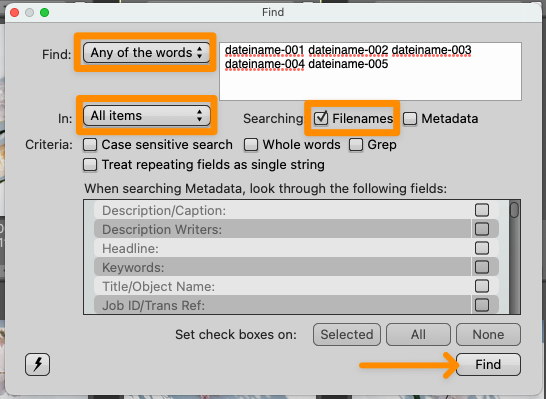
Paste the filter text from your clipboard into the search box (via Edit > Find... menu or cmd-F on Mac or Ctrl-F on Windows) and set the following search options:
After clicking "Find" in the lower right corner, Photo Mechanic will now select all photos of your choice from picdrop and you can continue working with them.
Please note that the search in the upper left corner of Photo Mechanic ("Search my Mac") cannot be used for these steps.

Please note that the filter text in Explorer can only hold a maximum of 259 characters.
The filter text in Finder is limited to 2048 characters or 99 files.
Many image editing programs allow you to use the file search to display exactly the files of a set you or your clients made in picdrop. This saves you the trouble of searching for each individual file. Here we show you how to do it:
Open the set in the gallery that you want to filter out on your computer. Or mark the files with the set tool (blue plus sign in the overview of your gallery).
Click on the "Export set" icon in the set, bottom right. When you are logged in to your account you will find the various filter texts to filter out this set in Lightroom, Capture One or in your Finder / Explorer.
Copy the corresponding file list / filter text to your clipboard.
Now continue on your computer in the program of your choice:
You can now save the filtered files in a new collection or mark them with stars / colors for your further workflow.
In Capture One, you can search for your files in multiple places using the exported folter text. To do this, open a folder or collection in Capture One with the files you want to filter. Then you have three options:


Done! You can now save the displayed files as your own collection or mark them with a color / stars.
Open the corresponding project folder in Photo Mechanic.
Paste the filter text from your clipboard into the search box (via Edit > Find... menu or cmd-F on Mac or Ctrl-F on Windows) and set the following search options:
After clicking "Find" in the lower right corner, Photo Mechanic will now select all files of your choice from picdrop and you can continue working with them.
Please note that the search in the upper left corner of Photo Mechanic ("Search my Mac") cannot be used for these steps.
Please note that the filter text in Explorer can only hold a maximum of 259 characters.
The filter text in Finder is limited to 2048 characters or 99 files.
Do you see too many results when using picdrop’s filter texts? Or do you get no results at all? There are several reasons why this might happen – and these are the solutions:
Lightroom, Windows Explorer, Apples Finder, etc. cannot filter out files that contain spaces. Before uploading, you should make sure that your file names consist only of letters, numbers, and underscores or hyphens.
Basically, the files on your hard disk must have the same file name as the files in your picdrop Gallery and the set you want to filter out locally. So you should make sure that e.g. Lightroom does not rename the files when uploading.
If additional images are filtered out instead of your set, this is often due to missing "fill zeros" in your file names. From the beginning, for example, if you filter to "File-2," Lightroom and Co will display all files that contain the "File-2" section in their names. Unfortunately, this section is also found in other file names such as "File-24". The result, both files (or even much, much more...) are displayed.
To solve this problem permanently, we recommend naming files from the memory card to the hard disk so that the trigger number always has at least 4 digits at the end of the file. Shorter digits before should always be filled with zeros. So "File-2" would become "File-0002" and the number is always and everywhere completely unique, even when filtering in Lightroom. For example, using this method, the "File-0002" file can no longer be part of the "File-0024" file name, as it was before.
This procedure helps you in many other programs besides Lightroom, including picdrop.
The filter text in the Explorer can contain a maximum of 259 characters. The filter text in the Finder is limited to 2048 characters or 99 files.
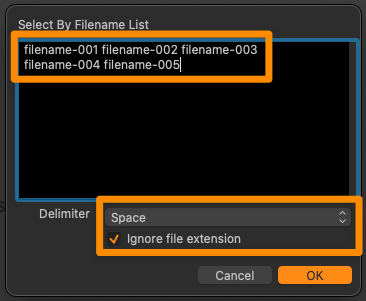
Capture One offers multiple ways to search for files. Please use the function in the menu Select > Select by > Filename List ...
Here is a detailed description of how to use this function: How do I filter color-coded images in Lightroom, Capture One, Photo Mechanic, Finder and Explorer?
Photo Mechanic offers two different search tools. Please use the search via "Edit & Find..." in the menu to filter your set. Here you will find the required settings for Photo Mechanic's search window.
You heard about the Lightroom plugin for picdrop but can't find it in your picdrop account?
The Lightroom plugin for picdrop is automatically activated for all accounts created before June 2022.
If your account was created after June 2022, you won't find the plugin in your account settings.
But don't worry, if you can't do without the Lightroom plugin for your work, please email us at hello@picdrop.com and we'll be happy to help.
Once the Lightroom plugin is activated for your account, you can find the installation instructions here in your account settings under Lightroom.
Important info about the Lightroom plugin.
The Lightroom plugin from picdrop is automatically activated for all accounts created before June 2022. If your account was created after June 2022, you will not find the plugin in your account settings.
But don't worry: if you can't do without the Lightroom plugin for your work, please email us at hello@picdrop.com and we'll be happy to help.
Attention: If you are using the outdated operating system macOS Mojave the Lightroom plugin will only work with Lightroom Classic version 10.2 or older. Newer versions of Lightroom Classic require at least macOS Catalina for you to be able to use the plugin.
Go to the "Account Settings" in your picdrop account and download the plugin under "Lightroom".
Save the ZIP file to your hard drive - preferably in a place where you won't accidentally delete it later. It's a good idea to put the plugin in the same place where you already store your Lightroom library. Your Lightroom installation folder is also a suitable place.
Here you unzip the file. The result is a file called "picdropftpupload.lrplugin", which you simply leave there.
Now you have to add the downloaded and unzipped plugin to Lightroom. It works like this:
Before your first upload with the plugin you have to configure the FTP settings for the plugin. Don't worry: this step is only necessary once!
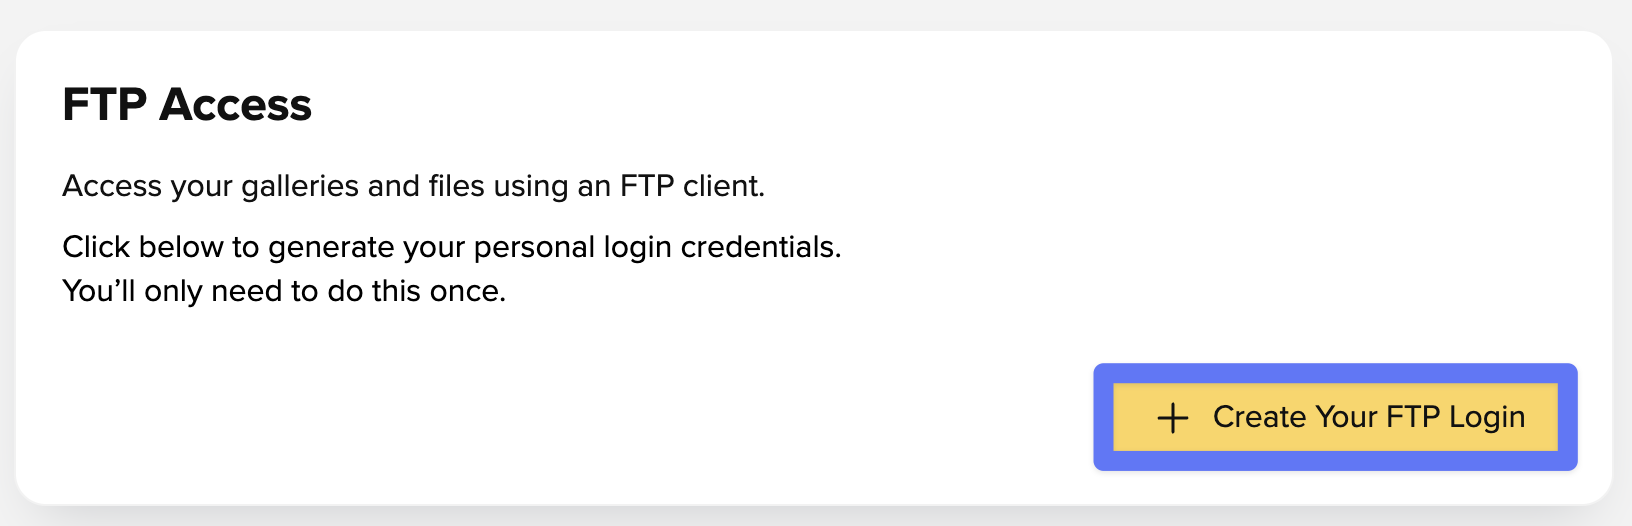
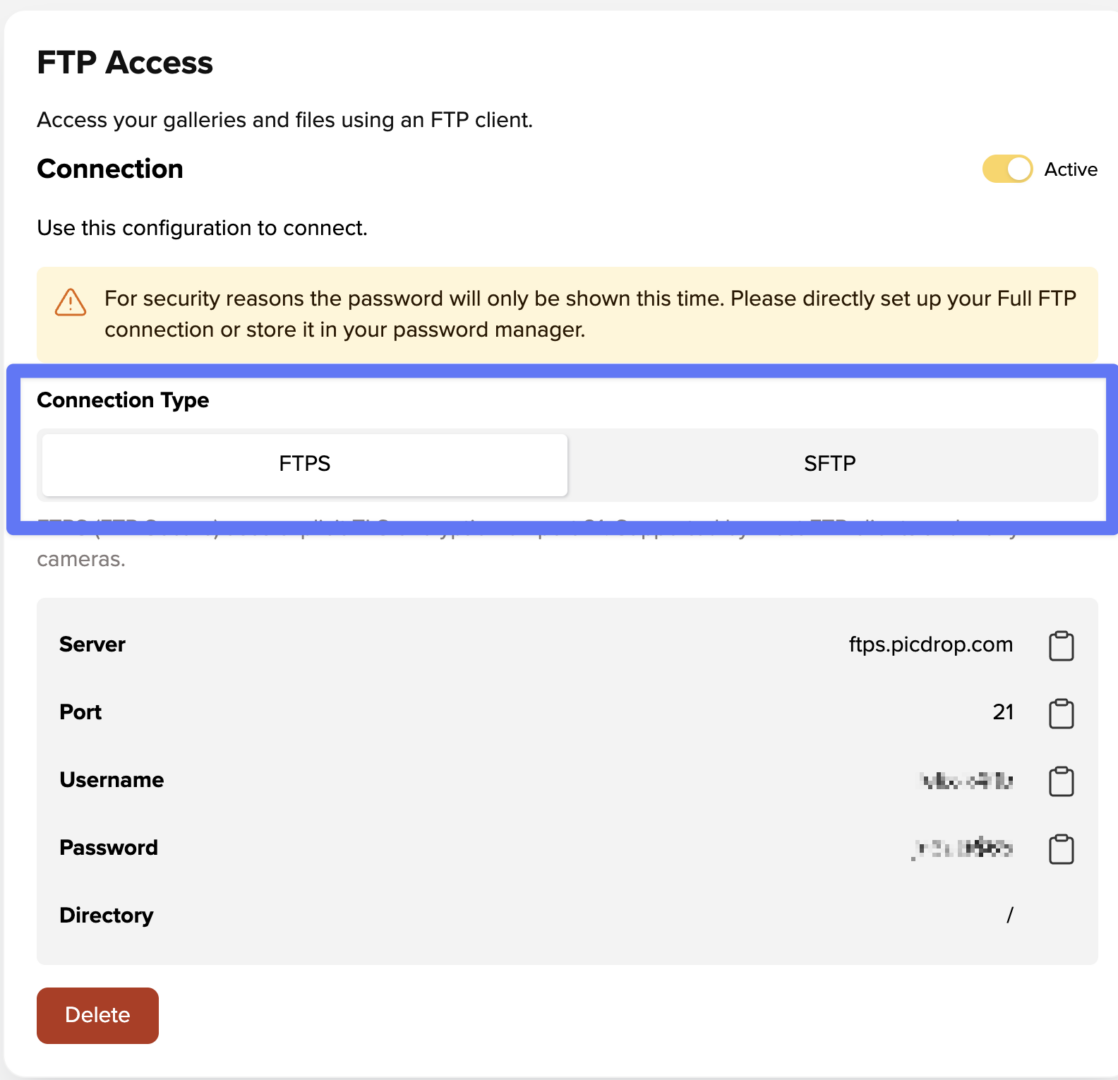
Before you can configure the plugin, you need to create your FTP-login in your account settings under FTP.
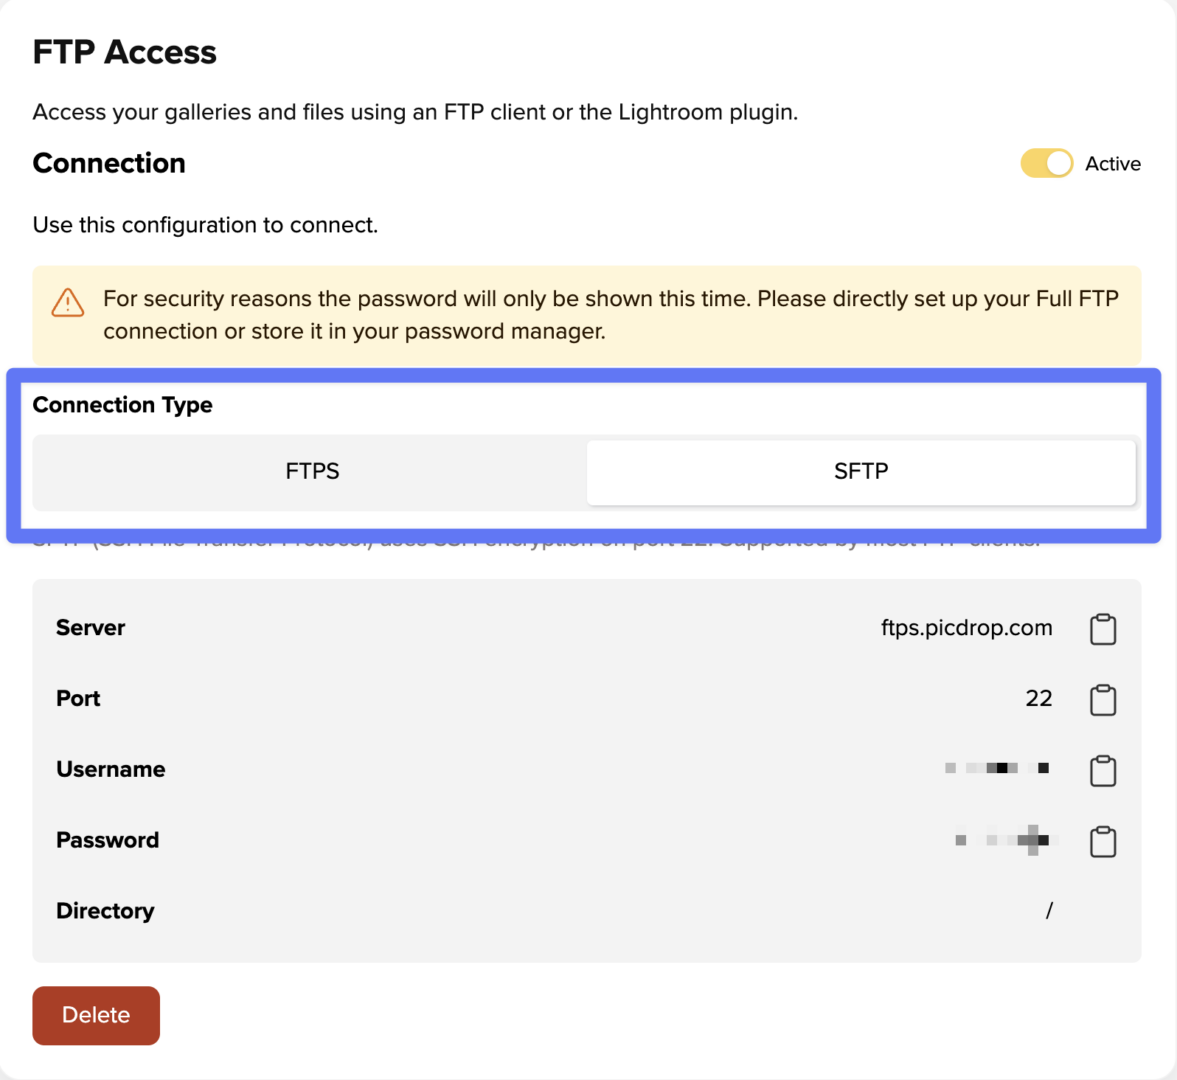
At the top, you can use the toggle to switch between the connection types FTPS and SFTP.
!! IMPORTANT: For the Lightroom Plugin you need to use SFTP as the connection type and port 22.
Please be aware that the password will only be shown once because of security reasons!
Now you can configure the Lightroom Plugin!
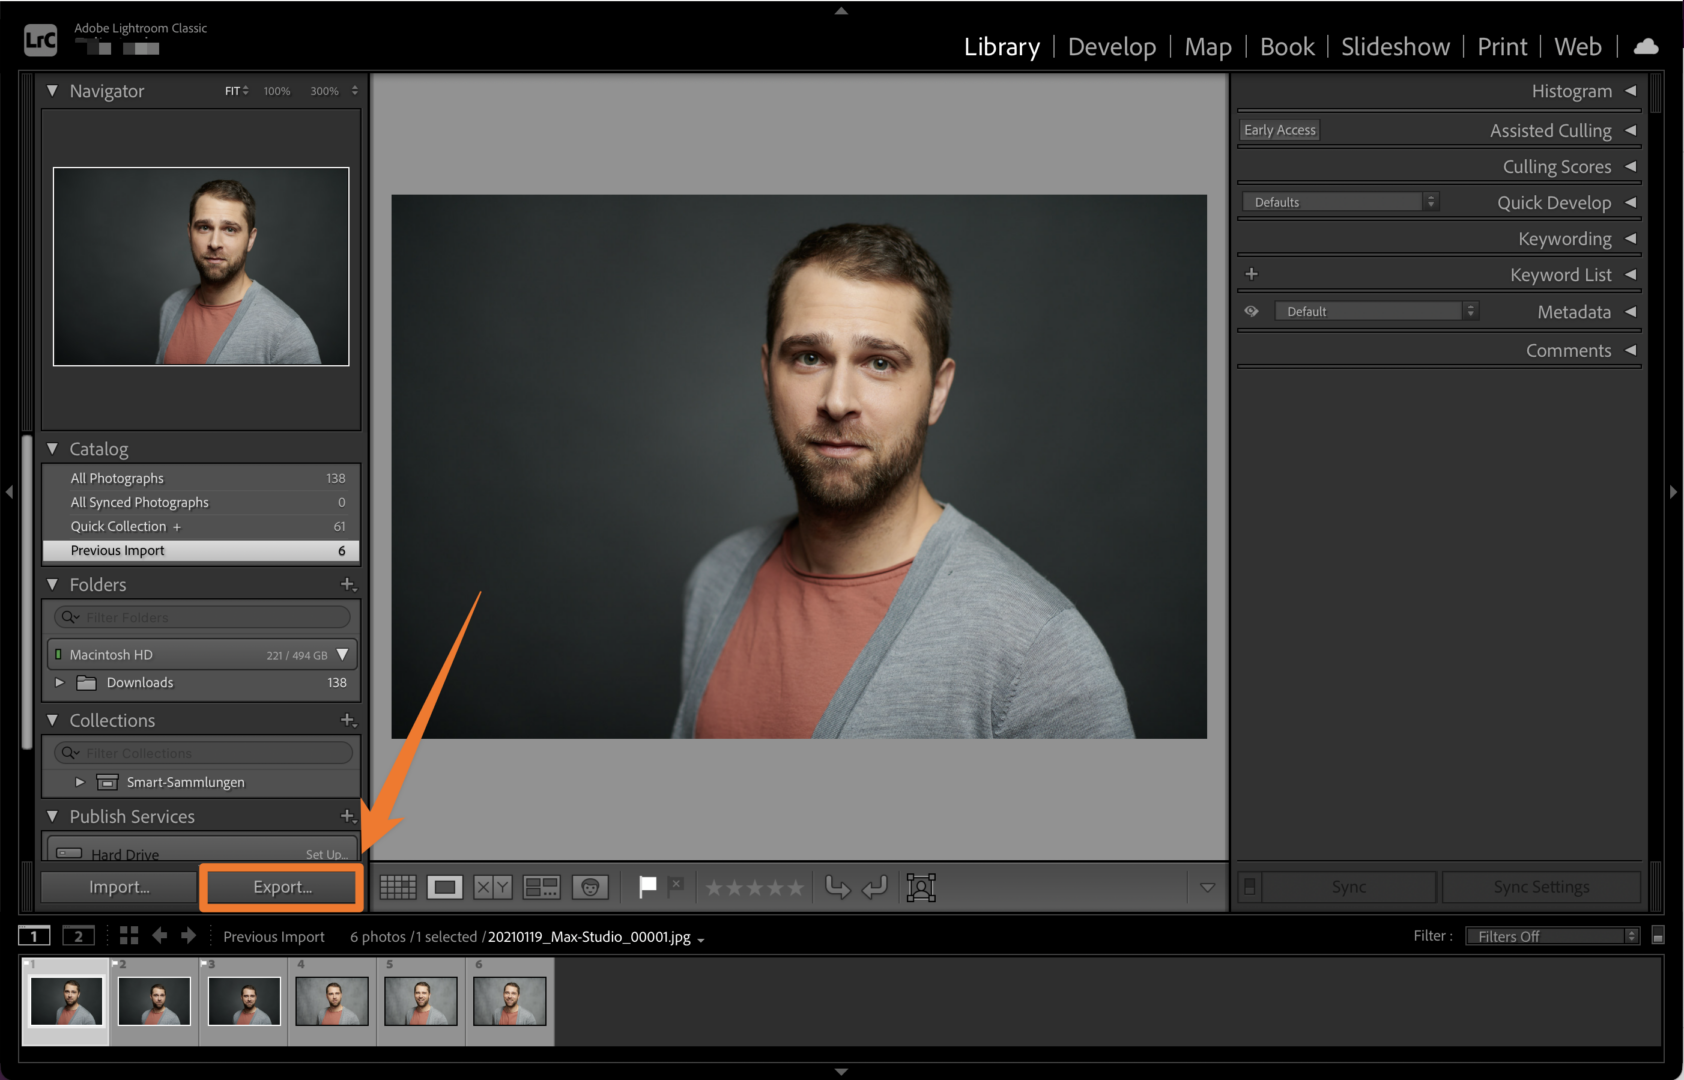
To configure the plugin, select one or more images in Lightroom and open the Export dialog. This is the same dialog you use to save images to your hard drive.
In the Export dialog you will see the following window:

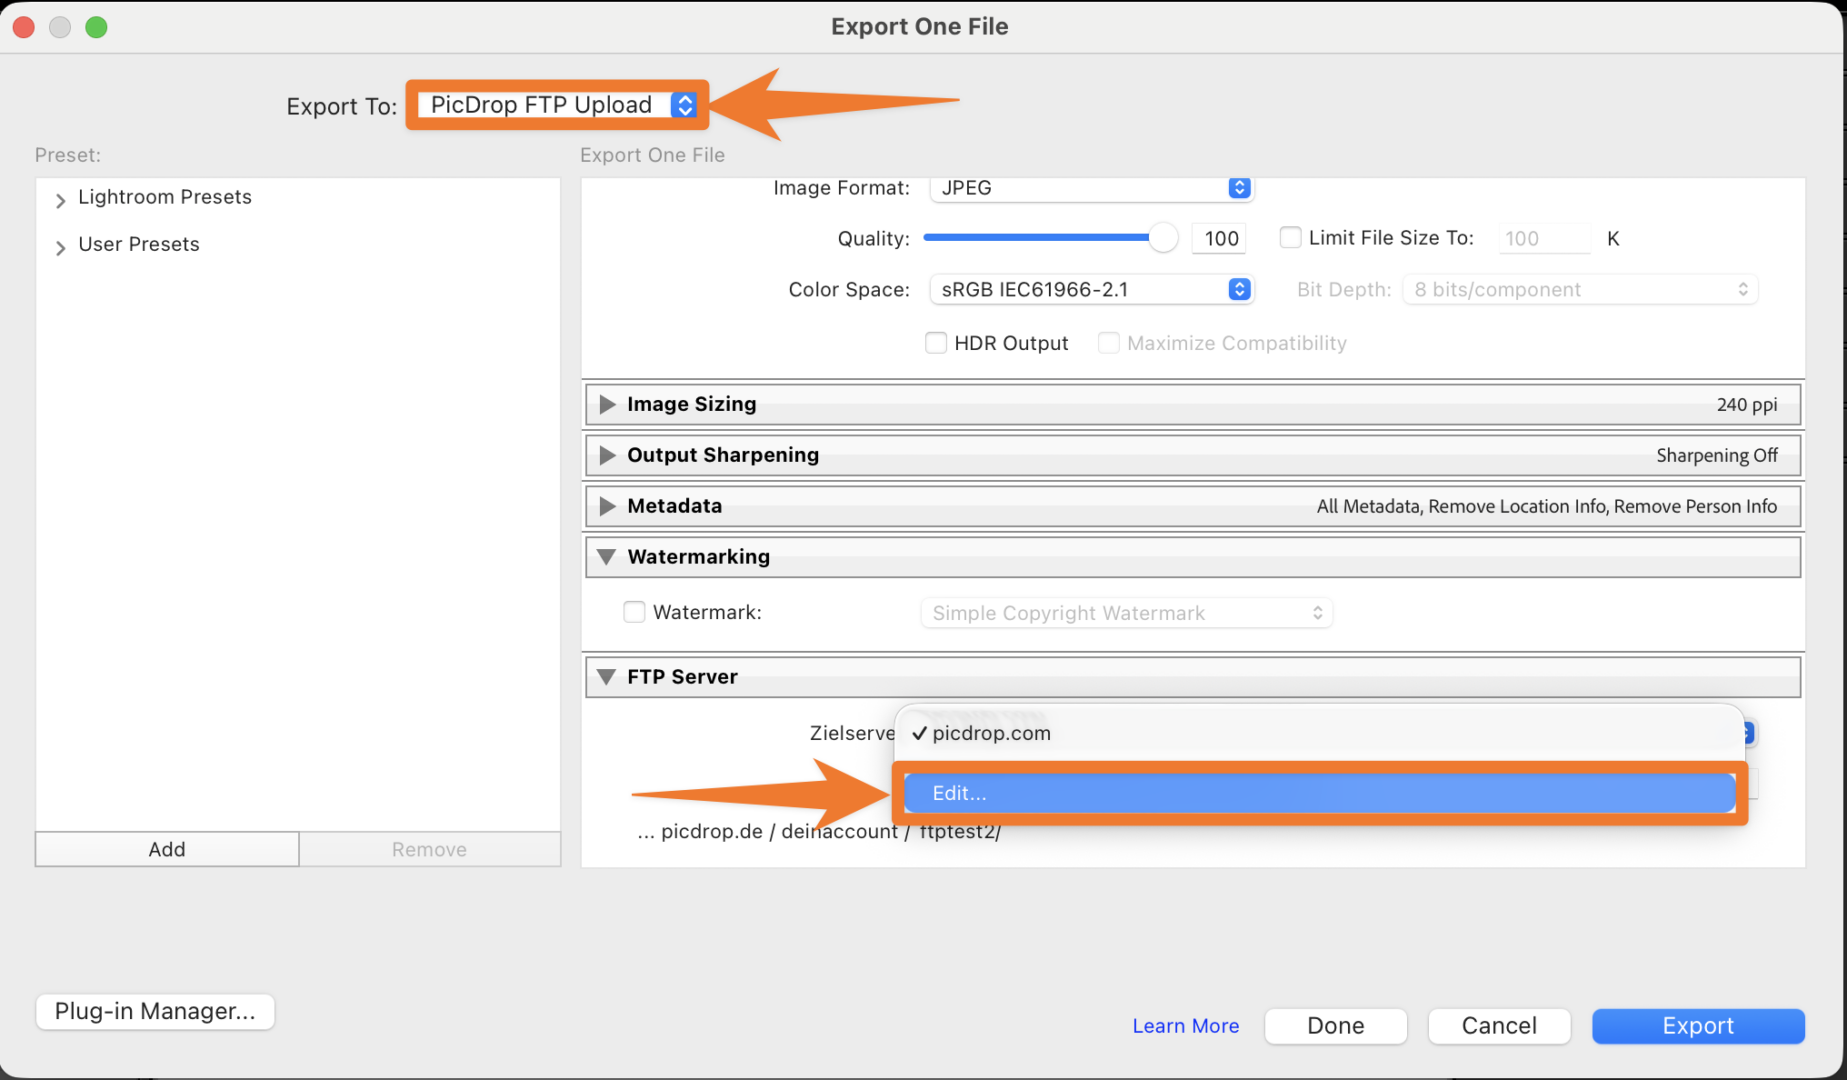
Select "picdrop FTP Upload" from the dropdown menu at the top.
Then, at the bottom, below the settings for your files, in the "FTP Server" area, click on the dropdown menu with the name Zielserver.
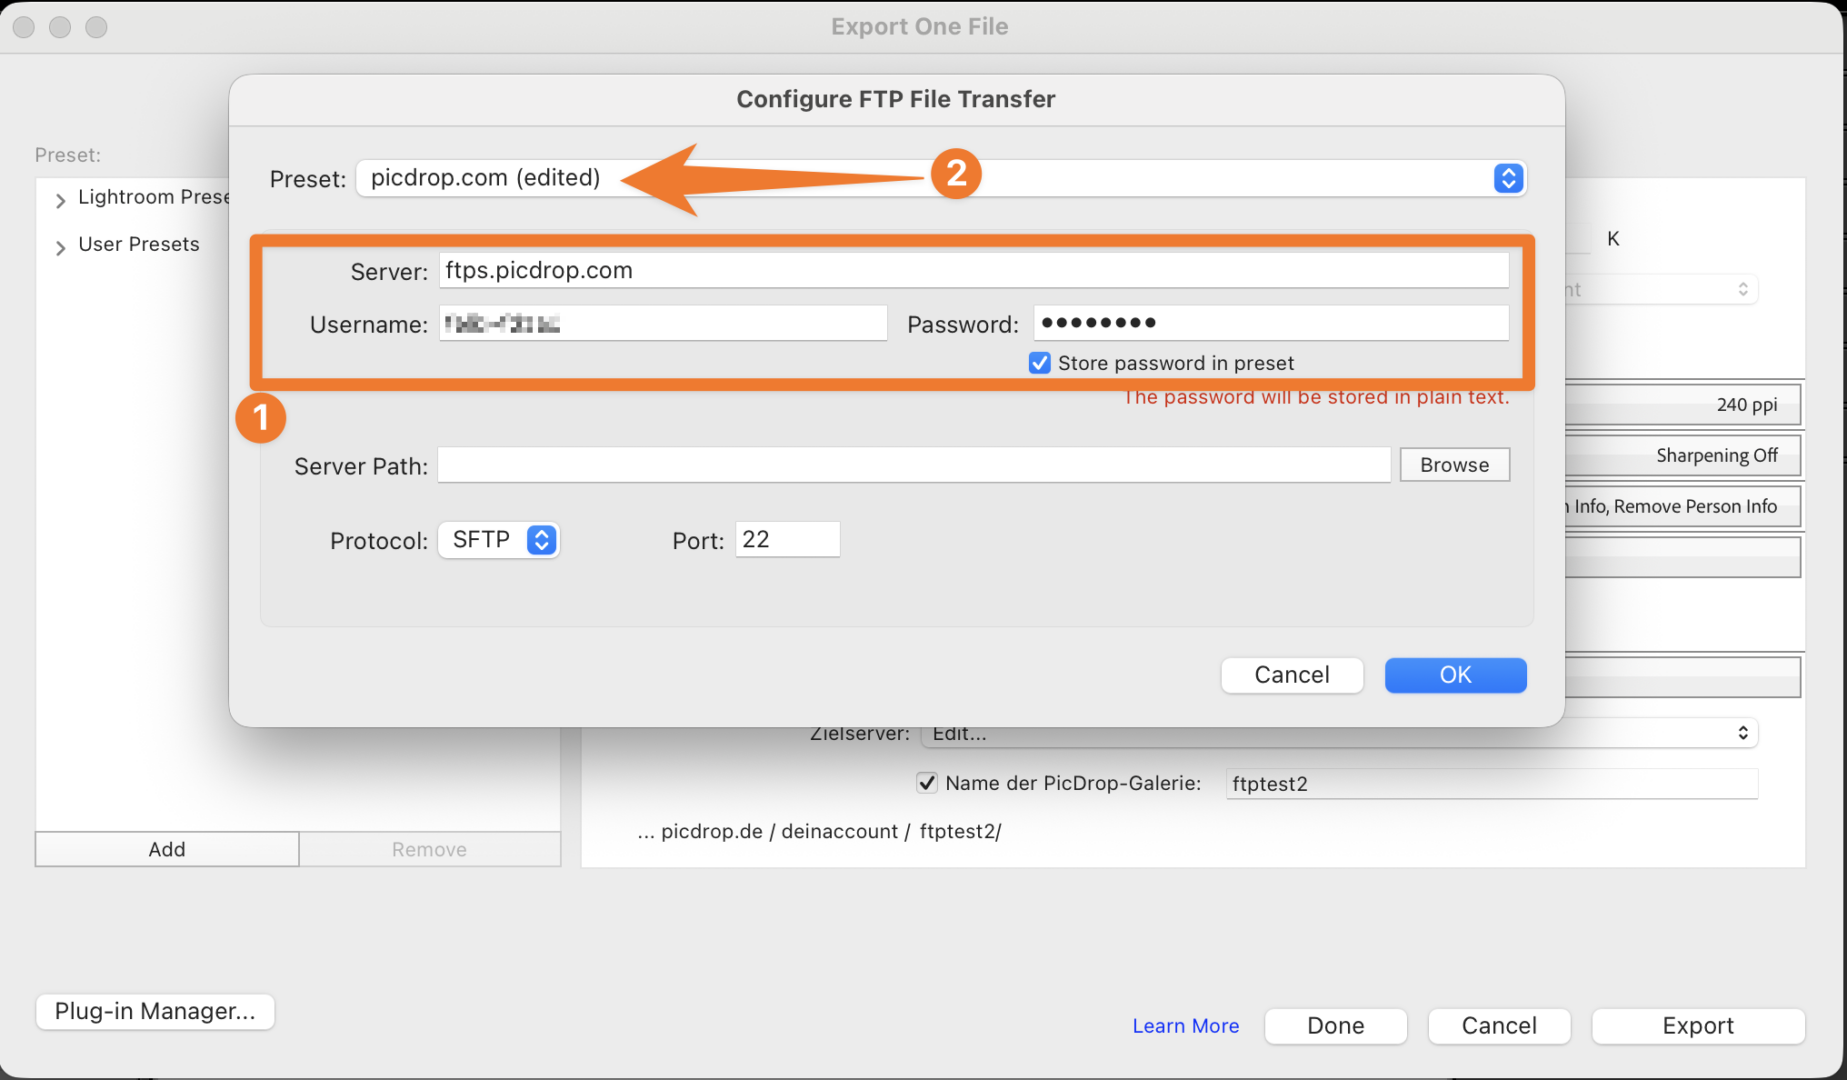
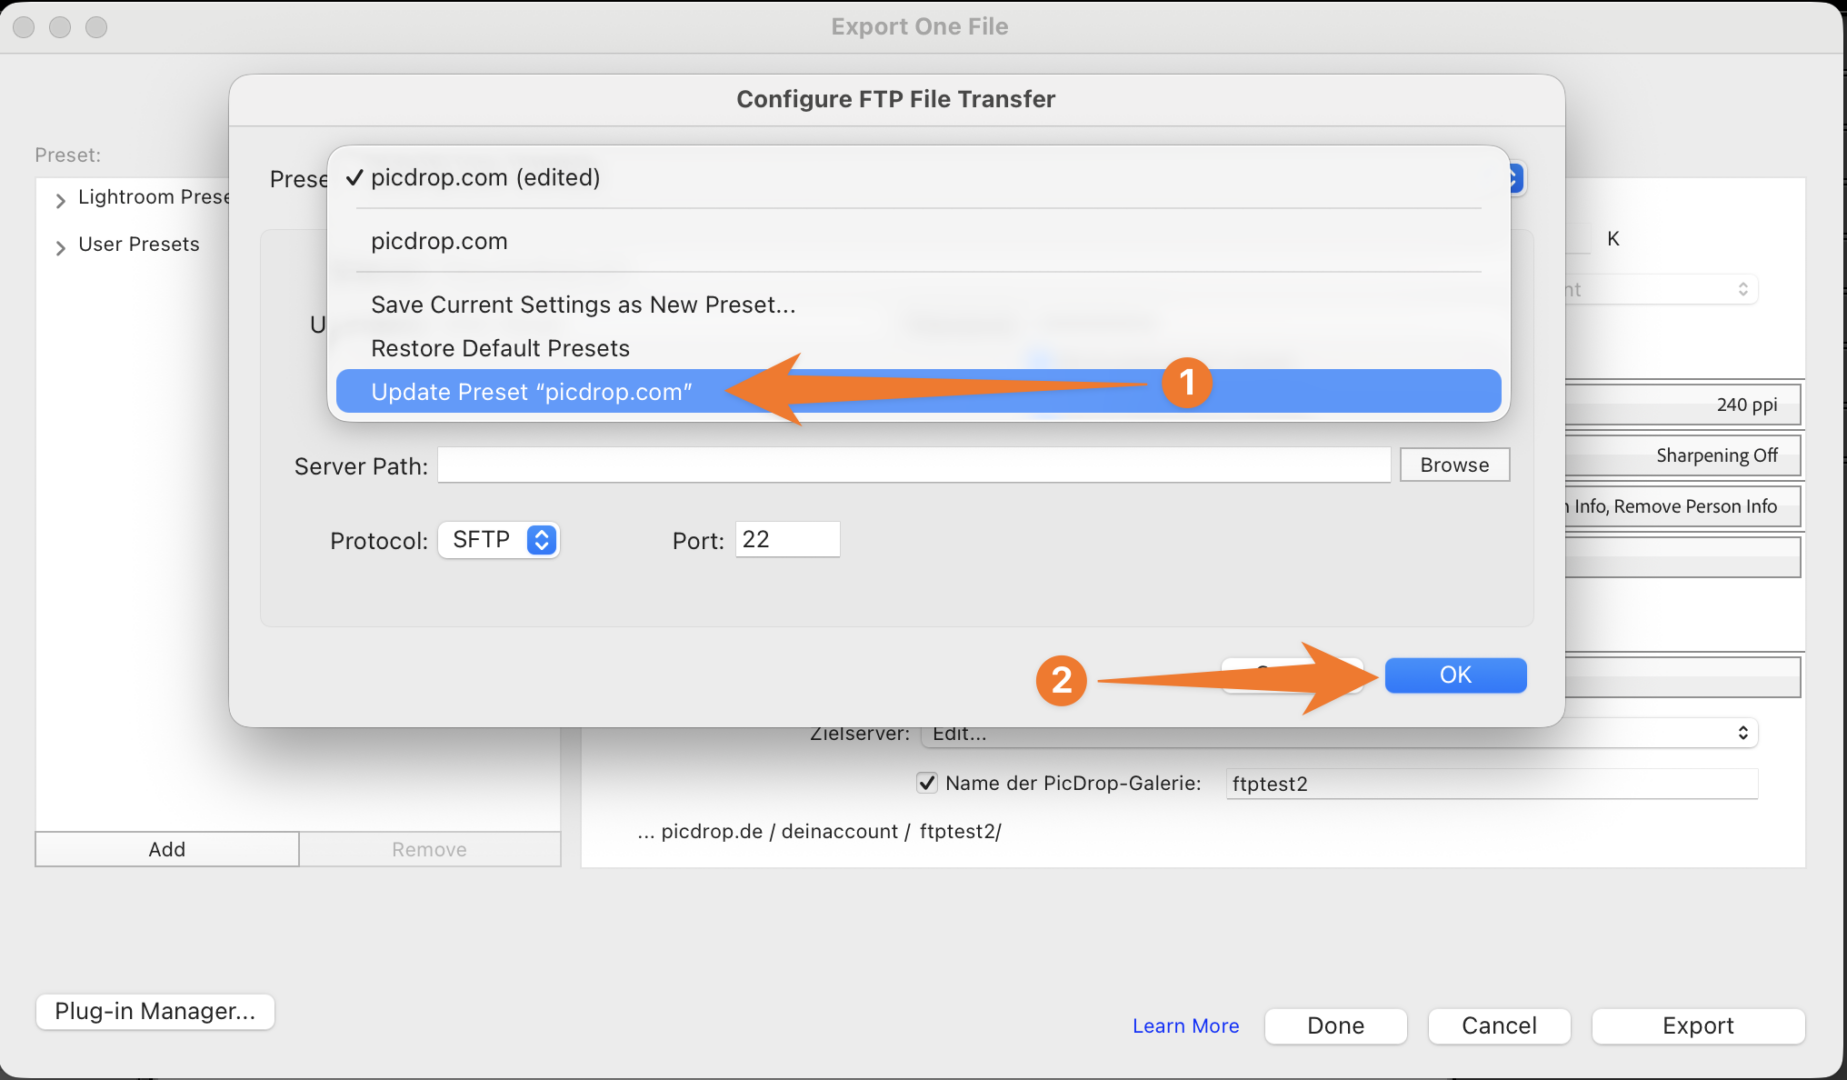
Select "Edit ..." and a new window with the title "Configure FTP file transfer" will open. In this window, fill in all the fields exactly as shown below.
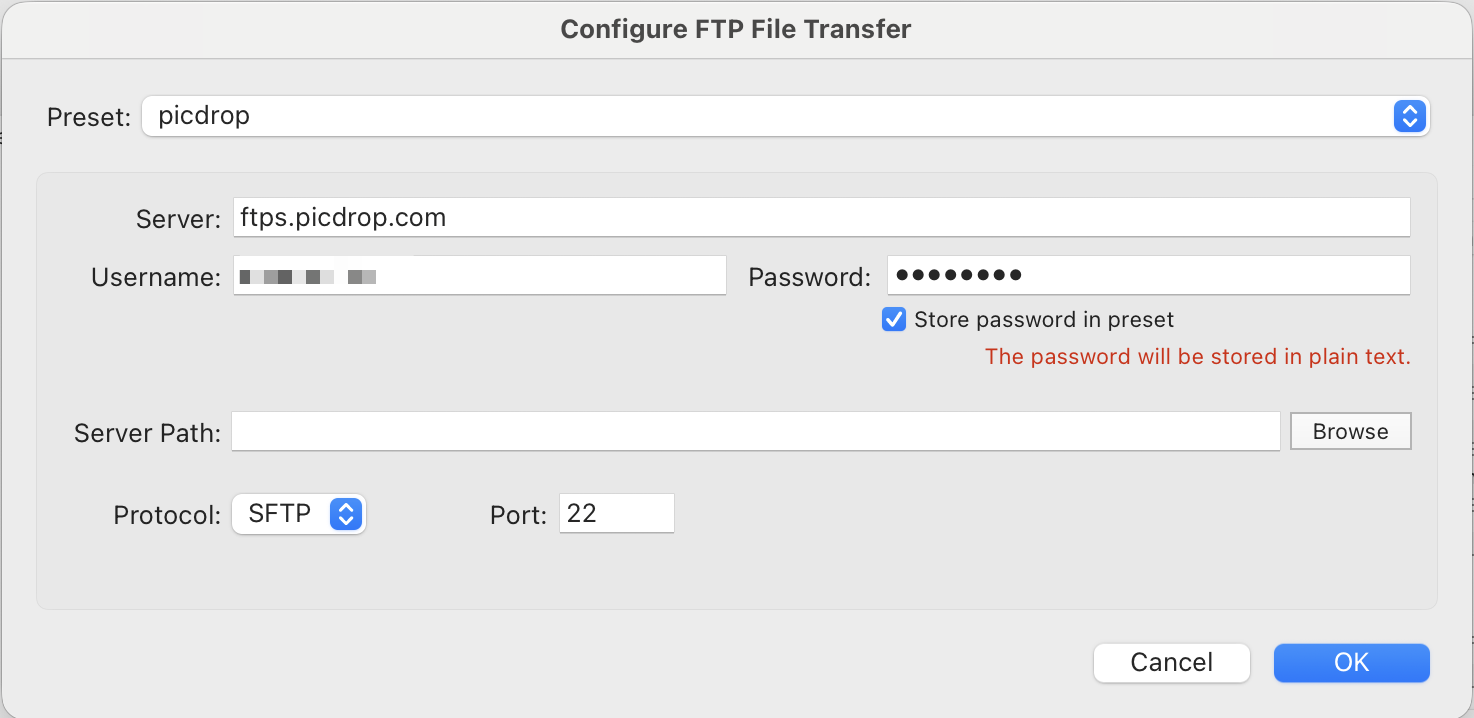
Important!
Make sure to click Custom at the top of the Preset section and select Save Current Settings as New Preset ...

Enter the name "picdrop" and click on "Create".
After that click on "OK".
This is the only way to save your settings permanently and you don't have to enter them every time you export.
If you have followed all the steps, you can now select images in Lightroom at any time and upload them directly to your picdrop account using the "Export" function.
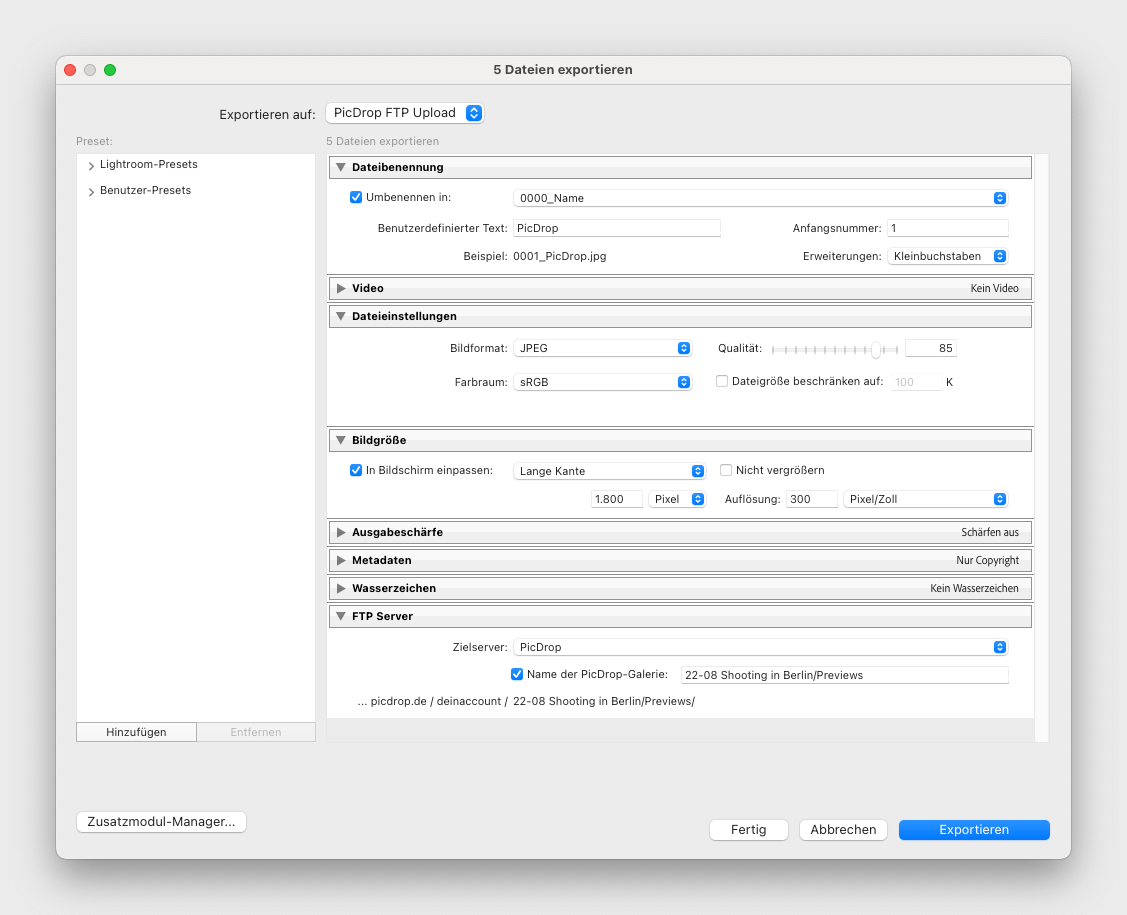
To do this, select "picdrop FTP Upload" at the top and adjust your settings for image size, sharpness, etc. as usual.
At the very bottom of the Export dialog at FTP-Server you set "picdrop" as destination server and use the settings you just created with this tutorial.
Now you just have to enter the name of a new or existing gallery where you want to upload the pictures.
Please enter the gallery name in the pattern shown below. Please do not use the secure link or similar shortcuts.
Of course you can also just create a new gallery. All you need to do is to type its name. It is also possible to create sub-galleries from within the export dialog.
Example:
The destination folder "Wedding”
becomes
www.picdrop.com/yourUsername/wedding
The destination subfolder "Wedding/Cake" becomes
www.picdrop.com/yourUsername/wedding/cake
IMPORTANT: Please do not use special characters in folder names (&, $, /, é, à, etc...).
Finally, click on the blue Export button at the bottom right and the upload to your picdrop gallery will start!
After the successful upload you will find all pictures in your picdrop account in the gallery you chose in Lightroom.
There are problems with the upload or you get an error message? Please read this article carefully. If the solutions from the article don't help, just write us at hello@picdrop.com and we'll see together how we can solve the problem.
PS: The plugin is not required to use picdrop. You can also always upload images via drag & drop or any other FTP client. But it is handy, isn’t it?
If you need help using your Lightroom plugin with the new FTP connection, you can find detailed instructions here: https://www.picdrop.com/web/faq/how-can-i-switch-to-the-new-ftp
We updated our FTP system, which means you’ll need to adjust the corresponding login credentials in your FTP program or for your Lightroom Plugin.
You'll find your new login details in your account settings under FTP.
This article shows:
Cyberduck:
FileZilla:
Transmit:
Forklift:
If you upload your images directly from your camera to picdrop, we recommend using our Live Push feature.
You can find all information about it here: https://www.picdrop.com/web/faq/live-push