There are several ways to create a new gallery:
Click on "Create New Gallery" in your gallery overview, enter the preferred name of your new gallery and click on "Create gallery" or press ENTER. You will automatically be taken to the new gallery and you can start uploading your first files.
Important info about the Lightroom plugin.
Upload via Lightroom is automatically enabled for picdrop accounts registered before June 2022. If your account was created after June 2022, you won't find the plugin in your account settings. But don't worry: if you can't do without the Lightroom plugin for your work, please email us at hello@picdrop.com and we'll be happy to help.
only for accounts created before June 2022
In your FTP program, log into your picdrop FTP account and create a folder. Ready! The gallery is created with it and you can upload files to the gallery at any time via FTP, Lightroom or in your browser.
For all three ways, you should remember to check the gallery settings afterwards and if necessary set what your client is allowed to see and do in the gallery.
After you've signed up for your free picdrop account there are many ways to upload your files to picdrop:
Simply mark the files or folders you want to upload in Apple Finder or Windows Explorer and drag them anywhere in your open gallery. (No need to drag them on the hint field for the "Drag & Drop" upload.) Then release your mouse button. Your upload starts immediately without you having to do anything else. You can check the status of your upload on the bottom right. Additionally you find the FAQ for folder-uploads right here: How do I upload folders and folder structures to picdrop?
In the hint field for the "Drag & Drop" upload you will also find a classic upload button (yellow). By clicking on it, you can search in your Finder or Explorer and also select several files at the same time.
only for accounts created before June 2022
You can also manage and organize your galleries and files via FTP. You will find the login data in your registration mail and instructions on how to set up your FTP program in the FAQ section "How do I set up my FTP program correctly?"
Important info about the Lightroom plugin
Upload via Lightroom is automatically enabled for picdrop accounts registered before June 2022. If your account was created after June 2022, you won't find the plugin in your account settings. But don't worry: if you can't do without the Lightroom plugin for your work, please email us at hello@picdrop.com and we'll be happy to help.
Your clients do not need an account to enter a picdrop gallery.
You simply send your clients the direct URL to a gallery. They then do not need to create an account or anything to open the gallery.
If you have activated the password protection for the gallery, all they have to do is to enter their password and they'll find themselves right in the gallery, ready to view their pictures.
To send this information to your clients you can easily use email, any messenger or the like - or conveniently send it from within picdrop by using the “Share”-option within every gallery.
It's as easy as that!
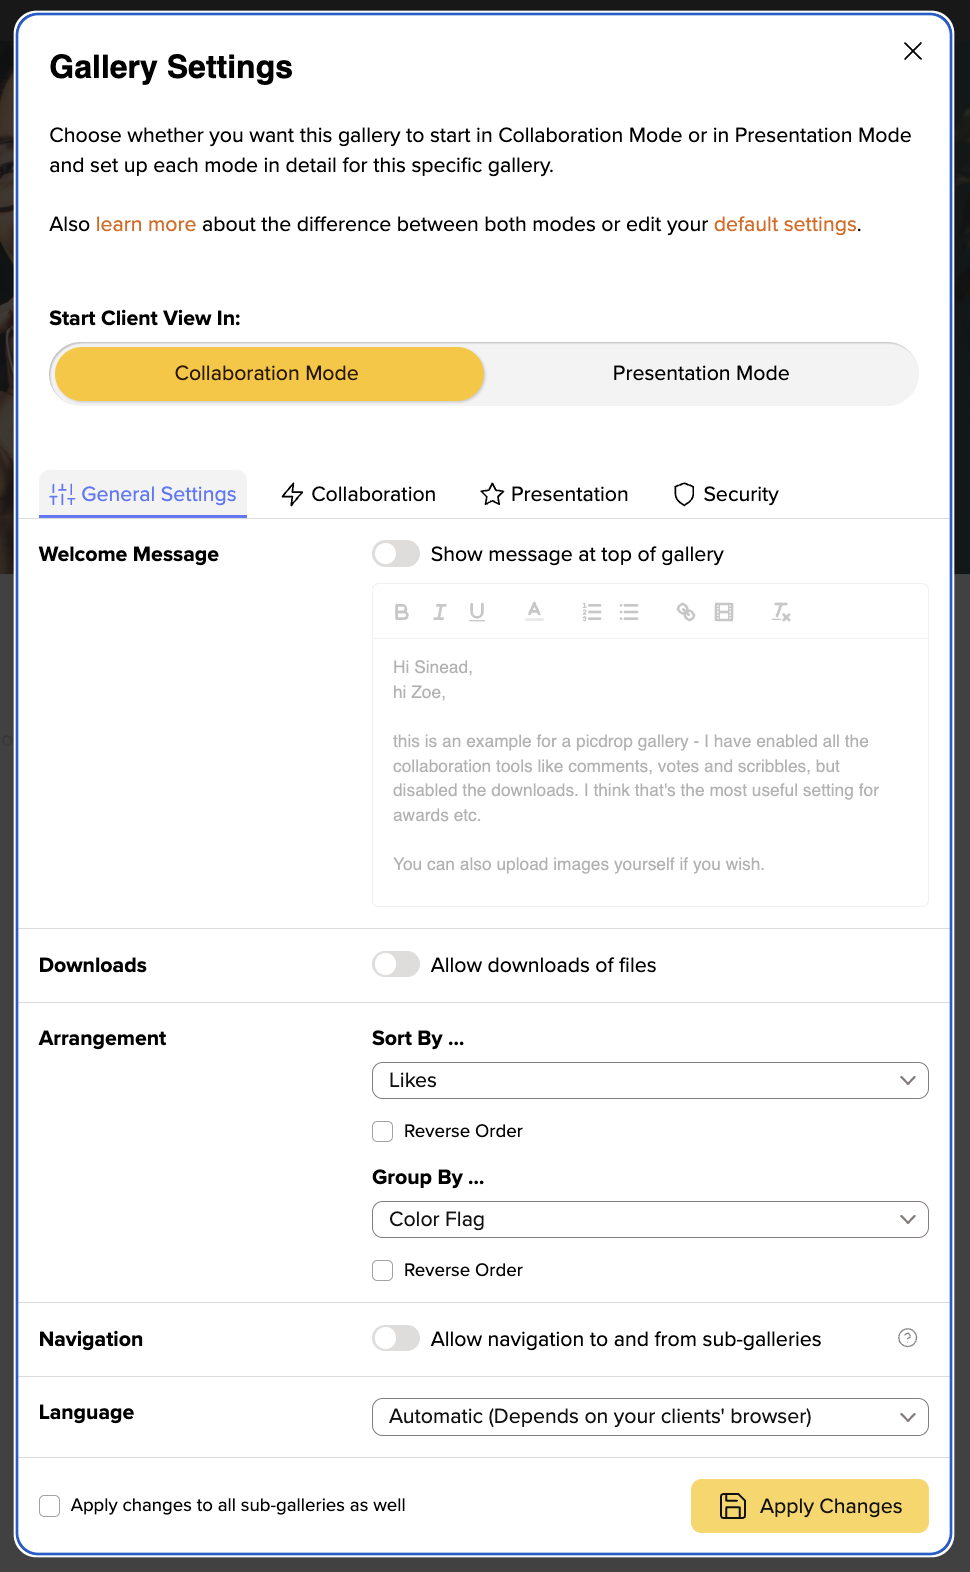
In each of your galleries, you can activate or deactivate all functions individually. You can tailor your galleries perfectly to every client and every project. You are able to do this in each gallery in the upper right corner under “Gallery Settings”.
If you want to change the header image you can find detailed instructions right here.
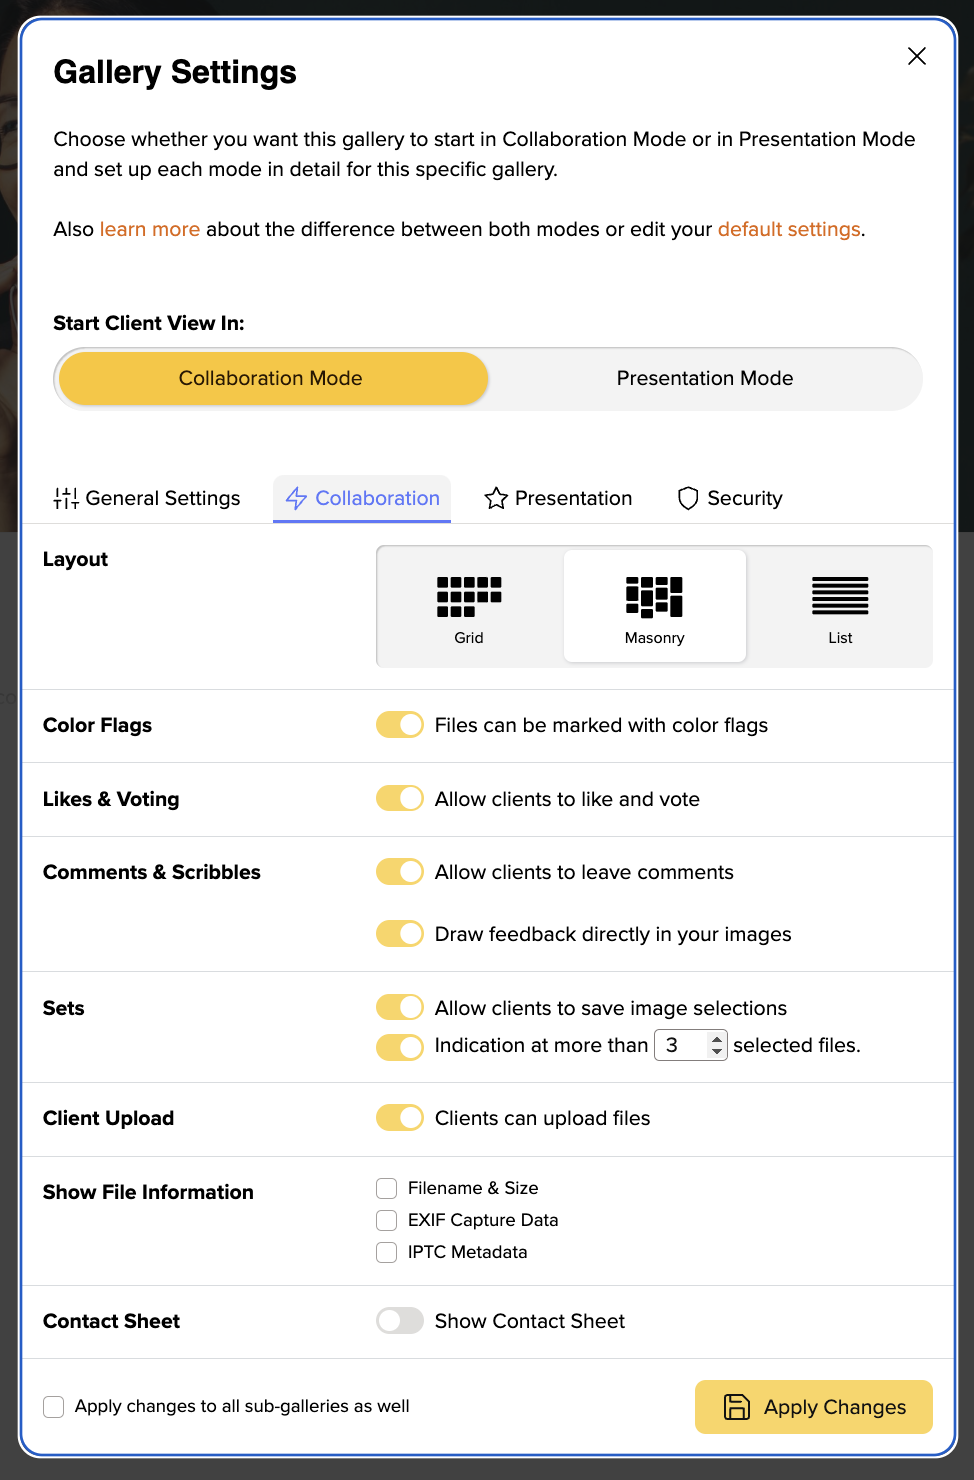
picdrop’s Collaboration Mode is for collaborating and communicating with your clients. Here you can decide what your clients can do.
(Pro-Tip: Sort the images in the “Appearance” area by color markers and downwards. This automatically sorts your images in the overview according to color and displays them separately, which makes it extremely easy to filter out favorites.)
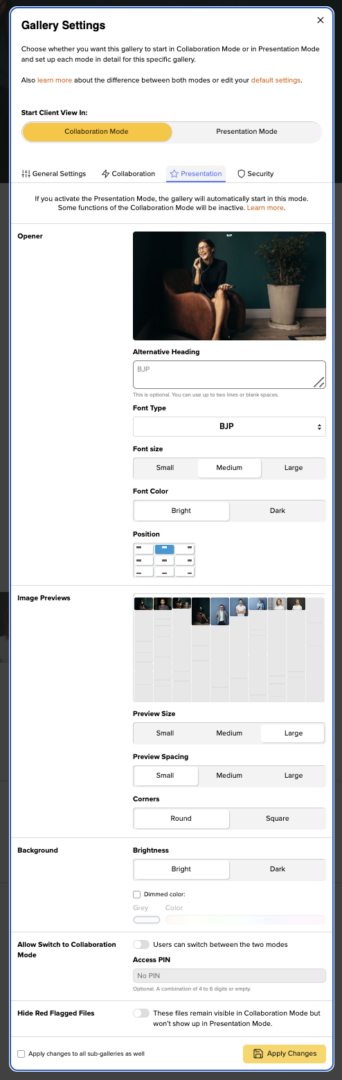
The Presentation Mode is a specific way for you to deliver a gallery to your clients. It focuses on the beautiful presentation of your pictures and videos and puts the practical picdrop functions in the background. The Presentation Mode is available for you in some plans (starting with Pro). All features of the Presentation Mode are also available in detail in our FAQ.
You can find more detailed information in our separate FAQ articles about gallery design, background color, title settings, setting a gallery’s header imgage and thumbnail settings.
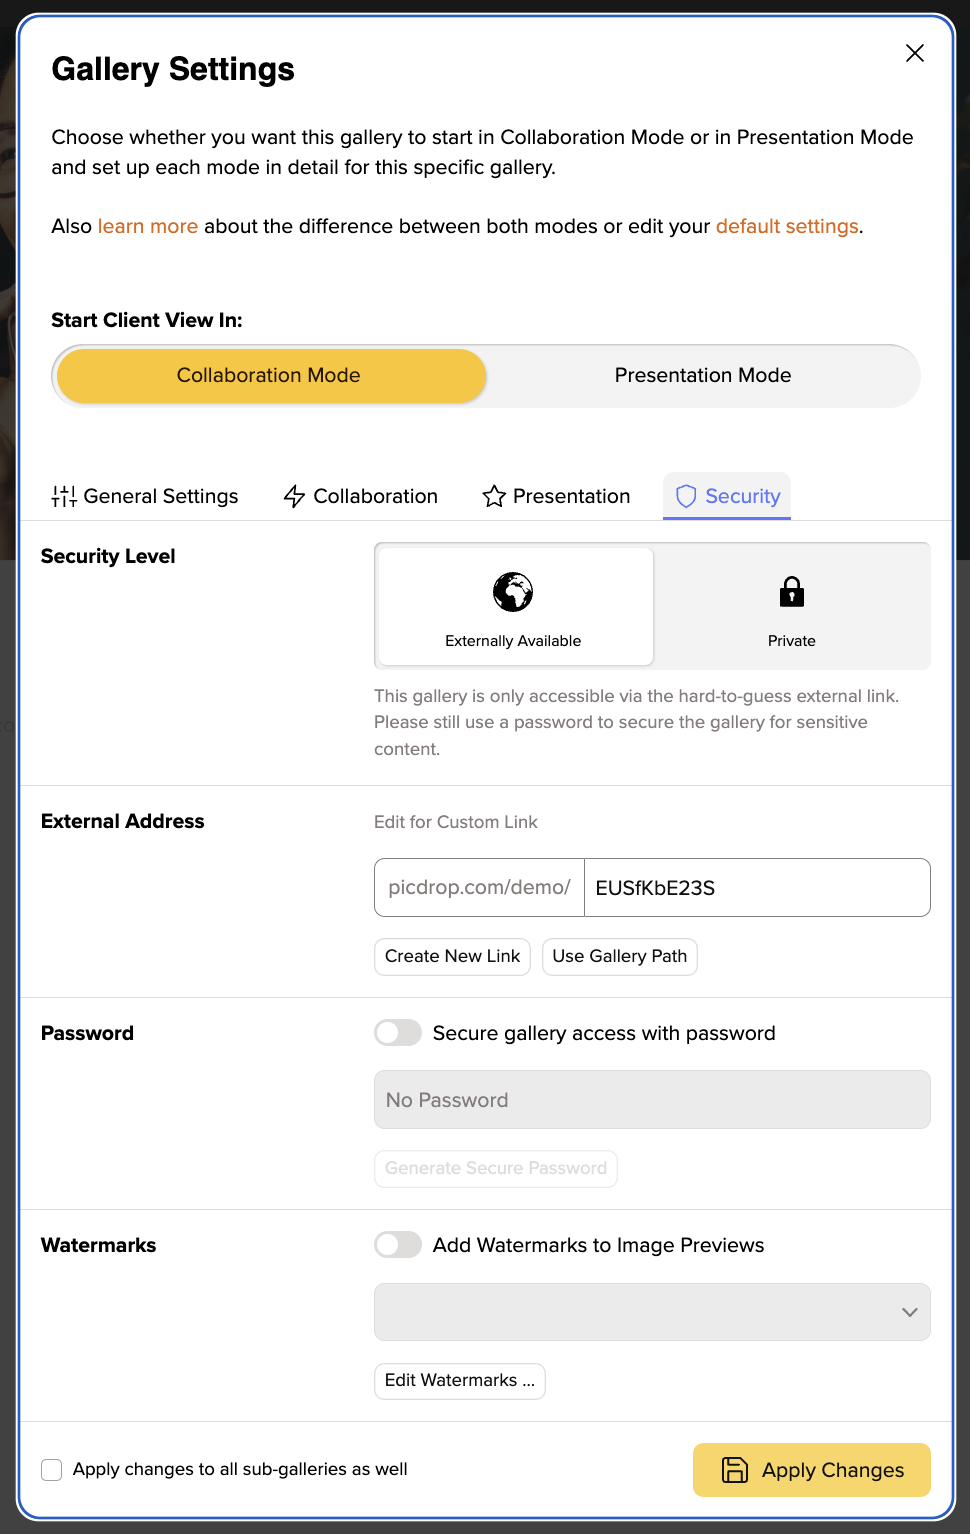
Here you are able to protect your pictures with a watermark and password. But above all, you can specify the address at which your gallery should be accessible.
If you have set everything, you can save your settings by clicking on “Apply Changes“. To make sure that your clients gets exactly the settings you expect, select “Preview” in the top left corner next to the settings to see how your clients will see the gallery!
You can define the criteria by which your files are sorted and grouped in each gallery. You can do this in the gallery settings under "Genera Settings".
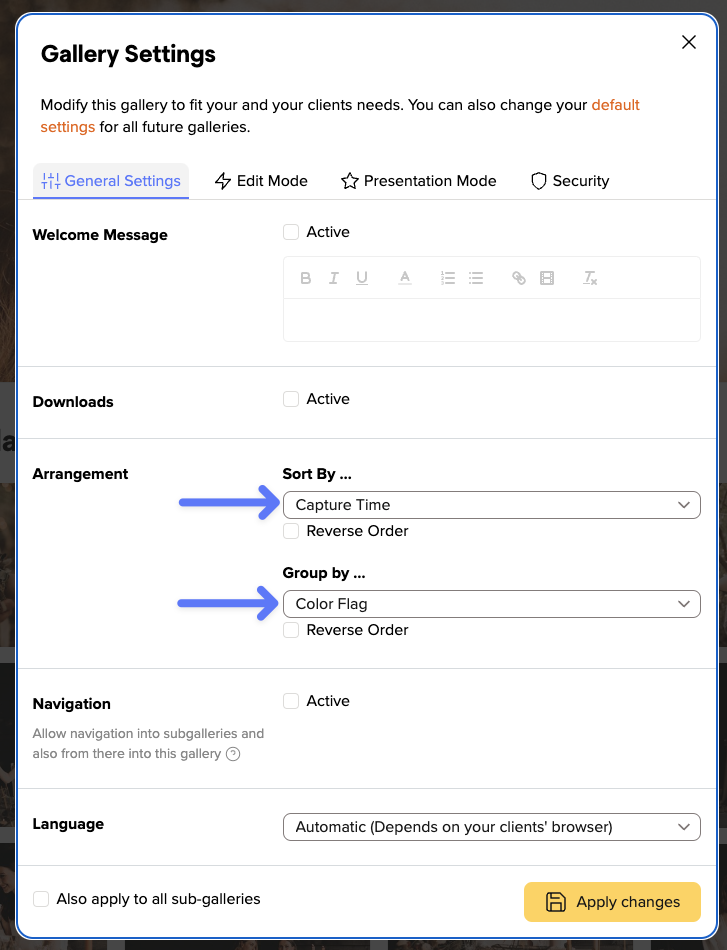
You can sort your files by the following criteria:
In order to be able to sort images according to the time they were taken, this information must be stored in the Exif data of your images.
You can also group files in your gallery. They will then be displayed in the gallery in individual sections.
You can group your files by these attributes:
For example, all files marked with the green color flag will be displayed in a separate section. Within this section they will be sorted according to your desired settings.
Each sorting and grouping can also be displayed in reverse order (e.g. files sorted by file name from Z to A instead of from A to Z) by activating "Reverse order".
In your picdrop account you will always find the Activities in the top right-hand corner so you can see what is happening in your galleries at any time.
The red number indicates that there is news in your account.
In the Activities you will find
in your galleries.
No matter where you are currently working in your account, when you call up the Activities, you will always see the events for all your galleries.
If you are in a gallery, you can restrict the display to the current gallery using the button at the top right ("Show current gallery only").
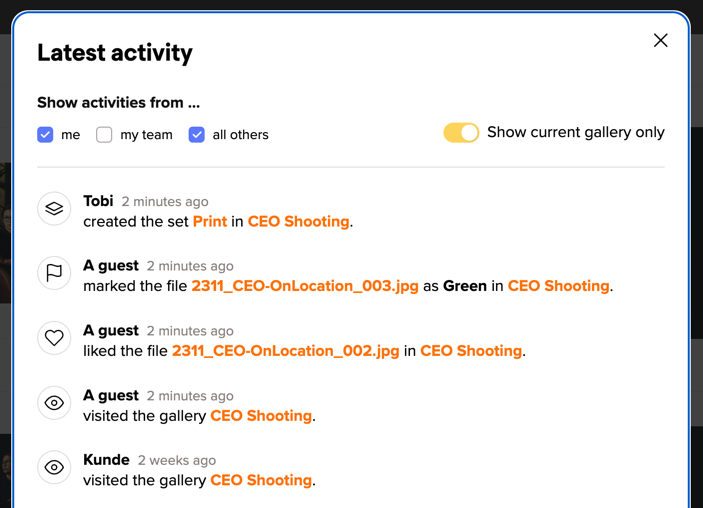
With the three options to the left, you can specify whose actions you want to see: all your own actions, actions from your Team Members or actions from all other visitors to your gallery. You can combine these filters as you wish to get the overview you need.
Two more practical tips:
The Activities will keep you updated about what’s happening in your galleries. You can also get notifications via email for some of those Activities.