In each of your galleries, you can activate or deactivate all functions individually. You can tailor your galleries perfectly to every client and every project. You are able to do this in each gallery in the upper right corner under “Gallery Settings”.
General settings
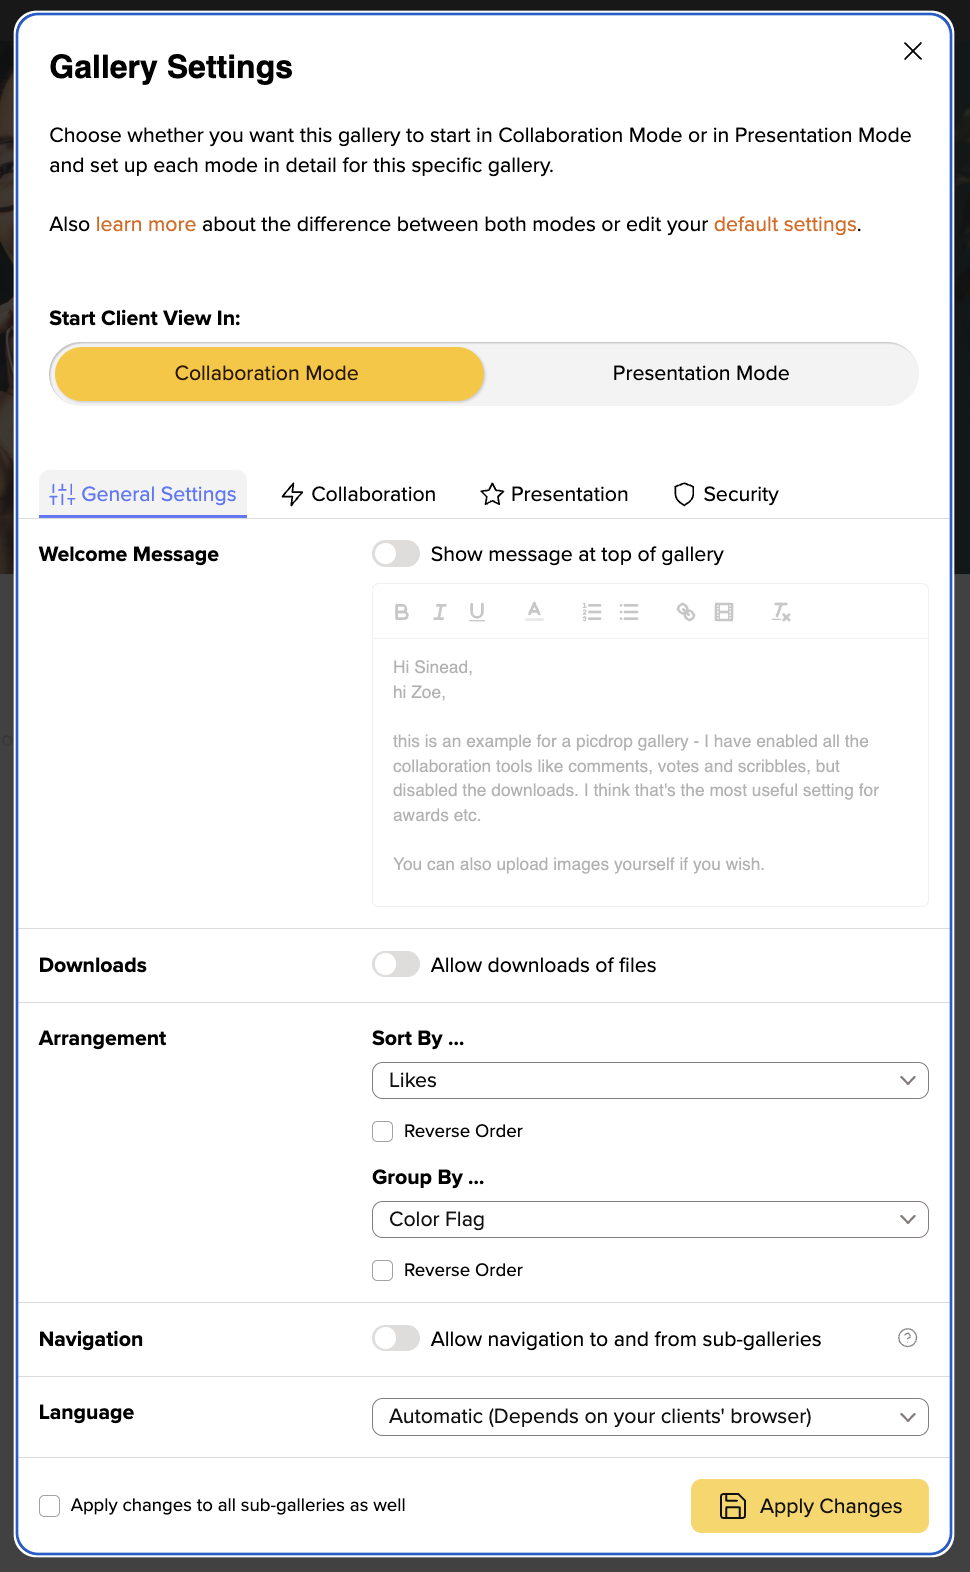
- Welcome Message: Here you can welcome your clients to their picdrop gallery or give them specific instructions along the way. The text will always be displayed on top of the gallery.
- Downloads: Here you can specify whether your clients may or may not download your original files.
- Arrangement: Here you select how your files will be sorted: by file name, capture time, upload time, file type, file size, and image dimensions. You can also group all images by color flags or file type.
- You can also decide if your clients should be able to navigate to sub-galleries and vice versa.
- picdrop is available in English and German, here you can define in which language your clients should see picdrop. If you do not set anything, picdrop automatically detects the browser language of your clients and then displays the gallery in German or in English.
If you want to change the header image you can find detailed instructions right here.
Collaboration Mode
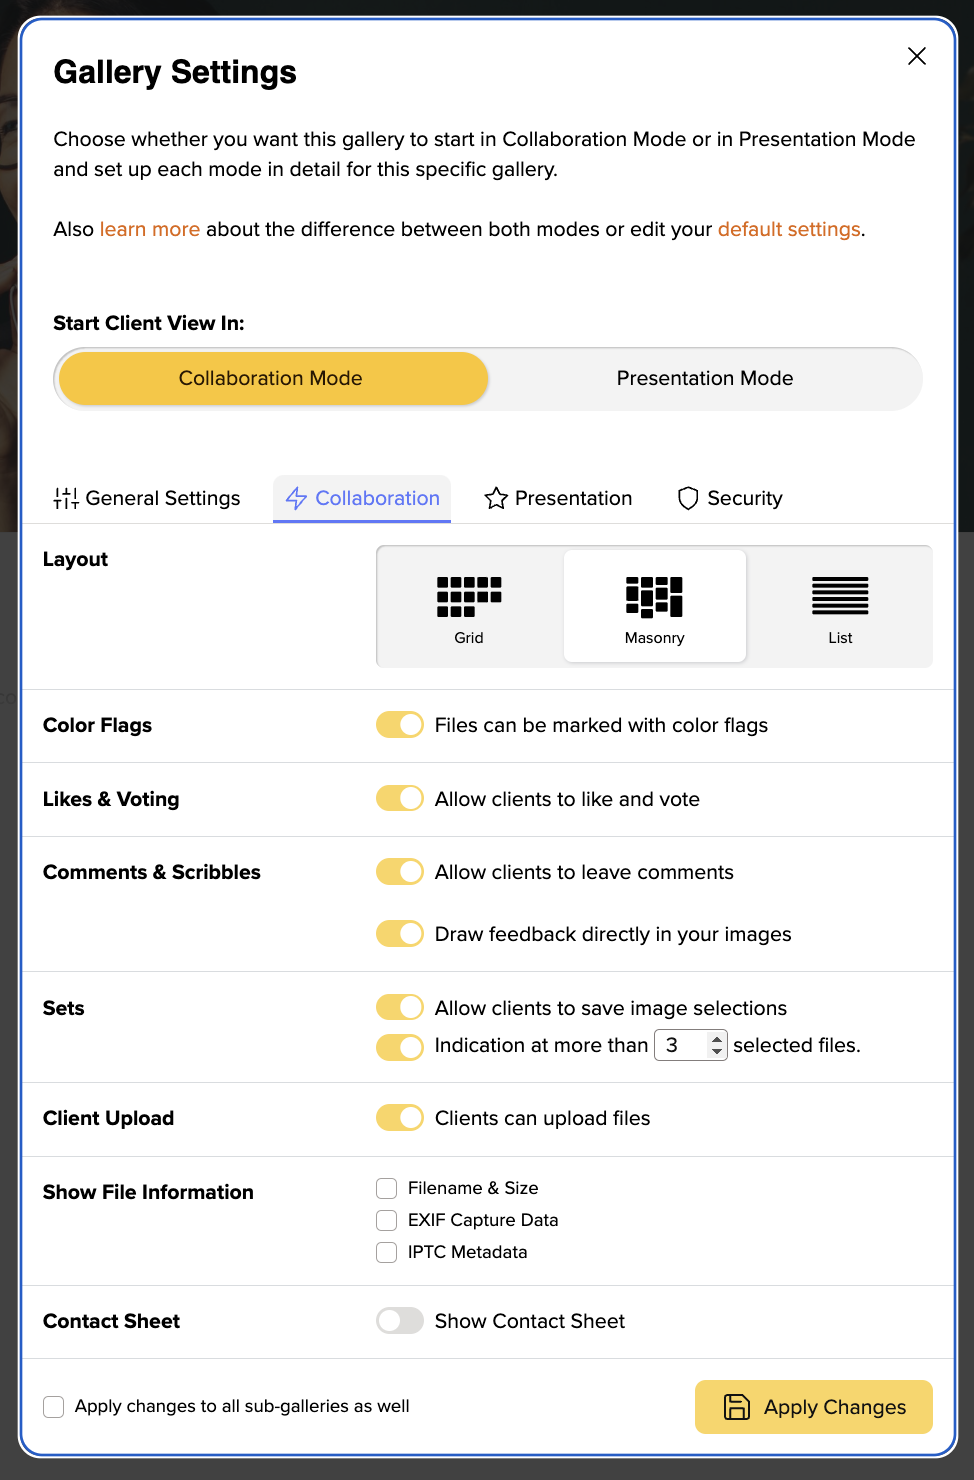
picdrop’s Collaboration Mode is for collaborating and communicating with your clients. Here you can decide what your clients can do.
- Layout: Here you define the appearance of your gallery and how your files should be arranged.
- File information: Choose what your clients can see when clicking on a single file.
- Sets: With the set function you can set specific photos in a gallery. With a click on the blue + at the upper left edge of the preview picture, the file is added to a set. After completing a set, it must be saved and named.
- Color flags: Color flags allow you to quickly and easily make assessments and decisions with your clients. You can find the color flags in two places: at the top right of the small preview images in the gallery and in the large single image display directly below the image. Click to open the color flag menu. Here you can choose from the colors red = no, orange = maybe, green = yes and black = FINAL. You can also customize the names for the color flags.
(Pro-Tip: Sort the images in the “Appearance” area by color markers and downwards. This automatically sorts your images in the overview according to color and displays them separately, which makes it extremely easy to filter out favorites.)
- Comments: By activating the comments your clients have the possibility to write comments on each file in the gallery. The comments will be displayed at the bottom left of the files and can be created in the same place.
- Image annotations: Scribbles let your clients draw their comments into the images.
- Client upload: If you want your clients to upload files to the gallery as easily as you can, then activate the client upload.
- Print contact sheet: For further coordination, you can also activate the option for your clients to print a contact sheet.
Presentation Mode
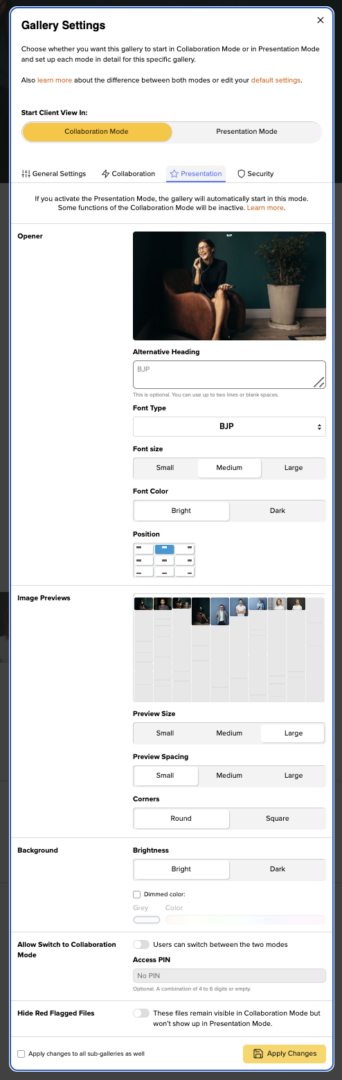
The Presentation Mode is a specific way for you to deliver a gallery to your clients. It focuses on the beautiful presentation of your pictures and videos and puts the practical picdrop functions in the background. The Presentation Mode is available for you in some plans (starting with Pro). All features of the Presentation Mode are also available in detail in our FAQ.
- Starting the gallery in Presentation Mode: The essential setting for the Presentation Mode is its activation/deactivation.
- Since some of the familiar picdrop functions are not active in the Presentation Mode, if you would still like to use these functions with your clients, you should activate the switch to Edit Mode. You can apply this change by entering a 4-6 digit PIN number.
- You can hide red marked images / videos in the Presentation Mode from the gallery, so you can only present the best results.
- Below these three functions, you find are all the settings with which you can customize the appearance of the gallery in Presentation Mode: being background color, appearance of the header image, as well as size, spacing and edges of your thumbnails. All other gallery components such as buttons and social links conveniently adapt to your settings for the appearance of the gallery.
You can find more detailed information in our separate FAQ articles about gallery design, background color, title settings, setting a gallery’s header imgage and thumbnail settings.
Security
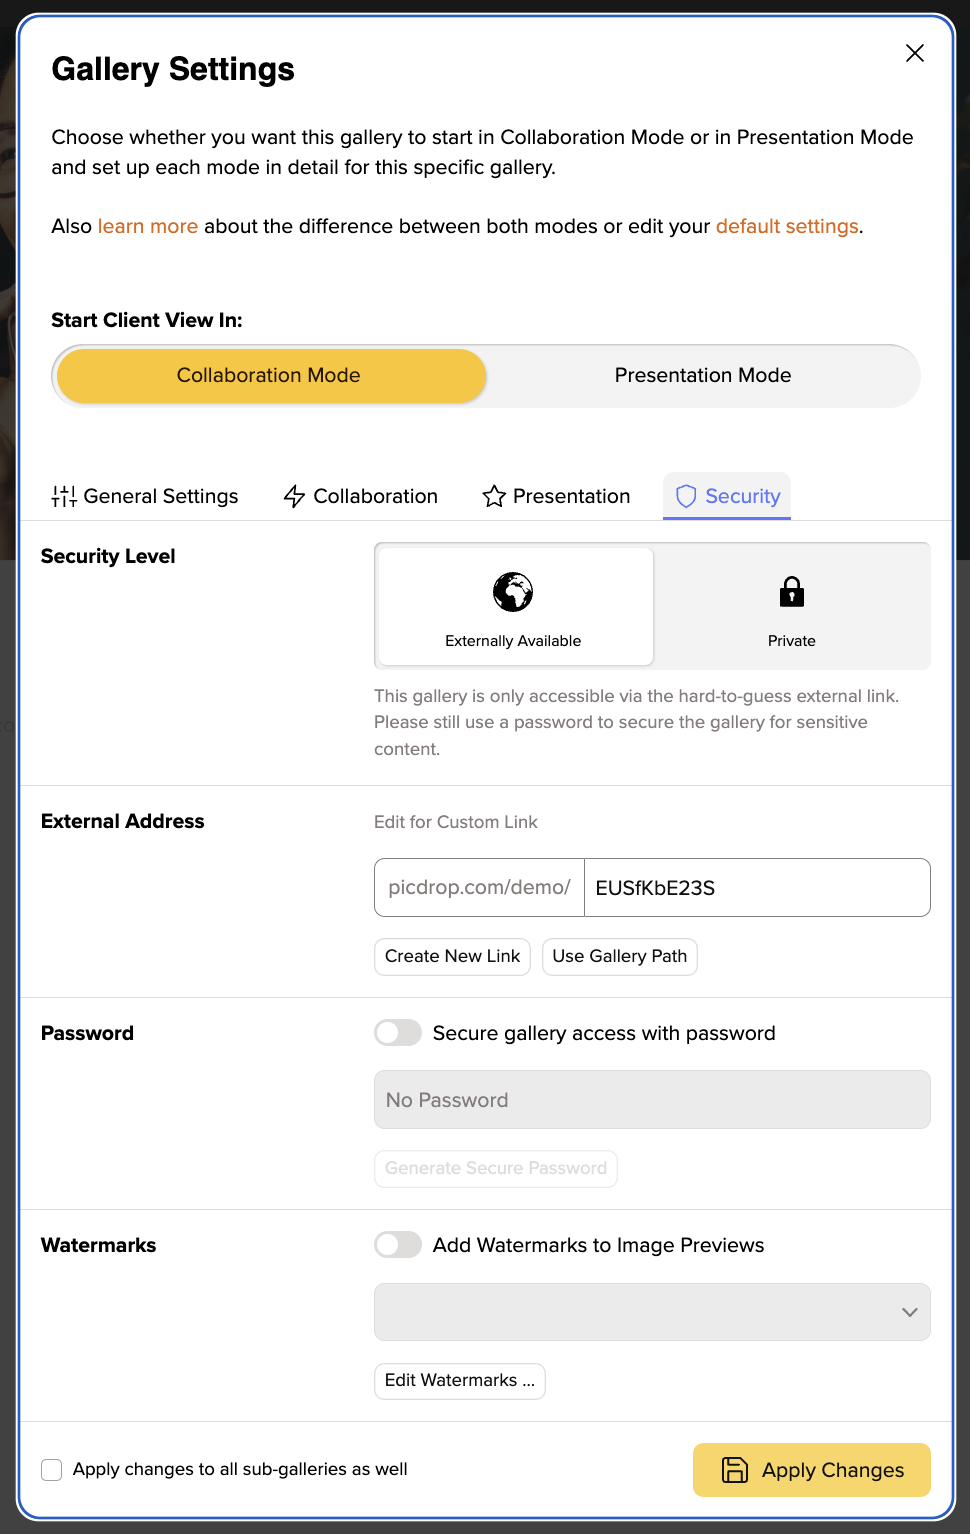
Here you are able to protect your pictures with a watermark and password. But above all, you can specify the address at which your gallery should be accessible.
- Gallery Links: There are several ways your gallery links can look. For each gallery, we always create an externally available, secure link first, which consists of a randomly generated string of letters and numbers. In addition, you have the opportunity to edit the link individually and enter the wording that you would like to use for the custom link to the gallery instead of using the random string. By clicking on the “Insert gallery path as custom link” button, you can also select the gallery name and gallery path as link wording. If you set your gallery as private, it will only be visible to you as an account owner and to client logins.
- Password: Regardless of the shape of the gallery link, you can create or have an additional gallery password created for each gallery. We generally recommend this additional step to secure the gallery to all our users.
- Watermark: To protect your pictures, you can activate the picdrop watermark function. For this purpose, enter one or more desired watermarks in your account settings, for example with your logo. These can then be selected in the gallery settings.
Please note: Activating and disabling watermarks for a gallery can take some time. Please be patient while the function is applied before making any other adjustments to the gallery settings. It is also important to know that we do not overwrite the watermarks on your original pictures since we will never change your files. Instead, we put the watermark over the thumbnails so they are protected from screenshots. Even though watermarks are enabled, the original files can be downloaded. Make sure to deselect download as a function in the gallery settings.
Don’t forget to save!
If you have set everything, you can save your settings by clicking on “Apply Changes“. To make sure that your clients gets exactly the settings you expect, select “Preview” in the top left corner next to the settings to see how your clients will see the gallery!