Using picdrop
How can I activate Scribbles to leave comments in an image?
Go to the settings of your gallery. There you will find the option to activate scribbles in the following location:
Edit Mode ➔ Comments ➔ Image annotations
You must first activate the comments so that you can activate Scribbles, as each Scribble needs a comment to be saved.
After that, Scribbles in this gallery can be used in Edit Mode in the desktop version of picdrop. In the mobile version of picdrop on smartphones and tablets, you can see the comments and Scribbles, but you cannot currently change them or create new ones.
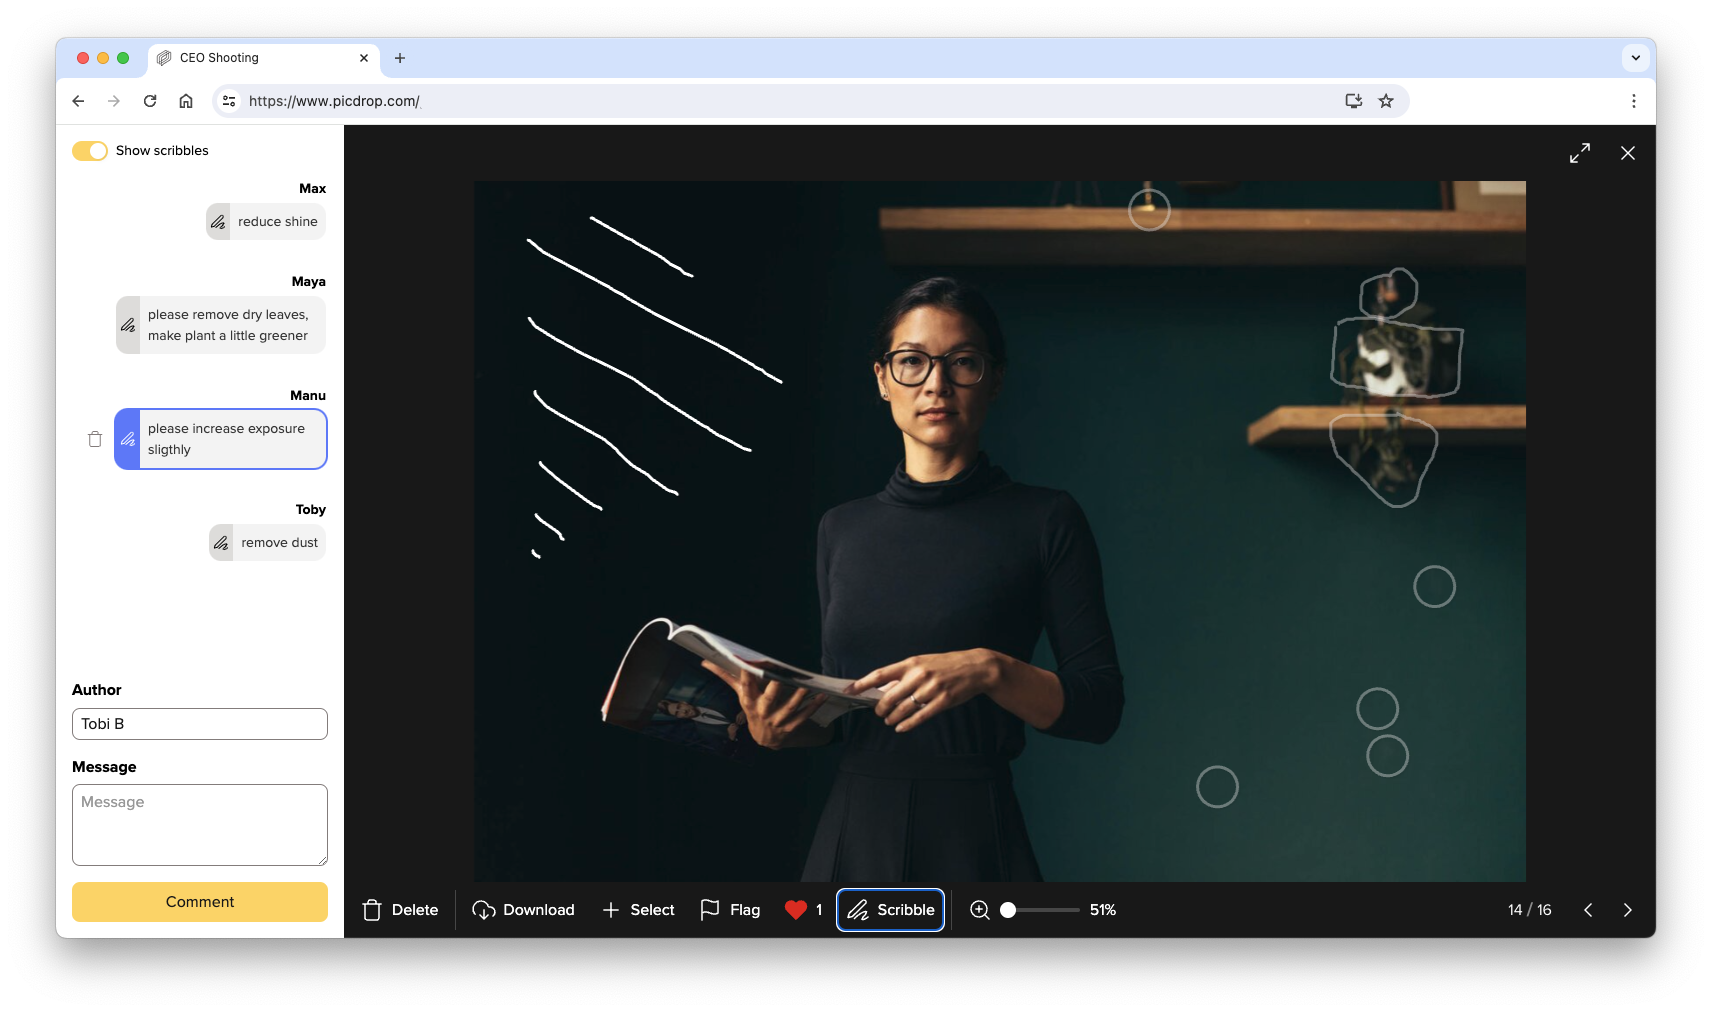
Link to this entryHow to use Scribbles in picdrop?
1 – activating Scribbles & starting Scribble Mode
Activate Scribbles in the gallery settings under Edit Mode ➔ Comments ➔ Image annotations. Back in the gallery, click on an image to open the large single image view.
Below the image you will find the Scribble button to activate Scribble Mode.
You can also press X on your keyboard to start Scribble Mode.
The blue frame around the images indicates that Scribble Mode is activated.
2 – creating Scribbles
Now click with your mouse on a spot in the image to create a small circular shape in the image.
Or hold down the left mouse button and freely draw any shape in the image.
You can undo the last steps of your Scribble by using the Undo button at the bottom left.
Or you can use the backspace key on your keyboard.
3 – saving Scribbles
Click on the Comment and Save button at the bottom right to save your Scribble.
You still need to enter a name and a comment and confirm the whole thing with Save Scribble at the bottom right.
Tada: The Scribble is saved on the image and visible to all visitors to the gallery.
You will find the comment on the scribble in the comment bar on the left.
4 – working with Scribbles
If you move the mouse over the scribble in the image, the corresponding comment will be highlighted. And of course it works the other way around too: if you move the mouse over a comment that belongs to a scribble, the scribble in the image will be highlighted.
If you are bothered by the scribbles in the image, for example because they are covering important areas, you can show or hide them by clicking the button at the top left of the comment column. Don't worry, the scribbles will not be deleted.
If you want to delete scribbles, you can do so using the trash can icon next to the scribble comment.
Link to this entryCan I draw annotations directly into my images? or: What are scribbles?
With Scribbles, you and your customers can draw comments and annotations directly into the images in a gallery. Scribbles are displayed on the image and saved together with a comment, making them visible to all visitors to the gallery.
Scribbles are the perfect tool for marking retouching requests in an exact location, leaving post-production instructions for certain areas of the image or simply for drawing ideas and thoughts into the image.
You can either place a circle in the image or draw your own shapes freely with the pen tool.
This is what Scribbles look like:
Scribbles can be created and changed in the desktop version of picdrop. In the mobile version of picdrop on tablets and smartphones, you can view scribbles and their comments.
Link to this entryHow do I prevent visitors from seeing the sub-galleries of a gallery?
To ensure that visitors of a gallery do not have access to existing sub-galleries, the item "View Sub-Galleries" in the parent gallery must be inactive. Thus no one in the parent gallery can see the lower galleries - and vice versa.
See also: How do I prevent visitors to a gallery from accessing the parent gallery?
Link to this entryHow do I prevent visitors to a gallery from accessing the parent gallery?
To ensure that visitors to a sub-gallery in the left menu do not have access to the parent gallery, the option "Navigation to sub-galleries and vice versa" must be inactive in this parent gallery. Therefore, no one in the parent gallery can see the sub-galleries - and vice versa.
Are you using Custom Links for your gallries? In order to additionally prevent a "clever" visitor from shortening the address of a sub-gallery by one level and still being able to access the parent gallery, we recommend only using the automatically generated random link. This link consists of only one random code and does not allow any conclusions on your folder structure. You can find it in the "Send" section.
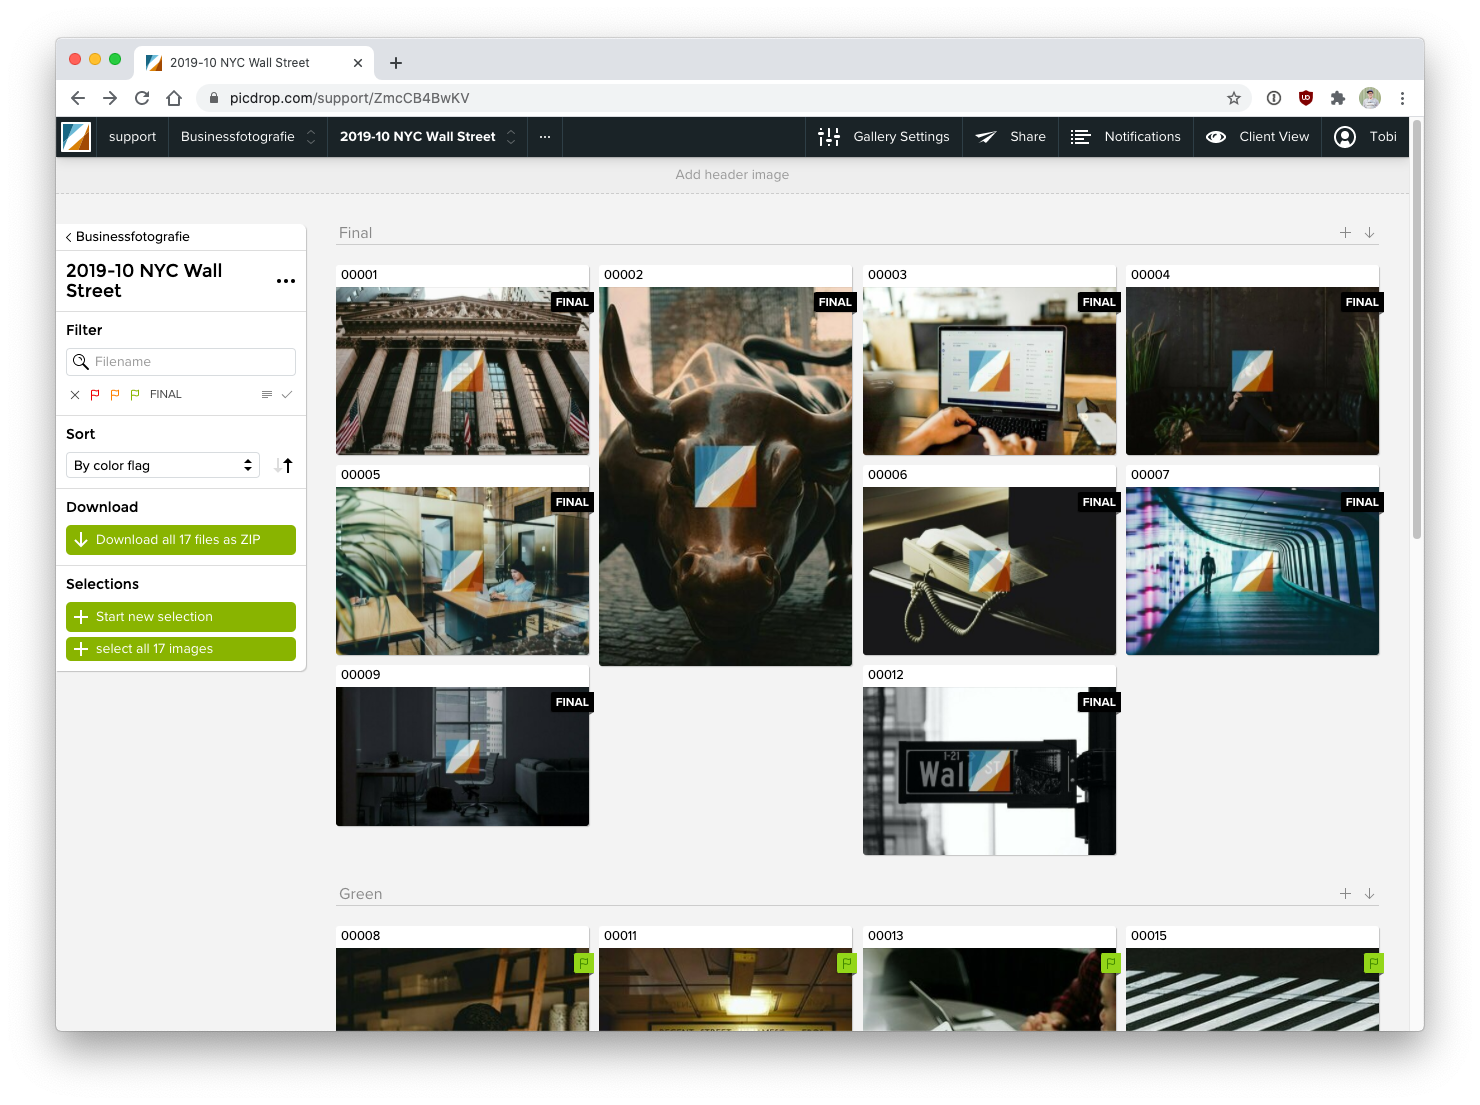
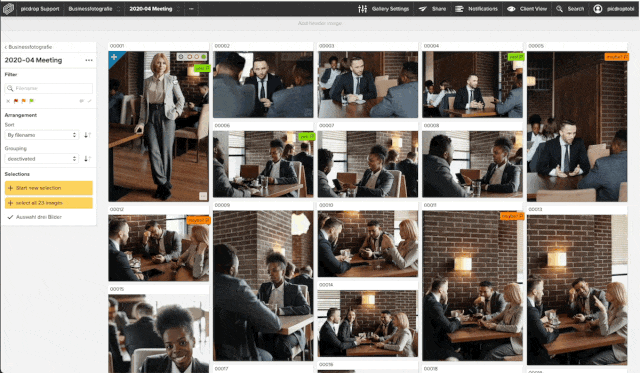
Link to this entryHow do I use color flags?
You can find the color flags above each preview in the edit mode of your galleries. You also find them below each preview in the large single file view.
Color flags can support the different stages of your editing or selection process. Just like you are used to in other programs.
For example, you can use the color "green" to mark files that you feel are ready. Your client can set them to "final" if they feel the same way. Or they mark files as "orange" again if they still want some changes. Of course, this is only one example of many ways you can use the color flags.
It is possible to give the color flags their own names. You can also hide individual color flags if you and your customers don't need them.
With these flexible settings you can set up your workflow exactly the way it suits you and your customers.
Link to this entryColor flags or selections – which one is better?
When is the best time to use color flags?
picdrop’s color flags are a very simple and quick way to mark those files that you want to use or select in the end.
They are primarily suitable …
When only one person should work on a selection. To get started, it requires no training and you can mark files directly. However. that also means color flags can be overridden at any time - and by every visitor to the gallery. So it's a good idea to use the color flags if you are only working with one client in the gallery.
To "narrow down" a selection. For example, the client can mark his first favorites "orange", use "green" as the favorites of that selection and "red" for pictures that should not be used. Therefore your client gets through the selection step by step and can approach the final decision.
Pro Tip #1: You can set the gallery up in a way that all the files get grouped by color. This way the color flags will also be visually separated for your clients.
For fast, real-time voting, for example, while on the phone or via Skype. Color flags are immediately visible on any computer or smartphone on which the gallery is open. This makes them very well suited to make direct arrangements that the counterpart should see in real time.
They are not suitable …
To map selections of multiple people in a gallery. If several people are to express their opinion on a set of files, the color flags often get in the way. One file can only have one color flag at the time. This means that multiple people using color flags in one gallery will always overwrite each others color flags. Therefore, we advise against the use of color flags when working with several people in a gallery.
When is the best time to use the selection function?
picdrop's selection function helps you capture and store multiple views of your clients in a gallery. Your clients use them best to set final favorites in a gallery. One of the most important things in creating a picture selection is remembering to save and name them. Therefore nothing stands in the way of further work with the selection.
It is best suited …
If several clients should select pictures. You have shared the picdrop gallery link with several clients and they should each give their assessment of the pictures. Each picture can be selected several times.
To set several selections for different purposes. An endless number of selections can be created in a gallery do not affect the overall gallery. However, the selections should then be named accordingly, so that you can identify them to the respective client or purpose.
Pro Tip #2: Selections can be moved and copied to a different gallery with just a few clicks.
To finalize a selection. By creating a selection your clients can easily tell you which files are for final editing or go to print.
It is not suitable …
As a step by step selection. However, the color markings and their filter options are simply clearer and intuitively understandable for your clients due to the color scheme.
For real-time coordination with your client. In order to make arrangements with your client in real time, the selection tool is a bit cumbersome, better to use the color flags.
Pro Tip #3: With the Shift key held down, you can click the left mouse button anywhere in the voting mode and draw a blue selection frame. Any file inside the frame will automatically end up in your selection bar at the bottom. More shortcuts can be found here.
Why shouldn't both be activated at the same time?
In general, we recommend to enable only one of them (either color flags or selections) per gallery for your clients. This prevents misunderstandings and confusion when using picdrop.
In conclusion, the color flags should be used as temporary markers. Selections are saved file sets that you can recall at any time to continue working in the gallery.
Link to this entryHow can I rename a color flag?
In the default settings, the color flags in your picdrop account are named after their color. The green color flag is simply called: green.
Starting with the Pro plan, you can customize the color flags to fit your own workflow and make it perfectly clear to your clients what a color flag means: to do this, you can change the name of the color in the Color flags section of your Default Gallery Settings.
A possible version could look like this:
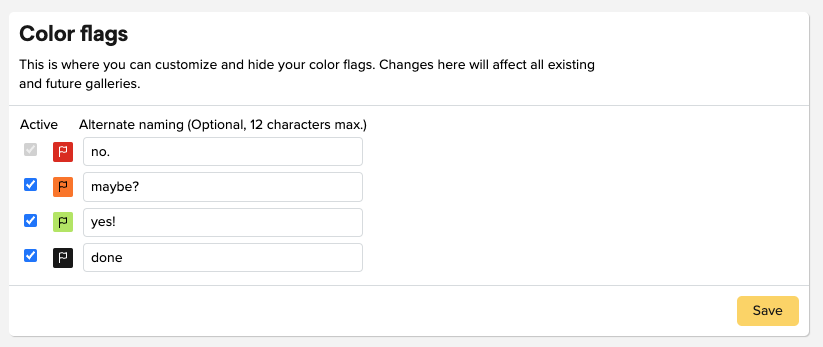
Please do not forget to save the new names for your color flags.
The name you assign to your color flags will then be displayed to you and your clients on every file that has that color flag.
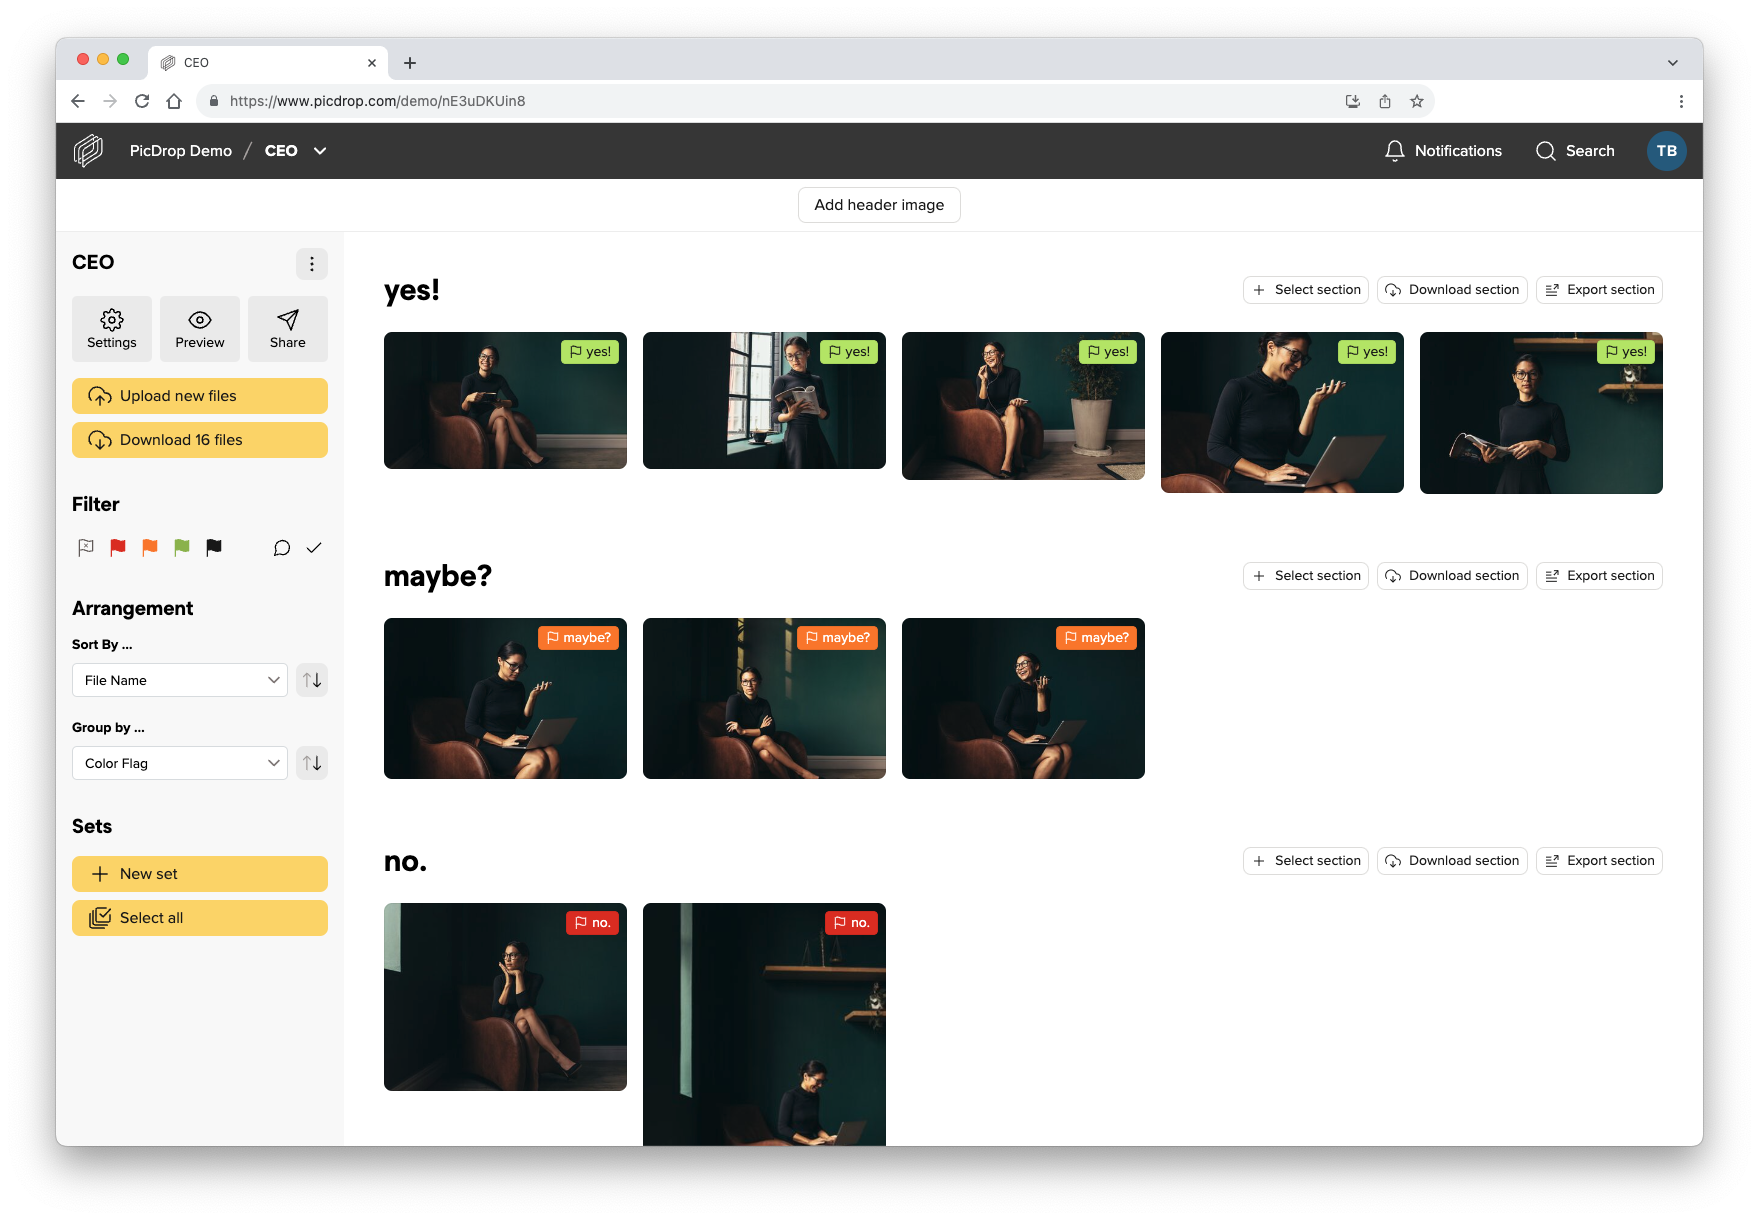
Please note: Renaming your color flags will affect all color flags in your picdrop account. Even existing color flags in previous galleries will be labeled with the new name after saving.
You don't want to use all four color flags? You only want to activate some of them? This is also possible! You can find more information here.
Link to this entryHow do I hide individual color flags in my account?
In the default settings for your picdrop account there are four color flags: red, orange, green and black / final.
If you want to use color flags in your workflow, e.g. only for a simple YES or NO for individual files, you can always deactivate those colors you don't need in the gallery preferences:
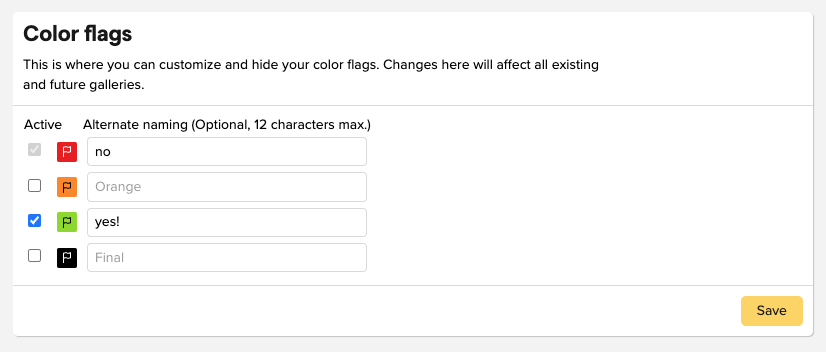
Uncheck the blue checkbox in front of the color flag, like done in the screenshot for "Orange" and "Final". It will then no longer be displayed in all your galleries (including existing ones).
Don't worry: if you have accidentally hidden a color flag, you can of course re-activate it. All files that already had this color flag will keep this color flag.
You want to change the names of the color flags like in the screenshot? You can find the instructions here.
By the way, you can use the function for hiding individual color flags - just like Presentation Mode - starting with the Pro plan.
PS: The red color flag cannot be deactivated. It is needed so that your clients can hide red marked files in Presentation Mode. You can find out how to do this here.
Link to this entryHow do I download images to an iPad or iPhone? (iOS)
Unfortunately, storing files on Apple mobile devices is not as easy as it is on Android devices. Unfortunately, we have no influence on that. But we want to make it as easy as possible for you and your clients with this guide. Basically, we recommend downloading rather on PC/Macs and not necessarily on mobile devices because our preview function in the galleries on mobile devices is good enough and it makes no difference for your clients if they have downloaded the pictures or not, as long as their mobile device is online and you leave the gallery online for them.
Option 1: Save a single file
1. open the file in the gallery
2. click on the download button
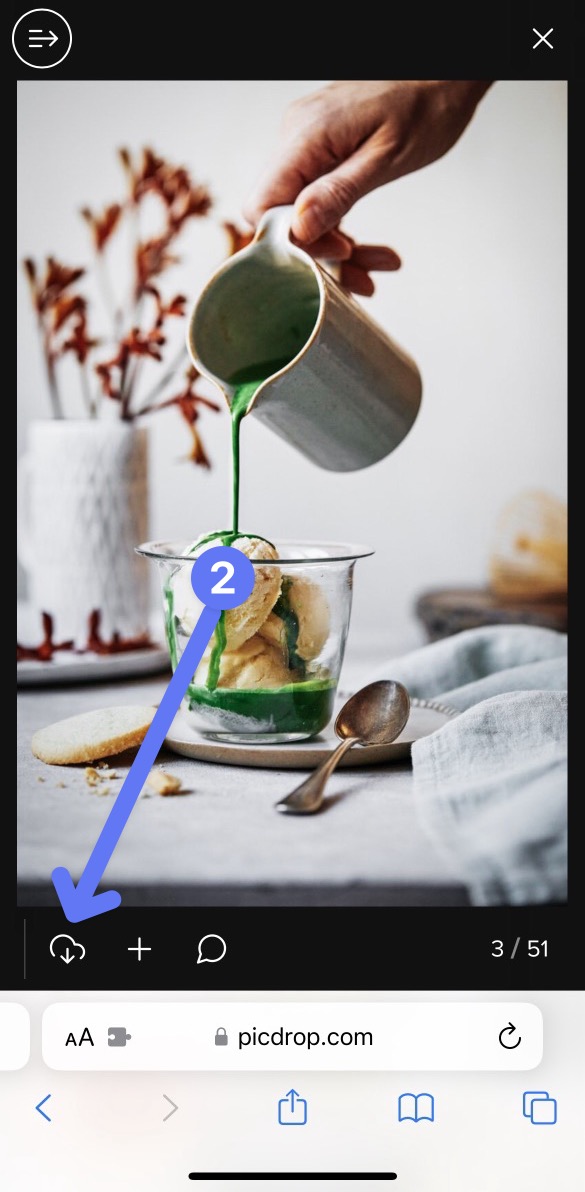
3. the download screen opens and tells you what's next
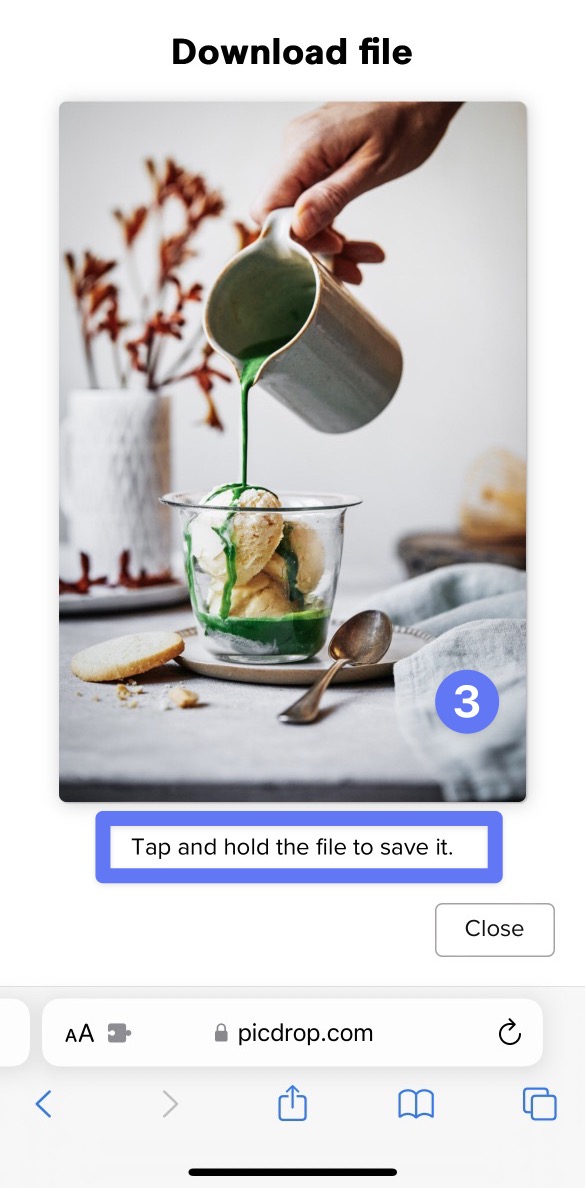
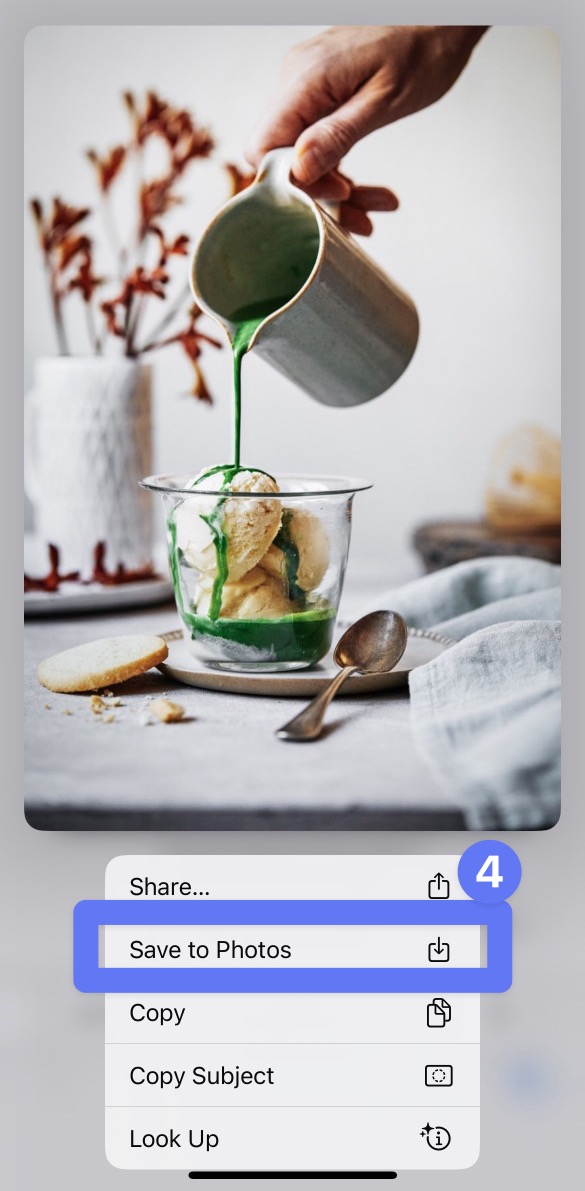
4. tap and hold to save it (Haptic Touch) and then press "Add to Photos".
The file is now automatically saved in your "Photos app". You can then find and open it at any time using the Photos app.
Option 2: Save all files of a gallery as ZIP
1. open the gallery
2. click on the 3 dots in the bottom right corner and choose "Download all files as ZIP"
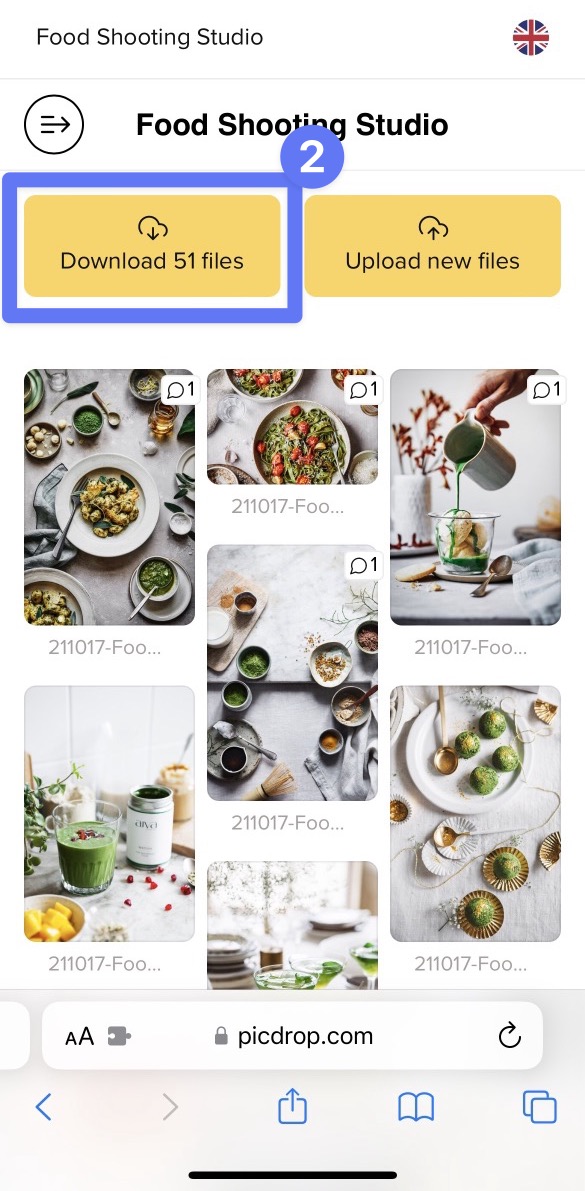
or choose "Download all files" in the client view
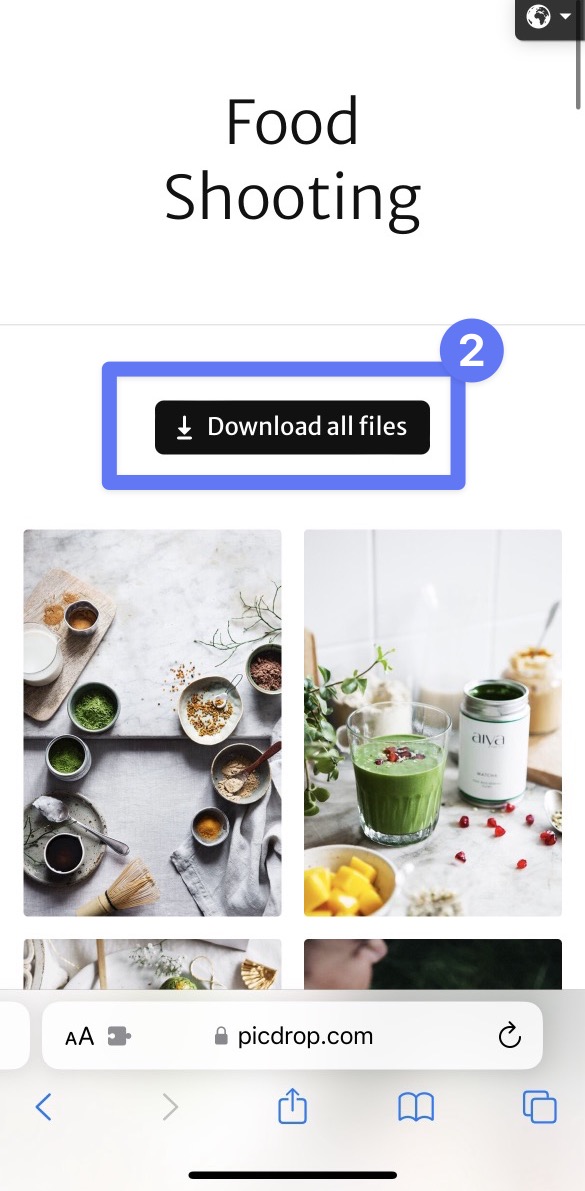
3. confirm the ZIP download in the pop-up menue
4. go to the Downloads folder in the Files app on your Apple device.
Open the downloaded zip file with one click. In the same place, a folder will now open containing all the downloaded files.
Open this folder and click the Select button - you can now select all the files and save them from the Files app to the Photos app.
(These steps apply for all downloads with devices that use iOS 13 or later versions. For all previous iOS versions, the following note still applies:
after downloading, your files contain a ZIP file. For further processing a ZIP file you or your client need an appropriate app to unpack the files into the Photos app. Winzip is a free tool, which we recommend :-)
Link to this entryHow do I change the default sharing text to send my galleries?
If you want to send a gallery to your clients, you can either copy & paste the link to the gallery and send it via any channel. Or you can send a mail using the "Send" button within the gallery. Here picdrop gives you a default general text, which fits every situation, but doesn't look very individual.
If you would like to make this text more personal, you can adjust it in the account settings. Open the part "Your sharing templates" and click on "Create new template".
There you will see the standard text in an editor. In this editor you can customize the mail as you like and save it under a name. Beside the (only visible for you) name of the template and the subject the e-mail is divided into 4 areas:
Greeting and beginning of the message
Note to the gallery password
Note on the PIN in the presentation mode
End of the mail and farewell
You can freely edit points 1 and 4 and be creative. It is important that you do not forget to insert the placeholder for the gallery link. All placeholders are already included in our template. However, if you have deleted them and want to insert them again afterwards, you can place them again in the text at any time using the "Insert placeholders" function. Make sure that the placeholders for the "Password" and the "PIN" end up in the respective areas 2 and 3.
You can also freely edit the already mentioned areas 2 and 3.
But: It is important to know that these areas are only inserted into your mail when the respective function is active in the gallery to be sent. The sentence "The password is "password123". (without quotation marks)" is only inserted if a password is active in the gallery. This ensures that you will never forget to send the password for a gallery. picdrop takes care about it for you. The same applies to the PIN to switch to the Edit Mode. So it doesn't make sense to put these topics in item 1 or 4. Just keep them separate and leave the rest to picdrop.
Of course you can create as many templates as you want. Afterwards you can open your templates in the "Share" area of each gallery with one click and save a lot of work with each gallery you send out. When sending, you can then decide whether you want to send the mail via your own mail program or via picdrop.
This function can be used from the Pro plan onwards.
Please note that many mail programs have a maximum character limit and these limits vary quite a bit. The length of the mail usually consists of recipient, subject and body. If your sharing template does not open in your mail program, it is possible that your template is too long - please shorten your sharing template text in this case.
Link to this entryHow can I protect my images with watermarks?
In your account settings ("Your watermarks") you can upload your logo or other graphics and create multiple watermarks with just a few clicks. You can set the place for the watermark and adjust its size and opacity to your needs.
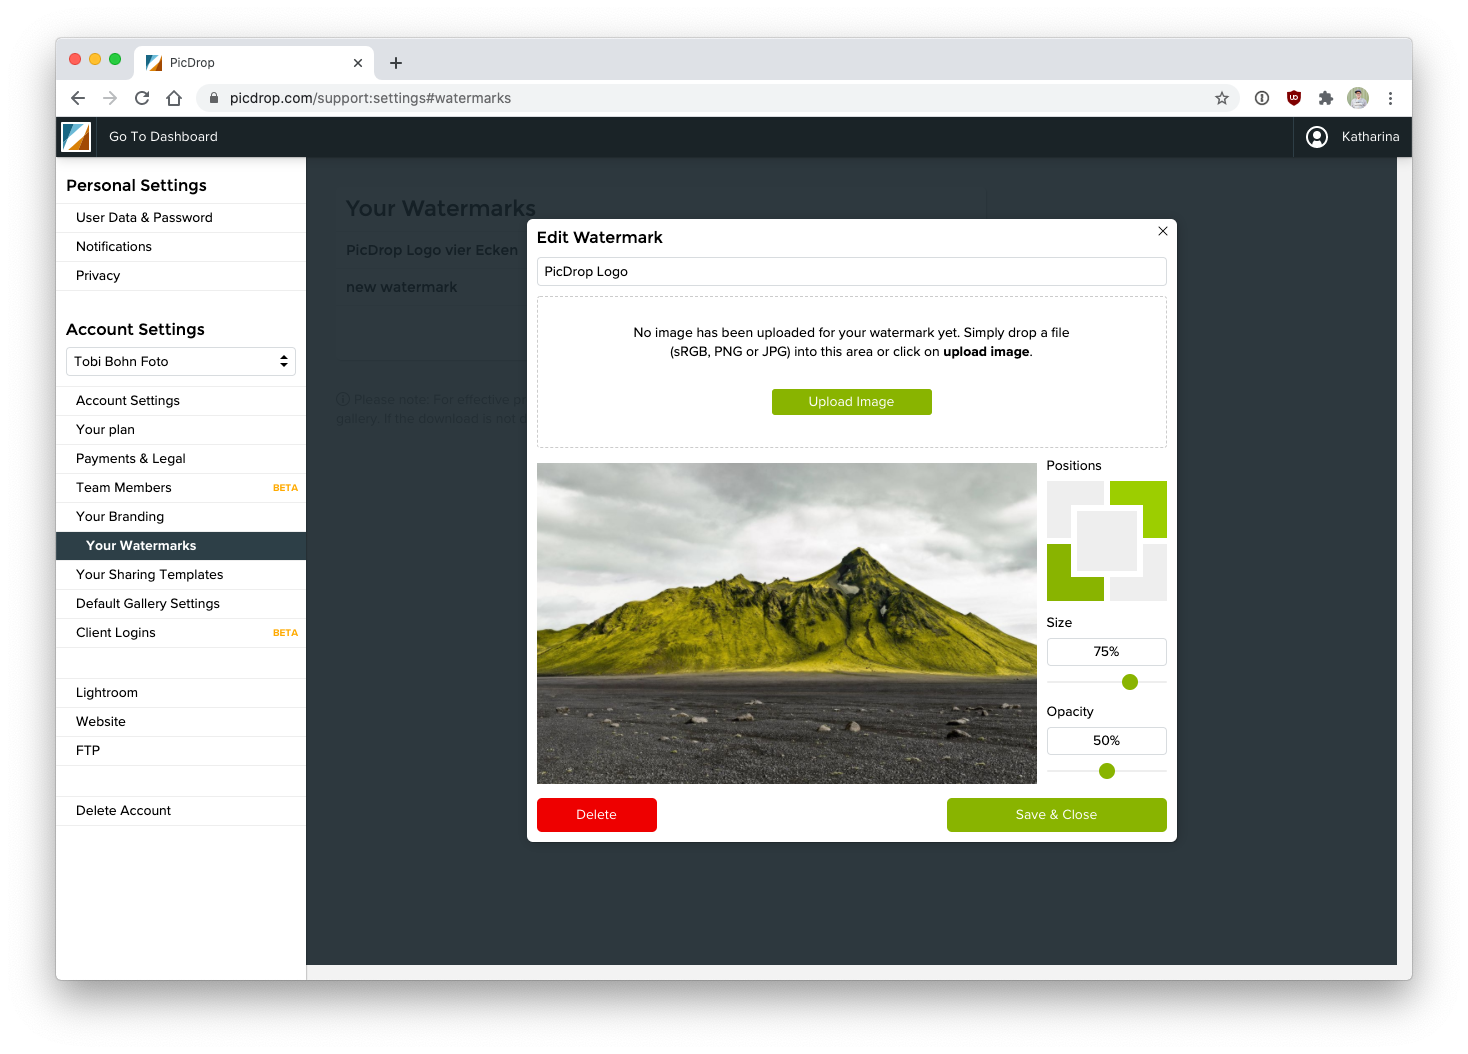
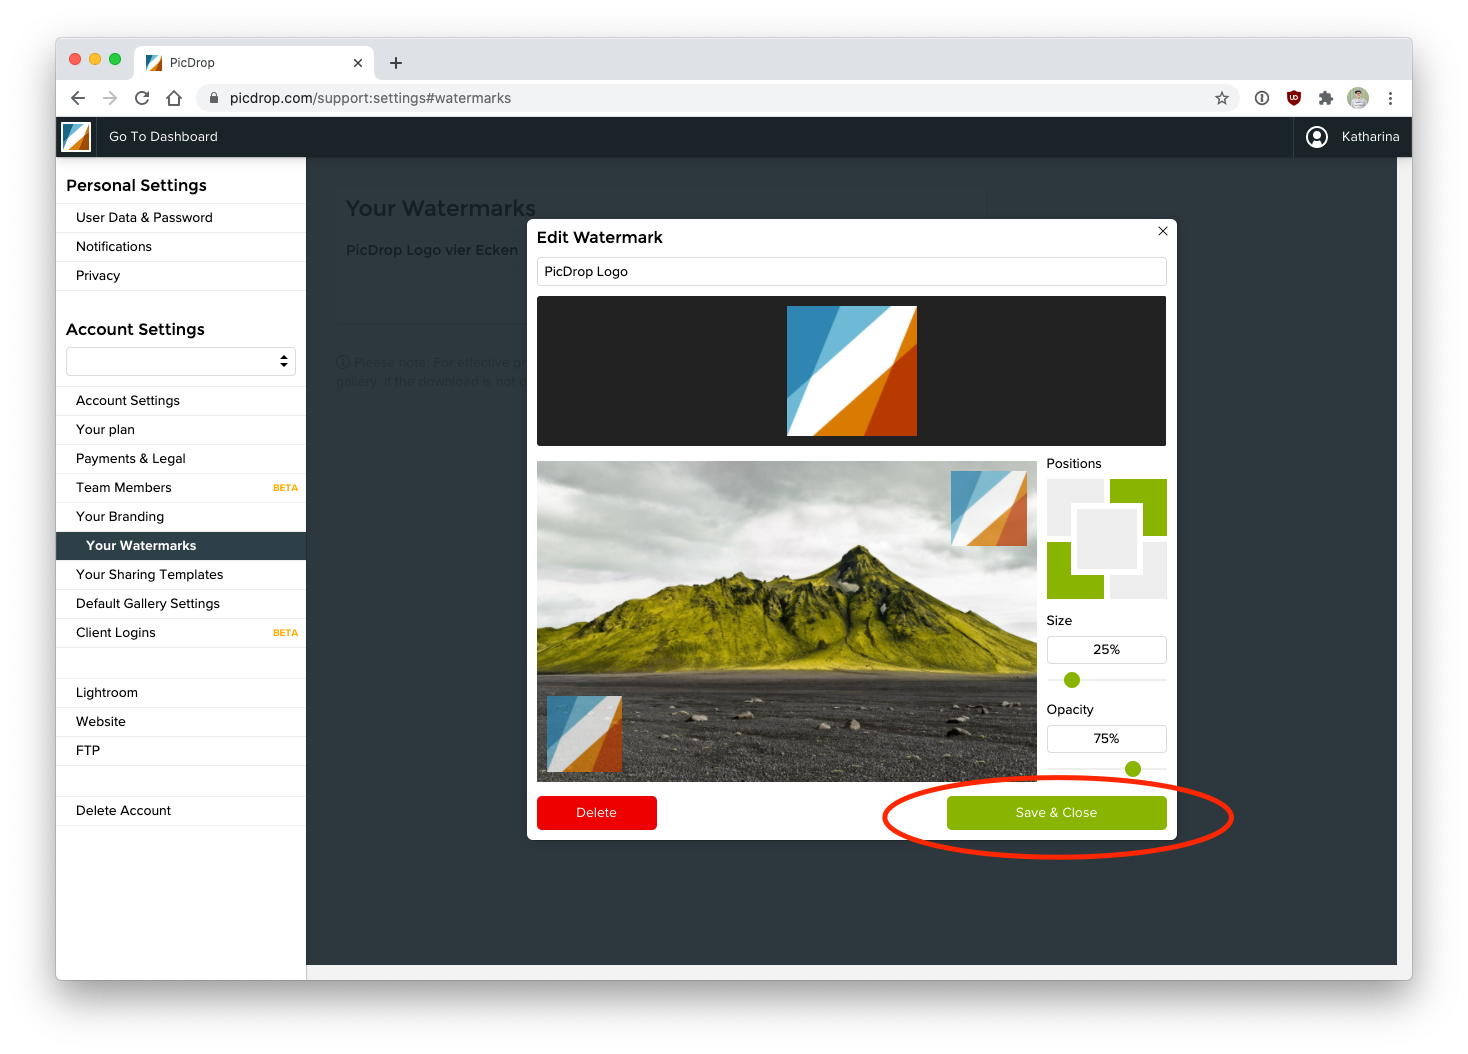
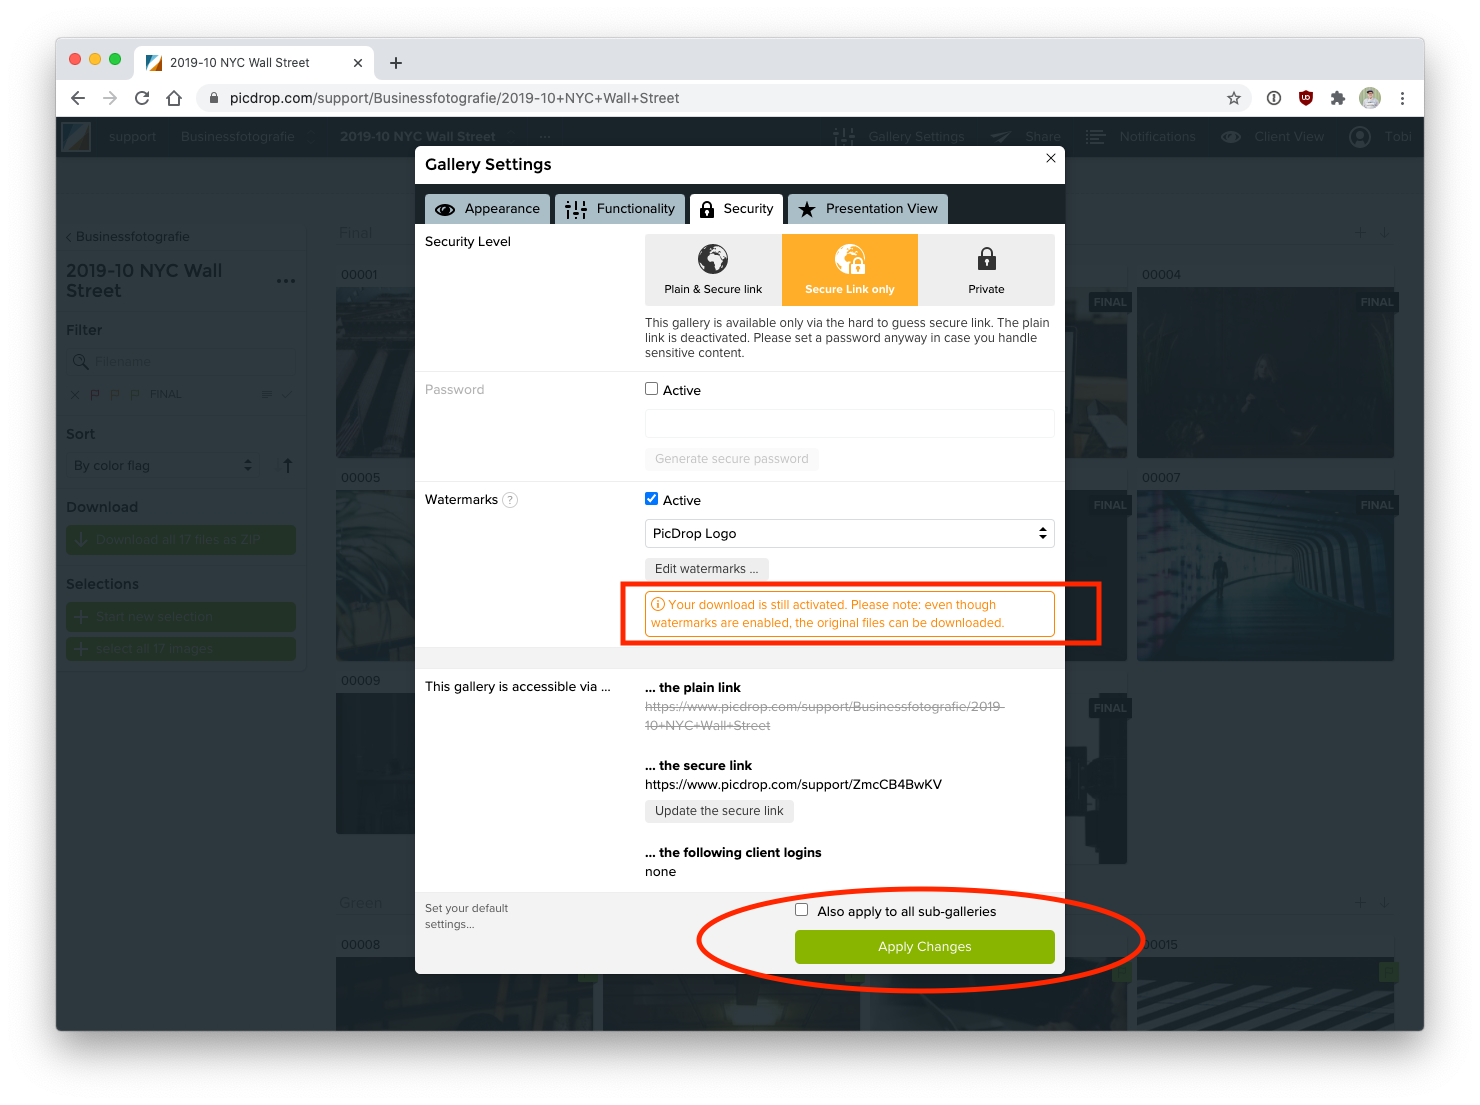
Note: the watermarks will “only” protect the thumbnails and previews in picdrop, so your clients can’t take screenshots or steal the pictures in other ways. If you activate the download of the original images at the same time, these will not be protected by watermarks because picdrop will never modify your originally uploaded images.
Find a German introduction video to our watermarks here:
Click here to display this video from Youtube. This will load and transfer data from Youtube. For details, please check our Privacy Policy.

Which keyboard shortcuts does picdrop support?
With picdrop you can also use shortcuts. This saves you a lot of time and it is also much easier for your clients to make a selection quickly. Here are the most important shortcuts and key combinations:
In single image view
You can use these keyboard shortcuts in the large image view:
| 0 | remove color flag |
| 1 | add red color flag |
| 2 | add orange color flag |
| 3 | add green color flag |
| 4 | add final flag |
| S | add file to selection |
| X | Scribble Mode |
| D | Download file |
| M | Magnifier |
| R + Enter | Delete file |
In the overview of your gallery
In the overview of all files within a gallery, you can use the following keyboard shortcuts if you hover your mouse over a file at the same time without clicking on it.
| 0 | remove color flag |
| 1 | add red color flag |
| 2 | add orange color flag |
| 3 | add green color flag |
| 4 | add final flag |
| i | Show file info |
| S | Add file to selection |
| D | Download files |
| Cmd + A | Add all currently displayed files to selection |
| Cmd + D | Deselect all currently selected files |
Please note, the mouse is not used for selecting/deselecting all files (last two shortcuts).
Select multiple images in combination with the left mouse button
| Shift | select files |
| alt | deselect files |
With the Shift key held down, you can click the left mouse button anywhere in the voting mode and draw a blue selection frame. Any file inside the frame will automatically end up in your selection bar at the bottom.
With the alt key pressed, you can draw a red frame with the mouse, which works the other way around: all files in the red frame are removed from the current selection at the bottom of the screen.
How do I rename a gallery?
There are several ways to rename a gallery:
- Open the gallery and click on the three dots right next to the gallery name on the left side of the screen. Click on "rename".
- In the gallery overview (listing A-Z) move your mouse over one of the gallery previews on the right. Three dots will appear on the lower left side of the gallery. Chosse "rename" in this menu.
- On the left side of your gallery overview, you will find a list of all your galleries. Hover above a gallery namen with your mose and the same three dots will appear. Simply clicke on "rename".
Please note that renaming a gallery will not change the external link of your gallery. If you want to change the external link you can find all the options in the gallery settings in the Security tab. You can find all the details here: The gallery settings in detail.
Link to this entryHow do I delete a gallery?
There are three ways to delete a gallery from your picdrop account:
Open the corresponding gallery. At the top left you will find the gallery name and next to it a menu with three dots. Click on the three-dot menu and select "Delete".
On your dashboard you will find an alphabetically sorted list of all your galleries on the left. Hover over the name of the gallery you want to delete. On the right, you will find a three-dot menu where you can delete the gallery.
On the right-hand side of your gallery overview, you will see thumbnails of your galleries. Move the mouse over the preview of the gallery you want to delete. At the top right you will find the three-dot menu in which you can delete the gallery.
Important: You must be logged in to your picdrop account in order to delete galleries. It is not possible to delete a gallery as a visitor.
Have you accidentally deleted a gallery? Don't worry! At the bottom left of your gallery overview you will find a recycle bin from which you can restore deleted galleries for a short period of time.
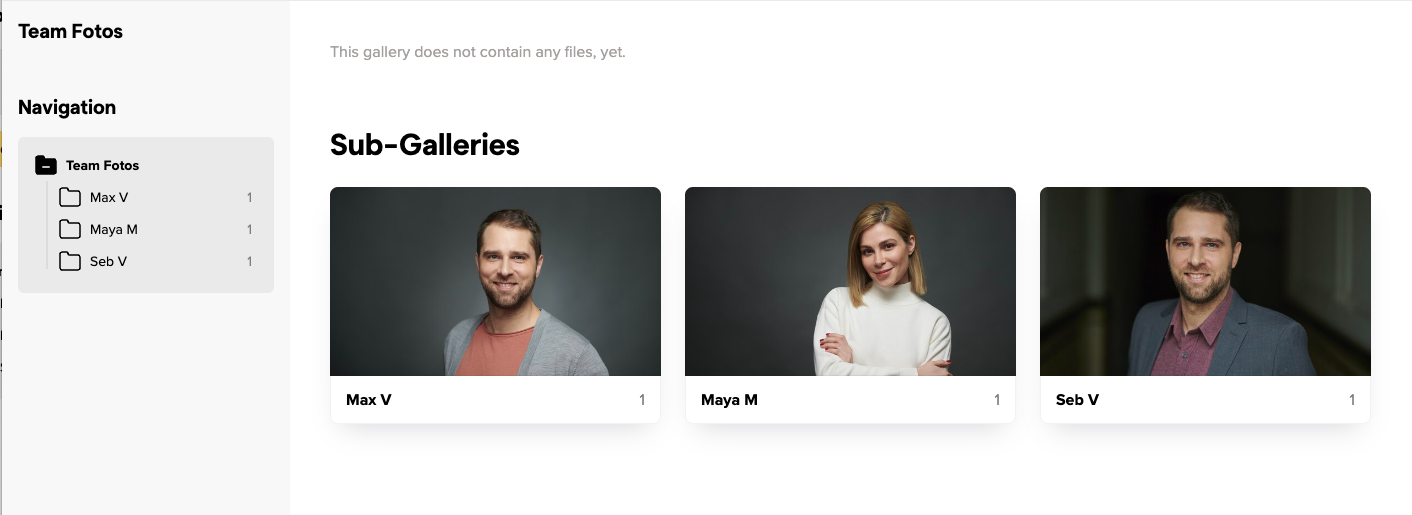
Link to this entryHow do I change the gallery image?
What are gallery images?
Each gallery you create in picdrop can have a gallery image.
You see the gallery image as an icon for the gallery – just like a cover page.
Where are gallery images displayed? Who can see them?
You are logged in as admin in your picdrop account.
Then you can see the gallery images here:
- for each gallery in your gallery overview
- for all sub-galleries within a gallery

In a gallery that contains subgalleries, visitors will see the gallery images for those subgalleries.
It looks like this for your customers:
Do you work with client logins?
Then your customers will also see the gallery images in their personal gallery overview after they have entered their access code.
How is the gallery image set automatically?
We always take the first image loaded into the gallery and automatically set it as the gallery image for you.
Galleries that do not contain images therefore do not get an automatic gallery image. They will be displayed with a folder icon instead.
This happens e.g. with galleries that you use for better organization and that do not contain any images themselves, but only sub-galleries.
How can I change the gallery image?
You can set the gallery image yourself for each gallery – this means you overwrite the automatically created gallery image or you replace the folder icon for empty galleries with a better fitting image!
You can change the gallery image in these places:
01 - Directly in the gallery
Click on the three dots at the bottom of the desired image – select "Set as gallery image", confirm with the green Save button, done!
In the same menu you can also click on "Upload image" and set an image from your computer directly as a gallery image. You don't have to upload the image to the gallery.
As a gallery image you can use a picture that is not in the gallery itself.

02 - In the gallery overview
In your gallery overview, click on the three dots at the bottom right of a gallery or next to the gallery name and select "Set gallery image". You can now upload an image from your hard drive as a gallery image – you don't have to upload the image to the gallery to do this.
If you want to use an image that is already in the gallery as a gallery image, see the description above at 01.
One more tip:
In the menu with the three dots of the gallery you can also delete an already existing gallery image – then the folder icon will be displayed. If you want to chose another gallery image you can do so as described in the sections 01 and 02 above.
Can I change the crop for my gallery image?
We automatically choose a section directly from the center of the image for the gallery image. With a little trick you can create the exact fitting image and upload it as gallery image:
Export from Lightroom (or any other program) an image with a crop in 16:9 format and at least 800px width - upload it as gallery image for your gallery directly from your computer. This way it will fit perfectly into the frame for the gallery image!
Of course, this does not only work with photos: You can also upload your own designs, lettering, etc. as JPG or PNG and use them as gallery images!
How do I delete multiple images at once?
To delete multiple files at once, select the files and click on the delete icon in the lower right corner.
To select multiple files at once, press Shift, click the left mouse button and draw a blue selection frame anywhere in edit mode. Any file that is inside the frame will automatically go into your selection. The files in the selection can then be deleted with one click.
Link to this entryHow can I change the order of my sub-galleries in the menu?
The sub-galleries of a gallery are automatically sorted alphabetically. In many cases it can be helpful to sort the sub-galleries indivdually. For weddings and other events, you may want to reflect the chronological sequence of events in the order of the sub-galleries.
To set the order of the sub-galleries, open the main gallery in which the sub-galleries are located.
As soon as the gallery has more than one sub-gallery, you will find a button for sorting right below the navigation window. Simply change the mode from "Sort alphabetically" to "Sort manually".
Now you can freely determine the order of the sub-galleries using drag & drop.
Link to this entryWhich link can be used to access my galleries externally?
The galleries in your picdrop account can be either private or externally available.
Private galleries
If you set a gallery to private, this gallery will only be visible to you as the owner of the picdrop account when you are logged in.
… or externally available galleries
If you set the gallery to be available externally (and this will be true in most cases, because you want your customers to be able to see their galleries), then we will always automatically create a randomly generated link for each gallery. This link consists of a random combination of numbers and letters.
For example, an externally available link may look like this: https://www.picdrop.com/username/sKdzPJbtGD
You would rather use a custom link for your gallery?
No problem - you can change the randomly generated link for a gallery at any time!
Just type the desired name into the field for the custom link. Save the custom link with the button Apply Changes and from now on the gallery is only accessible via this custom link.
This is how a custom link can look like: https://www.picdrop.com/username/2021-12-XMAS-Shooting-outdoor
You can use the button Insert gallery path as custom link, which you will find directly below the field for the custom link, to automatically insert the name or the entire path to your gallery as a custom link.
ATTENTION The simpler the structure of your custom link, the higher the probability that third parties can get access to your galleries by mere guessing of the link.
That is why we advise you to use only the automatically created, randomly generated links for your galleries.
If you do decide to use custom links, please always use a password for your galleries so that no one can get into your gallery by simply guessing the gallery link.
Where can I find the link for a gallery?
You can find the current gallery link in three places:
via the send button at the very top of the gallery
in the gallery settings in the section labeled Security
in the address bar of your browser
If you have set a password for the gallery, you will find it in the gallery settings or via the send button!
Link to this entryHow do I change the order of my images & videos?
You can define the criteria by which your files are sorted and grouped in each gallery. You can do this in the gallery settings under "Genera Settingsl".

You can sort your files by the following criteria:
File name
Capture time
Time of upload
File size
Image dimensions
In order to be able to sort images according to the time they were taken, this information must be stored in the Exif data of your images.
You can also group files in your gallery. They will then be displayed in the gallery in individual sections.
You can group your files by these attributes:
Color flag
File type
For example, all files marked with the green color flag will be displayed in a separate section. Within this section they will be sorted according to your desired settings.
Each sorting and grouping can also be displayed in reverse order (e.g. files sorted by file name from Z to A instead of from A to Z) by activating "Reverse order".
How do I filter color-coded images in Lightroom, Capture One, Photo Mechanic, Finder and Explorer?
You've probably seen how to filter out your clients' image selections in Lightroom, Capture One, Photo Mechanic, Finder, and Explorer. The whole thing is not only possible with image selections but also with all color-coded images.
Many image editing programs allow you to use the file search to display exactly the images of an image selection you or your clients made in picdrop. This saves you the trouble of searching for each individual file. Here we show you how to do it:
Copy the filter text to your clipboard
Filter out all images with the desired color flags using the filter function on the left side. Now you see only the images with the desired color flag.
Click on "select all images" (bottom left) or use the keycombination of cmd-A or Ctrl-A to select all currently displayed images.
You have now created a selection that you can use to filter out the images locally on your mac / PC.
Click on the "Export selection" icon in the selection menu, bottom right. When you are logged in to your account you will find the various filter texts to filter out this selection in Lightroom, Capture One or in your Finder / Explorer.
Optionally, you can save this selection permanently in picdrop to make it easier to find it again later.
Once you have copied the list of filenames to your clipboard, please continue on your computer in your tool of choice:
Filtering the images in Lightroom Classic
- Open the folder of the shooting in Lightroom’s Library mode.
- Press the "<" key (to the left of the Z) to display the filters at the top.
- Select the "Text" category there.
- Select "Filename" and "Contains" from the drop-down menus.
- Paste the filenames from your clipboard into the search field.
- Now you will only see the images you have saved in the selection.

You can now save the filtered images in a new collection or mark them with stars / colors for your further workflow.
Filtering the images in Capture One
In Capture One, you can search for your images in multiple places using the exported folter text. To do this, open a folder or collection in Capture One with the images you want to filter. Then you have three options:
1st option: Search in Browser
- Press cmd-F or ctrl-F to open the search in the browser.
- Paste the text from the clipboard directly next to the magnifying glass.
- The images you searched for will be displayed in the browser.

2nd option: Filter-tool
- Open the Filter tool in the toolbar.
- Paste the text from the clipboard next to the magnifying glass.
- Only the searched images will be displayed in the browser.
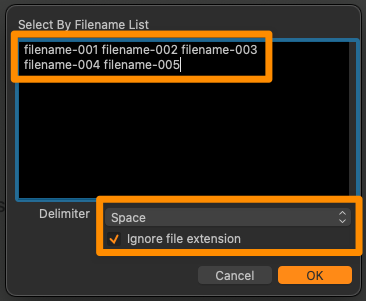
3rd option: Select by file name list
- Open in the menu bar the item Select > Select by > File name list ...
- Paste the text from the clipboard into the search field.
- Select "Space" as separator under the search field and "Ignore file extension".
- Click OK.
- Only the searched images will be displayed in the browser.
Done! You can now save the displayed images as your own collection or mark them with a color / stars.
Filtering the images in Photo Mechanic
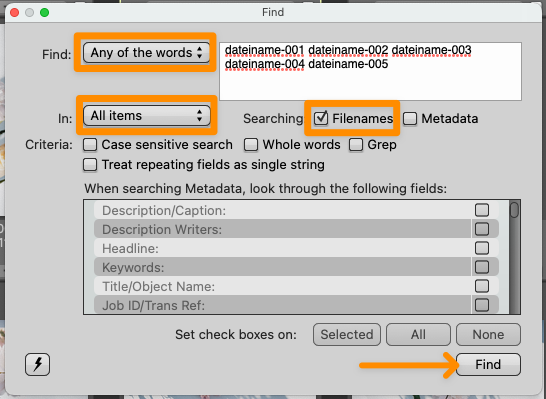
Open the corresponding project folder in Photo Mechanic.
Paste the filter text from your clipboard into the search box (via Edit > Find... menu or cmd-F on Mac or Ctrl-F on Windows) and set the following search options:
Find: Any of the words
In: All items
Searching: Filenames
After clicking "Find" in the lower right corner, Photo Mechanic will now select all photos of your choice from picdrop and you can continue working with them.
Please note that the search in the upper left corner of Photo Mechanic ("Search my Mac") cannot be used for these steps.
Filtering your images in macOS Finder and Windows Explorer
Open the folder containing your images
Click into the regular search field
Copy the list of filenames into the search field
You will now only see the images that were previously saved in the selection.
Please note that the filter text in Explorer can only hold a maximum of 259 characters.
The filter text in Finder is limited to 2048 characters or 99 files.
Link to this entryHow do I filter selections in Lightroom, Capture One, Photo Mechanic, Finder and Explorer?
Many image editing programs allow you to use the file search to display exactly the files of a selection you or your clients made in picdrop. This saves you the trouble of searching for each individual file. Here we show you how to do it:
Copy the filter text to your clipboard
Open the selection in the gallery that you want to filter out on your computer. Or mark the files with the selection tool (blue plus sign in the overview of your gallery).
Click on the "Export selection" icon in the selection, bottom right. When you are logged in to your account you will find the various filter texts to filter out this selection in Lightroom, Capture One or in your Finder / Explorer.
Copy the corresponding file list / filter text to your clipboard.
Now continue on your computer in the program of your choice:
Filtering the files in Lightroom Classic
- Open the folder of the shooting in Lightroom’s Library mode.
- Press the "<" key (to the left of the Z) to display the filters at the top.
- Select the "Text" category there.
- Select "Filename" and "Contains" from the drop-down menus.
- Paste the filenames from your clipboard into the search field.
- Now you will only see the files you have saved in the selection.

You can now save the filtered files in a new collection or mark them with stars / colors for your further workflow.
Filtering the files in Capture One
In Capture One, you can search for your files in multiple places using the exported folter text. To do this, open a folder or collection in Capture One with the files you want to filter. Then you have three options:
1st option: Search in Browser
- Press cmd-F or ctrl-F to open the search in the browser.
- Paste the text from the clipboard directly next to the magnifying glass.
- The files you searched for will be displayed in the browser.

2nd option: Filters tool
- Open the Filters tool in the toolbar.
- Paste the text from the clipboard next to the magnifying glass.
- Only the searched files will be displayed in the browser.

3rd option: Select by file name list
- Open in the menu bar the item Select > Select by > File name list ...
- Paste the text from the clipboard into the search field.
- Select "Space" as separator under the search field and "Ignore file extension".
- Click OK.
- Only the searched files will be displayed in the browser.

Done! You can now save the displayed files as your own collection or mark them with a color / stars.
Filtering the files in Photo Mechanic
Open the corresponding project folder in Photo Mechanic.
Paste the filter text from your clipboard into the search box (via Edit > Find... menu or cmd-F on Mac or Ctrl-F on Windows) and set the following search options:
Find: Any of the words
In: All items
Searching: Filenames
After clicking "Find" in the lower right corner, Photo Mechanic will now select all files of your choice from picdrop and you can continue working with them.
Please note that the search in the upper left corner of Photo Mechanic ("Search my Mac") cannot be used for these steps.
Filtering your files in macOS Finder and Windows Explorer
Open the folder containing your files
Click into the regular search field
Copy the list of filenames into the search field
You will now only see the files that were previously saved in the selection.
Please note that the filter text in Explorer can only hold a maximum of 259 characters.
The filter text in Finder is limited to 2048 characters or 99 files.
Link to this entryHow to copy or move files to another gallery?
You can easily move or copy files from their current gallery to another gallery in picdrop.
This is a step by step guide on how to do this.
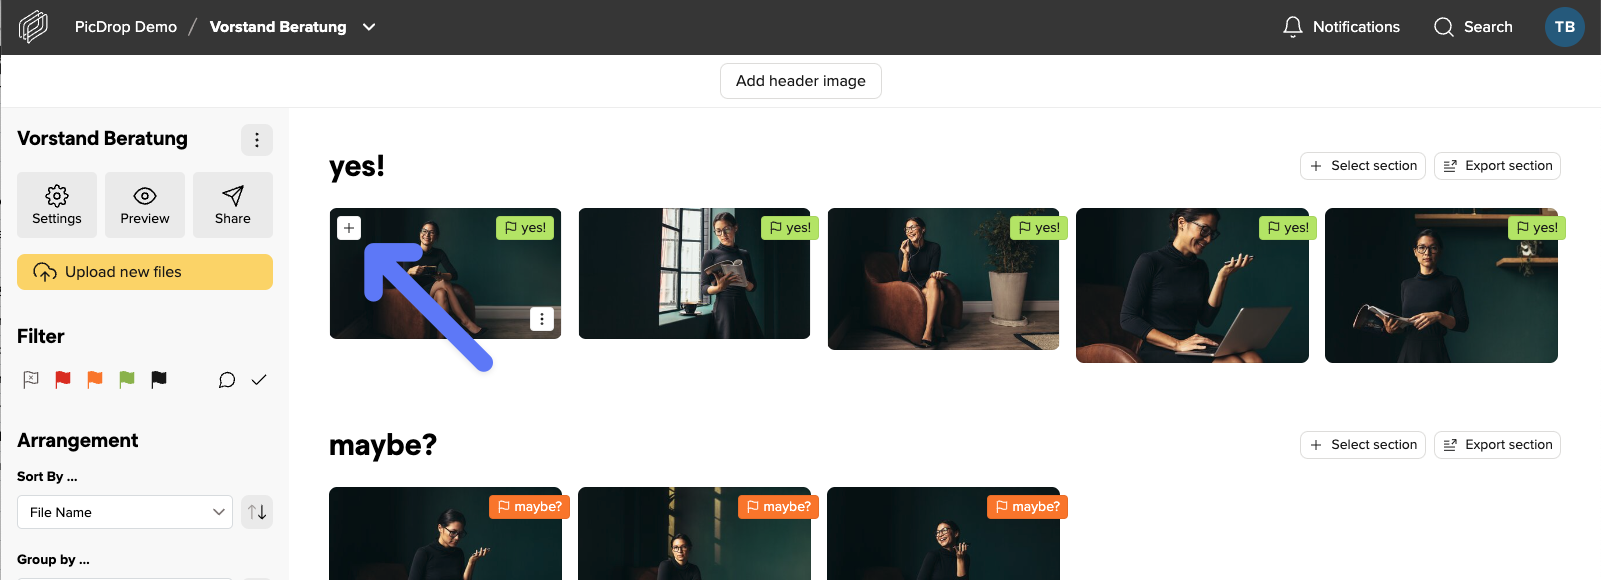
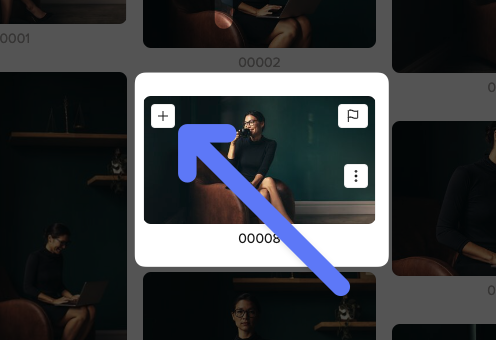
First select the files you want to move or copy. To do so, click on the blue plus sign that appears in the upper left corner of the file when hovering the mouse over it.
Pro tipp: You can also quickly select any number of files to copy or move from a saved selection or any filter set in the filter bar.
When you have selected all files, click on the Move / Copy icon located in the export bar at the bottom of the screen.
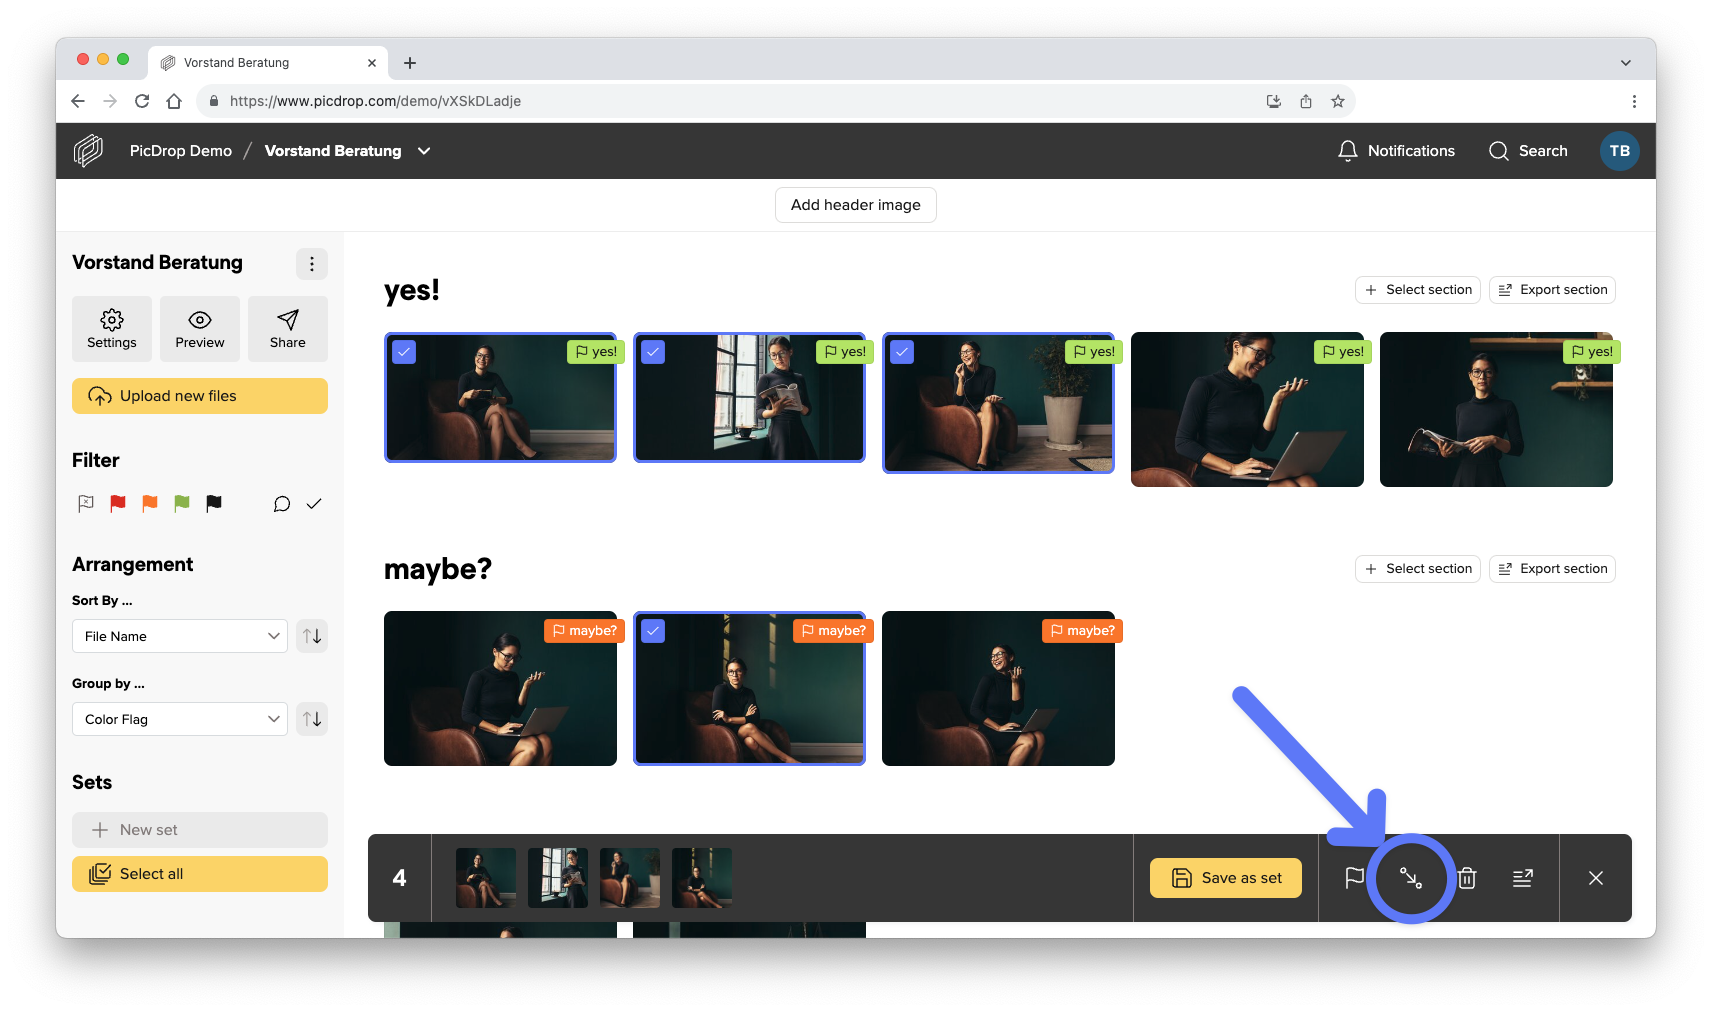
In the opening menu you can now choose whether you want to move or copy the files.
Select the desired target gallery in the list of your galleries or simply create a new gallery in the lower left corner.
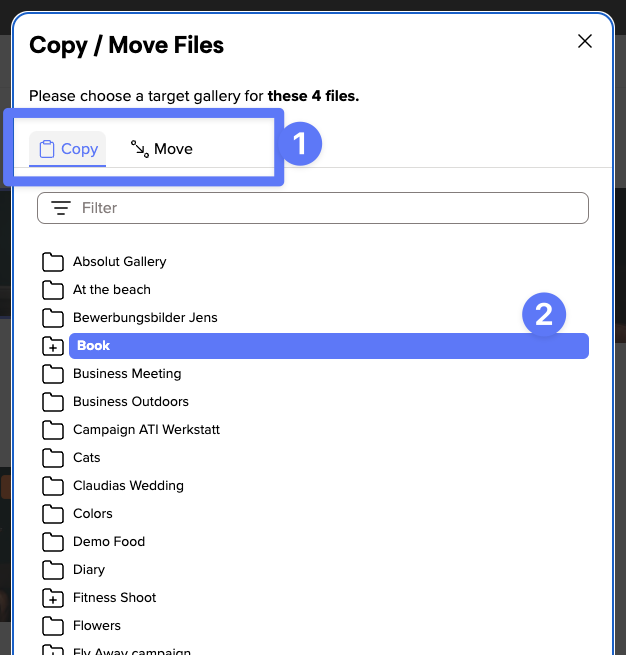
Confirm the selected action with the button at the bottom right.
The success message shows you that all files have been copied or moved.
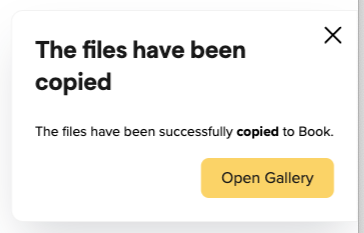
With a click on the button "Go to target gallery" you will be taken directly to the target gallery.
Link to this entryThe picdrop contact sheet
We have included this feature of analogue photography in picdrop, so that every photographer has the possibility to save a contact sheet of his or her galleries from within picdrop. There, e.g. printed out, notes can also be entered by hand.
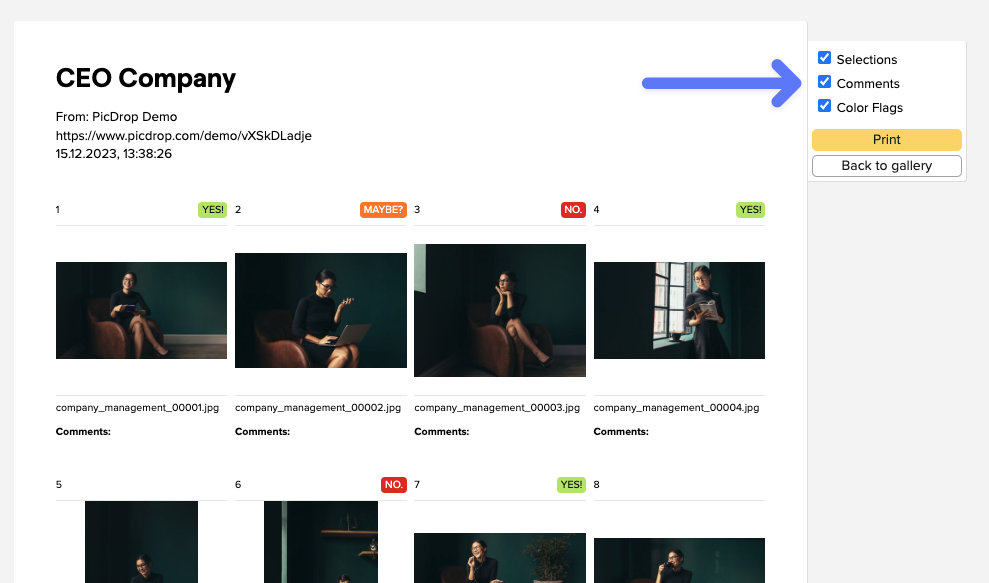
What is a contact sheet used for?
A contact sheet is a great way to compare, evaluate and get an overview of your images - exactly because the images are shown in a small size and all together.
On the contact sheet you have all images of the gallery at a glance and can also choose whether the color markings, comments and selections from picdrop should be directly visible.

The contact sheet always contains all images of your gallery, as already in analogue times the whole film roll was content of the contact sheet.
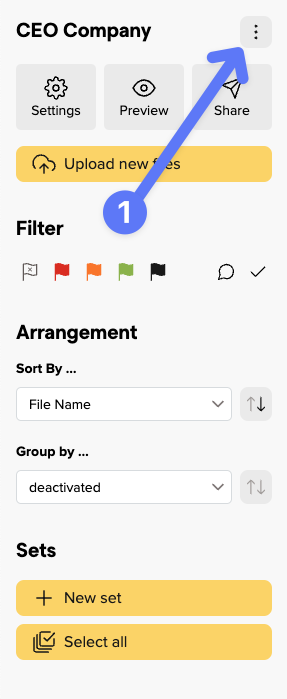
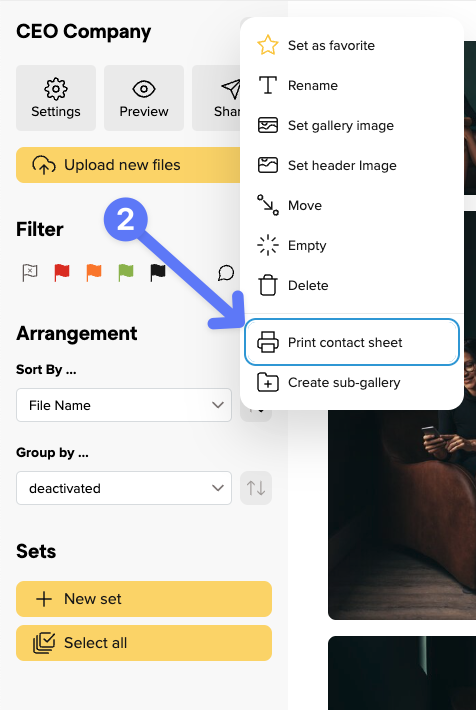
How do I create a contact sheet in picdrop?
You can create a contact sheet in every gallery by clicking on "print contact sheet" in the gallery menu...
... and then either print it, or save it as PDF with the help of the system dialogue.
How and when will I be informed about new color flags?
If your client adds new color flags to your files or changes or removes existing ones, you will always receive an email. All new color flags or changes to existing color flags are listed in this mail. Existing color flags that have not changed are not listed there. You can view them at any time in the gallery. The email is always sent 5 minutes after the last color flag was changed.
If you no longer want to receive these emails anymore, you can deactivate them in the notifications section of your account settings.
Link to this entryHow do I upload images directly from Photo Mechanic?
There are multiple ways to upload images to picdrop when working with Photo Mechanic.
Export to your hard drive – drag and drop to picdrop
Export the images from Photo Mechanic to your hard disk and upload them from there via drag and drop in your browser.
Drag and drop directly from Photo Mechanic
You can upload images directly from Photo Mechnanic to picdrop. Simply select alls the images and drag and drop them from Photo Mechanic to the gallery in your browser.
FTP upload from Photo Mechanic
Attention – FTP upload is only available for picdrop accounts registered before June 2022
it is also possible to upload images directly from Photo Mechanic to picdrop. picdrop supports direct upload via FTP and thus all programs that offer an FTP upload.
Here are the necessary steps for a successful upload:
1. Select the images to upload
2. Click on "File" - "Upload...." or "FTP Photos as..."
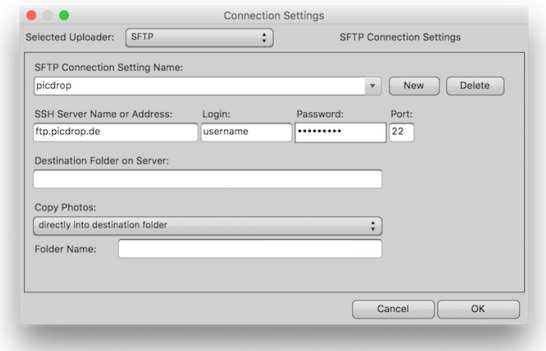
3. Select "SFTP" as uploader and set all necessary file preferences.
4. Click on "Connections..." and set up your connection here. All the necessary details can be found here.
5. Close the connection and click on "Send" in the lower right corner of the main window.
6. Watch how your pictures are uploaded.
How do I switch between mobile and desktop view on smartphone, iPhone, iPad, Tablet?
Every smartphone and tablet should automatically display the better, mobile version. To switch to the mobile version, tap on the white menu at the bottom right. There you can switch to the desktop view. If you want to switch back from the desktop view, you will find a corresponding option above the gallery.
Link to this entryCan I share galleries with a QR code?
Yes, of course!
If you are at a wedding, at an event or in a personal conversation with a client, you don't have to send your gallery link via WhatsApp or email – or even have it typed out character by character. Instead, you can find a QR code in the gallery's sharing menu for precisely this purpose.
You can display the QR code on your screen, where it can be scanned immediately by other people using any smartphone camera.
Of course, you can also download the QR code to print it on flyers, business cards, etc. or send it by email.
How does a QR code actually work?
In a QR code, very different information can be stored in a pattern of black and white squares. This works very similarly to a barcode in the supermarket. The information is stored directly in the pattern of the QR code. The special thing about QR codes: the information stored in a QR code can be read quickly and easily with the camera app of any smartphone.
What is stored in the QR code for your picdrop galleries?
In the QR codes that are created for your picdrop galleries in the share menu, the link to your gallery is stored in such a way that it can be read with any smartphone. From there, it can be opened directly in the browser.
Would you like to share the link to the gallery directly with the people present during a shoot, for example? Then open the QR code in the gallery and let people scan it directly with their smartphone camera.
What happens to the QR code if I change the link for a gallery?
If you change the link to one of your galleries, the QR code found in the sharing menu for this gallery will also change automatically.
If you have already shared a QR code for a gallery and now change the gallery link, you must also share the QR code again. The old QR code still refers to the old link, which no longer belongs to the gallery.
Link to this entryHow can I change a gallery’s header image?
Every gallery you create in picdrop can have a header image. The header image is the first thing you and your gallery visitors see at the top. In Edit Mode the header image is displayed in a narrow landscape format across the entire width. If your gallery starts in Presentation Mode, the header image is displayed as an opener across the entire browser window.
Does every gallery automatically have a header image?
No - unlike the gallery image, which we automatically create for you as soon as you upload images to a gallery, the header image for a gallery is not set automatically. So you are free to decide if you want your galleries to have a header image and which image you want to use for it.
How do I set and change the header image?
For each gallery you can set the header image in several ways. You can choose a header image that is already uploaded to the gallery. You can also upload an image directly from your hard drive, without it having to be in the gallery.
You can change the header image in these places:
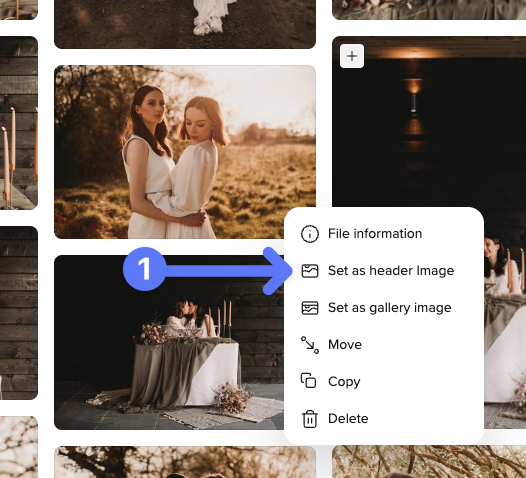
01 - the desired image is already in the gallery
Click on the three dots on the desired image and select "Set as header image" from the menu. In the next step, set the focus point for the header image. Confirm everything with the yellow "Done" button and the header image will be displayed in the gallery.
Alternatively, you can simply drag and drop the image into the header image bar at the top of the gallery.
02 - the image is not in the gallery
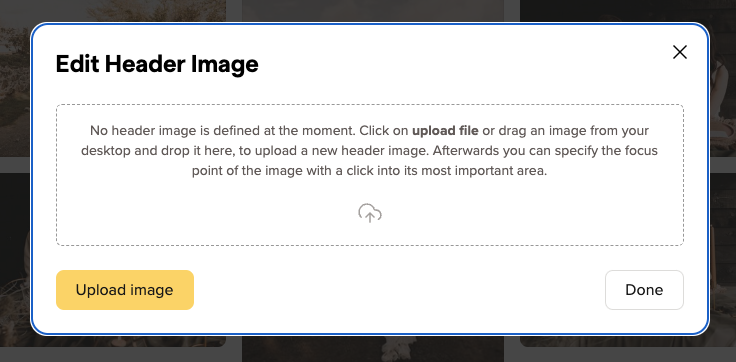
Then just click the gray "Add header image" button at the very top of the gallery.

The dialog for changing the header image will open. You can then drag an image from your computer directly into the dialog or select it from your hard drive using the "Upload image" button.
If you want it to be even faster, you can also drag and drop the image from your computer directly onto the header image bar to open the menu.
How can I crop the header image? And what is the focus point?
First, a brief explanation:
We display the header image in a wide variety of places in very different aspect rartios.
If your gallery starts in Edit Mode the header image is displayes in a 2:1 ratio.
If your gallery is in Presentation Mode, the header image automatically fills up the entire browser window and adapts to the aspecht ratio of the window.
If a gallery is opened on a smartphone, the same header image is displayed in portrait mode.
To make sure your header image is perfectly tailored for every possible use, you can to set a focus point for your header images. With the focus point you mark the most important part of your image and picdrop automatically creates the right header image for all screen sizes. This is how it works:
With the red circle you click on the most important part of your image that should always be displayed – no matter with which crop and which aspect ratio we display the header image in a gallery.

Tip for choosing the header image:
The best photos to use as header images are those that have a clear main subject, ideally set against a relatively calm background. This way, the title of the gallery also has enough space when you set up the gallery in Presentation Mode.
What size should my header image be?
We recommend that you use the highest resolution possible. With 4000px or more in width we have enough resolution for all possible crops of the header image and can display it perfectly - no matter if on a smartphone, tablet or a 4k display.
Link to this entryHow can I sort my dashboard?
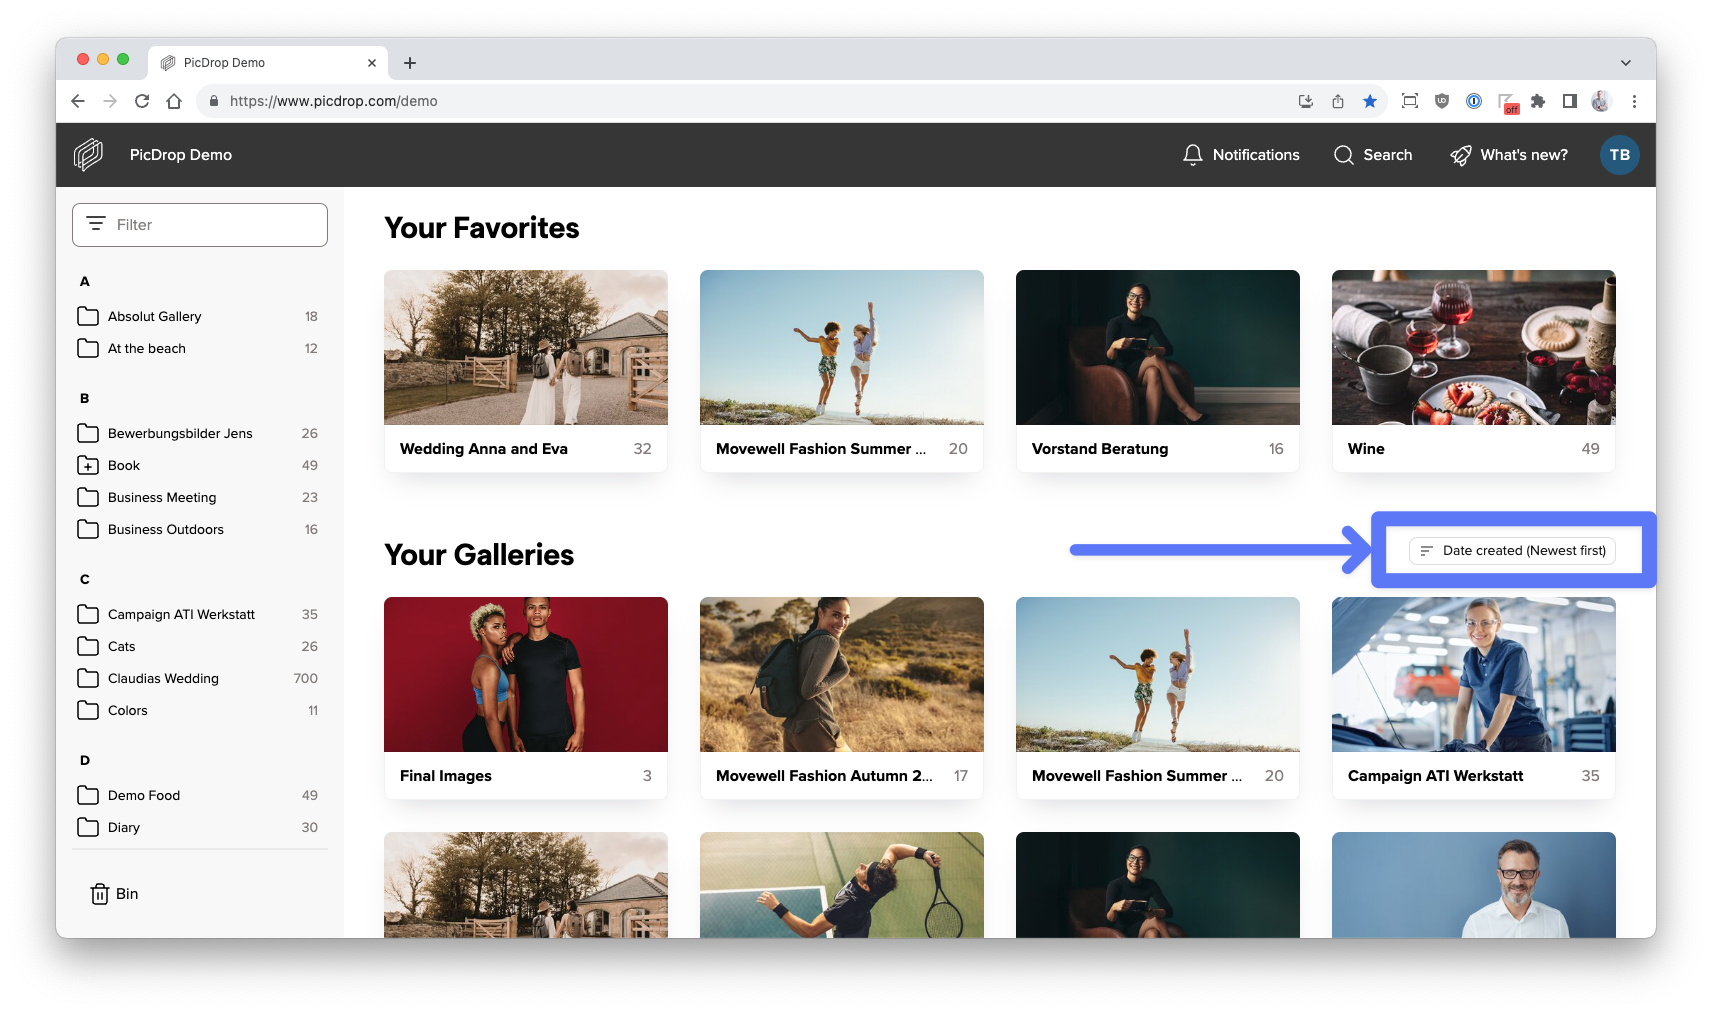
You can find your dashboard on your personal start page at picdrop.com/youraccount.
On the left-hand side of your dashboard you will always see an alphabetical list of all your galleries.
On the right-hand side, you will find a view of your most recently edited galleries by default – that way you can jump right in to where you last worked.
However, you can also sort your dashboard in several other ways.
picdrop offers you the following sorting options:
Sort by modification date (newest or oldest changes first)
Sort by creation date (newest or oldest galleries first)
You can change the sorting here on your dashboard:
You can also pin your favorite galleries to the top of your dashboard. This is super handy for galleries that you need again and again or that you are currently working on.
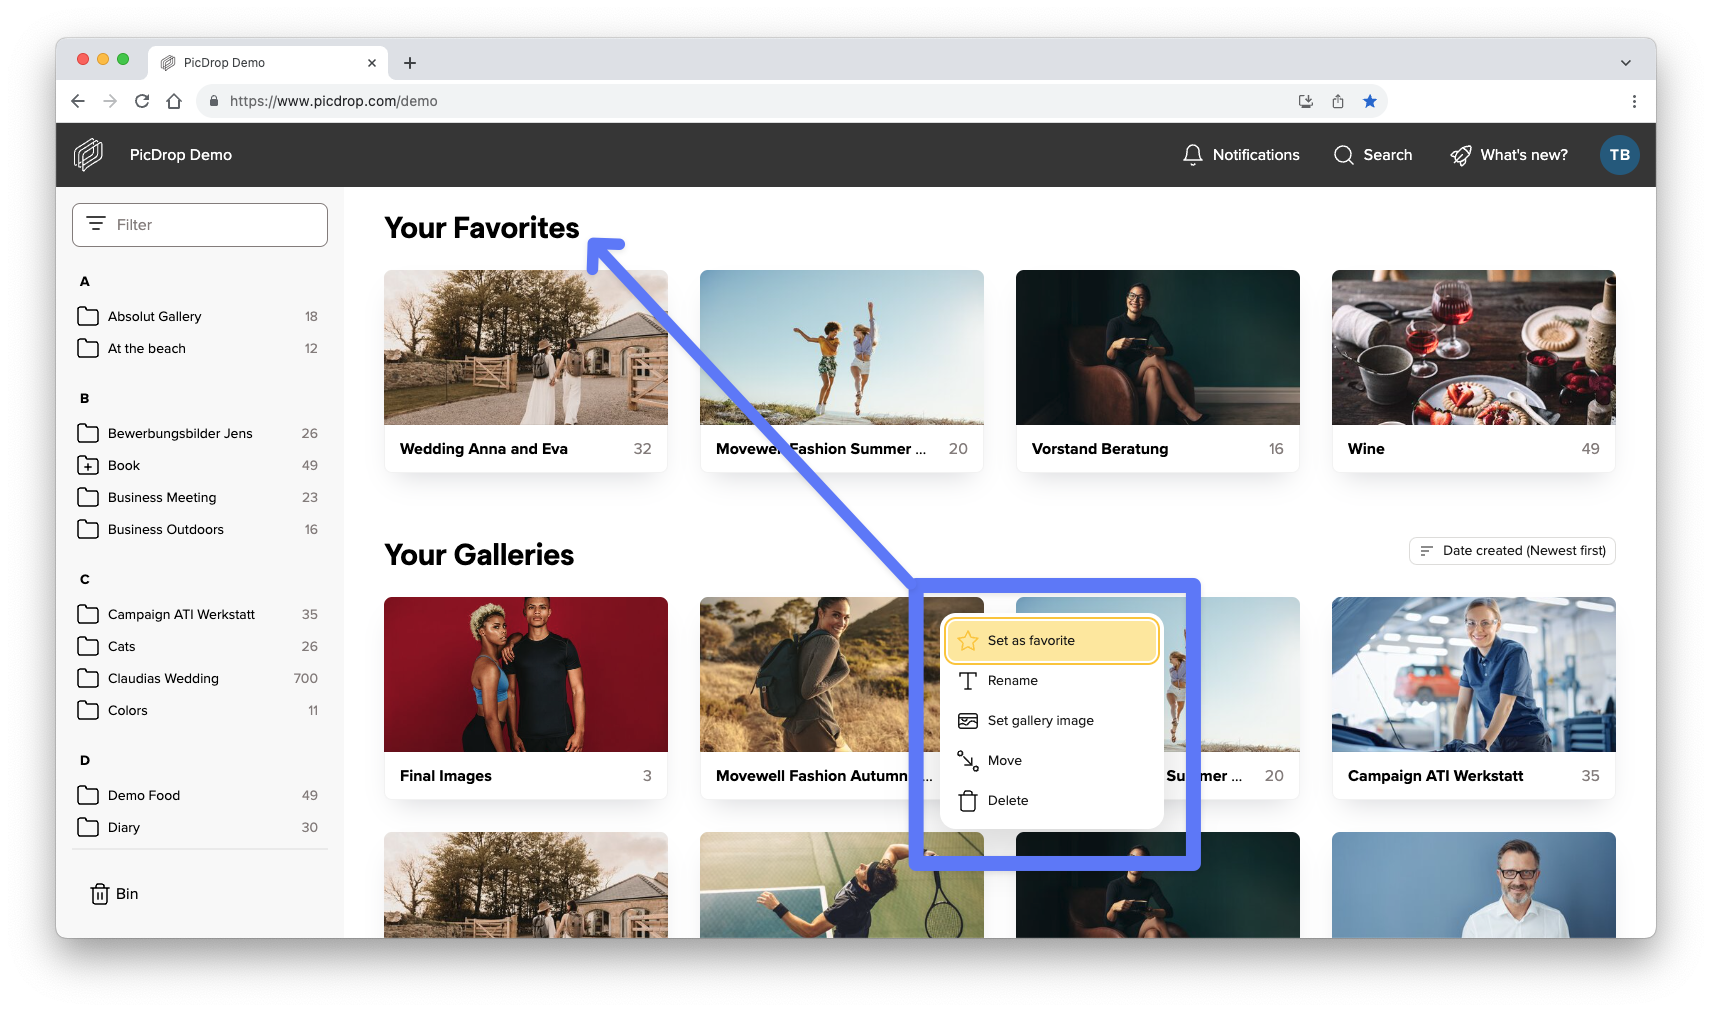
To do this, click on the three dots at the top right of a gallery and select "Set as favorite". Alternatively, you can also set a gallery as a favorite by doing this in the gallery in the three-dot menu next to the gallery name.
How to use the selection tool in picdrop?
What are selections in picdrop used for?
The selection is the tool in picdrop that helps you and your clients to save a certain set of files permanently in a gallery.
If several people are working in a gallery, each person can compile and save one or more selections of their own.
For a quick communication tool, where only one person in a gallery determines their favorites, we recommend using color flags.
How do I create a selection?
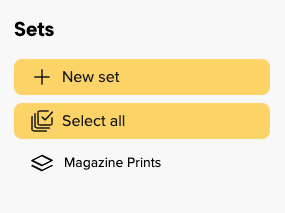
Please follow these three steps:
01 - Open the gallery
First, make sure you are in a gallery in Edit Mode. Only there you can create a selection. So your gallery should show a filter bar on the left side, like you see it here in the screenshot:

If you don't see the filter bar, the gallery is probably in Presentation Mode and you have to switch to Edit Mode first. If only the button with the hint "Start new selection" is missing, then the selections for this gallery are currently not activated.
02 - Select files
To start selecting files, click the "Start new selection" button or simply click the blue plus sign at the top left of each file you want to select:
Alternatively, you can select multiple files at once. To do this, hold down the Shift key and click the left mouse button anywhere in Edit Mode to draw a blue selection frame. Each file within the frame will automatically be added to your selection bar at the bottom. There you will also find information about how many images are currently in your selection.
03 - Do not forget to save your selection
When you have finished making your selection, it is essential to save it. To do this, click on "Save selection" at the bottom right of the gallery:

A box will then open for you to add a title, your name and your email address before you save & send your selection:
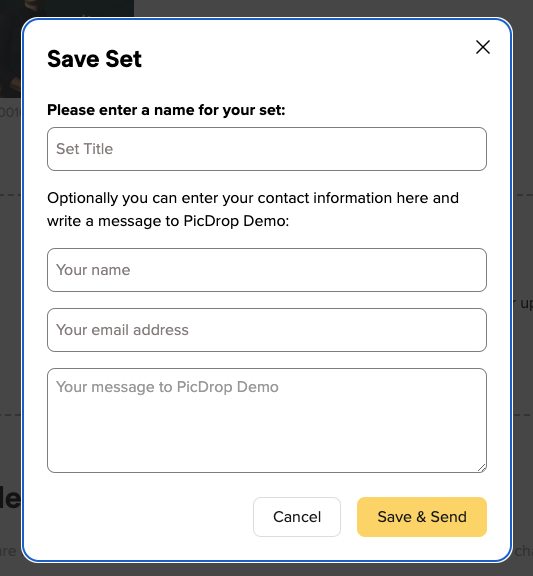
Please choose a unique title for the selection. After saving, this title will be visible to all visitors of the gallery in the filter bar on the left.
Please also leave your name and email address so that the selection can be clearly assigned. If you like, you can also add a message along with the selection.
Finally click on "Save and send selection".
As a confirmation the account ownder will receive an e-mail from us with all information about the newly saved selection.
Display, change & delete selections
In the left filter bar you can now display your selection. By clicking on the blue bar with the name of the selection, your selected files will be highlighted in the gallery. With a click on the eye icon, you can also view your selection in isolation: all files that are not in the selection will be hidden in the gallery.
To make changes to a selection, you must first activate the selection by clicking on its name. All images of the selection are again marked with the blue checkmark in the gallery.
Then you can add new files or remove existing ones. Again, don't forget to save the selection in the bottom bar so that the changes are permanent.
You will be asked if you want to update the existing selection or save the changed selection with a new name.
To delete a selection, just click on the trash icon in the left column, or on the same icon in the bottom bar when the selection is displayed. Don't worry about losing data: Only the person who manages the picdrop account can delete selections from a gallery.
Link to this entrypicdrop Likes - use our voting feature
What is our Like feature in picdrop?
The likes are intended to help you and your clients - or you and your team - to vote on which image is rated best by a larger number of people. If several people are working in a gallery and an image or several images with the "highest common denominator" need to be found, the likes are the thing to work with!
For a quick coordination where only one person in a gallery determines their favorites, however, the color flags are better suited.
How do likes work in picdrop?
To activate the likes, simply proceed as follows:
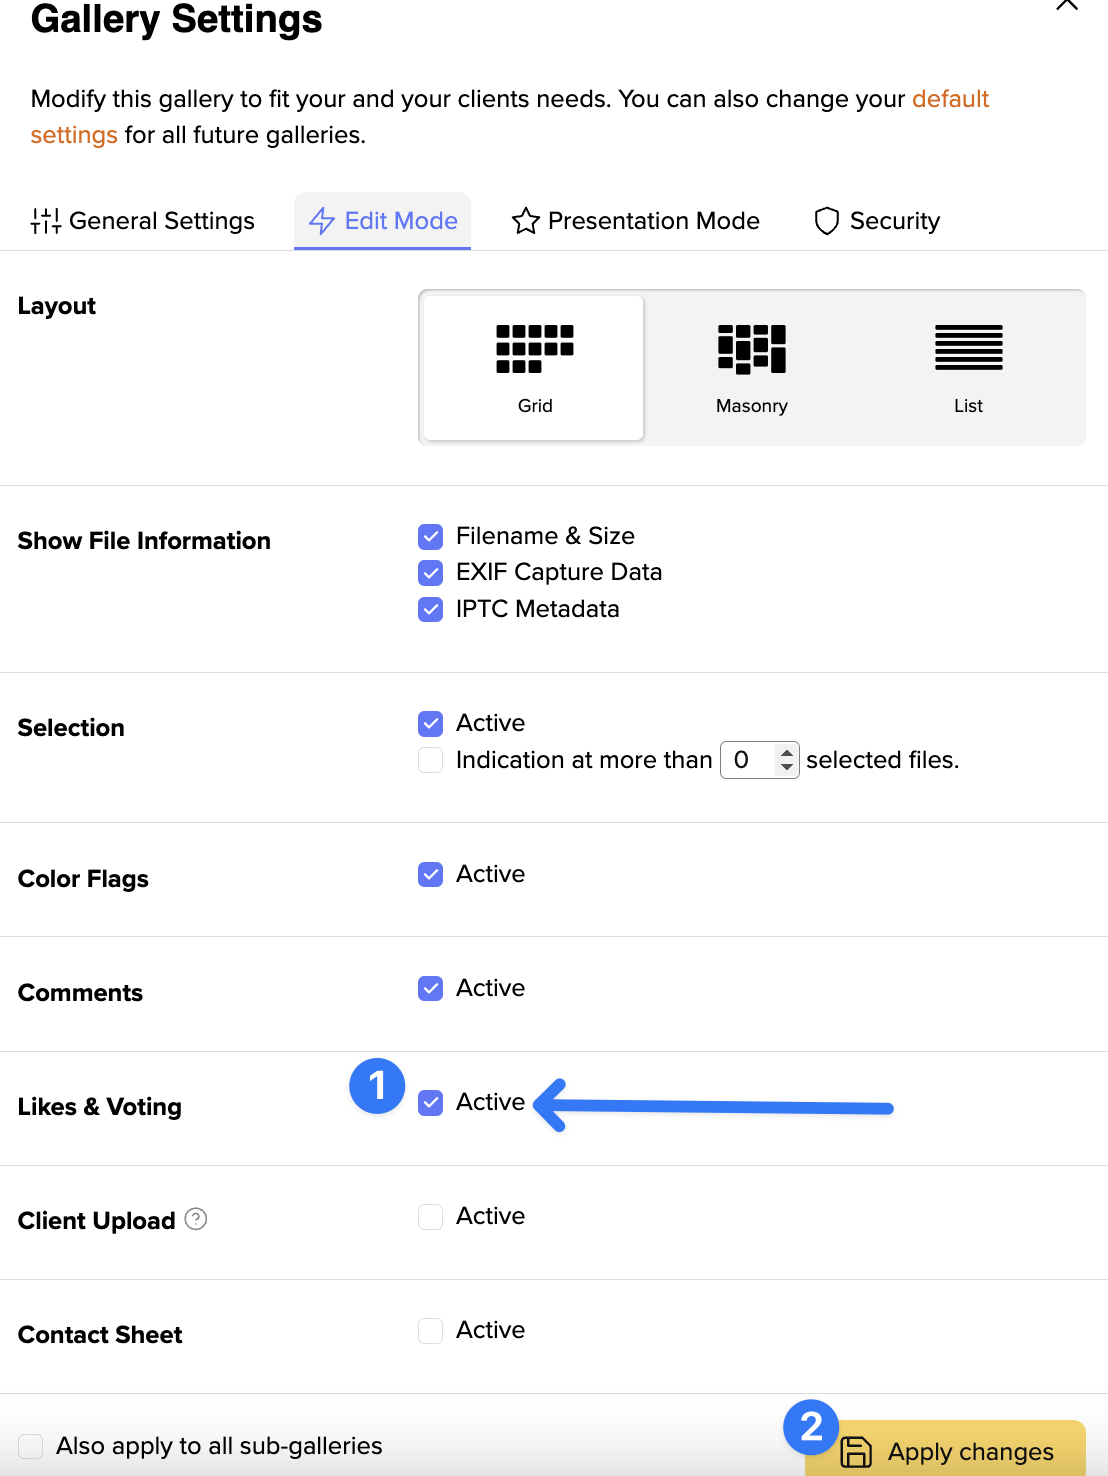
go to the settings of your gallery and you can activate the likes, this can be done in the tab of the edit mode under the item Likes & Voting (1) - don't forget to save the gallery settings afterwards (2).
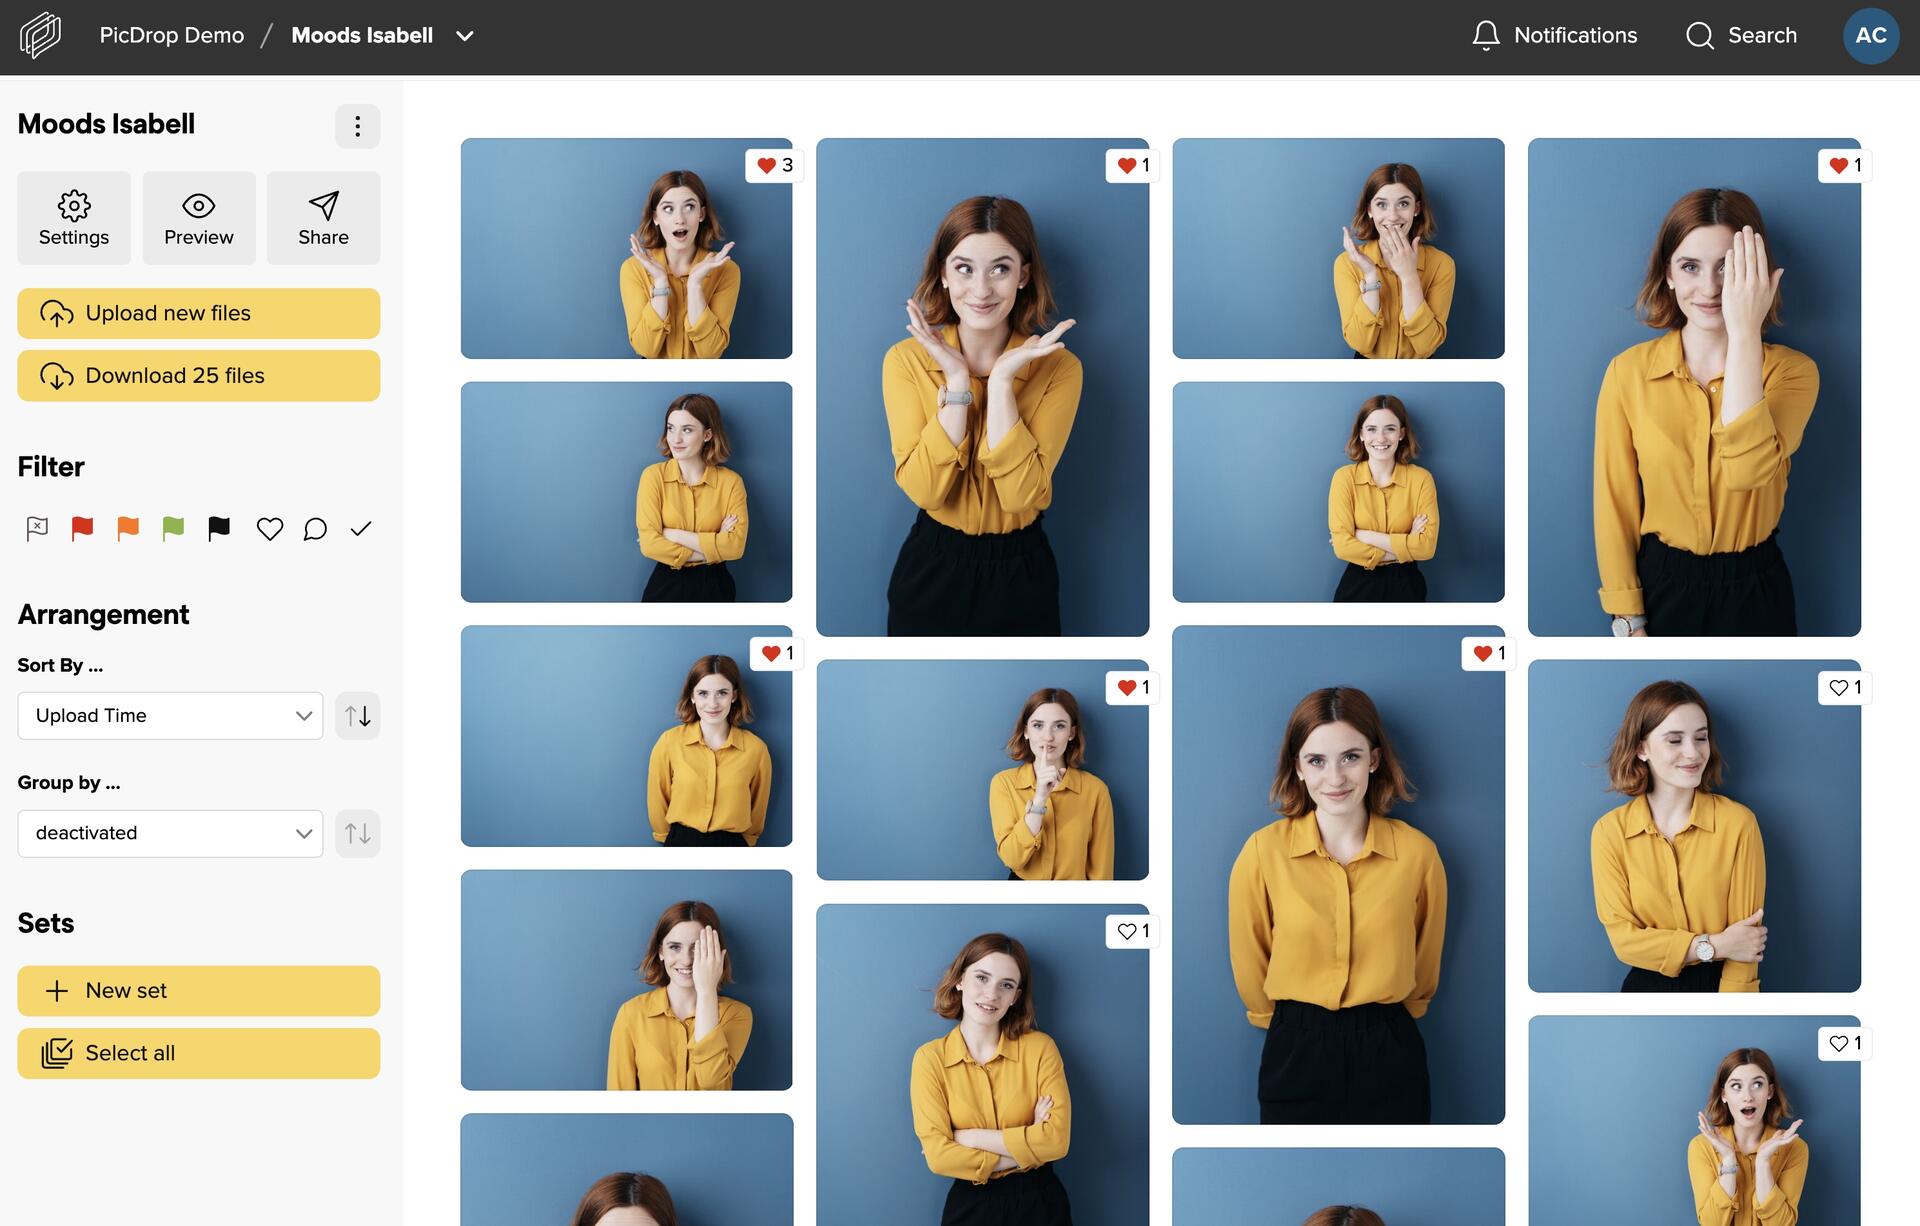
Once you have done this, your pictures can now be given likes. A small heart symbol will appear on each image when you or your clients hover over it with the cursor. With every picture that is liked, the number of likes for this picture increases and your clients' favorites quickly become visible.
And afterwards?
Export selected images to Lightroom, Capture One, Finder, Explorer and more
As usual, selected images can be exported to Lightroom, Capture One, Finder or Windows Explorer with just a few clicks. This saves valuable time! You can find more information in our article on the export function.
Notifications about new likes
To find out if your clients like your pictures, simply click on the notifications in the top bar of your account. We've added the likes there to make it as easy as possible for you to stay up to date.
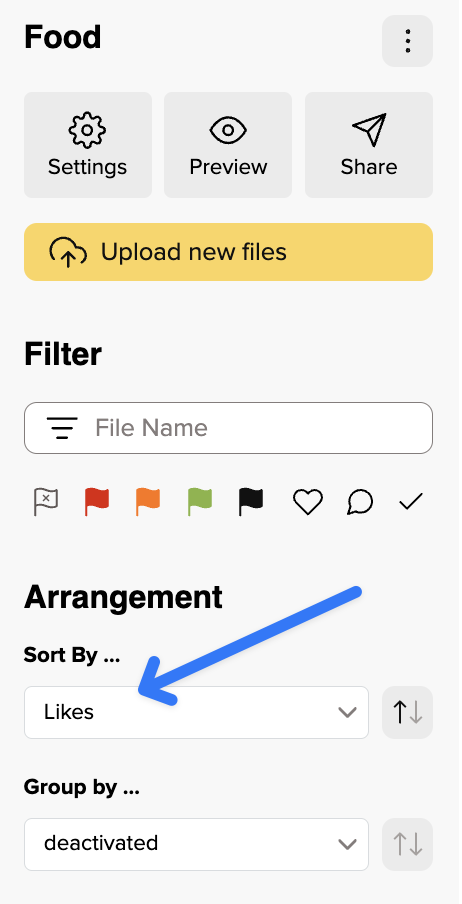
Sorting by number of likes
To make it even easier for your clients to find their way around, activate automatic sorting by likes in your settings in addition to the likes. Your images in the gallery are then sorted in real time with each like. The more likes a photo receives, the higher its position in the gallery. We recommend that you let your clients know if you have switched on real-time sorting to avoid misunderstandings due to the "moving" images. Of course, you can also sort or filter by likes as usual in the filter bar on the left-hand side without having preset this arrangement in the settings.
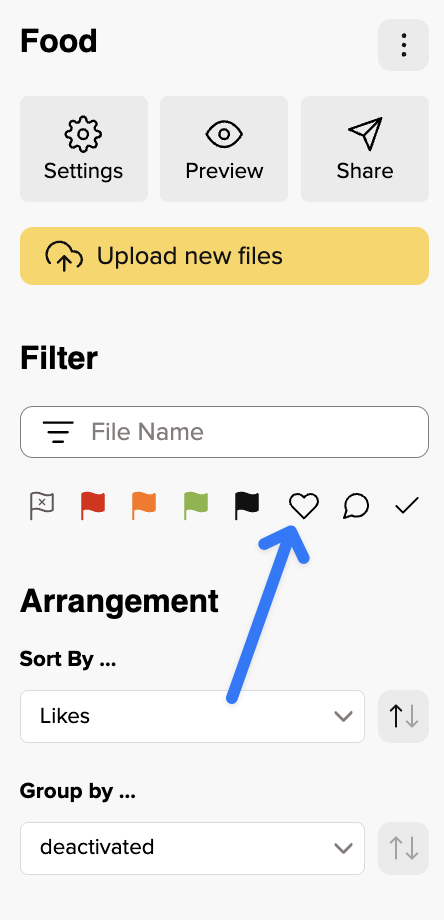
Only show pictures with likes
Ib the left-hand filter bar, you can now not only filter by pictures with likes and only display these, but also sort all pictures by their number of likes. To do so, simply click on the heart in the filter bar or select "Likes" in the sorting.
As you can see, working with Likes is easy as pie and if you still have any questions about this feature, just get in touch with our support team and we'll be happy to help you!
Link to this entryThe picdrop video function: Video streaming, quick preview and thumbnail - the most important at a glance
Our picdrop video function with streaming, quick preview & preview image is included in the Pro and Business plans, as well as in the Test month and the (old) Studio plan. Lite and Free users can upload and download videos to their account.
Here you can find an overview of all supported video formats.
Furthermore, you can find more information about the different limits of the video function in our plans here.
Video streaming allows you and your clients to play video files directly in picdrop. Each video must be processed first to be playable. Once uploaded and processed, your videos can be played as many times as you and your clients want. Processing your video file into a playable video in picdrop takes about one minute per minute of video. So have a little patience please.
Your video files also display a preview thumbnail that we create directly from the file.
And that's not all: we also show a quick preview for your video files when you or your clients move the mouse over the file. From left to right, you can scroll through the quick preview by moving the mouse. The quick preview and the thumbnail give you and your clients a good impression of your files and make it easy for everyone to (re)find a desired video file quickly in the gallery.
If you have problems playing a video, we have compiled an article on possible causes here.
If you have any further questions, please do not hesitate to contact our support team. Simply send us an e-mail to hello@picdrop.com
Link to this entryWhy can my video not be played?
There are many different reasons why a video cannot be played in your picdrop account.
Below you will find a list of possible reasons:
your video has not finished processing and is therefore not ready to be played yet.
your monthly processing volume for videos has been reached for your account. You can check in your account preferences if this is the case.
it is a video from the time before the introduction of the video support. To make the video playable, you need to re-upload it.
your video is too long and exceeds the playability limit for your plan.
your video file comes in a format that we don't support. Here you can find a list of all file formats supported in picdrop.
another error has occurred.
1. your video has not been processed yet
If you upload a new video and your plan limit allows the processing of a streamable video, picdrop will automatically process different versions of your video, which can then be streamed in your gallery with one click.
This process is very time-consuming and takes about 1 minute per minute of uploaded video material. After the processing is finished, your video is automatically updated and streamable with one click.
2. your monthly processing volume has been exceeded
Your plan includes a maximum monthly volume of video minutes that can be automatically processed into a streamable video after an upload. The maximum amount of video minutes that can be processed within your plan can be checked in your account preferences. Here you will also find information about the minutes you have already used. If you have already used all your video processing minutes included in your plan, your volume will be topped up again on the 1st of the next calendar month. Unfortunately, it is not yet possible to add video processing volume to your account and plan yet.
3. it is a video from the time before the introduction of the video support
The video feature in picdrop was introduced in November 2022. Videos uploaded before that date cannot be streamed. If you want an existing video to be streamable and you are on a plan that includes video streaming you can easily download the video using the download button and then re-upload it. It will then be considered a new video and will be newly processed and made streamable. Please note that the processing of the streamable version will then be deducted from your monthly volume of video processing minutes (see 2.).
4. your video is too long and exceeds the streaming limit for your plan
Depending on which picdrop plan you use, there is a time limit on how long a video can be to be playable in picdrop. This limit lies at 15 minutes for the Pro plan and 30 minutes for the Business plan. If your video file exceeds this time limit, streaming in picdrop is not possible. In order to watch the video your clients will then have to download it from picdrop first.
5. the file format of your video does not belong to the supported file formats in picdrop
In our list of supported file formats you will find an overview of all video formats that picdrop currently supports. Please note that a file extension does not necessarily indicate which codec was used to encode a video.
6. another error has occurred
Nobody is infallible - not even us. If none of the given solutions fit your problem, please write us at hello@picdrop.com and tell us the link to the gallery and the file name directly. We will then take a closer look. Thank you!
Link to this entry